The question: how to lay tiles on a putty wall is of interest not only to builders, but also to those who do their own repairs. Often, to eliminate wall imperfections, putty is used, which differs in its specificity for further work. Some home owners prefer drywall or another material to line their walls.
Repairs involving tiles are relatively expensive, and the great success of using the material depends on how to lay it correctly. When performing work, not only aesthetics must be observed, but also all the necessary rules. A competent approach will help increase the life of the tiles, regardless of whether they are installed in the kitchen or bathroom. Before you putty the walls (this is done to increase adhesion), you need to select one from all known putties that will provide both thermal insulation and reliable leveling for the brick wall.
Advantages of putty walls
When figuring out whether it is necessary to putty the walls before laying tiles in the bathroom, everyone finds an ambiguous answer. If you do this, you can completely protect the surface from mold and mildew, level the walls (very important when installing expensive tiles), and provide better adhesion. Before gluing the tiles, you need to make sure that the treated wall is ready to withstand the load and will serve as a reliable foundation. Do not forget that price plays a role when choosing any building material, so when choosing for yourself, it is better to choose the best.
Answering the question: is it possible to lay tiles on a putty wall in the bathroom, you should make sure that the surface will allow you to easily lay not only the adhesive layer, but also the tile itself. If the puttying was carried out a long time ago and began to crumble in some places, then it is better to remove it and re-do the work to renew the wall.
Laying tiles on the wall
Features of installing tiles on putty
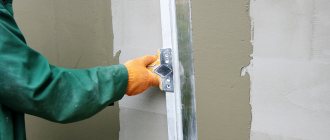
One of the conditions for laying tiles is a flat surface. Bulges and depressions can be smoothed out by grinding and applying putty. Cement should not be used, as it has poor adhesion with plaster. In addition, the mixture must be applied in a layer of at least 3 cm, and this is not always allowed, since each wall and partition has its own strength limit.
As for putty, even with a layer of 1 cm it is a good basis for finishing work. The finishing solution mostly consists of gypsum and is characterized by friability, porosity and weak load-bearing abilities. To lay heavy ceramic tiles on such a substance, it must first be strengthened.
For this purpose, deep penetration primers are used. The liquid impregnates the plaster, fills cavities and ensures good adhesion of the putty to both the wall and the tile covering.
Choosing putty for tiles
The craftsmen's answer to the question whether it is possible to lay tiles on a putty wall is positive. The procedure is carried out to level the surface if this cannot be done mechanically. In addition, applying the solution increases the area of contact between the tile and the base, reducing the consumption of heavy and expensive glue.
When planning work, you need to take into account that not all mixtures are suitable for the preparatory stage. The selected material must be waterproof, resistant to temperature changes, have plasticity and high adhesion. If the room will be operated at sub-zero temperatures, then you should purchase frost-resistant putty.
If the plaster absorbs water, it swells and bursts in the cold, causing the tiles to peel off. Therefore, gypsum or cement is suitable for dry rooms with heating, and polymer putty for damp and cold rooms.
Preparing walls for tiling
Ceramic coating can be laid on a properly prepared base. It is not possible to correct the mistakes made with minor repairs; in most cases, you have to completely dismantle and re-lay the tiles.
Preparation consists of the following steps:
- Taking measurements. Determining the area that needs to be covered, the need for glue, crosses, primer and other consumables.
- Drawing up a laying diagram. You need to decide from which corner to start gluing the tiles, use a whole fragment or trim it.
- Checking surfaces for vertical and horizontal deviations. Problem areas are marked with a pencil.
- Treat the wall with a primer in those places where putty is planned to be applied.
- Leveling problem areas. This may require a large amount of plaster to cover the entire wall. At this stage, it is better not to save money so as not to experience difficulties with the finishing coating.
- Making notches. They are made at intervals of 2-3 cm with a sharp tool (for example, an ax) or a hammer. If the room is undergoing a major renovation and there is no furniture in it, then you can make grooves with a grinder and a cutting disc.
Finally, the walls are cleaned of dust and treated with a deep penetration primer.
Determining the thickness of the putty layer
Having decided whether you need to putty the walls before laying the tiles, you should correctly determine the thickness of the mortar layer. This is necessary to obtain information regarding the evenness of the surface. Based on the measurements, the need for the mixture and the tools necessary for its application are calculated.
The simplest and most accurate way to determine the degree of curvature of a surface is a plumb line. The device is applied in one of the corners and then every 15-20 cm. Plumb lines are hung at the corners of the walls and along the line of maximum protrusion. Accuracy is checked by pulling the thread diagonally.
If there is a building level 200-250 cm long, then it is better to use it. So the speed of implementation will be much higher, but the result will be the same. It is even easier to work with a laser device, but buying it for one-time use is impractical.
If the wall is smooth, the surface is dense, without large differences and defects, then you can limit yourself to cleaning it from dirt and priming. Irregularities less than 2 cm are sealed with starting putty, which is characterized by good strength, hardness and quick hardening. If protruding fragments remain after finishing, they are removed with a grater. Small irregularities will be filled with adhesive and will not affect the quality of the masonry.
Basic requirements for laying tiles
Before laying tiles, it is worth considering the following requirements for the base:
- sufficient degree of strength (the surface should not be wet, cracking, crumbling);
- good penetrating properties;
- no obvious defects.
A responsible approach to preparatory operations will help maintain the evenness of the plastered walls and the laid tiles. Considering that plastering can be done in different ways, it is worth considering both the thickness of the layer and the type of putty used. If the newly applied layer begins to deteriorate its physical properties over time, then it is better to remove it - this indicates that the chosen putty is not suitable for you.
Compared to wallpaper or other building materials, tiles are an expensive type of building material, so you need to approach it responsibly when laying it yourself. The coating will perform decorative functions for up to 20 years if you take proper care of the wall base. Before starting work, you should decide how to glue the tiles to the putty wall, taking into account all the nuances.
Even in new buildings you have to level the walls with putty and then glue the tiles. To glue tiles, plitonite is often used, which is very flexible and is simply irreplaceable in the interior decoration of a bathroom. Multifunctional rotband plaster also has a place for use in modern construction. (apply it to partitions, solid walls and even to the floor). When decoratively renovating a bathhouse, you can give preference to other finishing materials to create a smooth surface. For example, after installing drywall, all irregularities are filled with putty, on which, after a while, you can safely lay ceramic tiles.
But plastering the walls in a bathhouse with tile adhesive will be the best solution if you need to quickly level the walls. Tile adhesive even has advantages over conventional plaster, since it is intended only for laying tiles. Plasticity and adhesion allow the adhesive to be applied without slipping, and after hardening the surface does not crack.
Drying time
Regarding the period of time required for complete hardening, much depends on the type of putty and tile adhesive used. As a rule, the plastering itself dries completely within 24 hours after application in a dry environment. As for tiling, everything here can take up to several days. In this case, partial drying occurs several hours after application.
Important. It is necessary to lay the devices in parts, since in its raw form the glue has a greater mass than subsequently when partially or completely hardened.
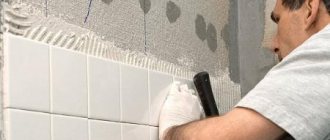
How to glue tiles to a putty wall
Independent laying of tiles on a putty wall should be carried out exclusively according to the instructions.
| Stage | Range of work | Peculiarities |
| Measurements and planning | Calculate the area of each wall and calculate the number of tiles with a margin | You need to buy material with the expectation of 10-15% more |
| Preparation | Lay out the tiles, clean the walls of excess, prepare the tools | Decide which area you will start from and mark the walls with zones |
| Laying | It’s better to start from the center (to do this, apply the entire row without glue), working in small areas | It is advisable to mark several points so as not to get lost in the process of laying tiles |
| cutting | First make a scratch, and then use a rail tile cutter (near pipes you can cut with a drill attachment) | Carefully separate one part from another |
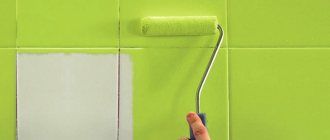
| Grout | Grout the seams after 24 hours have passed since the tiles have been glued. | Using a rag, you need to wash off all the white plaque in time. |
Tiles on a putty wall
Will the tiles stick to putty?
Putty is used to level surfaces when mechanical methods do not give the desired result. And the evenness of the wall and the absence of defects are the main conditions that must be met when laying tiles.
Properly executed putty will ensure reliable adhesion of the tile to the surface. It will stick firmly to the wall and will last for decades.
Putty technology
Some walls cannot be treated with plastering, so a different type of leveling is chosen for them. If the base is gas silicate material, then high-quality wall plaster is needed - different solutions are used for its implementation.
When choosing putty for gas silicate partitions, the following mandatory requirements are set:
- high adhesion;
- steam permeability;
- resistance to humidity;
- The surface should not be damaged by climatic conditions;
- The mixture must be elastic so that cracks do not form in the future.
If insulation for walls made of gas silicate without putty is used, then it is irrational to glue tiles in the “wall-insulation” interval. The structural layer is only suitable for painting or can be treated with a special putty.
Carrying out the plastering process at the same time also implies insulation, since several layers of another material are laid on the building material (blocks, bricks), and tiles are placed on top of it. There is no point in saving on plaster, but it is equally important to follow the technology.
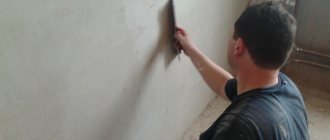
Before filling, you need to clean the surface of foreign inclusions (glue residue, scraps of wallpaper, hardened mortar), and then gradually bring the wall to readiness:
1. Mount the beacons vertically and parallel to each other.
2. Apply the solution to the surface using a trowel.
3. Level and compact the mixture until it hardens to a thickness of 3 mm.
4. Apply a thicker layer if the wall is porous or uneven.
5. Upon completion of the leveling, remove all the beacons and sand the wall.
If you want the finish to look beautiful and not be cold, then you need to choose the tile material in advance. You need to prepare the surface taking into account new technologies and standards, and if necessary, watch a video.
So, is it possible to lay tiles on a putty wall? The answer is simple - yes. The main thing is that the base for puttying is selected correctly, and all work is carried out according to the instructions.
Important Features
The criteria for choosing material for putty are:
- moisture resistance;
- adhesion level;
- required layer thickness;
- tile weight.
It “sticks” to the wall without compromising its performance characteristics. They also take into account where it is used - inside or outside the building. The outer material is required to be frost resistant.
The type of putty is taken depending on the condition of the wall. Small irregularities are removed using a finishing coating; for deeper irregularities, starting mixtures are used. You can understand what layer of putty will be needed for leveling by using a long building level. To do this, find the most protruding point on the surface of the wall and take measurements relative to it.
A perfectly flat surface for laying tiles is not required. Small flaws can then be easily removed after applying tile adhesive. After puttying, the base is not sanded. On the contrary, in order to strengthen the adhesion of the base to the finishing material, special notches are applied to it.
Gypsum putty takes water from the adhesive layer, thereby worsening its quality characteristics. Therefore, it can be used when attaching ceramics to liquid nails.
Photo gallery of finished works
How long does it take to dry?
The final hardening time of the adhesive layer varies depending on the following factors:
- Temperature conditions (at low temperatures, drying may take 3-4 days).
- Humidity.
- Layer sizes.
- Glue composition (high-strength ones harden faster).
- Additives.
- Water absorption of the base.
The surest way to find out exactly how long the glue will dry is to read the information on the packaging. Manufacturers base their calculations on the hardening time at room temperature with an air humidity of 60%; this time is indicated with a margin.
If you want to create a solid base for laying ceramic sheets, putty the walls to level them. However, tiles will adhere well to a putty surface only if the materials are selected correctly and the requirements of the technological process for wall putty are met.
Do I need to remove old plaster before laying tiles?
Old plaster is checked for strength before laying tiles. This must be done, because tiles are heavy materials and can fall off along with the base.
Interesting materials:
Why did they add a hard sign? Why do spirits need to settle? Why the soul of the fire keeper? Why pour oil into a two-stroke engine? Why terry sheets? Why is there a slit in the back of the coat? Why do you need to turn your mattress over? Why do you need a 1c thin client? Why do we need edge pearls? Why do you need an admin panel on a website?
Preparing walls for tiling
The base on which the tiles must be properly prepared for such finishing.
As a result of this work, it should acquire:
- Durability and stability. Walls that are crumbling, wet and prone to cracking will not be able to reliably hold a heavy coating on themselves - over time it will begin to fall off.
- A smooth vertical surface without large defects. Laying tiles evenly on a curved base with your own hands is not easy, and if you repeat all the curves, the coating will not look aesthetically pleasing. In addition, it will not stay on an uneven surface for long either.
READ Is it possible to use aerated concrete blocks for the foundation?
In a word, failure to comply with the technology will lead to the fact that the finishing result will not please you with its appearance, and soon you may incur losses due to the need to relay the tiles.
Note. It will no longer be possible to re-lay used material again in a high-quality manner, and the price of new material is such that it is easier and cheaper to immediately prepare the walls in accordance with technological requirements.
This can be done in different ways, for example, leveling them with plaster or covering them with plasterboard (see: Cladding walls with plasterboard: do it sequentially). Both methods are used in cases where thorough leveling is required with the elimination of large defects and differences in level.
If the walls are fairly even, minor defects can be completely eliminated with putty. But it possible to glue tiles to putty?
Is it possible to glue tiles to putty? | Construction tricks
How to determine layer thickness
To decide whether it is necessary to putty the walls under the tiles, it is necessary to assess the condition of the surface and, first of all, its evenness:
- If it is durable, with minor differences and defects, you can avoid putty altogether, limiting yourself to a primer;
- If there are small irregularities, determining their size and the required thickness of the leveling layer will allow you to calculate the required amount of material;
- If the differences are more than 2 cm, there is no point in puttingty; it is better to think about plastering or leveling the walls with plasterboard using a frame or frameless method - using glue.
Note. In the latter case, putty will still be required - to seal the joints between sheets of drywall. It is selected in accordance with the above criteria.
You can find out what layer of putty is needed to level the wall using a long building level or plumb lines. To do this, you need to find the most protruding point on the surface and take measurements relative to it.
Plumb lines are hung at the corners of the walls and along the mowing line of the maximum protrusion. Accuracy is checked by pulling the thread diagonally.
The evenness of walls can be determined using other devices, for example, a laser level.
How to properly apply putty on a wall. Types of putty mixtures
Putty (correctly “putty”, from the word “spatula”) is a mixture that is used for leveling and finishing, eliminating defects on surfaces. It is also used as a base before painting or wallpapering (the so-called gesso).
There are several types of mixtures. For each stage of finishing, a specific type is used.
- Cement mixtures. Such mixtures are very resistant to moisture, which is why they are often used for bathrooms or kitchens. After drying, such mixtures become especially durable, but over time their elasticity is lost, which is why cracks begin to form on the surfaces. The shrinkage of cement mixtures is also quite high, which requires repeated puttying of the walls.
- Gypsum mixtures. They do not shrink and are perfectly leveled, but are not intended for rooms with high humidity or sudden temperature changes.
- Polymer mixtures. Today there is no more ideal option for puttying walls and ceilings. They do not shrink, are resistant to moisture and allow you to create an ideal surface. In addition to their composition, putties are divided into starting, finishing and universal.
Starting putties are intended for initial leveling of walls. Due to the fact that the particles of these mixtures are large, they make it possible to hide noticeable flaws in walls and surfaces.
Finishing putties allow you to get a perfectly smooth and even surface, hiding only small flaws. Therefore, they are recommended to be applied on top of the starter ones.
Universal putties combine the properties of starting and finishing putties. They are used to treat walls with minor flaws. For example, for the usual leveling of walls before wallpapering. If you have thick non-woven wallpaper, you just need to apply a layer of this universal putty before gluing.
Also, putties are produced both in the form of dry mixtures and in the form of ready-made solutions. The latter, accordingly, are more expensive. But they also cause greater shrinkage, which affects the consumption of such mixtures.
Laying tiles on a putty wall: stages of work
Laying of ceramic material takes place in stages according to the instructions:
Stage 1. Taking measurements. At this stage, the area is calculated. Based on its size, it becomes clear how much tile you need to buy with a mandatory margin for defects (10-15%). The amount of consumables is also affected by the types of patterns. Diagonal laying requires more material consumption.
Related article: Do-it-yourself primer composition for walls
Stage 2. Preparatory. Clean the wall from dirt, lay out the tiles and tools. Determine the place to start work and, depending on this, divide the wall into zones.
Stage 3. Laying. They start it from the center, having previously laid a row of tiles without glue to eliminate mistakes and secure the support stops. Apply adhesive to small areas using a notched trowel. The size of the adhesive layer is equal to the depth of the spatula tooth. After installation, be sure to check its correctness using a level and plumb line. To maintain the minimum distance between the tiles, beacon crosses are installed in the corners.
Stage 4. To fill the remaining surface, the material is cut to size and glued. This is done using a special tile cutter. If necessary, it is replaced by a glass cutter or grinder.
Stage 5. Grouting joints. It is carried out after the adhesive layer has completely hardened. The grouting compound is applied with a rubber spatula in the following sequence:
- a small amount of grout on the seam between the tiles;
- deepen it into the seam;
- Place a spatula across the seam and remove excess grout.
Preparatory operations
A logical question arises: is it possible to lay tiles on a wall that has been puttied or treated with another material again? It will not be possible to reinstall a fallen element a second time efficiently. Buying a new puzzle each time instead, you may go bankrupt. In this regard, it is strongly recommended that you initially approach the preparatory operations responsibly.
Leveling the wall is done using different methods, for example, by plastering or fixing plasterboards. The methods are relevant in the presence of noticeable hollows and protrusions.
In the case where the wall is relatively smooth (with only small deviations), it is rational to stop at puttying.
Selection of material
The putty mixture should be selected due to its good moisture resistance, penetrating abilities, the width of the required layer, and the weight of the mixture:
- Gypsum putty, which cannot boast of this ability, is permissible for use only in rooms without heating failures, and air humidity is not subject to constant fluctuations. It is not advisable to use the material in the bathroom and kitchen, since the putty layers will swell from constant moisture. A cement mixture is more appropriate in such rooms.
It is undesirable to use gypsum putty under ceramic tiles. This type of material draws out moisture, thus reducing the working properties of the adhesive used under the tile elements.
- The putty material must adhere perfectly to the surface without reducing the performance characteristics of the wall. For special walls, specific solutions are selected (for example, for gas silicate block surfaces, cement and a well-known solution are suitable).
Requirements for putty and its choice
According to experts, it is better to lay the tiles on a prepared layer. There are several indicators by which you can determine whether the putty is suitable for the base or not. They are as follows:
- Protection from moisture. Most often, tiles are used in wet rooms, due to their protection from moisture. This is the bathroom, kitchen, corridor. Accordingly, the putty layer must also withstand such moisture and sudden temperature changes. Otherwise, the layer will begin to collapse. Gypsum-based putty is no longer suitable; it has no moisture protection. Therefore, the best option is polymer mixtures or cement-based ones.
- The putty should provide better adhesion. Wallpaper or paint have minimal weight and, accordingly, practically do not load the wall. The tile weighs a lot, so the thickness of the putty layer and its adhesion quality should be enough to hold both the tile and adhere well to the base of the wall. Polymer compounds have shown themselves to be the best in this regard.
- Compatibility of the type of putty with the material from which the walls are made. For cellular concrete (aerated concrete, foam concrete), it is recommended to use compositions based on cement, silicone and silicate. Acrylic is suitable for brick and concrete. The packaging indicates for which surfaces the composition is used.
- Application area depending on climate. Tiles can be used to decorate both indoor and outdoor spaces. Putty is also divided into: internal and external. The second type is more expensive, but can withstand the negative influence of the external environment.
- To level the walls and obtain the required thickness, not one, but several layers of putty are made. The first is the starting one, it serves to level the surfaces. The second allows you to fill large irregularities. The third is the finish, which makes the surface ideal for further processing.
When the surface is made with large differences, the number of layers can be increased. But it is best to use plaster for this.
Often, to level walls for installing tiles, they resort to using plasterboard. In this case, it is enough to fill the seams and joints between the sheets and apply 1-2 layers of putty to the entire surface.
Article on the topic: The walls in the apartment turn black, what to do