This type of work is considered the basis of high-quality construction, and includes the preparation of the wall surface, as well as the prevention of destruction, in order to enhance the strength characteristics of the wall.
It can also be used as repair work in case of damage. Clips are often used for this.
What types of clips are there, how exactly the process of screeding brick walls occurs, what materials and tools are required, read in the material presented.
Strengthening the structure in case of destruction
Screeding of brick walls for strengthening, when destruction has begun, is carried out much more often than ordinary work in preparation for finishing. There are various factors that can cause a brick wall to fail.
For example, load-bearing (structural) walls can have the following types of damage:
- Structural and shrinkage . Incorrectly carried out foundation work, without calculating the load-bearing load, depth, soil conditions, shrinkage of the foundation within 1 year, features of groundwater occurrence, use of cement mortar of the wrong grade, construction not according to plan, violation of technological building standards (design errors), construction of buildings on bulk soils.
- Deformed and worn out . Man-made (high seismicity), incorrect selection of materials during masonry, strong mechanical stress, end of brick life, incorrect tying of brick laying, reinforcement laid with violations.
- Natural and atmospheric . Significant errors in the construction of the foundation, due to which it constantly freezes in the cold season, as well as temperature changes, the formation of condensation due to atmospheric fluctuations, problems with heaving soils.
The degree of damage to the walls, which will then require restoration work and screed, can be different - superficial or deep.
Any deformation or crack in the wall, various collapses of part of the wall structure will require filling and restoration of the affected part of the surface, elimination of construction errors and screeding according to the established level and beacons.
The process of screeding will help strengthen the structural walls and foundation, and prevent the formation of serious deformations and distortions. Wall screeding is carried out using injection, using sealants, foam concrete and cement mortars under metal anchoring of the edges of reinforced products, onto which a plaster layer will then be applied.
The extension has moved away
The main factor in the divergence of masonry is the deformation of the foundation. All the rest are nothing more than consequences.
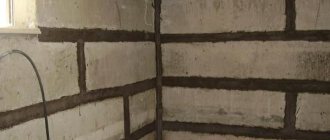
When cracks occur at the junction of the extension with the main house (and this is the problem that people encounter most often), the connection between the walls erected at different times is broken. There are several ways you can help here.
Types of reinforcing clips
For work on strengthening a brick wall, clips are used as a tie. By variety they are divided into:
- monolithic reinforced concrete;
- steel;
- compositional;
- reinforced
The use of a monolithic reinforced concrete frame is 4-12 cm thick. It is made of reinforcement, which is laid longitudinally and transversely, and is attached to the wall with special fasteners around the perimeter, forming a kind of mesh. Such a clip takes on part of the load of the wall, which prevents its further destruction.
The steel frame (reinforcement with a diameter of 12 mm) is based on the use of different types of rolled metal, which are located on the surface of the wall. Most often they are large, and are represented not only by rods, but also by channels of various sizes, as well as corners.
With a steel frame, it is good to strengthen holes that appear in partition masonry, near door or window openings. This type of clip requires additional thermal insulation.
The installation of a composite frame is based on the use of carbon fiber (wire) or high-strength glass. This solution can significantly improve the compressive properties of brickwork.
This type is considered the most expensive, it is always used with any metal frame, for example, steel mesh, and is considered effective only after careful preparation, priming, painting and puttying of the surface. The use of wall injection has become very popular here, the edges of which are fastened with carbon fibers, which can even be laid inside a crack.
Reinforced casing is used in the form of frames, rods and reinforcing mesh made of metal . The rods can be short, long, welded together, and when combined form a large frame. Metal mesh can be ready-made, purchased, or knitted yourself. The mesh cells are at a minimum 50 x 50 (mm), and can reach up to 150 x 150 (mm).
The reinforced collar can be used on any side of the wall - external or internal, but before doing this it is necessary to drill holes in entire parts of the wall. This type is fastened using through studs and anchor bolts. Upon completion of installation work with reinforcement devices, concrete mortar up to 40 mm thick is applied to its surface.
With this method, high grade cement is used, for example, M300, 400, 500 (the higher, the better). During the work, auxiliary material is also useful: corners and rods with a diameter of up to 30 mm.
Corner metal channels under cement mortar especially well fasten the corners of the building, giving the ideal shape not only to a specific part of the house, but also to the entire perimeter of the building.
Other technology violations
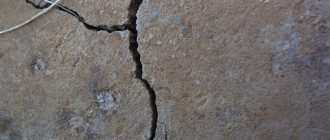
First of all, they are evidenced by the rupture of the masonry clearly along the seam. In this case, the blocks always remain intact. More often this problem is caused by:
- poor wetting of brick surfaces;
- insufficient pressing to the solution;
- improper preparation of the masonry mixture (not enough cement).
If errors were made when calculating the foundation or the house turned out to be heavier than planned, then cracks often form in the corners of the building. This, however, is also caused by the lack of additional reinforcement for this part of the structure.
Here, one screed will not be enough, since it does not correct the main problem in any way - the foundation will have to be further strengthened. You shouldn't give up on this if you want to continue to live in the house for many years.
Technological requirements for fittings and angles
The conditions for using reinforced devices and corners used to strengthen brick walls with screeds are specified in the technological requirements of GOST 10922-2012, which contains references to other regulatory documents:
- GOST 5781-82;
- GOST 6727-80;
- GOST 10884-94;
- GOST 12004-81;
- GOST 14098-91;
- GOST 23858-79;
- GOST 23279-2012.
These rules include a number of important points that you need to know when performing screeds and working with devices - these are parameters, location, technical standards and requirements for the quality of manufacturing of reinforced products, control and installation methods.
Required tools and materials
In the process of screeding a brick wall, you may need the following tools, equipment, materials and fasteners :
- Hammer, large anchoring devices, bolts, screws, self-tapping screws, nails, angles.
- Reinforced rods of a given size, mounting wire or mesh.
- Channels and welded corners with them.
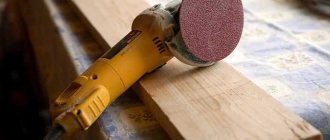
- Screwdriver, drill, grinder.
- Apparatus for welding work.
- Construction cord, tape measure, beacons.
- Polyurethane foam, sealant (for example, bitumen).
- Dry mixture for preparing cement mortar, shovel, container, clean water, concrete mixer (construction mixer).
- Work clothes and shoes.
- Metal profile (100 x 100 mm) with a length along the height of the walls, studs with a diameter of up to 16 mm, one and a half inch pipes.
- Spatula and trowel.
- Dry plaster mixture.
The technician who will diagnose the crack or damage that has appeared will be able to tell you what other consumables and tools will be needed. A specialist can also draw up an estimate if the owner’s plans include seeking services from construction companies.
Features of screed for heated floors
If heated floor pipes will be laid in the screed, then it is better to use a ready-made dry mixture specially designed for this purpose to prepare the solution. The finished mixture for heated floors contains additives that increase the elasticity of the solution.
If the mixture is prepared independently, then an emulsion is added to the solution to increase elasticity. For example, home craftsmen add PVA glue at the rate of 2 liters. per 1 m3 of solution.
The screed should cover the underfloor heating pipes with a layer at least 4–5 cm thick. Thus, the total thickness (taking into account the diameter of the pipes is 1.6 cm) will be 6–8 cm.
Caring for the heated floor screed for the first three weeks is carried out in the same way as usual. Before laying the finishing coating on the screed, the screed must be thoroughly dried. To do this, 21 days after laying the screed, turn on the heating and increase the temperature daily by 5 °C until it reaches a limit of 24 °C.
This temperature should be maintained for 14 days and then reduced by 5°C daily. Consequently, heating of the screed lasts another 23–24 days, which should be taken into account when scheduling finishing work.
More articles on this topic:
⇒ Floors on the ground on the first floor of a private house without a basement. ⇒ How to make the right concrete floor in a wooden or frame house.. ⇒ Wooden floor on joists in a private house. ⇒ Floor with dry prefabricated screed made of gypsum fiber board, chipboard, OSB or plywood
More articles on this topic
- Choosing a soft roof for the roof of a private house
- Heating a private house with a wood-burning solid fuel boiler
- Sheathing, wall cladding with basement siding
- Norms and rules for planning a private house, cottage
- Load-bearing, self-supporting and non-load-bearing walls - what's the difference!?
- Septic tanks and wastewater treatment stations Eurolos autonomous sewerage
- Correct sewerage scheme in a private house
- How to make a beautiful spring in the garden
Calculation of the required amount of building materials
Calculations of the required amount of materials for the screed are carried out with the addition of + 15% of consumables (in case of additional needs). In order not to make a mistake in the process of preparing the purchase of material and not to overpay extra funds, it is best to contact a construction specialist for calculations, who will attach a sheet with the calculation operation performed to the work report and estimate.
The screed of a brick wall is calculated using the formula V = L x W x T , where:
- D – length;
- W – width;
- T – thickness.
Calculations are based on the building design. The area of the walls is calculated, the type of masonry, type of frame, and reinforcement pitch are taken into account.
Do-it-yourself reinforcement of structural elements with steel ties
The cracks are cleaned of dust, mortar and damaged parts, washed with a brush and water, then primed and filled with fresh solution (cement, sealant or polyurethane foam along the entire depth of the destruction). But before that, perform a standard screed as follows:
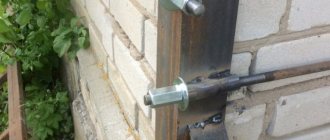
Metal corners 100 x 100 (mm) are mounted in the corners, grooves are cut into the existing plaster for further masking with mortar.- From the corners with grooves, thick steel strips with holes are installed, which are connected at the ends with rods and tightened with nuts.
- Weld sections of pre-prepared pipes to the corners (minimum length of metal parts along the length is 150 mm), which are located in two directions.
- The existing cuttings of twenty-centimeter studs in the wall are connected by welding to the remaining reinforced parts, and then fixed with nuts, which can be slightly heated with an autogen for better tightening.
- The welding site is additionally reinforced with metal pieces 120 mm long.
- After screeding, the cracks begin to be sealed.
After the screed and mortar have dried, painting work (plastering and finishing) is carried out.
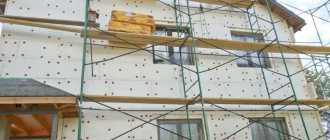
For monolithic and steel frames of standard thickness (40 mm), after their installation, 2 main methods are used: shotcrete and pneumatic concrete surface, which precedes plastering work.
When the thickness of the clips is greater than standard (for example, up to 120 mm), inventory formwork is used , installed at the height of the surface being repaired, into which the tubes are inserted, to supply a fine-grained concrete mixture.
The reinforcement frame is made from longitudinal rods of class A, described in GOST (I-III). Steel and composite frames are always secured with corners around the perimeter.
The reinforced cage is made using metal rods (diameter up to 6 mm). To do this, step back from the edge of the corners by 25 or 30 cm. When using a mesh, take studs and anchors. They can be attached on both sides, depending on the damaged surface. The reinforcing mesh can be reinforced by welding or tied with wire yourself.
The thickness of the poured cement layer on top of the screed, according to regulatory rules, must be more than 3 cm. This is necessary in order to protect the reinforced parts from corrosion.
Types of floor screeds
By design, screeds can be connected to the base on which they are laid, or laid on a separating layer, or floating.
Screeds connected to the base are performed if the base is also made of concrete. For example, a screed on a reinforced concrete floor slab or on a concrete floor preparation. To ensure adhesion of the screed to the base, the surface of the latter is specially prepared - dust-free and primed. The minimum thickness of the screed is 2.5 cm.
In screeds, on the separating layer between the concrete base (reinforced concrete slab or concrete preparation) and the screed, a layer of waterproofing film with a thickness of at least 0.2 mm is laid. The edges of the film panels are laid with an overlap of at least 10 cm and sealed with adhesive tape. The edges of the film are wrapped on the walls.
The film separating layer prevents water leakage from freshly laid concrete. Dewatering of concrete reduces the strength of the screed. The screed concrete must be laid on a separating layer of film in all cases where water leakage from the concrete into the base of the screed is possible.
The minimum thickness of the screed on the separating layer is 3.5 cm.
A floating screed is laid on a layer of insulation or sound insulation, for example, when installing a floating floor or a floor on the ground. The minimum thickness of the screed is 4.5 cm, subject to reinforcement. A floating screed with a thickness of more than 7-8 cm may not be reinforced.
Pros and cons of the procedure
The advantages of using methods of additional strengthening of brick walls using screed are obvious; they consist in the following points:
restoration of the destroyed wall surface and its structural qualities;- taking on most of the load-bearing load;
- elimination and prevention of destruction;
- connection and restoration of destroyed parts;
- creating a basic basis for high-quality plastering work;
- strengthening the building for its long-term operation;
- obtaining the ideal geometric shape of the corners of the building.
Any of the screed options mentioned above (in previous sections) has no disadvantages, since each type takes care of strengthening the walls of the building.
The only thing is that some types of reinforcement can be somewhat expensive, but builders do not recommend saving on reinforcing elements , much less using corroded or improvised means for screeding. Since such savings will again lead to additional costs after some time.
How to repair cracks yourself - step-by-step instructions
You can cope with the repair of small cracks on your own without the involvement of a construction team and additional costs. Having previously studied the intricacies of the technology, as well as correctly choosing the tools and materials necessary for the work.
On a brick wall
The most common material for laying walls is brick. If the damage is minor or medium, then repairs should be carried out according to the following instructions:
- Carry out jointing using a hammer and screwdriver; as a result, the gap will increase slightly.
- Completely clean the joint from dust and moisten the surface. Using a spatula or trowel, apply cement mortar, carefully filling the depth of the crack and leveling the surface of the seam.
For large and through gaps, the operating procedure will be different:
- Extend and clean the surface of the crack, as in the previous instructions, knock out the remnants of the old mortar.
- Drill holes for dowels on both sides of the gap, insert dowels.
- Treat the surface with a penetrating primer to increase the adhesion of materials.
- Fill the cavity with solution, pushing it deep and filling the voids.
- Lay a reinforcing mesh on top of the seam and screw the screws into the dowels.
- In more serious situations, tighten the crack with metal bars secured with anchors or embedded elements.
- Plaster the mesh. It may be necessary to partially dismantle the old damaged masonry, and then new bricks are inserted into fresh mortar, thus restoring the masonry and strengthening the wall.
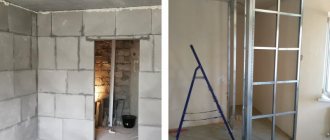
On a plasterboard partition wall
Usually, the joints of drywall sheets crack, and if the crack goes along the sheet itself, there is damage to the frame or deformation during installation.
Steps for sealing gypsum board cracks:
- Clean and unstitch sheet joints or cracks.
- Coat the edges of the sheets with primer.
- Apply a small layer of putty.
- Press the reinforcing mesh or tape into the seam surface.
- Level the entire layer and sand thoroughly.
On a plastered surface
Cracks in the plaster are superficial and do not pose a threat to the structure, but they greatly spoil the appearance of the interior and spread in the form of a grid.
Stages of repairing small cracks:
- Using a hammer, tap the entire area of damage without sparing and knock off the peeling parts, remove the remaining plaster and dust with a spatula.
- Walk over the resulting recess with a penetrating primer, which will strengthen the edges and improve adhesion, or wet it with water.
- Fill the entire cavity with a solution or a special ready-made mixture, if necessary, lay a reinforcing mesh, securing it with nails or small screws.
- After the plaster layer has dried, apply finishing putty; narrow cracks can be reinforced with special tape.
Possible errors and difficulties
The occurrence of errors in the process of strengthening walls with screed clips can be associated with incorrect selection of material (use of low-quality consumables), as well as:
- Use of reinforced materials with signs of corrosion. A few years later, when the metal has completely deteriorated, it will be necessary to carry out exactly the same work on the surface of the wall.
- Inaccurate calculations to create a metal frame that does not match the dimensions of the wall. Instead of simply attaching the finished structure, you will have to saw it, possibly weld it, and this is an additional waste of the worker’s time and a lost day for further work on arranging the building.
- Use of excessive amounts of reinforced parts. There is no need for an excessive amount of reinforcement, since the mortar that will fill them can “move away” from the surface and collapse due to poor bonding with the brick.
All of these errors can be avoided if you adhere to the technological rules of GOST standards in your work. Professionals rarely make mistakes when screeding, so it is best to order the necessary work from them.
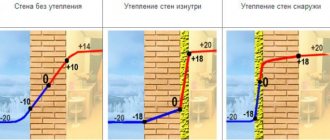
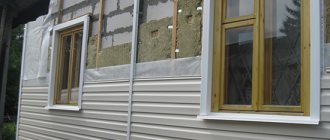
Frost on the walls
This situation can be attributed not to mistakes, but to misunderstandings. A house made of planed logs was erected on the site. But for some reason the workers did not caulk the inter-crown grooves. Or not all the grooves were caulked. As a result, when the owner of the house turned on the heating with the onset of cold weather, heated air began to pass through the inter-crown cracks. Upon contact with cold outside air, moisture condensed on the outer surface of the wall in the form of frost.
As manager Alexey Galimov notes, uncaulked seams (or poor-quality caulking) are often found in log houses. It is not difficult to fix such a marriage. The cost of caulking 1 linear meter of inter-crown grooves from the inside and outside of the house is 150-230 rubles. (labor and materials). The portal Remont.Divandi wrote in detail about the features of constructing houses from logs or timber in the article “Wooden house construction in the Urals: the fastest and longest technology.”
Average cost of work in the Russian Federation
The average price for strengthening brickwork using screeds using clips in the Russian Federation may vary depending on the region.
So, for example, in the Moscow Region and the Novosibirsk region it will be higher than in the Bryansk or Irkutsk regions.
The cost of the work depends on who will do the screeding - a hired contractor or a specialized construction company. When hiring a contractor, the home owner will have to purchase supplies himself.
A professional construction company will allocate a team of specialists to the site and provide its own materials, according to the estimate specified in the cooperation agreement, after a preliminary inspection and assessment of the site.
A contract worker takes from 250 rubles/m2 for his work . Therefore, on average, for hiring by region the amount is 350-500-700 rubles, without purchasing material.
Material costs depend not only on who will carry out the process and in which region, but also on changing prices in the construction market. For example, part of the price list for a company’s services, on average in the Russian Federation, may look like this:
| Strengthening brick screed | m2 | 5,000 rub. |
| Crack repair | m2 | 3,500-5,000 rub. |
| Strengthening floors over a brick wall with injection | m2 | 4,000 rub. |
The cost will also be affected by:
- season,
- masonry type,
- surface dimensions,
- complexity of work,
- thickness of the wall layer,
- the whole complex (scope of work).
And:
- amount of cement,
- injection equipment,
- price of fastener,
- metal mesh or reinforcement,
- sealant,
- foam concrete, etc.
The consumables listed in the price list help determine the required amount of material, especially after a specialist visits and gives them an assessment of the damage, but not more than 2,000 rubles. Exceptions are massive destruction that requires a large number of consumables, and therefore the amount will be significantly increased.
Laying the screed
Laying the screed indoors is done in one step, without interruptions. When planning work, take into account that the traditional solution must be laid within two hours after preparation. The shelf life for mortars prepared from ready-mixes is indicated on their packaging.
The solution is placed a few centimeters outside the doorway, and then the excess is cut off along the border of the expansion joint.
The surface of the screed is smoothed over with a trowel 8-10 hours after laying, until the concrete has completely set. The semi-dry concrete screed laid using a concrete pump is rubbed down after 3-4 hours. Smoothing eliminates minor roughness on the surface. There is no need to grout the screed if tiles will be laid on the screed.
Screed care
The screed should remain damp for a week after installation. At this time, the screed should not lose moisture, otherwise the strength of the screed will decrease. To prevent the screed from drying out, it is covered with plastic wrap or sprayed with water daily.
After seven days, the film is removed, the room is ventilated and the screed is left to dry. After another three to four weeks, tiles can be laid on the screed. Moisture-sensitive floor coverings are laid on the screed after four to six weeks, when the moisture content of the screed is less than 3%.