By the way, colored grout is in fashion now, take note. Perhaps in this way you will give the kitchen the zest that it so lacked.
Instagram @officesandm
Instagram @skorikdesign
- Kitchen
Kitchen apron design (70 photos)
Polishing
Over time, glossy tiles can lose their shine. If the damage and abrasions are minor, a tile polishing and protecting product (Sidolux Expert, Keraseal) will help you. It creates a thin polymer film on the surface that smoothes out all irregularities. After application, the tiles will be as glossy as new or even better.
You need to wear rubber gloves when working with the protective agent. It is easy to apply and absorbs quite quickly. Your actions:
- Clean the tiles and degrease them with detergent;
- Apply the liquid with a microfiber cloth;
- Once absorbed, remove any residue with a lint-free cloth;
- Repeat the process if you are not happy with the effect.
Floor tiles are most often polished, as they lose their gloss faster. But if you need to add shine to wall tiles, polishing is what you need.
Floor tiles before and after polishing.
Decoupage
If the tiles are laid flat, then you can use a technique such as decoupage. The pictures will be repeated or alternated, due to this the decor will be given to the tiles.
Before starting work, the tiles must be thoroughly cleaned and degreased, otherwise the paper will not stick.
- For the pattern, you can take napkins or printed pictures.
- To create the technique, the image is placed in water, soaked, then glue is applied to the back surface and placed against the tile.
The pictures will stick better if you apply an additional clear varnish on top. Where there is an apron in the kitchen, it is better to install glass to protect the surface.
Painting
This is a rather radical and labor-intensive method. But it will help completely transform the bathroom. You can choose one color for the entire tile, paint only one wall, part of it, or use several colors. It all depends on your imagination and free time.
We recommend articles:
How to paint bathroom tiles.
16 ideas: How to update a bathroom without renovation with minimal investment.
Partial painting of tiles
Dyeing process
Painting old tiles in the kitchen is a simple process that you can do yourself, even if you have no experience. The procedure is divided into successive stages:
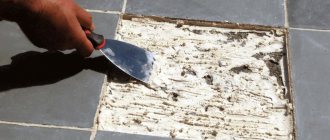
- Initially, the base is prepared, from which dirt is removed, and cracks are filled with cement or other building mixture;
- areas that should not be painted are covered with masking tape;
- a calculation is made on the basis of which it is determined how much paint needs to be purchased for the planned work;
- a coloring composition is purchased, which must be resistant to moisture, suitable for use in residential premises and of high quality, and it is advisable to focus on well-known brands;
- paint is applied using different tools, which include rollers or brushes, and you can also use a spray gun, with which a uniform coating is formed;
- stencils are used to create drawings, and unnecessary areas can be sealed with masking tape;
- It is recommended to create at least two layers, and before applying the second coating you need to wait for the first layer to dry;
- if you need to work in hard-to-reach areas, you have to buy brushes of different sizes.
After the last layer has dried, it is advisable to apply varnish on top to ensure a long service life of the coating.
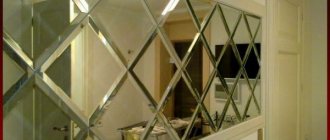
Mirror tiles
An interesting way to update your bathroom interior is to use small mirrors. There are ready-made mirror tiles that can be glued over existing ones. You can order several mirrors according to the size of your tiles and stick them on.
The disadvantage of mirror tiles is that they need to be glued in place of the existing one. But a small mirror can be glued on top of the old tile. This can be done within 10 minutes. Any moisture-resistant glue for mirrors is suitable for gluing, for example:
- Tytan;
- Soudal;
- Mir-O-Bond;
- Intertool.
Self-adhesive tiles in the kitchen
Self-adhesive tiles are not a very popular solution, but at the same time they are great for replacing old tiles and laying new ones. Such tiles (actually stickers) are glued to each individually. Contrary to their appearance, they are very durable and resistant to moisture - they can even last for several years. In addition, they perfectly imitate ceramic tiles.
Adhesive tiles are also very easy to install. Anyone can DIY them - all you have to do is maintain a high degree of diligence and precision. Sticker tiles come in a variety of colors and designs available in stores. It is better to choose patterned ones - any dirt on them is almost invisible.
For example, self-adhesive tiles with azulejo-like patterns look very beautiful. Their additional advantage is the fact that even if one sticker is damaged or removed, you can easily buy one such element - it will blend into the whole. We can also order self-adhesive foil with your own design or photo.
Since each tile is glued separately, this can be time consuming for very small tiles. You should also take into account that the tiles must be perfectly smooth, because any unevenness will lead to new tiles peeling off. It should also be remembered that before gluing, old tiles must be thoroughly washed, dried and degreased.
Start gluing from the least visible places to give yourself a chance to practice. Manufacturers recommend using glossy kitchen stickers, which are more resistant to moisture and dirt.
Adhesive sheets are most often made of vinyl or polymer film. Their inner side is coated with a special glue that does not damage the ceramic surface and leaves no marks. The design on the outside is protected by a layer of laminate, so the stickers retain their colors for a long time. Keeping them clean is easy - just wipe them with a damp cloth and a mild cleaner.
What is worth knowing about adhesive tiles? Ceramic tile repair
- Adhesive tiles are great as a replacement for major renovations that involve removing old tiles and installing new ones.
- Even if one sticker is damaged, it can be easily replaced with a new one without compromising the overall aesthetics.
- Each tile is glued separately, so it's best to start with less visible areas to give yourself time to practice.
- The tile stickers are waterproof and durable and easy to keep clean: if they get dirty, simply wipe them with a damp cloth and detergent.
- Adhesive plates are made of vinyl or polymer film.
- Sticker tiles are available in many colors and designs.
Adhesive stickers are a cheap way to update your kitchen tiles
Updating seams (3 options)
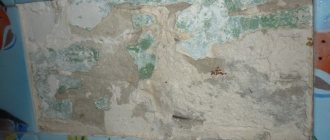
This method is especially good if the seams between the tiles have changed color, turned yellow or blackened. If the seams turn black, it means the grout is not of the best quality and there is mold or mildew in it. If they have turned yellow or changed color (faded, become a different shade), this is a sign of poor-quality grout.
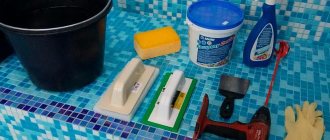
In the first case, you will have to remove the old grout completely. You can do this in three ways:
- Manually, using a special scraper for cleaning seams or a knife with teeth;
- Use a cement and tile adhesive remover that effectively removes grout;
- Use a special tool, a seam stitcher (they come in different types and greatly simplify the work).
Various types of seam extenders.
If the grout is not moldy and you just want to update it, there is no need to remove the old one. You can simply update it - paint it. There are two options:
- Use moisture-resistant paint (acrylic, latex, oil or enamel);
- Color the seams with an acrylic marker.
Painting the joints between tiles
The third option is to apply new grout over the old one. It is suitable if the old grout is recessed into the seams and does not go flush with the surface of the tile. To do this, use plastic grout or sealant (preferably silicone or latex). There are special sanitary sealants that contain substances that prevent the appearance of mold.
Advice
If you had grout to match the tiles, choose a contrasting color. Conversely, if the seams stand out against the background of the tiles, choose grout to match the tiles. This will completely transform your bathroom.
Decorate with foil
We are not talking about food foil, but about self-adhesive one: this is a cheap way to transform the kitchen without knocking down the tiles. The adhesive layer is already applied to the back of the film, so there is no need to purchase additional materials.
The work is easy to do yourself according to the instructions on the package. Typically, the foil is made of aluminum, has a relief pattern, is easy to clean and can withstand temperatures up to 250 degrees.
The manufacturer guarantees excellent wear resistance of the material, so it recommends using foil over the stove and sink.
Varnish coating
A simple but effective way to update old tiles in the bathroom without renovation. Especially if the tile has lost its gloss, become matte or cloudy. You can varnish only the tiles themselves, or you can also apply varnish to the seams. It all depends on your preferences.
Ceramic tiles after varnishing. The shine is uneven because there are three layers of paint of different colors.
Film
In terms of its design and installation principle, it resembles the same stickers, only with a larger area and it will cover the entire space. The outer part is made of PVC, and the inner part is made of glue. Usually its sizes vary, so you need to choose the best option for yourself.
The outer layer can be of any type, both smooth and rough, glossy and matte. The film allows you to quickly disguise old tiles. Some people do not glue it entirely, but cut out patterns from it, and decorate the surface in a similar way.
This option can replace popular washable wallpaper. It will not fade in the sun, fade from sunlight, and will be resistant to temperature and water.
If you want to mask cracked tiles with film, choose a material that has a dense backing. If the room has high humidity, it is better to treat the walls with a special primer to prevent the development of mold before gluing.
Volumetric decor
You can decorate individual tiles or entire areas yourself. Anything that is not afraid of moisture is suitable for this. Pebbles and shells are considered classics. Some tile manufacturers sell ready-made solutions - tiles made to look like natural pebbles. But it looks slightly unnatural, since the decor is repeated.
Ideally, it is better to cut the pebbles in half before gluing. This way you will save on glue, and the stones will not protrude too much from the wall. For good long-lasting fixation, use a special adhesive-putty for stone or MS-sealant (hybrid sealant). Before applying, sand the surface of the tiles with coarse sandpaper. This will improve the adhesion of the glue to the tile.
Are paint, wallpaper and veneer a good idea?
Special paints for tiles can be found in stores. However, this solution is more difficult to use than you might think. First of all, you paint the tiles and grout with paint, and it must be applied evenly everywhere if you want to get a good effect. It's not always easy. In addition, before painting, each tile should be washed, dried and sanded with fine sandpaper.
An interesting solution is waterproof wallpaper for tiles or veneer. However, not wooden ones - they are not suitable for the wall between the lower and upper cabinets in the kitchen, since they are not very resistant to moisture. However, a stone veneer that is made from crystalline slate bonded with polyester resin will be ideal.
This material is extremely durable and resistant to water and mechanical factors. The thickness of no more than 1-3 mm allows it to be used even in hard-to-reach places.
However, there is a slight catch. You won't be applying wallpaper or plywood directly to the tiles. First you need to apply drywall to them.
Full or partial overlap
There are plastic panels designed for installation in the bathroom. According to the connection principle, they are similar to lining and are installed on top of old tiles. Installation is simple, you can do it yourself. The only thing you need is special glue for installation.
Some cover the tiles with other materials - plasterboard, MDF, magnesite boards, etc. This is impractical, since installing guides takes away the useful volume of the bathroom. And water-repellent panels are what you need. They can cover the tiles completely, or in a certain area. If desired, you can paint the panels or decorate them.
Installation of overlay panels.
What to put on old tiles in the kitchen? Plasterboard finishing
If you can't carry out a major renovation that involves chipping tiles, it's worth considering placing drywall over the old cladding. This solution allows you to create extremely aesthetic surfaces.
The prerequisite for success when laying drywall on tiles is the same as when gluing new tiles to old pieces of an old wall that are attached to a solid wall. However, if you're not so lucky, nothing is lost. Installing drywall can be done using a stud, but you must remember that this will reduce the surface area of the renovated kitchen. Therefore, it is recommended rather for large kitchens.
Covering a layer of unsightly tiles with plasterboard gives new installation options. You can paint it with waterproof paint (the drywall should be waterproof too!), apply wallpaper to it, or finish it with veneer (What? More on that later).
What should you remember when installing drywall on a kitchen wall?
- The layer of old tiles should fit snugly against the wall. Otherwise, the drywall will need to be mounted on a frame, which will reduce the size of the renovated room.
- Drywall installed in the kitchen must be waterproof.
- The attached panel can be painted or a fresco or special veneer can be glued onto it.
If the old tiles are well adhered to the wall, you can put drywall over them and paint them.
Painting through a stencil
There are special stencils for painting tiles. They are made of plastic or silicone and are reusable. With their help you can decorate any surface and tiles in the bathroom, in particular.
If you haven't found a suitable option, it doesn't matter. You can find a suitable pattern or ornament on the Internet and download it. Then:
- Print the image;
- Rub the paper with paraffin on both sides;
- Cut out the parts that will be painted.
This stencil is not very durable, but it will last for several dozen uses. It won't be difficult to make a new one. For work it is better to use acrylic, oil paint or enamel.
Changing the design of tiles
An affordable and most uncomplicated way to transform a ceramic surface can be called “masking” defects.
In addition to hiding possible damage from prying eyes, this will also allow you to change the usual interior of the room, highlighting your taste and creative abilities.
Vinyl stickers
The range of modern interior stickers will allow you to choose the right option. Before pasting, the surface is thoroughly washed and degreased, and wiped with a clean rag.
The sticker is applied gradually, leveling and pressing down each area to avoid the formation of air voids.
Over time, stickers will lose their appearance and will need to be replaced, but this method is popular, especially if you're on a budget.
Painting patterns on tiles
Plain ceramic tiles can also be refreshed by painting them with paints. If you have even minimal artistic skills, this is not difficult to do.
The main rule will be the compatibility of the design with the overall style of the interior.
To do this, it is advisable to “try on” the selected composition on paper, and only after that start working.
Pre-cut stencils will be of great help in decorating, with which interior decoration will become easier and faster.
Helpful advice: to make the drawing last longer, it is better to varnish it after drying.
Overlapping tiles with another material
If it is not possible to purchase ceramics, the areas freed from tiles can be covered with other suitable materials. Typically, plywood or chipboard of appropriate thickness is used for this.
After installation, the surface will have to be painted over, because the usual structure and color will clearly contrast with the rest of the part.
Stickers and Stickers
This is probably the easiest way to update your bathroom tiles. There are many options in size, pattern, color. The only problem is to choose a sticker that matches the height and width of your tile. The stickers already have adhesive applied, they are made of vinyl and are not afraid of moisture.
In addition to the usual ornament or pattern, it is easy to find large format stickers. As a rule, they are glued to a flat, smooth surface, but they are also suitable for tiles. The largest assortment of such stickers is on the AliExpress website, but if you don’t want to wait for delivery, you can choose options in your city.
Stick figures on suction cups
It is interesting to decorate the walls and even the mirror in the bathroom using small figures on suction cups. They are easily attached to a smooth surface and will allow you to create small design accents in one place or another. True, such jewelry will have to be regularly returned to its place - over time, they will still fall off. But on the other hand, they do not stick tightly, and they can be changed for others or re-glued to a new place easily and effortlessly at any time.
Let's summarize: 11 ways to update old tiles in the bathroom without renovation
- Polish the tiles with a special compound;
- Paint the tiles completely or partially;
- Glue several small mirrors the same size as the tile;
- Cover the surface with pearlescent varnish;
- Replace or paint the grout;
- Coat the tile with varnish;
- Make voluminous decor;
- Conceal the tiles with overlay plastic panels;
- Paint the tiles by hand;
- Apply an ornament or design with paint through a stencil;
- Use large or small stickers.
In the article, we tried to provide as many simple and inexpensive options as possible on how to update old tiles in a bathroom without renovation. All methods do not require large expenses or special skills. We hope the article was useful to you. Don't forget to share the post with your friends!
more
Use panels
Old tiles can also be covered with plastic panels without removal. The labor intensity option is approximately the same as painting, but it looks much better and neater. The panels will make it easy to completely change the design of the room.
To decorate the bathroom with panels, first assemble a frame of wooden slats, onto which the panels are attached one by one. The slats are fixed mainly with liquid nails.
Attention! Installation of a slatted frame will definitely “steal” at least 5-10 cm of free space on each wall. Therefore, this finishing option is recommended for use in spacious bathrooms.
Here you can read how to use panels that imitate ceramic mosaic wall decoration.
Thematic variety of stickers
Knowing how painstakingly traditional decoupage from paper fragments is performed in several stages becomes the main motive leading to the purchase of ready-made stickers, which allow you to simply and easily update the desired area. There is no need for glue, varnish, or tedious waiting for everything to dry. The owners of a renovated kitchen only need preliminary thinking, a schematic representation of color spots, which should result in an approximate image of a tile that fits organically into the established interior.
With this approach, once in the store, you won’t have to rely on momentary insight when looking at the variety of topics reflected in the stickers. Among the thematic series, the following images will be most suitable for the kitchen:
- still lifes of aesthetically attractive vegetables, herbs, and fruits;
- images stylized to resemble familiar images - a dancing samovar, a teapot with an accordion, a cook;
- realistic drawings of forks, cups, pans;
- texts, for example, an interesting recipe, a wise thought, a good wish.
The color of the stickers is selected based on existing combinations, supporting one of the dominant tones or enhancing the accent sound of an additional color. Refined graphic lines of the sticker in the style of Japanese prints will create an aura of romance, and high-speed decoupage with a bright marine accent will support the collection of Gzhel ceramics.
It will be successful to purchase a variety of geometric color patterns applied to square sticker fragments corresponding in size to the tile. All that remains is to completely cover the entire plane, alternating colors or types of images, creating a fantastically beautiful mosaic composition in patchwork style.
By creating your own canvas from stickers, you can give space to your own imagination without limiting yourself to the stingy confines of a monotonous pattern. To visually highlight the tiles, it is worth experimenting and making modern decoupage from several types of stickers in the form of a thematic collage.
Rules for working with stickers
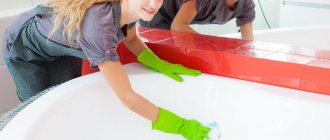
When starting to perform simplified decoupage in order to refine an old, but still high-quality tile, you should prepare its surface by washing it with a saturated soapy solution for degreasing. You can use a household composition designed to remove grease from dishes. This is followed by rinsing with clean water.
Important! Be sure to thoroughly wipe off all traces of moisture, since the surface must be completely dry before pasting.
If you plan to apply a small pattern to all the old tiles while maintaining the same gaps, then it is advisable to prepare a template from cardboard, the dimensions of which are equal to the tile. On it, the distance from the edges to the drawing is measured with dots connecting to form a rectangle into which the sticker fits. This piece is cut out to form a pass-through window. By applying a template to each tile, you can quickly and evenly glue stickers without unnecessary measuring operations, achieving an effect no less elegant than that of well-executed decoupage. It is more convenient to carry out this operation with an assistant.
Attaching a small sticker to brighten up boring old ceramic tiles is easy. The protective layer is removed, applied to the desired location and ironed evenly from the center point to the edges, avoiding wrinkles. A soft cloth is used.
It is recommended to glue fairly capacious fragments with a large number of openwork thin weaves using a special transparent mounting film. It is applied with the sticky side to the front side of the sticker and smoothed with a cloth. After this, you can remove the protective paper from the sticker and fix it on the selected area, smoothing it to avoid leaving unadhered cavities. When finished, all that remains is to carefully remove the film. In this way, you can renew an impressive wall area in one go.
If the pattern used is applied without openwork weaves, then film is not required. The most important point here is to absolutely accurately glue the first edge of the sticker, bending the paper. Then, using a rag, carefully press the vinyl layer against the tile, expelling the air and gradually removing the protection.