/Furniture/Set, wardrobe, rack/
When your kitchen furniture has become dilapidated or you just don’t like it anymore, don’t rush to buy new ones, because, most likely, you can update it yourself. All you need for this is a couple of free hours or days, a well-thought-out idea for a remodel, some money and one of our instructions.
See also: 4 super ways to transform a chair and stool with your own hands
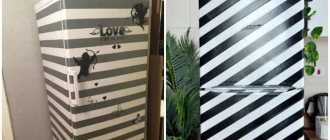
Self-adhesive film
This method of restoring a kitchen set has become truly popular, and all thanks to its many advantages :
- vinyl film is inexpensive, so updating facades will not break your pocket;
- The range of self-adhesive films is huge; you can find options that imitate any type of wood, stone or leather. There are films depicting landscapes, with interesting designs, etc., with a smooth and embossed surface;
- Almost everyone can handle installing the film - just be careful during the measurement process and directly during gluing;
- vinyl film is not afraid of temperature changes and moisture, which is very important for the kitchen. It will be easy to care for such a surface;
- if any part is damaged, or you again want to change the situation, the film can be easily removed.
The downside is the low durability of the film, only 3-4 years, but the low cost and ease of replacement smooth out this drawback.
The procedure for gluing kitchen facades is quite simple. The main thing is to follow the following recommendations:
- choose a film of a suitable color, taking into account your preferences for the new kitchen interior. It is not necessary to take a material with imitation wood - you can take a plain, light-colored film, and then you will be able to make a small kitchen larger and make your dreams of creating a minimalist interior come true;
- It is best to remove the kitchen facades - this will make the work easier. The fittings must be dismantled in any case;
- measure the parameters of each removed facade;
- the film must be glued to a clean, dry surface, i.e. facades must be thoroughly cleaned of stains of grease and dirt. This can be done with a soap solution or using dishwashing detergent. After this, you need to remove the remaining detergents and wipe the facades dry;
- If the facades are seriously damaged, you will have to spend some time on repairs. The peeling edges at the ends must be glued. The holes must be sanded, then filled with acrylic putty, sanded again and primed. If there are large potholes, then it is better to glue a patch of plywood or veneer in their place;
- In accordance with the measurements taken, the film must be cut. Experienced craftsmen recommend adding 4-5 cm of allowance in places where the film will bend. If there is a large design on the film, then when cutting it is necessary to control that it is positioned correctly. It is better to cut with a stationery knife - this way the edge will be as smooth and neat as possible;
- Take the first piece of film, start removing the protective layer of paper and apply the film with the adhesive side to the facade. Controlling the evenness, gradually peel off the protective layer and stick the film;
- You can roll the film with a rubber roller or a plastic scraper. This removes any remaining air. It is necessary to smooth out from the center to the edges. If there are any air bubbles left, you can pierce them with a needle and roll the surface again with a roller;
- If suddenly you notice that somewhere the film is glued crookedly, then within 5-6 hours the situation can be corrected. The film can be re-glued, but not more than 1-2 times, since then the glue will simply lose its properties;
- when all the facades are pasted over, you can screw them back on;
- You can use old fittings, or you can replace them with new ones, which fit better into the updated style.
If the shelves are dirty to such an extent that no detergent can remove them, then they can also be covered with film. The operating principle is still the same. The film can be chosen to be close to the original color of the shelves.
Preparation
As with any task, preparation plays a very important role in the process of painting furniture at home. First of all, the furniture is disassembled before painting. At least take the doors off their hinges. Thanks to this, the process of applying paint will become more convenient, and parts that do not need to be painted will be protected from the ingress of paint.
Take a responsible approach to the process of preparing furniture.
Working surfaces are thoroughly washed and degreased. This is done using an aqueous solution of dishwashing liquid, vodka (or alcohol). Then, using a special wood putty, chips and cracks are removed.
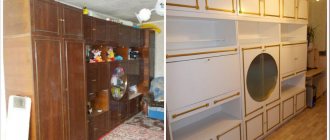
Replacement of facades
Many people think that facades covered with film look somehow too modest. This is all, of course, a matter of taste and personal preference, but it is difficult to radically change the kitchen using vinyl film, because glass inserts or panels will not be added to the doors. To make serious changes to the kitchen interior, it is better to act radically and completely replace the facades. Yes, it will be more expensive than with film, but still much cheaper than buying a new headset. This method is perfect if the furniture frame is still quite strong and durable.
It will be easiest for owners of modular furniture that was purchased relatively recently. Then you can buy facades of the required size and replace them yourself. But you’re not so lucky often, so you usually have to make custom-made facades. It is not at all necessary to change wooden doors to wooden ones, and chipboard to chipboard. The uniqueness of this restoration method lies precisely in the fact that the appearance of the set can be dramatically changed using completely different materials.
The cheapest option is facades made of chipboard or plastic. MDF and wood will cost more. You can choose fittings and decorations, for example, use glass inserts, but all this will be reflected in the price. Handy craftsmen, of course, can make all the facades themselves. If you have woodworking skills, then why not? But it’s much easier and faster to contact a specialized company that will produce facades for your set.
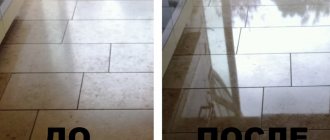
Repair of kitchen facades in Moscow
We recommend to residents of Moscow and the region, which has been operating for more than 20 years and specializes in the repair of kitchen facades. Experienced specialists can replace facades or repair existing ones by painting, enamel coating or gluing film. The company's services also include hardware repair and countertop replacement. All work is carried out on site, preliminary measurements are taken, the design and estimate are agreed upon, and the required fittings are manufactured from the desired material. All work is guaranteed. You can view detailed information and examples of work on the page https://remont-kuhni.com/service/remont-kuhonnyh-fasadov/.
An example of the work of specialists
Benefits of DIY painting
Anyone can paint a kitchen with their own hands (even if they have no experience in renovation). There is nothing complicated about painting furniture. The main thing is to first study the algorithm of actions and strictly adhere to it in performing the work.
Experts also recommend paying special attention to the choice of paint. It's definitely not worth saving on it.
High-quality paint will last as long as possible and will make work easier because it will apply more evenly.
The main advantages of painting kitchen facades yourself include the following factors:
- financial savings. All you need is to purchase paint and tools;
- staining will take several days;
- processing can be carried out at any convenient time;
- If you perform the actions correctly, the result will exceed all expectations.
Coloring
The method is quite simple, but requires careful surface preparation. The main advantage of this method is the ability to paint the facade in any color. If you want to make your kitchen bolder, you can choose a bright shade, such as blue, green or orange. A win-win color is white, as well as many light shades, incl. beige, gray, cream, etc. Imagine in advance what the kitchen will look like and get creative.
At the same time as painting the facades, they can be slightly transformed using moldings , special strips that are glued to the surface and give it an interesting relief.
The sequence of actions is as follows:
- remove the facades from the furniture, dismantle the fittings and glass. Those elements that are difficult to remove can be sealed with masking tape;
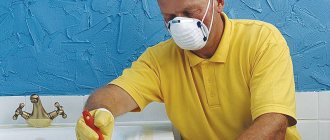
- It is most convenient to remove old varnish or paint using a sanding machine. If PVC film was used as decoration, it is better to use a hair dryer. The temperature will melt the film and make it easier to remove. It is better to work in a respirator so that small particles of the facade and the pungent odor of PVC do not enter the respiratory tract;
- if there is serious damage, they must be filled with putty and then sanded;
- the surface is rubbed with sandpaper, then the dust is removed and degreasing is carried out;
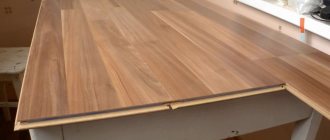
- if you plan to use moldings, then they are attached at this stage. You can choose smooth or textured planks; there are products that imitate stucco. It is better to sand the planks in advance, then they are cut into pieces of the required sizes. Often moldings are attached along the contour of the doors, or they are formed into a pattern closer to the center. Usually a connection at an angle of 45 degrees is used. After you are sure that the figure is laid out evenly, the elements are glued, you can use glue for wooden products. It is allowed to use nails without heads;
- MDF, chipboard and wood absorb moisture well, so it is better to pre-coat them with a primer. The one designed for woodwork will do. It is better to apply two layers;
- Now you can start painting. It is better to use acrylic paint or auto enamel. The first is cheaper, the second is better in terms of moisture resistance and resistance to mechanical damage. You can use a brush, roller or spray gun. The paint is applied in 2-3 layers depending on the required color saturation. To guarantee, some craftsmen cover the facades with a layer of transparent varnish;
- when the paint has dried, the masking tape is removed, the fittings are returned to their place, and the facades themselves are hung on hinges.
If painting seems too banal to you, then use glisal , a translucent glossy paint. It is applied in exactly the same way as acrylic paint, but while the coating dries, you can create an interesting texture on the surface. Using a sponge, bag or other available items, you can make a geometric design or an ornate pattern. If anything happens, part of the drawing can be removed with a roller. The result is an unusual result that will appeal to lovers of ethno-style.
Primer
Priming is necessary so that the layer adheres well to the surface, and the composition will also help remove remaining flaws. You need to select a primer solution based on the type of wooden material that will be primed. The tool is a roller or brush, drying will take approximately 24 hours.
Priming is necessary so that the layer adheres well to the surface, and the composition will also help remove remaining flaws.
Varnish coating
This option is only suitable for facades made of solid wood . Varnish allows you to reliably protect the wood and at the same time does not hide its chic natural appearance. When it comes to furniture, nitrocellulose, alkyd-urea, polyurethane, epoxy and polyester varnishes are used. It is important that the varnish protects the wood from moisture and elevated temperatures. The varnishes have a not very pleasant smell, so it is better to carry out all work outside. If this is not possible, then it is better to take a water-based material, it has almost no odor.
It is very important to decide in advance on the degree of gloss . The varnish can be glossy, which will add visual volume to the set, or it can be matte, which will emphasize the wood pattern. The degree of gloss is indicated on the packaging as a percentage of reflected light: glossy varnish will reflect up to 90% of light, matte - only 10%, there are many intermediate options. Which is better depends only on your preferences.
The operating procedure is as follows:
- remove the facades, dismantle the fittings, if necessary, seal some parts with masking tape;
- remove the old layer of varnish; you can use sandpaper. Dust is best removed with a vacuum cleaner. After finishing the work, wipe the surface with a damp cloth, then allow it to dry thoroughly;
- apply primer varnish;
- The varnish is applied using a brush or roller; it is better that each new layer is slightly thinner than the previous one;
- Some types of varnish need to be worked only outdoors;
- drying speed varies for different varnishes, the average is indicated on the packaging;
- After drying, the tape is removed and the fittings are returned to their place.
To create an aging effect , you can apply stain in several layers.
Replace some or all of the upper cabinets with open shelves
Another common solution even for new interiors. Such storage spaces will cost mere pennies, but the work area will become lighter and visually lighter. By the way, shelves can be built from elements of old furniture.
Updating hardware
We have all repeatedly heard about the enormous influence of little things, but many, however, refuse to believe the truth of this statement. Designers, without any doubt, convince us that sometimes changing the handles on a kitchen set can transform the kitchen space. More often, however, replacement of fittings is carried out along with updating or replacing facades.
It happens that the kitchen set itself is perfectly preserved, but the handles from constant interaction with them have become peeling, tarnished, or even deformed in places. Remove the old fittings and head to a specialty store, where they offer a wide variety of handles to choose from. The main thing is that the size matches and you don’t have to drill new holes.
If the old handles fit perfectly into the style of the kitchen, then you can find new ones that are as similar to them as possible. If you want something fresh, or if the kitchen façade has become completely unrecognizable after some simple manipulations, then choose handles in a new style. The range of manufacturers includes handles in modern and classic styles, smooth chrome-plated and antique carved. There are handles with imitation leaves and animals, and some with inlaid glass and stones. There are wooden, plastic and metal, transparent and colored - everyone can choose the right one.
Perhaps the hinges and mechanisms of the sliding shelves need to be replaced . Before going to the store, these elements should be dismantled and taken with you as a sample. New loops are selected to match the size of the previous ones. It happens that the existing holes become very loose, and it is impossible to attach new hinges to them. Then they will have to be puttied with an acrylic-based compound in the color of the facade, sanded, varnished or painted, and only then new holes will be drilled and purchased hinges installed. Old roller mechanisms can be replaced with ball ones. All these actions give a huge result - using the headset becomes more pleasant and comfortable.
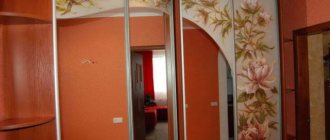
Original special effects
- The “chameleon” effect allows you to see new colors of the facade from different lighting angles. Day and evening they constantly change their color, making the kitchen mystically mysterious. The chameleon can demonstrate its unusual beauty only on radius facades.
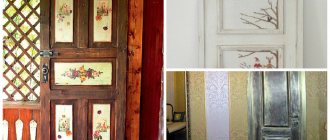
- The crackle effect and decoupage are often used to create classic interiors, kitchens in Provence or retro style. With its help, the surface of the furniture slightly ages and acquires a whole history of use. The crackle technique is used to imitate a web of fine wrinkles. The decoupage technique allows you to cover any thematic image with a web of wrinkles.
- The effect of pearls or mother-of-pearl is formed due to special processing, during which a coating with an optical effect is applied to the product. It creates a slight shimmer and clearly demonstrates how beautiful the play of shades can be.
- The “metallic” effect is created by mixing the coloring composition with special components that form a recognizable metallic sheen on the surface of the product. It is suitable for creating voluminous cabinets in golden or gray color.
- Stencil tint – creating an additional pattern on a painted surface. It is applied using stencils or an airbrush. Designers recommend using a similar effect only for decorating one or two facades of upper or lower cabinets.
Crackle effect
Photo printing looks elegant on painted facades. Using it, designers apply an openwork silver pattern and create a whole world using complex plots or floral prints.
Glass replacement
As a rule, it is enough to simply wash glass inserts in facades well to return them to their original ideal appearance. But what if you want something new? You can replace the existing transparent glasses with frosted or colored ones, then the kitchen will noticeably change. True, the glass will have to be made to order, and not everyone can handle the replacement itself.
A more budget-friendly option is to buy self-adhesive film. With its help, you can give the glass the desired shade without depriving them of transparency. It will help create a matte effect or imitate a real stained glass window. Anyone who knows how to use a tape measure or measuring tape, scissors and is able to carefully apply the film can definitely cope with gluing the film.
There is also an old, ancient method that involves applying a mixture of chalk powder and silicate glue to the glass. This material is applied to the glass in two layers, after which they become matte.
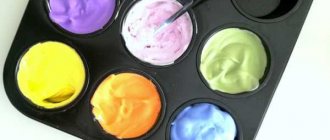
Color palette
The variety of colors is impressive, you can easily choose the desired shade. There are ready-made shades that can be mixed if necessary to obtain the desired shade. Pigments can be added to the white base color to achieve the tone you like. There are also additives that provide the following effects:
- Matte, this option is usually chosen for furniture;
- Chameleon You can paint all the cabinets in the set, but stick to one tone so as not to overload with color, because the effect is complex. It is advisable that the shade be still somewhere in the interior;
- Gloss is also popular;
- Mother of pearl, experts recommend using it as an accent solution;
- Glow, looks stylish;
- Shimmering.
In order for the shade to turn out well, it is important to monitor the density of the layer and also dry it under natural conditions. Then the paint will adhere securely.
Be sure to read the instructions from the manufacturer, where the nuances of application may be prescribed.
The variety of colors is impressive, you can easily choose the desired shade.
Decoupage of kitchen facades
Decoupage is a great way to update your kitchen set and give it a touch of Provence style. After the transformation, the facades will look as if talented artists painted them for you, but you will know that you made all this beauty with your own hands. You can put absolutely any design on cabinets and shelves, but usually they choose something related to plant and kitchen themes: images of fruits and vegetables, coffee, jars of spices and cereals, flowers, etc. Decoupage will help decorate facades with ornaments in the style of Gzhel or Petrikov painting. The main thing is to find a suitable drawing - no one limits your imagination.
Everyone can cope with the restoration of facades on their own:
- remove all doors, remove fittings;
- If the surface of the headset is perfectly flat and smooth, then you only need to wash it well to get rid of stains of grease and dirt. If there are defects, it is better to sand the surface. First use fine-grained sandpaper, and then coarse-grained sandpaper. If you have a sanding machine at your disposal, it will greatly simplify the process. If there are cracks, depressions, or pits, it is better to fill them with putty. When it dries, the treated areas are sanded again. After this, the facades can be primed, but many skip this stage;
- The decoupage technique is suitable not only for wood, chipboard and MDF - it can also be used to decorate plastic and glass facades. Preparing them for decoration is very simple - just get rid of all the dirt and grease;
- The easiest way is to use three-layer napkins for decoupage. Think in advance about which part of the façade the drawing will be located. Don't use images that are too small. Different cabinets can be decorated with pictures in the same style. The image can be glued to regular PVA glue;
- Now all that remains is to open the facade with acrylic varnish, it is better to use 3-4 layers, each applied after the previous one has completely dried. The easiest way to work is with a narrow brush with long bristles;
- All that remains is to return the fittings and install the facades.
If this is not your first work using the decoupage technique, then you can use not only special napkins. Experienced craftsmen know that fragments of wallpaper with a suitable pattern, and even maple for a kitchen table, will do, not to mention that the image you like can be printed on a printer.
Varnishing
After painting, in most cases it is also necessary to varnish the product. The first layer of varnish, prepared for use, is applied at the same rate as primer (150 g per 1 sq. m).
The second layer is applied after the first layer has completely dried. Then, when this paint dries, you need to sand the MDF panel again. First, coarse-grain sandpaper is passed over its surface, and then fine-grained sandpaper is used. To prevent lumps from rolling off, the treated area is periodically moistened with water.
Another week after this, the MDF must be additionally polished with a sander and abrasive paste. This is the most correct technology, although at home, when working with your own hands, it is sometimes not followed, limiting yourself to ordinary varnishing.
Decoration with ceramic tiles
After renovation, almost everyone has leftover tiles. You don’t need a lot of material for this method, so even buying new tiles won’t break your budget. Naturally, not all facades are tiled. A fragment with a beautiful pattern can be glued in the center. This can be one tile or four smaller tiles laid out in a square or diamond shape. You can lay out the contours of the cabinets with small tiles. Often such decoration is used to decorate the lower or upper edge of the set. The image on the tiles should match the overall style of the kitchen.
The operating principle is as follows:
- It is better to remove the facades, dismantle the fittings;
- At a minimum, the surface must be washed and degreased with an alcohol-containing composition. If desired, the facade can be painted, following the tips described above;
- Place the tiles on the surface in advance, determine the ideal place for them, it is better to carefully trace them with a pencil;
- Prepare tile adhesive, apply it to the facade and start gluing the tiles. The principle is almost no different from the usual installation of tiles, only the glue will be needed so that it can hold the tiles on a wooden (or other) facade;
- when everything is dry, you can frame the tiles with molding to make the decor look complete.
Introduce bright accents
Colored elements will make even the most gloomy kitchen more lively, modern and cheerful. However, it is important to avoid chaos and excessive diversity. Accents should be one or two colors. The number of bright details should also be limited. Everything is good in moderation.
In the photo: the tiles on the walls and floor were painted, the facades were painted, the fittings were replaced, and accents were added. The kitchen looks completely new.
Decoration with rattan inserts
The principle is the same as with ceramic tiles. Rattan inserts will look appropriate with ethno- and eco-style. Rattan copes well with moisture, which is why it is well suited for the kitchen. It can be used to replace glass inserts along with large-scale restoration of facades. Rattan inserts can be glued on top of blind cabinets. The variety of weaves and the presence of several shades will allow you to choose the appropriate insert option.
Working with rattan is easy:
- a fragment of the desired shape and size is cut out; you can use pruning shears or metal scissors;
- the segment can be attached to the facade with a stapler;
- Wooden planks pre-treated with an antiseptic are installed around the perimeter of the insert. You can use glue;
- The main thing with rattan is not to overdo it - small inserts on the largest cabinets will be enough to add the necessary notes to the interior.
Grinding
When the putty solution dries well, the base is brought to perfection. Use coarse sandpaper and sand the surface until it is smooth. Then replace the sandpaper with a smaller version so that the smoothness becomes better.
It is optimal to choose the sandpaper grain numbers P400 or P600.
When the putty solution dries well, the base is brought to perfection.
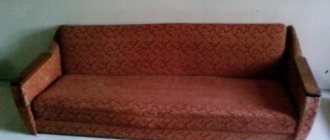
Use of chintz
Fabric decor is rarely used, so this is your chance to make your kitchen unique. You will need a piece of fabric with a suitable pattern, and then everything is simple:
- the beginning, as always, is to dismantle the facades and fittings;
- cabinets are measured, fabric is cut out and glued to pre-washed and degreased facades;
- facades are covered with colorless varnish in 5-7 layers, it will protect the fabric from moisture, grease and odors;
- All that remains is to return the fittings to their place, and you can purchase new, more suitable handles;
- An interesting effect can be achieved if you make a lampshade for a lamp from the same fabric, or sew covers for chairs.
What else is used to update kitchen facades?
The imagination of home craftsmen knows no bounds, and people's ingenuity has generated a lot of interesting, non-trivial ideas on how else to refine an old kitchen facade. The following materials are used for this:
- vinyl stickers, the range of which amazes even experienced designers. Plain, boring facades can be decorated with animal figures, world landmarks or inspiring phrases. It is very easy to glue and remove this decor;
- sea pebbles and mosaics are glued like ceramic tiles and allow you to create interesting decorative effects;
- wooden decor. There are ready-made kits for children's creativity, but if you have the skill, you can cut wooden figures yourself. All that remains is to open them with varnish and glue them to the facades. This decor looks best on wooden facades.