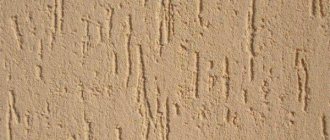
Decorative plaster "Bark beetle" is often used for finishing houses and various structures. This is due not only to the decorative qualities of this type of plaster, but also to a number of other advantages that it has.
This type of plaster is quite light, does not contain substances harmful to both humans and the environment, is resistant to various temperatures and is quite durable.
Thanks to all its positive qualities, bark beetle wall covering is used for finishing various surfaces of different types of structures.
Preparing walls for bark beetles
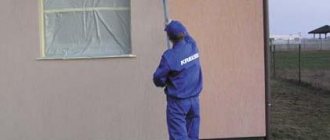
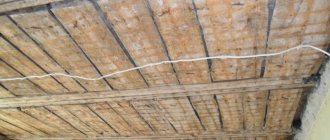
As before any other plastering process, also before applying bark beetle, the surface of the walls needs careful preparation. To do this, you need to get rid of dust and other contaminants on the foam, and then be sure to glue a reinforcing mesh to its surface.
To avoid mistakes when applying bark beetle, you should use only reinforcing glue and a special plastic mesh. Also, it is necessary to give the surface some time to dry thoroughly, but not less than 24 hours.
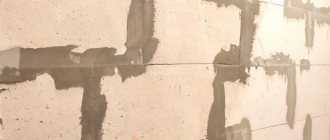
Further, preparing walls for bark beetles includes applying so-called priming paint to the reinforcing surface. It is necessary to treat the walls under the bark beetle with it so that the plaster composition does not fall off or slide down when it is applied.
How to apply bark beetle to foam plastic
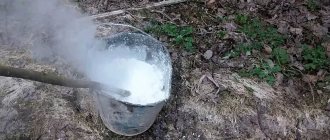
So, after preparing the walls for the bark beetle is completed as described above, you can begin finishing work. First of all, before applying the bark beetle to the foam, it must be properly prepared (to a suitable consistency).
The consistency of the bark beetle should be such that the finished solution does not slide down or fall off the reinforcing layer. Therefore, here are some simple tips that will help prevent many mistakes when preparing bark beetle:
Bark beetle plaster should not be applied immediately after mixing, but after waiting a certain time, 5-10 minutes is enough. The tools to perform this work will require a wide metal spatula, and a somewhat smaller spatula for applying the finished mixture.
It is important that when applied, the thickness of the bark beetle plaster layer does not exceed the grain size of the crumbs. Half an hour after finishing the walls with bark beetle, you should use a grater to rub the surface in a circular motion until a uniform pattern is obtained.
Source
Features of painting a plastered surface
There are two options for painting the decorative surface:
- Adding coloring pigment directly to the finished mixture.
- Painting a plastered and hardened wall.
The first option is more acceptable when using a ready-made mixture, to which a certain amount of dye should be added to obtain the required shade. When a dry mixture is used, it is very difficult to calculate the dosage of color. In this case, it is better to paint the finished base.
To paint the finished surface, you should use acrylic, silicate or water-based paint, which is applied with a brush or roller. The acrylic composition should be applied no earlier than two weeks from the date of finishing, and silicate paint can be used after three days.
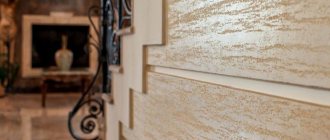
Textured bark beetle plaster can be painted with silicone, acrylic and silicate paints, which apply well and dry quickly
Coloring can be carried out in two stages. The first time, the entire surface is carefully covered, including the grooves of the texture. After the surface has dried, a second layer of a lighter or darker shade is applied, which involves painting only the upper part of the coating, excluding paint from getting into the grooves. This effect can be achieved by using a semi-dry roller, which must first be rolled on plywood. Also, it is advisable to use special dyes with reflective properties.
Helpful advice! If you don't paint the grooves, you can get the illusion of depth of coverage.
Instead of painting the surface, you can glaze the coating with acrylic varnish, to which you can add mother-of-pearl or color. This mixture should be applied using a steel spatula, completely filling all the grooves on the wall surface.
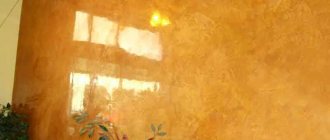
Surface application of paint on textured plaster allows you to get the effect of depth due to the fact that the grooves are not painted over
Strict adherence to the sequence of actions when covering the surface with textured bark beetle plaster will allow you to obtain a high-quality, durable, attractive and aesthetic coating that will delight the eye for many years without losing its original appearance.
How and how to properly plaster polystyrene foam outside the house with your own hands
When the question arises about insulating a house, experts give preference to polystyrene foam. It retains heat well, is easy to install and operate, and is sold at an affordable price. To make the material last longer, builders cover it with a finishing layer. Plastering foam protects it from environmental influences and extends its service life.
How to apply plaster to a façade insulated with penoplex?
To insulate the facade, foam plastic, penoplex or polyurethane are often used. These synthetic materials perform their functions well, but they need to be protected from external adverse factors.
This may include wind, rain, snow and hail. To create a protective barrier and at the same time give the building an attractive appearance, facade plaster using penoplex is used.
What type of foam is suitable for plastering?
The building material is based on the synthetic polymer polystyrene foam, the name of which, for convenience, is abbreviated to 3 letters “PPS”. Most of the insulation volume is occupied by gas. It provides high thermal insulation with low weight.
In addition, rodents, bees, wasps and other insects often live in polystyrene foam.
Polymer boards and their features
A distinctive feature of polymer thermal insulation boards is their low weight, so even when insulating multi-story buildings, they do not create a serious load on the foundation of the building.
There are two types of polymer insulation for external walls:
- Styrofoam. This type of thermal insulation material is a rigid board consisting of many air-filled granules. Thanks to the treatment with fire retardant, the foam does not support spontaneous combustion, but is capable of melting when a powerful source of fire is close. Polystyrene foam is cheaper than other types of polymer insulation, but has low vapor permeability and is gradually destroyed by prolonged exposure to direct sunlight.
- Extruded polystyrene foam is an insulating board with a fine-porous structure. This material is quite durable, so it is sometimes used as a building material to form interior partitions. Expanded polystyrene is resistant to deformation, practically does not allow water to pass through and provides high-quality wall insulation.
When choosing a material for insulating a building, it is necessary to take into account the characteristics of the walls of a given building. For surfaces with low thermal conductivity and good vapor permeability, such as wooden beams, aerated concrete or cellular foam concrete, choose a thermal insulator that allows air to pass through well, i.e. mineral wool slabs. To insulate building materials with high thermal conductivity, such as brick, cinder block or concrete panels, you can use any thermal insulator.
Is it possible to plaster polystyrene foam, and why is it done?
The technology of insulating the facade with polystyrene foam involves subsequent finishing with plaster. According to experts, this is the most competent solution, because this layer extends the life of the insulation and protects it from moisture, ultraviolet radiation and other unfavorable climatic factors.
It should be remembered that the percentage of completion of the assigned tasks depends on the basis of the finishing material.
Plastering technology of the selected insulation
The procedure for applying plaster is the same for almost all types of insulation.
You need to do the following:
Reinforcement and plastering
Insulating the outer surface of walls is an important and very useful operation from the point of view of preserving the wall material and improving comfort for the residents of the house. The main task facing the owner is the choice of material for insulation, the appropriate time for work and compliance with the technology for installing insulation and applying decorative plaster.
The option is quite labor-intensive and more expensive compared to “dry” finishing methods, but the result looks very solid and noble, which many times justifies the expense and effort.
How to plaster polystyrene foam
Construction experts recommend giving preference to durable and tenacious mixtures.
Any composition is suitable for interior work. If you don’t know how to plaster foam on the outside of the house, you should choose a special solution for facades. Due to its technical characteristics, gypsum mortar is not suitable for external use, and cement destroys the structure of the insulation.
Plaster for foam plastic differs from decorative plaster and is sold in the form of ready-made specialized mixtures. Manufacturers take into account the strength, durability of the material and its adhesive properties. Thus, solutions under the brands Ceresit, Ecomix and Stolit contain additives that improve adhesion to polystyrene foam.
Mixtures
Construction stores offer several types of plaster mixtures that are suitable for working with penoplex. It can be:
- Mineral. The composition includes Portland cement and various polymer additives. They make the mixture more plastic than, for example, ordinary sand and cement, so the solution is easier to apply. This plaster resists precipitation well and is not affected by fungi and mold.
- Silicate. Excellent elastic plaster. Permits moisture from the room, but does not absorb water from the atmosphere. Has antistatic properties. Manufacturers claim that such compositions can be used for both external and internal wall decoration.
- Acrylic. This option is perfect if the plane can be deformed or located in a place where there is constantly high humidity. Both the liquid solution and the frozen layer are elastic. The plastered surface repels atmospheric moisture and perfectly resists ultraviolet radiation, so it remains attractive for a long time.
If the home owner does not know which option to choose, then you need to pay attention to the service life of the plastered surface. Acrylic compositions are considered long-lived. Their service life can exceed 20-25 years. But this takes into account the fact that all the work was carried out correctly. Then come the silicate ones and then the mineral ones.
The duration of service will depend on the invoice. Ideally smooth surfaces lose their original attractiveness much faster. But rough and textured ones are much less susceptible to deformation.
Features of styrofoam plaster
Foam plastic plaster will last longer if you apply a finishing layer with a reinforcing mesh. The insulation is not primed before applying the solution. The main feature of expanded polystyrene is that the dew point (the level at which condensation appears) is located inside the skin, where there is no cold air. Because of this, heat accumulates and the building cools down more slowly.
Along the façade
If you decide to insulate a room with foam sheets, experts recommend using the “wet facade” technology.
Interior finishing
If you can’t get to the outside wall, then you can sheathe the room from the inside. For interior work, the walls are prepared identically to the exterior insulation. Then the foam is glued, the mesh is mounted and the solution is applied. The only difference is in the final coverage, because Wallpaper can be glued to the walls or decorative plaster can be applied. Then the leveling layer is additionally treated with putty and dried.
Sticker of mineral wool boards
To complete the work, you will need slabs with a density of 125-150 kg/m3. Slabs of lower density are too loose for applying plaster. The thickness of the slabs depends on the thermal characteristics of the walls of the house, but in most cases a 50 mm thick slab is used. The wall is primed with a deep penetration primer.
For gluing the slabs, a universal adhesive is used for gluing mineral wool. First, the glue is applied in small slides over the entire surface of the slab, and then it is leveled with a notched trowel. Next, the plate is glued to the wall, pressing evenly over the entire surface. You need to press firmly enough, but without causing deformation of the plate itself. When gluing, the slabs should be leveled in all planes. If it is clear that the slab, due to the unevenness of the wall, does not stick to the applied layer of glue in any place, then it should be removed and glue should be added. To make this happen less often, you need to level the surface of the wall well.
In most cases, the presence of a protruding part of the base of the house allows you to rest the first row of wool on it. If there is no such protrusion, then some kind of structure should be provided to support the first row; this could be, for example, an aluminum base strip or a profile for gypsum boards.
We try to carefully align the first row of mineral wool slabs horizontally. This will allow you to avoid additional adjustment of the slabs to each other in the future. Start the next row with half of the slab so that the vertical seams of the first and second rows run apart. Next, row by row we cover the entire surface of the walls of the house. Mineral wool slabs in places adjacent to windows and doors are cut along the line of the existing slope.
The next step will be to fasten the glued slabs with a dowel-umbrella. The dowel should be installed in the corners of each slab, both below and above the row, as well as in the center of each slab. There are many opinions on this matter, but this option has never failed. You should not try to press the dowel into the cotton wool too tightly; just a tight fit over the entire surface of the cap is enough.
DIY plastering technology
Tools and materials for work
Preparing the mixture
Most often, the method of preparing the composition and proportions are indicated on the packaging by the manufacturer. The solution is prepared immediately before starting work.
Preparing the base of the facade for plaster
When the installation of foam plastic is completed, it is necessary to carefully inspect the treated surface. There should be no defects on it. The seams are filled with polyurethane foam. You need to remove the remaining glue with a knife and sand the joints. Builders often use a trick: if the foam sheet is completely smooth, they go over it with sandpaper or a special roller. This procedure will ensure stronger adhesion to the solution.
Portal about construction
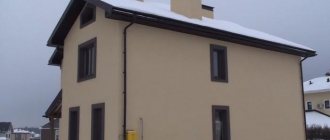
Finishing the façade with bark beetle is often combined with wall insulation. You can perform these manipulations yourself. Polystyrene foam can be used as a thermal insulation layer; its thickness ranges from 20 to 150 mm. This parameter will depend on climatic conditions and the severity of winter cold. The next layer will be a reinforcing mesh, which is laid on the glue. At the final stage, bark beetle plaster is applied.
Preparing the walls
Before you start finishing the facade, you need to prepare the surface. The wall should be made level. Large protrusions and depressions will contribute to pushing through the applied layer. The recess can be filled with plaster, and the protrusions can be knocked down. The surface is cleaned of dirt and dust. A stiff brush is used as a tool for this.
To check the need for this operation, you should run your hand along the facade. If the palm remains clean, the plaster has not crumbled, and no small marks have formed, then the base is ready for work. It must be coated with primer. The purpose of these manipulations is to fix small dust particles. It is important to prevent elements from shedding and increase the adhesive properties of materials.
Thermal insulation
Finishing a façade with bark beetle quite often involves installing a heat-insulating layer. To do this, the plates are attached to the surface. At the horizon, you need to fix the starting profile to the base. It will act as a limiter for the insulation layer and protect the fur coat on the facade from damage from below.
Plastering doorways and slopes
When you have decided how to plaster the foam, you need to move on to finishing the doorways and slopes near the window frames. You can begin work immediately after the polyurethane foam has hardened. Its excess is cut off to obtain the most even area. The procedure then resembles laying drywall. Parts of the required size are cut out of polystyrene foam sheets and installed around the perimeter of the door or window. It is not recommended to use tile adhesive as a fixative. After drying, the parts are fastened with dowels.
Further work on finishing the slopes is carried out according to the instructions described above. The corners are fixed with mortar, the reinforcing mesh is cut into strips of the appropriate size, covered with another layer of plaster, primed and decorated. To prevent building materials from staining the glass, they are sealed with masking tape.
Reinforcement of slab surfaces with mesh
After gluing and securing the slabs with dowels, the joints of the slabs are glued and reinforced from the front side, and not between them. When the slabs fit tightly to each other, gluing them to one another is not required. The same glue is applied to the joint with a spatula, to a width of approximately 10–15 cm. Next, a strip cut from the reinforcing mesh is pressed with a spatula into a layer of glue, the thickness of which is approximately 0.3–0.5 cm. This operation eliminates unevenness at the seams between the plates , the dowel heads are hidden and give the thermal insulation surface a uniform structure.
Similar to gluing joints, mesh reinforcement is performed on the entire surface of the slabs. For reinforcement, any plaster reinforcing mesh made of fiberglass, polypropylene, or polyethylene is used. It should be noted that the mesh size should be in the range of 0.3–0.5 mm, and also that the mesh should be more rigid (approximately like a tarpaulin, and not like fabric). Although this is not essential, it is simply easier to work with such a grid. A layer of glue is applied to the slabs over its entire width with a spatula, and then the mesh is applied and pressed into it. There are various mixtures instead of glue to perform this operation, but the use of universal glue for gluing mineral wool boards is the most common. After the applied layer with the mesh has dried, the entire surface of the insulated walls should be puttied again with glue. The layer should not be thick - putty to strengthen the surface and even better leveling.
Corners, slopes of windows and doors are reinforced with special plastic corners with strips of reinforcing mesh glued to them. They are also pressed into the layer of glue and then putty again.
Consumption of façade plaster for external work on polystyrene foam
Material consumption depends on the method of wall treatment and the composition of the selected mixture. For example, when performing external insulation, you will need 10 kg of universal solution per 1 sq. m. m. If separate types of plaster are used, you will need 4 kg of adhesive mixture and 6 kg of leveling mixture. When using a polymer composition, gluing foam will take about 3-4 kg per 1 square meter. m, the rest is plastering work.
It is important to remember that the solution must be applied in full at once, so it is better to purchase a few kilograms in reserve. If there is not enough mixture, then joints will remain on the finished surface, which in the future will turn into cracks. Plasters with the same purpose from different manufacturers can differ significantly in quality and technical properties. Therefore, you cannot mix them on site. It is recommended to purchase the entire volume of material under one brand.
How to calculate the thickness of insulation
Calculating the thickness of insulation is not an easy task.
First, the thermal resistance of the outer wall is determined using the formula:
R1, R2, R3 are the heat transfer resistances of all layers of the wall (we conventionally assume that there are three of them, although in practice there may be more or less).
α(в) and α(н) - the amount of heat transfer from the inner and outer surface of the wall, respectively.
Then the minimum value of thermal resistance is calculated using the formula:
λ is the thermal conductivity of the material.
After this, the results obtained should be compared. If Rmin is less than (or equal to) Rpr, then the wall does not need insulation. If it turns out the other way around, the minimum value is greater than the calculated value, then the difference - ΔR - is the determining value for determining the thickness of the insulation (δS), which is found by the formula:
The calculation method is quite complicated due to the need to look for specific data and values for each region, use SNiPs or other reference materials. All this is quite difficult for an unprepared person, which gives rise to errors that reduce all efforts to nothing.
It’s easier to turn to online calculators , which will quickly give the required value; you just need to enter a few data on the wall material and the selected insulation.
If you have absolutely no desire to engage in such calculations, then you can resort to the simplest (and most commonly used) method: simply use insulation 5 cm thick. This value is the most common, it is suitable for almost all regions (with the exception of the northern ones or those characterized by severe frosts).
Prices for various types of facade decorative plaster
The cost of plaster depends on the purpose, composition, place of production and sale. For example, in Moscow the markup on building materials may be higher than in the city where they are produced. Imported solutions will also be more expensive than domestic analogues.
Among Russian manufacturers, TM Perfecta (PERFEKTA) is distinguished, which offers high-quality mixtures at an affordable price. For 25 kg of decorative plaster “Bark beetle” you will have to pay only 430-460 rubles. While similar mixtures from manufacturers Knauf Diamant and Krafor cost 550 rubles. and 980 rubles, respectively.
Source
Leaders of sells
The best-selling brands, as reviews show, are the following brands:
Knauf Gips KG is a company operating in Northern Bavaria in Germany since 1932. Today, enterprises under this brand operate in Russia and in 5 other former Soviet republics. The company produces building materials primarily based on gypsum. The plasters are fireproof and plastic, which makes it possible to finish relief surfaces. Knauf decorative mixtures fit well on insulation materials such as polystyrene foam, extruded polystyrene foam, and pressed mineral wool slabs.
Unis is a Russian group of companies operating in the Russian building materials market since 1994. This domestic manufacturer of construction and finishing materials provides a 15-year guarantee for its products.
Facade plaster on polystyrene foam
The easiest way to insulate a house is to cover it with polystyrene foam. The material is inexpensive, installation is easy to do on your own, and the energy-saving effect is obvious. And in order to protect such cladding from the harmful effects of the environment, you need to choose a suitable coating for it. The best option here is façade plaster, since it does not require much expense, and anyone can master the application technology.
Plastering on foam plastic, ready-made options
Facade plaster on polystyrene foam
Why plaster polystyrene foam insulation?
In the process of insulating facades, polystyrene foam is mounted on the outside of the building. Insulation boards are glued to the walls using an adhesive solution for PPS, and then secured with disc-shaped (mushroom-shaped) dowels. To protect and preserve its properties, the surface of the heat-insulating layer must be protected from ultraviolet radiation, temperature changes and other atmospheric influences (wind, precipitation, etc.). One of the best ways to provide a protective finish to expanded polystyrene is plastering . This type of coating is stronger and more durable than others, and also has a large selection of design options. Plaster is perfect for both protecting and decorating the facade.
Which plaster to choose
When choosing a plaster composition, first of all you need to take into account the characteristics of the foam. This material is not durable, so the protective coating must be sufficiently dense and resistant to mechanical stress. Also, the plaster mixture must have high adhesion to the base, since the foam has a smooth surface. In addition, you need to choose a plaster that is moisture-resistant, plastic, easy to apply and not prone to cracking. But the vapor permeability of the composition is not of great importance, since the vapor permeability of the insulation is very low.
A conventional cement-sand mixture only partially meets these requirements, and it is not advisable to use it on foam plastic. Of course, this is the most budget-friendly composition, but within a year the facade will be covered with small cracks and everything will have to be redone. Therefore, for finishing on foam plastic, it is recommended to use only factory-made plasters containing special additives.
Decorative mineral plaster, shades
Acrylic facade plaster
What is good about acrylic plaster?
The range of plasters for foam plastic is quite large, but there are brands that are in particular demand: Ceresit, Stolit, Osnovit, Knauf, Ecomix. Manufacturers produce several types of formulations:
It is best for a novice master to choose a universal type of plaster that can be used at all stages of finishing with equal efficiency. But even if you prefer to use separate compounds for each process, they should all be from the same manufacturer, and preferably from the same line.
| Name | Characteristics |
| A universal-purpose cement-based composition. It has good frost resistance (up to 75 cycles), water resistance and excellent adhesion. Consumption ranges from 3.5 to 7 kg/m2 | |
| Acrylic plaster, ready to use. Designed for the formation of thin-layer decorative coatings. It has strength, elasticity, and excellent water-repellent properties. Consumption ranges from 2.6 to 4 kg/m2 | |
| Water-soluble polymer-based mixture, structural. It has excellent performance characteristics and is highly decorative. Consumption is 2.5-3.5 kg/m2 | |
| Founds CAVEPLIX T-117 | Plaster and adhesive composition. Has excellent adhesion to polystyrene foam, waterproof, frost-resistant. Consumption is 1.3-1.5 kg/m2 |
Prices for various types of decorative plaster
Types of material
Depending on the filler, façade plaster “bark beetle” is divided into the following types:
Peculiarities
Such decorative plaster can be called a universal finishing material, since it is equally effectively used when performing both facade and interior work. At the same time, it can be sold in the form of pastes, both white and already tinted; the dry mixture will have to be mixed and tinted yourself.
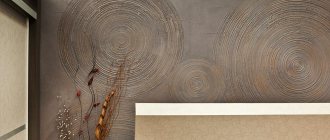
A variety of decorative effects, which consist of both color and additive size.
When choosing a composition, take into account the grain size - the larger it is, the more prominent and noticeable the decorative grooves will be, but the material consumption will also be greater. As for the material of the walls on which bark beetle plaster can be applied, the base can be almost anything from concrete and gypsum, brick to polystyrene, plywood, cement-sand plaster and so on. Let us note a number of distinctive features that all decorative materials of this type have:
Review of manufacturers
The leading brands in the market for bark beetle plaster manufacturers are Ceresit, Dufa, Baumit, De Luxe, Lakra, Weber, Bundex, Perfekta. They differ from domestic ones in quality and affordable price - this combination determines the popularity of the material among buyers.
The construction market also highly appreciated the products of Russian manufacturers, however, it is worth noting that these productions were organized with German investments - we are talking about Bergauf, Bolars - the geography of distribution of these brands covers more than 2 dozen regions of Russia and the CIS countries, which is due to compliance with the state standards of the Russian Federation and technical international requirements.
Osnovit, Vetonit, Atlas, Volma, Hercules, Caparol, Prospectors, Yunis.
It is also worth noting Russian manufacturers - Osnovit, Vetonit, Atlas, Volma, Hercules, Kaparol, Prospectors, Yunis.
Advantages and disadvantages
Finishing the facade with bark beetle has the following advantages:
The application of plaster is limited by season, since it imposes special requirements on humidity and temperature conditions. Among the disadvantages are:
When using cheap material, you should be prepared for the appearance of the finish to deteriorate after a few years, which is associated with low-quality ingredients in the material.
Necessary calculations
To estimate the costs of decorating a house with bark beetle, it is enough to determine the total area that will need to be covered with plaster and calculate the material consumption per square meter of area. The calculations take into account:
It is necessary to evaluate the information on the packaging - it indicates the material consumption for a standard layer thickness. The process of calculating the volume of plaster involves setting beacons, which will allow you to calculate the deviation of the surface from the plane. Next, we calculate the magnitude of the deviations at each point and calculate the arithmetic mean deviation for all points on the wall. Next, you need to evaluate the information on the packaging - it indicates the material consumption for a standard layer thickness (10 mm). Having the standard layer thickness, the thickness of the layer according to the beacons and the standard consumption of plaster, we calculate the required amount of the mixture using the rule of proportion.
Plastering technology
Materials for work
Plastering on polystyrene foam has its own characteristics. As a rule, the insulation itself is not primed; plaster compounds adhere to it well. But to strengthen the coating, a reinforcing layer is required, otherwise cracks will appear very quickly. For reinforcement, fiberglass mesh of various densities, resistant to alkalis, is used. The most convenient to work with is a mesh with a density of 140-160 g/m2 - it provides excellent adhesion and easily takes the desired shape when finishing corner areas.
Fiberglass mesh
The leveling layer must be primed in order to increase adhesion between the topcoat and the base, and therefore a primer will also be needed. The choice of composition depends on what kind of coating is planned: for painting, ordinary waterproof primers are used, for decorative plaster, compositions with quartz filler are required.
The plaster mixture must be purchased immediately in full and always of the same brand. This is especially true for decorative plaster. The fact is that each manufacturer has its own manufacturing technology, and the compositions may differ in structure, color, setting time and other characteristics. If you use different plasters on the same plane, after drying transitions will be visible, and eliminating them is not at all easy.
Additionally, before starting work, prepare the following tools:
Tool for plastering walls
Construction mixer price
Preparing the base
After completing the façade cladding, you need to carefully inspect the working area and eliminate minor defects. Empty seams must be filled with polyurethane foam, excess glue must be cut off with a knife, and the joints must be cleaned with sandpaper. The surface must be smooth, without protrusions or depressions, and free of dust. If the foam slabs are too smooth, experienced builders recommend lightly sanding them or rolling them with a special needle roller. This will increase the adhesion of the plaster to the insulation, and the coating will hold tighter.
Foam insulated wall
Fastening the reinforcing mesh
This stage is the most critical, since the quality and durability of the coating depends on it. If the mesh is not secured correctly, during subsequent processing the plaster will peel off from the wall and fall off in pieces.
Step 1. Start by preparing the solution. Take a bucket, pour water at a temperature of 15-20 degrees into it, then add the dry mixture. Here you should strictly adhere to the proportions specified in the manufacturer's instructions. Mix the mixture with a mixer at low speed until smooth, leave for 5 minutes, then mix again. You cannot add water or dry ingredients after this, as this may affect the strength of the plaster. If a ready-made composition is used, it just needs to be mixed in case the particles settle.
Step 2. The first to finish are corners, slopes and areas with a complex configuration. Perforated corners with a fiberglass mesh attached to them are designed for this purpose.
Reinforcing mesh with corner
Some make do with just the mesh itself, cutting it into strips 30 cm wide and bending it in half lengthwise. The savings here are insignificant, and the strength of the coating on the corners is noticeably lower, so it is better to use the corners.
So, take the solution onto a spatula and apply it on both sides of the corner to its entire height.
Set of mixture on a wide spatula
There is no need to level anything yet, the main thing is that the corner is covered with a continuous strip. Next, apply a corner, lightly press it to the surface, and check the vertical level. When leveling, press the profile into the solution along its entire length, and then take a spatula and carefully smooth the mesh from the corner to the sides and down. If necessary, add a little more mixture so that both the mesh and the profile itself are evenly immersed in the solution. Excess mass is removed with a spatula.
Step 3. After reinforcing the corners, proceed to the slopes. First, the corner is applied to the opening, the required length is measured and the excess is cut off. Then the solution is applied and the profile is secured in the manner described above. If the width of the slopes is too small, it is more convenient to use the corners and mesh separately. This way the mesh will not bulge at the joints and interfere with work. To do this, cover one slope completely with the solution, attach the inner and outer corners, and remove the excess mixture with a spatula. Cut a strip of fiberglass mesh 10-15 mm wider than the width of the slope and carefully apply it to the surface. The side edges of the mesh should not reach the edge of the corners by approximately 5-7 mm. Smooth along the length of the strip, then to the sides.
Gluing the mesh to all corners (including slope corners)
Step 4. When all corner zones have been processed, you can begin to reinforce the planes. Since the height of the external walls is quite large, it is difficult to attach the mesh with one sheet. Therefore, it is recommended to cut the material into pieces 1-1.5 m long. The plaster solution is applied to the surface in a continuous strip, starting from the edge of the wall. The height of this strip should be equal to the length of the mesh, and the width should be 5 cm less. The layer is made about 2-3 mm thick.
Take a piece of mesh, apply it to the wall, and even out the edges. Then, using a wide spatula, smooth the mesh from the center to the sides and down until all the material is immersed in the solution. The side edge of the mesh must remain free to a width of at least 5 cm. This is necessary so that the material does not form rough joints after overlapping.
How is fiberglass mesh attached to polystyrene foam?
Advice. When reinforcing the surface, it is recommended to attach the mesh in such a way that its edges do not fall on the seams between the foam plates. All joints must be completely covered with reinforcing fabric so that the coating is as durable as possible.
Prices for construction reinforcing mesh
Step 5. Having secured the first piece, proceed to the next one. Everything is exactly the same here, only the edge of the mesh protruding from the solution needs to be slightly bent, and the solution must be applied under it too. The new piece is overlapped by 3-5 cm and smoothed with a spatula. After reinforcement, the surface should remain smooth, without sagging, stripes or grooves. During the smoothing process, excess mortar is removed with a spatula and applied where it is missing. It is not allowed to show through the mesh in certain areas, as well as voids under the reinforcing layer. Any defects made at this stage lead to a decrease in the quality of the finish.
Gluing plaster mesh
Gluing reinforcing mesh
Grouting the surface
No matter how hard you try to smooth the surface when reinforcing, there are still small irregularities that can appear under the finishing layer. To eliminate them, grouting is done using a plastic float with an emery cloth attached to it. The grain size of the sandpaper is selected depending on the type of finishing coating: for painting use fine grain, for structural plaster - with coarse grain.
Grouting begins after the plaster layer has dried, that is, in about a day. The grater is applied flat to the wall, pressed a little, and movements begin in a circle counterclockwise. The pressure force should be the same throughout the working process; you cannot rub in one area for a long time. Since the fabric wears out quickly, you will have to change it from time to time. After treating the entire area, the walls are cleaned of dust with a brush.
Final alignment
This time the solution is made more liquid - it should flow freely from the instrument, leaving a translucent continuous trace. Scoop the mixture onto a wide spatula and carefully apply it to the wall in a thin layer - about 1-3 mm. It is most convenient to treat the surface in squares, and mix the solution in small portions to prevent it from hardening. Upon completion of the process, you need to wait until the plaster dries, and then rub the base again.
At the next stage, the facade is cleaned of dust and primed. For priming, use a short-haired roller and a paint brush. The brush is used to process corners, protrusions, slopes and other areas where it is inconvenient to work with a roller. The primer is applied in 1-2 layers, depending on climatic conditions.
Application of decorative plaster
Finish decorative plaster of walls
So, the primer has dried, you can start decorative plaster. Prepare the solution according to the instructions, stirring the dry ingredients with water, or simply stir if using a ready-made composition. Apply it with a wide spatula to the wall from bottom to top, ensuring the uniformity of the layer. The thickness of application is usually equal to the size of the filler grains contained in the plaster; information about this must be on the packaging of the mixture. Apply plaster in vertical stripes or squares.
Advice. In order for the entire surface to be uniform, without stains or transitions, it is necessary to plaster it at a time, taking breaks only to prepare the next portion of the solution.
Having distributed the composition over the surface, they begin to form the relief. Most often, special graters are used for this, but you can form a pattern in other ways - with a sponge, a brush with stiff bristles, or a spatula. The most important thing is that the texture is the same over the entire area, and there are no transitions between areas. If the plaster is different in color, this can still be hidden under a layer of paint, but the relief pattern cannot be masked.
Wall decor with roller
Price for structural rollers
How to make a relief with a spatula
At this point the finishing process can be considered complete. If desired, you can paint the facade if the plaster was not tinted.
Decorative plaster painted in two shades
Surface preparation
The wall must be cleaned of old paint, swollen plaster, and aligned as carefully as possible into one plane. This will allow you to get a fairly smooth surface when gluing the insulation, and this, in turn, will affect the finish of the wall and its appearance. If the surface of the wall is not smooth enough, after cleaning it should first be leveled with a layer of putty for exterior use, completely or in places, depending on the quality of the surface. If the wall has a loose surface, crumbling brick joints, or uneven surfaces of more than one centimeter, then it is better to level the surface with plaster at the initial stage.
Recommendations for finishing
It is advisable to perform plastering on foam plastic immediately after the seams have dried. The longer the insulation is exposed to atmospheric influences, the lower its thermal insulation properties. Moreover, such a house cannot be left unfinished for the entire winter.
Plastering should be done in dry, warm weather and on a dry surface. The presence of moisture, dust, and greasy stains on the foam negatively affects the adhesion of the plaster to the base, as a result of which the coating very soon falls off in pieces.
When mixing the solution, strictly follow the proportions and do not add anything other than water. Factory mixtures already contain all the necessary components, and the presence of foreign impurities will only worsen the quality of the plaster. Also follow the specified application thickness - it is better to do 2 thin layers than one thick one.
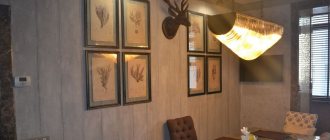
Decorative plaster can give a house a unique exterior
Video - Facade plaster on polystyrene foam
Applying bark beetle plaster
The bark beetle should be applied to a pre-primed surface with a metal plaster float, using a 10–15 cm wide spatula. Using a spatula, apply a portion of the plaster mixture onto the float, and then smoothly move the float onto the wall. At the stage of applying the bark beetle, the direction of movement of the grater is not very important; find a convenient path for you to move your hand. The thickness of the plaster application layer should be comparable to the diameter of the particles in the bark beetle. Feel the crumb particles in the mixture with your fingers and try to make sure that the layer of plaster covers the wall without gaps, but is not thicker than the solid crumbs in the bark beetle. This is approximately 2–3 mm, depending on the manufacturer of the composition. Five millimeters is already a lot in most cases. We do not level the wall with bark beetle, but only decorate it. Without experience, do not apply large areas at once, but do not make bark beetle stains on the wall. Apply an area of 3–4 m2 from top to bottom and from a corner, for example, to the window slope. Pay attention to the time. To begin, select an area that you can cover with plaster in no more than 20-30 minutes. After covering a section of the wall with plaster, the bark beetles move on to giving it texture.
Insulation and cladding of the facade of the house, bark beetle, brick cladding
Various cladding materials are used to insulate and cladding the facade of a house to protect it from bad weather and destruction. Facade finishing technologies vary, but in most regions of Russia, in addition to adding aesthetics to external walls, they are additionally insulated. In this regard, most homeowners carry out insulation and cladding of the facade of the house in a complex.
How to choose a “fur coat” for your home
To insulate and cladding the facade of a house, organic and inorganic insulation materials are used. The first group includes ecowool, popular polystyrene foam and penoplex. The second is mineral wool and glass wool. Let's look at each material in more detail.
Ecowool
This material is based on natural cellulose. In this regard, ecowool rightfully deserves the title of environmentally friendly insulation. The material has soundproofing properties, like natural wood it is “vapor permeable”, due to the inclusion of borax and boric acid, it is not afraid of rodents, does not rot, and does not burn.
Figure 1. ECO WOOL. This material is based on natural cellulose.
Foam plastic and penoplex
An alternative to ecowool and mineral wool are materials based on polystyrene foam. This is the well-known polystyrene foam and the more modern penoplex. The difference between them lies in the production method. Penoplex is manufactured under pressure and at elevated temperatures by extrusion. It is technology that provides penoplex with significant advantages over its “big brother”.
Should I choose extruded polystyrene or polystyrene foam?
— Extruded polystyrene has a water absorption rate 10 times higher than polystyrene foam.
— Polystyrene is stronger and more elastic. The strength in bending and compression is 2.5 times higher.
— At a temperature of 50-60 C, foam plastic loses its properties, while extruded polystyrene is resistant to heat.
— Extruded polystyrene is 1.2 times heavier than polystyrene foam.
— Polystyrene foam does not have noise-reducing properties, unlike extruded polystyrene.
— The scope of application of extruded polystyrene is wider.
— If the service life of foam plastic does not exceed 20 years, then extruded polystyrene (penoplex) lasts up to 50 years.
— As for prices for materials, foam plastic wins here. However, you shouldn't go for cheap. If you calculate the cost of heating a house, it turns out that it is more profitable to insulate it with Penoplex
Mineral wool and glass wool
Glass wool is rarely used for insulating houses, unlike mineral basalt wool, which is safe for health. Basalt material is superior in durability to foam. As insulation, it is better to choose material in the form of semi-rigid and rigid slabs, since the insulation in a roll is too loose.
Figure 3. Basalt material is superior in durability to foam.
Why is mineral wool so popular?
Along with foamed and extruded polystyrene foam, mineral wool is popular for external insulation.
· This material has one of the lowest thermal conductivity values, that is, a house lined with mineral wool resembles a thermos.
· Both glass wool and basalt wool do not absorb moisture. This means that the walls of the house do not become damp, and conditions are not created for the formation of mold and mildew.
· Alkalis and acids do not affect the material in any way.
· The material “breathes”, positively influencing the microclimate in the house.
· The special fibrous structure of mineral wool provides it with increased sound insulation properties.
· The material does not support combustion.
· Even when heated, mineral wool from proven brands does not emit harmful compounds.
· The material does not shrink.
· Stone wool is the most durable among analogues and can withstand significant loads.
Insulation technologies
For thermal insulation, dry and wet methods are used, the technologies of which are similar. The wet method provides the most dense and thorough contact with the wall, but it has temperature limitations. So at sub-zero temperatures it is not recommended to work with wet material.
The dry method can be practiced 365 days a year. It does not involve the use of an adhesive solution. This speeds up work deadlines.
Typically, the choice of dry or wet method depends on the insulation. So, when working with mineral wool and ecowool, if insulation is carried out under plaster, the wet method is chosen. When finishing the facade with siding using sheathing, it is more rational to choose the dry method.
In the dry method, wool slabs are fixed between the sheathing guides. Afterwards, the insulation is covered with wind and vapor barrier films. At the final stage, the external cladding is installed.
With the wet method, insulation boards are glued directly to the wall, and in addition they are fixed with dowels. The first row is placed on a special profile to prevent the material from slipping.
How to choose the right insulation thickness
In order not to make a mistake with the choice of insulation thickness, you should use special programs. For example, there are calculators online for calculating the thickness of thermal insulation. One of them is here. It takes into account many parameters, and even relies on the climatic conditions of various Russian cities.
The proposed fields must be filled in, indicating the desired temperature in the room, the type of room and structure, and the dimensions of the building. By clicking the “perform calculation” button, the program will display the desired figure.
In general, there are standards for each region.
Chelyabinsk – 130 mm
Kemerovo – 140 mm
Wet facade “bark beetle”
For simultaneous insulation and cladding of the facade, wet cladding is used. This is a complex design that resembles a layer cake. It includes insulation, reinforcing mesh and finishing that protects the façade system from negative environmental factors.
Expanded polystyrene or slab mineral wool is used as insulation for wet facades. They, unlike their analogues, are not so susceptible to shrinkage.
The main advantage of a wet façade is that the dew point moves outward. This prevents the insulation from getting wet and ensures proper heat transfer in the building.
The wet façade “Bark Beetle” is popular among homeowners. It got its name thanks to its finish, which resembles a wall eaten away by the beetle of the same name. Such a facade looks beautiful, and the aesthetics are preserved for several decades.
Figure 4. For simultaneous insulation and cladding of the facade, wet cladding is used.
A wet facade is difficult to damage. It does not support combustion. Additional advantages include heat and energy intensity and the impossibility of the appearance of “cold bridges”.
Which plaster to choose
The final coating for a wet facade may vary. Mineral, silicate, silicone and acrylic plaster have their own characteristics and provide different finishing results.
Parameter
Acrylic plaster