Houses made of foam blocks are lightweight, prefabricated buildings. Due to the nature of the material used, they require a protective coating. The most affordable and popular type of protection is foam block plaster. To save money needed for construction, property owners prefer to carry out certain work themselves. The article on how to plaster foam concrete walls is addressed to beginners in the plastering business.
What is a foam block
Since its invention two centuries ago, Portland cement and concrete have been used in the construction of various structures. Artificial stone turned out to be attractive, and many attempts were made to modify it, endowing it with various properties. Appearing at the beginning of the last century, a new type of concrete was called foam concrete for its production method and structure.
The main foam concrete components are cement (main binder M ≥ 400), sand (filler), foam concentrate (based on bone glue, protein or pine rosin), water.
To obtain foam concrete, two types of technologies are used:
- foam whipped in a foam generator is fed into the cement mortar and mixed to evenly distribute air bubbles in the volume;
- Abundant foam is whipped in a mixer, then sand and cement are added to it.
To produce foam concrete blocks, the resulting mass is either poured into separate molds, forming finished blocks (cast foam concrete), or one large block is poured, which, after hardening, is cut into commercial blocks (sawn foam concrete).
Finished blocks obtained by casting and sawing differ:
- casting - often have chips (obtained during stripping), a lumpy, uneven surface contaminated with lubricating oil substances, low adhesion;
- sawing - have a rough surface, more accurate geometry, good adhesion.
Methods for producing foam concrete blocks
Unlike aerated concrete, foam blocks have closed pores and a different chemical composition. Air pores, reducing the density and weight of products, impart thermal insulation properties. And vapor permeability, reduced to a minimum, allows the use of polystyrene foam (foam plastic and penoplex) as insulation.
How to plaster foam blocks indoors - finishing technology
To independently plaster foam block walls, you should carefully study the technology requirements. It involves performing finishing work in several stages.
The plastering algorithm includes the following stages:
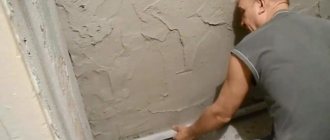
- Preparatory activities related to cleaning the work surface.
- Treating the surface of the blocks with a deep penetration primer.
- Reinforcement of the structure with plaster mesh and finishing work.
- Final work on preparing the wall surface for finishing.
Each stage has its own characteristics. Let's look at them in more detail.
Getting ready to plaster foam blocks indoors - preparatory work
The adhesion of the plaster mixture and the durability of the finish depend on the quality of preparation of the foam block surface.
Preparatory measures are associated with cleaning the work surface
Plastering of walls made of foam blocks is carried out after completion of preparatory activities:
- Thorough cleaning of the foam block surface from dust and dirt.
- Degreasing areas of contamination and removing oil stains.
- Recessed joints between blocks.
If it is impossible to remove traces of oil with a brush, dirt that has penetrated deeply into the foam block mass should be cut out using a chisel and hammer. To quickly remove contaminants, use a grinding machine equipped with a coarse-grained wheel. Before plastering, repair deep cracks and local defects. Preparatory work is aimed at ensuring improved contact of the plaster mortar with the surface of the foam block masonry by opening the surface of the pores and removing the top layer from the foam blocks.
Apply primer for foam blocks and install reinforcing mesh
When performing finishing work, it is important to ensure improved adhesion of the material so that the foam block plaster from the inside and outside of the building is in reliable contact with the foam block walls.
Using primers and concrete contacts for priming walls
Increasing the adhesive properties of foam blocks is carried out using the following methods:
- applying special primers or treating the surface with concrete contact. The main feature of priming compositions is the deep penetration of soil into the foam blocks, as well as hardening on their surface with an increase in the level of roughness;
- arrangement of a reinforcing layer based on a plaster mesh. Various types of mesh are used, made of metal or nylon thread. The mesh is fixed using hardware or by pressing the mesh into a previously applied plaster solution.
The simultaneous implementation of these two methods ensures improved adhesion of the plaster composition.
When performing work, adhere to the following algorithm:
- Cover the surface of the foam blocks with primer using a wide roller, brush or sprayer.
- Using dowels, secure a nylon or metal mesh to the surface of the foam blocks.
- Fix the metal guides to make it easier to level the plastered surface.
After completing the above work, you should moisten the foam block walls using a spray bottle. This operation will improve the penetration of the plaster mixture deep into the cellular mass.
Metal guides make it easier to align walls
How to plaster a wall made of foam blocks - features of the process
Novice builders do not always know how to properly plaster walls made of foam blocks.
The finishing technology, proven in practice, involves performing work according to the following algorithm:
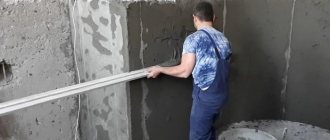
- Preliminary sketch of the mortar on the walls using a trowel or spatula.
- Ensuring the flatness of the finishing layer using the rule.
- Removing excess and hardened lumps after the plaster has dried.
During the process of preliminary plastering of walls, there is no need to ensure that the surface is perfectly clean. It is important to level the material over the entire area to complete the next step.
There is no need to ensure perfect surface cleanliness during pre-plastering
Final steps after applying plaster to walls and partitions
At the final stage of work, it is necessary to ensure the ideal smoothness of the plastered surface.
Finishing events include the following operations:
- Applying primer to the hardened rough finish layer.
- Coating the plastered surface with the finishing mixture.
- Leveling the plaster using a wide spatula.
For the final operation of finishing putty, gypsum-based mixtures, polymer compounds, as well as special solutions with increased water resistance are used.
Gypsum-based mixtures are used for the final finishing operation
Why do you need foam block plaster?
During transportation and laying, the hydrophobic layer of the blocks is damaged. Susceptibility to moisture and reduced adhesion are serious disadvantages of foam concrete.
Open foam blocks, saturated with carbon dioxide from the atmosphere, become more fragile, and carbonization shrinkage occurs. The porous material also has low compressive and abrasion strength. Therefore, walls (especially external ones) need protection.
Of the existing methods of protection, the simplest and most affordable is plastering.
Let's look at the means used to plaster foam block walls.
Priming is an important stage in preparing the surface of walls for plaster.
Regardless of the methods of subsequent finishing, as well as whether the work is carried out indoors or outdoors, priming of aerated concrete and foam concrete blocks is a necessary step. Primers are used to obtain the following effects:
- Reducing and leveling water absorption of the base. Any primer composition contains polymer fillers. Penetrating into the structure of the blocks, they bind to the base and compact it. This reduces the ability to absorb moisture and liquids.
- Strengthening the adhesive ability of walls. Porous blocks and drywall, due to high water absorption, are characterized by low adhesion ability. Priming the walls before plastering can slightly improve the adhesion strength of the mortars.
- Dust removal of the surface. The presence of a large number of small fractions of sawdust and sand on the treated surface negatively affects adhesion. This can even lead to peeling of the applied hardened layer. Priming will bind the particles and give the surface an adhesive structure.
What primers are used for aerated concrete and foam blocks before applying plaster?
For highly absorbent substrates, it is most rational to use either universal or deep penetration primers with the property of reducing the moisture absorption of materials. We recommend using the following types of primers for preparing walls made of gas silicate block, foam block, and other cellular concrete:
- Primer Ceresit CT 17 deep penetration. It is used on all types of highly absorbent substrates, strengthens, evens out water absorption, and enhances adhesion. Due to the pigments in the composition, when applied, it leaves a light tone. It allows you to visually identify gaps for the highest quality and uniform surface treatment. Interlayer drying - up to 30-40 minutes, complete drying in 2-4 hours (at room temperature).
- Primer Eunice for interior work. It is used for processing and preparing walls indoors. The composition based on acrylates perfectly levels out moisture absorption and binds dust (removes dust from the surface). Recommended for application to walls made of cellular concrete blocks and plasterboard. Interlayer drying - up to 40 minutes, complete drying - 3 hours.
- Ceresit façade primer ST 16. Specialized polymer-based composition with anti-frost additives. Ideal for priming external walls before applying decorative plaster. Can be used for interior work before subsequent finishing putty. Interlayer drying - up to 30-40 minutes, complete drying - 3 hours (at a temperature of 18-25 degrees).
- Primer Knauf Mittelgrund F. Concentrated composition based on polymer binders. Has a high ability to level moisture absorption. The composition contains a yellow pigment to visually determine the quality of application to the surface. It is recommended to dilute with water in a ratio of 1k5 (foam concrete and aerated concrete) and 1k3 (plasterboard). The primer has the property of frost resistance. It can be used when preparing walls before façade finishing. Complete drying - up to 6 hours.
There is a type of primer called concrete contact . It is not recommended to use it on porous, highly absorbent substrates such as foam concrete or aerated concrete . During the drying process, it forms a film that does not have sufficient adhesion to such materials.
Technology for applying primers before plastering and filling gypsum plasterboard, aerated concrete, foam concrete
It is recommended to apply primer to aerated concrete and foam concrete in at least 2-3 layers. GKL - no less than 1-2 layers. Each layer should be generous. This is important to achieve the best effect.
Manual and mechanized means can be used for application. Suitable:
- brush-brush;
- roller;
- sprayer for flowerpots;
- garden sprayer.
To treat a large surface area of the walls, you can also use a spray gun, which will significantly speed up the preparation process.
Before each subsequent layer, it is necessary to wait a technological pause - allow the surface to absorb the solution and dry. Pay attention to the recommendations of the primer manufacturer, namely, the time of interlayer drying and complete drying.
Further work should be started only after the recommended period of complete drying has passed. A completely dried layer guarantees high-quality polymerization of the composition in the structure of the blocks and the set of required qualities by the base.
How to plaster foam block
These disadvantages of foam concrete somewhat limit the choice of available plaster compositions. That is, the foam block plaster must be durable, light, serve as an obstacle to water and have high tenacity.
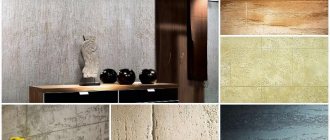
To navigate the huge number of different plasters and make the right choice of plastering material, let’s consider their types.
According to their application (functions), plaster mixtures are divided into:
- simple, used for roughing (leveling) work;
- special ones, used both for leveling and for solving certain problems, for example, for noise reduction (soundproofing plaster), X-ray protection (barite), insulation or waterproofing (thermal insulating and waterproofing plaster, respectively);
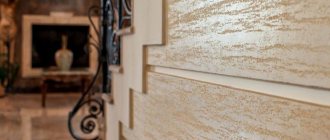
- decorative, used for design purposes.
Plastering technology
Plastering on foam blocks includes the following steps:
- Preparatory. First you need to clean the work surface so that the solution adheres as tightly as possible to it. For these purposes you will need a metal brush. To speed up the process, you can attach it to an electric drill. It is important to treat the entire surface, paying special attention to the joints.
Cleaning the wall before plastering - Applying primer. After cleaning, it is better to prime the walls. To do this, first apply the first layer and allow it to dry (drying time is indicated by the manufacturer). After that the second and third. This number of layers is necessary so that the primer saturates the foam blocks well, and the plaster ultimately lays down tightly and adheres well. This stage is considered one of the most important, so you need to strictly follow the instructions and recommendations src=»https://otdelkagid.ru/wp-content/uploads/2016/08/1033.jpg» class=»aligncenter» width=»600″ height=”400″[/img] Foam concrete primer
- Preparation of the mixture. If you still decide to prepare plaster for the foam block, then follow the following proportions: lime - 1 part, cement - 1 part, sand - 6 parts. You can do without sand, then you need to mix 1 part cement and 4 parts lime. If the solution was purchased in a store, then you need to dilute it in a bucket of water in the proportions specified by the manufacturer. After this, you need to install a special attachment on the drill and stir the solution for 5-7 minutes. After this, you need to wait a minute and repeat the procedure again. Mixing the plaster mixture
- Applying the first layer. To do this, you need to take a spatula, apply plaster on it, and then treat the wall. The technology for applying plaster to foam blocks is somewhat different from the standard one. You need to work from the bottom up. At this stage, it is important not to overdo it, since cellular concrete does not require a large layer of mortar. It should be about 1 centimeter. Applying the first layer of plaster
- Reinforcement. After the first layer has set, it is necessary to strengthen the structure with reinforcing mesh. The product must be stretched as much as possible so that it fits tightly to the first layer of plaster. If you plan to apply a thick layer, it is recommended to use a metal mesh. In other cases, you can get by with fiberglass or nylon. The product should be fastened with nails or dowels (the second option is preferable).
Fastening the reinforcing mesh - The final stage. Apply the second layer according to the same rules as the first. Then leave the wall until completely dry (the time is indicated by the manufacturer on the packaging). After which a layer of finishing primer is applied to the hardened plaster. Applying plaster to the mesh
Important! Only after all the above steps can you start painting or wallpapering.
Required tools and materials
For plastering operations the following is prepared:
- spatulas (notched, wide and narrow);
- grater;
- mixer (for mixing the solution);
- trowel;
- level;
- roller;
- rule;
- paint brushes;
- masking tape;
- containers;
- rags.
Also purchase the required amount of finishing materials:
- dry plaster mixture (otherwise - SS) or ready-made compositions (in buckets);
- primer for foam block under plaster;
- adhesive composition (for installing a wet facade);
- reinforcing mesh;
- corners;
- sandpaper;
- lighthouse strips;
- perforated corners.
What tools will you need?
When planning to finish a house, in addition to the question of how to plaster a foam block, another question arises, what tools will be needed. When carrying out plastering work you will need the following tools:
- Drill and mixing attachment for it.
- Several spatulas.
- The level also failed.
- Large brushes or roller.
When carrying out plastering work, certain tools will be required.
The interior decoration of the foam block significantly improves the quality characteristics of the structure and protects the house well from dampness and retains heat in cold weather. But you can get the desired effect after finishing work only if you follow the technological process and use the appropriate tools.
How to properly plaster walls made of foam blocks
Plastering the foam block will change the thermal conductivity of the entire wall. Therefore, you need to become familiar with the concept of dew point.
When air and surface come into contact at a certain temperature difference, conditions arise for moisture condensation. The dew point is the temperature at which air moisture begins to condense. The dew point (TP) can be:
- a - on the surface of the wall in the room;
- b - in the thickness of the wall, moving towards the room;
- c - closer to the outer surface.
Preparatory stage
When preparing walls made of foam blocks, pay attention to the following points:
- The surfaces of walls built from cast blocks require ensuring the required level of roughness and removing existing irregularities.
- Blocks produced by sawing have a clear geometry and the required roughness, which greatly simplifies preliminary preparation.
Before carrying out work, it is necessary to carefully prepare the surface - clean the walls from all contaminants
At the preparatory stage, perform the following activities:
- Apply primer according to the instructions on the package. Make sure to use a deep penetration mixture;
- Sand the cast elements with coarse sandpaper. This will remove residual lubricant and improve the adhesion coefficient;
- Apply a primer to the plane of the walls with a roller or brush, ensuring uniform coverage of the entire surface;
- fix a plastic reinforcing mesh on the surface that is resistant to alkaline solutions. This contributes to reliable fixation of the plaster layer.
Popular manufacturers
Plaster for foam concrete is produced by such popular manufacturers as:
- Livna – cement Profit Contact MN (for machine plastering);
- Ceresit is a cement mixture for cellular concrete ST 24, as well as ST 24 light (for facades and interior walls);
- Osnovit – cement Belsilk, Startwell, gypsum Ekonsilk, etc.;
- Concern Atlas – light mixture with perlite KB-TYNK;
- Knauf company - plaster-adhesive Sevener is used as a transition layer.
Difficulties of plastering cellular concrete
The high water absorption of cellular concrete blocks is fraught with negative consequences if the finishing technology is not followed. These materials, comparable to a bath sponge, absorb moisture. When applying plaster mortar to such a wall, all the liquid will be absorbed by the wall material within a few minutes. As a result, complete hydration of the cement or gypsum binder will not occur. The applied layer will acquire a loose and free-flowing structure. For reference:
Hydration of cement (gypsum) is a process in which the main component of the solution, as a result of chemical reactions, is saturated with a sufficient amount of liquid and, after complete hardening, forms a dense, solid structure (cement or gypsum stone).
For normal hydration of cement, the solution must retain a sufficient amount of liquid (be wet) for 8-10 hours after application. This is the only way to guarantee that the applied layer will receive the desired properties and will perform the task for a long time.
To reduce moisture absorption of aerated concrete or foam concrete blocks and gypsum boards, the most important stage in wall preparation is priming.
Insulation of foam blocks
To reduce heat loss, foam block walls are additionally insulated. For external insulation, “wet facade” systems with sheet foam or penoplex are used. The facades are also insulated with mineral wool insulation. Inside the house, plasterboard and warm plaster compounds are used as insulation.
Anyone can easily learn how to plaster foam blocks with their own hands. This way you can significantly save your family budget. The acquired knowledge can be useful more than once in life, for example, when plastering a garage or summer kitchen, and experience gives rise to a feeling of confidence and self-esteem.
Why finish foam blocks?
Foam blocks, compared to other building materials, have many advantages. The main advantage is increased thermal insulation characteristics. However, inside the wall, moisture is concentrated in the cells of the array, reducing the thermal resistance of the composite.
An increased concentration of moisture in the air cells causes a violation of the integrity of the block and contributes to the appearance of stains that impair the presentation. Aggressive components contained in a humid environment contribute to the development of corrosion processes and weakening of reinforcement.
Finishing foam blocks inside the building does not allow the development of fungi, mold, as well as bacterial colonies that disturb the comfortable microclimate of the room and destroy the cellular composite. If you plaster foam blocks with special compounds, you can significantly increase the service life of cellular materials, create a favorable indoor climate, and optimize humidity.
By finishing foam block walls, it is possible to counteract the processes of building shrinkage that occur due to the saturation of cellular blocks with moisture and gases. Properly selected plaster for cellular surfaces allows household fumes to escape outside the building.
The most common plaster mixtures for aerated concrete
There are several types of facade plaster compositions that have proven themselves when working with aerated concrete:
| Types of plaster |
Decorative facade plaster Decorative facade plaster Ceresit ST35 with “Bark Beetle” effect
|
Cement-lime dry composition Osnovit StartWell T-21
|
Ready-made silicone mixture Ready-made silicone mixture Baumit SilikonTop
|
Ready-to-use silicate mortar Ready-to-use silicate mortar Baumit SilikatTop
|
Most popular manufacturers
Plaster mixtures for finishing aerated concrete are available in the product lines of all major plastering manufacturers. Mixtures of popular brands are distinguished by exact correspondence of qualities to the declared indicators.
Among the popular manufacturers are the following companies:
- German concern Henkel (develops and produces plasters under the Ceresit brand);
- Austrian brand Baumit;
- the Knauf company, which initially produced gypsum mixtures, also produces cement-based mixtures;
- Krasland company;
- Bolars (Uniplast mixture);
- A number of plasters for aerated concrete are produced by the company Pobedit.
From the Ceresit line, the brands CT 24 and ST 77 and others are most often used for aerated concrete. ST 24 is a lightweight cementitious, frost-resistant, vapor-permeable plaster mixture for leveling for universal use. ST 77 – façade acrylic aerated concrete plaster, ST 35 – decorative “bark beetle” mixture for façade use.
Popular in the Baumit line are the cement-lime composition Baumit HandPutz for universal use, the silicone composition SilikonTop, the silicate mixture SilikatTop, and the acrylic Nanopor Top.
Among the Knauf mixtures suitable for aerated concrete walls are gypsum Knauf-Profi, gypsum polymer Eisberg, gypsum with polymer additives Rotband, Goldband, cement Grunband (thermal insulation), Sevener.
The Krasland company produces compositions specifically for aerated concrete walls, for example, Aerated Concrete-2.
Requirements for plaster on aerated concrete
The products have high moisture absorption and vapor permeability. Therefore, the main requirements for plaster are excellent protection of aerated concrete from moisture penetration. With all this, the mixture must also be vapor-permeable so as not to disturb air exchange. Then condensation will not accumulate.
Plaster for gas silicate blocks must meet the following parameters:
- High adhesion rates - about 0.4 MPa.
- Vapor permeability indicators are from 0.17 to 0.2 mg (m*h*Pa).
- Moisture absorption is less than 5% by weight.
- Frost resistance indicators – 50 cycles or more.
- Minimal shrinkage after drying.
- Density after drying is from 500 to 1 thousand kg/m3.
- Strength after drying is about 0.29 mPa.
- Compressive strength class CS1.
Features of plaster on aerated block
Before plastering an aerated block indoors, you need to pay attention to some technological features of the process. Blocks made from aerated concrete have the qualities of lightweight concrete
This construction material has the following properties:
- Increased vapor permeability due to the content of aluminum powder and cellular (open) structure.
- Less cement content, much more lime and quartz sand than in aerated concrete.
- Water is used in production.
The fact that the product contains 30% moisture determines the order of wall finishing. Exterior finishing begins only after plastering of aerated concrete blocks indoors has been carried out. This is due to the fact that for outdoor work a humidity of 15% is required. Prioritizing interior work allows moisture to evaporate from the outer surface of the blocks.
This factor needs to be paid special attention. A common mistake that builders make is plastering the facade first, and finishing the interior second (in winter)
This approach is unacceptable: moisture comes out through the walls and ventilation. When the outside temperature is below 0 degrees C, the steam turns into condensation and settles on the interior walls, as well as on the seams between the blocks and the exterior finish. This entails cracking of the plaster layer. It peels off.
The most reliable way is to start with interior plastering of aerated block walls.
Conclusion
To plaster walls made of foam blocks, it is necessary to use only permeable materials that can reliably protect the walls from the effects of negative factors both outside and inside the room.
If everything is done efficiently and in accordance with the developed technologies, then you will only have to occasionally seal small cracks and periodically restore the color of the paint.
Is it possible to putty foam blocks? What do you need to know when working with aerated concrete?
Aerated concrete is a porous material, the main feature of which is good air permeability. In order for the walls to “breathe” after finishing the room and freely allow the steam generated inside the house to pass through, it is necessary to choose the right plaster and putty. An ordinary cement-sand mortar is of little use for this purpose, since it will clog the pores, which, in turn, will inevitably lead to cracking of the finishing layer. For plastering and puttying foam blocks, special gypsum- or lime-based compounds are used, which perfectly allow air to pass through and allow the material to “breathe.”
Characteristics of aerated concrete.
It is important to know that you can putty a house made of aerated concrete no earlier than six months after construction; you must wait until the building shrinks and only then begin finishing work. The putty is used only indoors; for facades, special facade plaster for foam blocks is used or cladding is done with a well-ventilated material
For rooms with high air humidity, such as a bathroom or toilet, cement-based plaster is used, on which tiles are laid.
Plaster and putty are carried out at a temperature of at least +10º C; it is best to carry out the work in the spring-summer period or early autumn. Basically, 2 types of wall decoration are used. The first method involves applying plaster, installing a reinforcing mesh, and applying putty. The second method is simpler; it consists of applying 2 thin layers of putty with mandatory intermediate drying. If you want to ensure good waterproofing, sound insulation and durability, then choose the first method of wall finishing.
Plastering foam concrete with your own hands - tips
Finishing a house made of foam blocks with plaster is carried out according to the standard scheme, but is somewhat different from plastering aerated concrete or brick. The difference is not significant, but it is there. Therefore, let’s look at the distinctive features.
When is it possible/needed to plaster a house made of foam blocks?
Finishing with plaster is carried out in dry weather, only at positive temperatures (from +5 to + 30 ° C). You can start plastering no earlier than 3-4 months (ideally a year) after the completion of construction of a house made of foam blocks. During this time, the walls will shrink.
Briefly about the main thing
Creating a plaster layer on foam concrete walls is a practical way to improve the performance of a structure. In order for the finishing layer to be of high quality, the preparatory work cannot be ignored.
Foam blocks have a particularly smooth surface, so their adhesion is increased artificially: they are treated with a primer, and for additional reinforcement, a fine mesh is used. It is necessary to take into account other subtleties: the dew point will not shift inside the housing if the ratio of the thickness of the internal and external cladding is maintained.
Plaster mixtures of different compositions are suitable for external and internal finishing work. If you do not want to use a ready-made mixture, you can prepare it using a home recipe.
Ratings 0