Spring has come. Many teenagers almost instantly had thoughts in their heads of going to the nearest abandoned site and drawing branded graffiti, for which they would need an incredible amount of spray paint.
Important: You should not abuse this type of activity, it is illegal, and current legislation provides for administrative liability for such hooliganism.
However, many people will also need spray cans for quite acceptable purposes, for example, painting their new craft. However, the cost of one can is quite high, and if you need a lot of them, and perhaps in different colors, the wallet of a creative person will be significantly emptied. In order to prevent this, you can make a homemade reusable can, which will significantly alleviate financial losses.
The essence of the life hack
The main goal is to create the ability to pump air into the can, creating the necessary pressure in it for subsequent spraying of paint. Two key components will help with this:
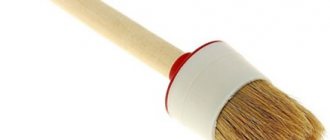
- Pneumatic valve. This is an ordinary nipple from a bicycle inner tube, and you can take an old valve. The main thing is that it is intact and reliably holds pressure.
- Hand pump. The one you usually use to inflate bicycle tires will do. It is quite enough to pump air into the can.
Nipple from a bicycle tube
But there is a catch. Aerosol cans are completely sealed because otherwise they would not withstand the pressure inside. Disassembling the spray gun is not an option, since it will not be possible to reassemble it and guarantee its functionality. Ordinary ingenuity comes to the rescue.
Read also: How to make a survey in Odnoklassniki?
Work order
To turn a disposable aerosol can into a reusable one, you must:
- make sure that the canister is completely empty - this is the most important point, since filled canisters are under pressure, and any mechanical impact can lead to depressurization and explosion, which leads to serious injuries;
- carefully remove the nipple from the old chamber, clean it, degrease it and, if necessary, polish it;
- mark a mark on the empty aerosol can for the location of the pneumatic valve, press a small dent with an awl;
- carefully drill a small hole in the place of the resulting mark;
- clean and degrease the hole;
- disassemble the nipple, thread the body onto a wooden skewer (necessary for stability during fixation);
- Apply liquid sealant to the edges of the hole and the base of the nipple;
- insert a skewer into the hole;
- Using a compact gas torch and solder, carefully solder the nipple to the body of the aerosol can.
Installing the nipple into the can
This completes the main cycle of work. The solder seam should be uniform, even, and of high quality. When pumping a canister yourself with a hand pump, it will not be possible to create a lot of pressure inside the spray, so there are no great demands placed on the seam in terms of strength. It is enough if it reliably holds the nipple in a given position and does not allow air to leak out.
Algorithm for filling a container with dye
Inflating cylinders using professional equipment is beneficial in terms of filling the container, but is not available due to the high price. Self-filling of aerosol cans with paint is justified by its low costs and ease of operation. Although the container is not filled to its maximum capacity.
The aerosol container can be used more than once.
Before filling the can with paint, prepare the following tools:
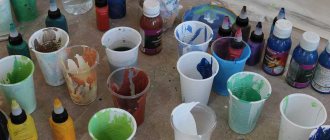
- A container container is being prepared: empty deodorant, used for dye. A paint can of one type is filled with paint of the same type: acrylic after acrylic, alkyd after alkyd. Otherwise, a “chemical conflict” may occur. The quality of the coating will suffer as a result.
- The dye can be refilled with the desired shade, purchased ready-made or tinted with your own hands.
- The dye is pumped into a large volume medical syringe. If an additional broken needle is used, then releasing the safety valve will be more effective.
- A nipple taken from an old bicycle tube is used.
- For a bicycle or car, a chamber inflation pump.
- Pressure measuring manometer.
Before you fill the paint into the can with your own hands, remove the cap and sprayer from the container. The remaining actions are performed in strict sequence:
- The syringe is filled with dye.
- Using the needle on the syringe, the cylinder fuse is pressed out, and the syringe is inserted into the container until it stops.
- The paint is pumped into a container. Its number corresponds to a specific shade. You can select the desired color by fan. Colors for tinting are most often selected from the RAL, NCS, Pantone catalogs. Mixing base colors allows you to get the desired shade.
- Actions are performed until 2/3 of the container is full. So, for example, a 520 ml cylinder is pumped to 400 ml. This container is enough to paint 1.5 m2 if the paint is applied in two layers.
- To mix the dye, 5 balls are added to the container. Balls from bicycle bearings will do.
Useful video on the topic:
To spray, add air under pressure to the container to be filled:
- The safety valve is released using the bicycle nipple. It is inserted into a can.
- A bicycle pump is connected to the nipple. Air is pumped up to a pressure of 5 atmospheres. Low pressure does not provide high-quality atomization. If the indicator is higher, then the container ruptures.
- The nipple is removed and the spray button is installed in its place.
The canister is ready to use. It is shaken, the paint is mixed and spray control is carried out. A small dose of dye is applied to the unwanted surface.
Necessary conditions for refueling
Aerosol cans are filled with compressed air to a pressure of approximately 3-5 atmospheres. At lower pressure, filled vessels do not spray paint; at higher pressure they can easily explode. That's what an old pressure gauge is for. After pumping the air, the nipple put on for filling aerosol cans is removed, and the cap with the sprayer is put in place.
The container with the pumped liquid and air is shaken, and the spray intensity is checked on any suitable surface. Many motorists refill spray cans at specially designated points to save time, and do not realize that there are no secrets in how to refill a spray can with paint, and you can save not only time, but also money.
How to pump paint into a can (2 videos)
Different types of varnishes and paints in cans (25 photos)
Design[
Sectional view of an aerosol can. The design of an aerosol can is extremely simple. Gas (propellant) and useful contents are pumped into the cylinder under pressure. Air can also be used as a propellant, but this would lead to high pressure in the cylinder. Therefore, an easily liquefied gas is used so that the liquid and gas are in equilibrium. They try to ensure that the liquefied propellant mixes well with the useful contents (to save space in the cylinder).
When the valve is opened, gas pressure forces the contents out. In return, part of the propellant evaporates, returning the pressure to its original level.
“Compressed air” cans work on the same principle, and contain liquefied gas rather than air. Inhaling such gas is dangerous.
For viscous contents such as sealants, the gas may be separated from the contents by a piston. New development - the contents are placed in a plastic bag; this is convenient for hazardous contents and some cosmetic products, for example, suntan lotions - the contents and gas do not come into contact, the gas does not escape, such a cylinder works even upside down, and the jet practically does not cool.
Valve design[
Two different valves: “male” and “female” The valve is the main part that facilitates atomization. The valve includes not only the main mechanism, but also the parts with which it is mounted.
Pros of using dye from a can
Paintwork from an aerosol can is valued for a number of its qualities:
- The dye is used sparingly. All sprayed material falls on the surface to be painted. Since no painting tool is used, paint residues do not remain on the brush or roller.
- Spraying begins immediately after shaking the container to mix the dye with the balls inside it. It is enough to do this for 5 seconds. Other types of paints are prepared for application more carefully: mixed until smooth, diluted with solvents to the desired consistency, and poured into a convenient container. Saves time on coloring.
- Controlling the use of the dose is easy: by pressing the spray button.
- Restorative repairs of part of the surface are carried out using dye in cylinders. The place of painting after the paint dries does not stand out against the general background.
- The container allows you to paint the most difficult to reach places. The paint applies evenly over the entire surface.
- A beginner in painting can do the job; no special skills are needed.
- There is no need to purchase special equipment for painting the surface and refilling the bottle.
- If the material is not completely used, then there is no need to worry about its safety. In the cylinder it retains all the qualities from the manufacturer
- The container is airtight, which allows you to store and transport the dye without worrying about it spilling out.
- It becomes possible to carry out repairs without a car service at a time of financial difficulties.
- The cylinders are filled with paint of different compositions and intended for painting different surfaces: wood, plastic, glass, concrete. It is applied both to the outer surface and to the inner part.
How to make a reusable spray paint can easily and cheaply
Spring has come. Many teenagers almost instantly had thoughts in their heads of going to the nearest abandoned site and drawing branded graffiti, for which they would need an incredible amount of spray paint.
Important: You should not abuse this type of activity, it is illegal, and current legislation provides for administrative liability for such hooliganism.
However, many people will also need spray cans for quite acceptable purposes, for example, painting their new craft. However, the cost of one can is quite high, and if you need a lot of them, and perhaps in different colors, the wallet of a creative person will be significantly emptied. In order to prevent this, you can make a homemade reusable can, which will significantly alleviate financial losses.
DIY Reusable Refillable Aerosol Can
An aerosol can of paint is convenient, practical, and economical. No wonder street artists love these useful inventions. It is the cans that help them create stunning graffiti on urban sites, and thanks to their mobility, the cans have a significant advantage over airbrushes connected with a hose to a compressor.
However, aerosol cans have a significant drawback - the paint runs out quite quickly, after which the only thing left to do is throw away the can.
But tell me, would you like to reuse aerosol cans? After all, this will significantly reduce the cost of purchasing new aerosols. It is enough to pour the paint into an empty can, create sufficient pressure and you can continue using it. Sounds tempting, doesn't it?
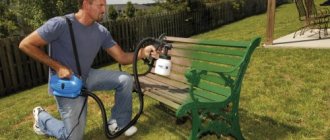
The problem is that making a full-fledged aerosol spray with paint at home is almost impossible and unsafe. However, there is an easier and simpler method that has been tested many times in practice. Compressed air will help with this.
Refilling a paint can using compressed air
How to use it?
As a result of completing all of the above points, a new can will come out, which will not be thrown away after the first use, because it can always be refilled using a regular syringe. What is needed for this? You just need to buy a special paint and mix it with a solvent. This is necessary to ensure that the paint does not come out too thick or too thin. Such actions help regulate the density as the user needs it. Also, we must not forget about pumping air using a pump.
We assemble and test
It's time to assemble the resulting device and test it. The nipple is assembled according to the standard pattern and screwed tightly. The can is checked for leaks, after which it is necessary to attach a hand pump to the nipple and pump in air.
The more compressed air there is inside the can, the longer it will be able to spray paint in one pump. However, you shouldn't overdo it either. As a result, having pumped in a sufficient amount of air, you can begin painting. By pressing the valve of the spray bottle, the spray will spray the paint due to the air inside.
This method is quite simple and safe. The main thing is to make sure that the can is completely empty before starting work (precautionary measures are never superfluous). After pumping in paint and air, you can safely start your favorite hobby - drawing graffiti or painting any surfaces.
How do you like this life hack? Be sure to share your opinion in the comments to the article.
How to refill a cylinder yourself
Filling paint solutions into a spray can can easily be done with your own hands.
Of course, it will not provide such complete filling as with vacuum pumping with a special installation, but it is simple and cheap.
The cylinder can be used repeatedly.
Required tools:
- An empty can of deodorant or paint. If a container is used after dyes, then you need to fill in a solution of the same quality (for example, after acrylics - acrylic, after alkyds - alkyd). Incorrect selection of paint and varnish components can lead to a “chemical conflict” that will affect the quality of the coating.
- Paint for refilling. Any one will do - purchased in a store or tinted yourself with the necessary selection of shades.
- A large medical syringe without a needle: with its help the paint will be pumped into the container. To more effectively release the safety valve, you can put a broken needle on it.
- Bicycle nipple (can be cut from a worn-out inner tube).
- Pump (car or bicycle).
- Pressure gauge.
Operating procedure:
- Remove the cap and spray nozzle from the can.
- Draw the coloring solution into the syringe, insert it into the container until it stops, pressing the safety valve.
- Pour the dye into a container.
- Repeat the filling procedure until the container is approximately 2/3 full.
- If you used a deodorant container, you need to add 3-5 metal balls there. Balls from worn-out bicycle bearings are quite suitable for this purpose.
- The remainder of the container must be filled with pressurized air, otherwise the sprayer will not work. To do this, insert the bicycle nipple tightly, squeezing the safety balloon valve.
- Connect the pump to the nipple and, while pumping, create a pressure of up to 3-5 atmospheres. If you do less, you won’t get a full spray; if you do more, the container may not be able to withstand the load.
- After inflating, remove the nipple and replace the cap with the sprayer.
- Now you need to shake the can a little, stirring the coloring solution, and check its operation. For this purpose, release a small portion of the dispersed mixture onto an unnecessary board or other surface.
How to repurpose an existing container
To remake a disposable vessel so that you can fill it with paint yourself, you need to take an already used one, choosing a model with a good, hard bottom and a tube nozzle. Of course, the paint will not be refilled under such pressure as in factory conditions, but refilling can be done repeatedly, and you will pay practically nothing for it, except for the cost of the coloring composition. And this will save almost half the cost of the dispersed spraying process. To do this you will need:
- used aerosol can;
- a nipple that can be cut from an old bicycle tube;
- large medical syringe;
- pressure gauge (not necessarily new);
- car or bicycle pump.
To make a reusable can of paint, these things, which can probably be found in the garage or at a disassembly site, are quite enough. To refill an aerosol can, remove the cap and spray nozzle, draw the paint into the syringe, and insert the syringe into the can all the way, with the safety valve pressed down.
You can also use deodorant containers by adding a few metal balls. Injection is carried out in this manner until the level of the composition reaches approximately 2/3 of the volume of the vessel. Then the bicycle nipple is inserted and the can is filled with compressed air.
On video: installation for refilling aerosol cans.
Refilling methods
A can usually doesn’t last long, it costs quite a lot, so there is a natural desire to save money by not paying the cost of new cans every time, and the injection process, which you can do yourself.
This is quite possible if you fill a can of paint with your own hands from a purchased large container with a coloring composition, which in this form is much cheaper. To do this, you need to purchase one disposable one from a good manufacturer, and carry out the process of converting a used aerosol container into a vessel into which you can pump paint repeatedly.
The second possible option is to purchase special equipment for refilling aerosol cans, which is not sold everywhere and is quite expensive. The third is to refill it in the appropriate workshop where there is such equipment, but there it will be approximately half of the cost of the refilled paint, and they may give a small discount for several cans.
What are the savings? How much should you spend and how much can you save?
It's actually simple math at work here. One can of paint, holding about 400 ml, costs about 200 rubles. Buying paint separately will cost about 70 rubles per 1 liter, and 500 ml of solvent can be purchased for 40 rubles. It turns out that for 110 rubles we get at least a liter of paint, while in a store for 200 we buy only 400 ml. Using simple calculations, you can determine that for the same canister, made yourself, you will need to spend about 50 rubles, instead of 200. The savings are quite impressive, which is good news. However, this method also has a number of disadvantages, for example, pumping paint through a syringe or mixing it with a solvent yourself.