To keep your working tool always clean, you need to know how to rinse the spray gun after painting. This is very important for creating a good torch, thanks to which a high-quality coating is achieved, creating an even layer without smudges and unpainted areas. If the tool is poorly cleaned, then it will perform much worse, to the point that particles of paint remaining from the last time will fly out of it.
Some are trying to save time on cleaning, while others would like to save on solvent. Both lead to an uneven layer of coating, unpainted areas of the surface and smudges. It is best to keep 2 spray guns for work, one of which will be used for rough ground work, and the other, ideally clean, only for final finishing painting.
Advice from professionals
In order for the equipment to function for a long time and work without failures, it is recommended:
- Wash the spray gun very thoroughly after each use with a solvent specially designed for this purpose.
- Clean the equipment only with a soft brush or toothpick, avoiding hard metal devices that can damage the air cap.
- It is recommended to regularly lubricate all moving parts of equipment that are not in direct contact with paint and varnish with a special silicone-free lubricant.
- At least once a week you need to disassemble the sprayer to completely and thoroughly clean it.
- At least once a year, worn parts of the gun should be replaced with new ones, using special sets of spare parts produced by manufacturers.
Some craftsmen do not bother with disassembling the spray gun, but simply pour solvent into it, shake it and spray it, thus cleaning all working parts. And this is repeated 3 or 4 times. It is possible that this method is also suitable for rough work, but during final painting it will certainly create problems.
Conclusion
Information on how to set it up, how to wash the spray gun after finishing, etc. It will be useful primarily for those who use such devices relatively rarely. Compliance with these simple rules can not only extend the life of the device - it will also ensure the necessary quality of painting even for the most complex parts.
You can learn more about the operating technique by watching the video in this article.
P
Practical guidelines for the best way to maintain spray guns. Step-by-step instructions with photographs and descriptions from SATA. The reasons for the appearance of some defects and ways to eliminate them are considered. Emphasis is placed on manual cleaning.
Disconnect the nozzle
Disconnect the paint needle and unscrew the air cap.
Cleaning and drying
We clean the channel for the material and the surface of the spray gun.
When cleaning, do not use a wire brush as this may damage the spray gun.
Dry with a blow gun.
After each cleaning, the spray gun, the inside of the air cap, as well as the surface of the gun where the air spray insert is located, must be thoroughly washed and dried with air. Blowing dry air over the washed gun protects against possible defects during painting.
Cleaning the nozzle
Assembly and maintenance
Attach the nozzle and tighten it using a special wrench.
Let's install the air cap.
Lubricate the needle in the sealing area and install it in place.
Lubricate the paint needle spring and the threads of the material supply regulator.
We will install and lubricate the visible part of the piston rod.
Use special lubricants recommended by the equipment manufacturer. They are silicone-free and paint compatible. This will ensure free movement and excellent functioning of the component parts even after many years of use.
Defects
1.The torch vibrates or air bubbles appear in the water
Cause
- The nozzle is not tightened enough
- Air distribution ring dirty or damaged
Solution
- Tighten the nozzle
- Replace the air distribution ring (it cannot be cleaned, as disassembly will cause damage)
2. Spray pattern is too small, bent or deformed on one side
Cause
- Air cap holes are clogged with paint or cleaning fluid
- The nozzle (nozzle outlet) is damaged
Solution
- Clean the air cap.
- Check that the nozzle is not damaged, replace the nozzle if necessary
3. Torch adjustment does not work (flat/round) - the adjusting head does not rotate or scrolls
Cause
- The adjusting knob was turned counterclockwise as far as possible, possibly loosening the threaded connection.
- The air distribution ring is not installed correctly - the fixing pin does not fit into the hole
Solution
- Unscrew the adjusting knob completely clockwise and lubricate the threads
- Replace the air distribution ring, paying attention to its correct installation (the locking pin fits into the hole). It is convenient to use a universal key.
4. The air is constantly being released (siphonitis)
Cause
- Air piston seat clogged or piston seal worn
Solution
- Clean the air piston seat and/or replace the air piston and seal.
5. Corrosion on the threads of the air cap, the material supply channel (barrel connection) and on the surface of the spray gun
Cause
- The air cap and area around the air distribution ring were not thoroughly dried when using a water-based cleaning fluid.
- Using unsuitable cleaning fluids or non-ph neutral solvents that are too chemically aggressive.
Solution
- Use ph-neutral cleaning fluids (ph 6.0-8.0). Rinse the spray gun thoroughly and be sure to bleed the gun and air cap inside and out.
Washing and cleaning
Mandatory washing of the spray gun after each painting of a car part or the entire mechanism is due to the fact that if you do not wash it in time, the primer, varnish or paint can dry out and clog the spray gun channels, thereby making both its quality use and belated cleaning impossible. In the future, particles of paint and varnish materials will peel off under the influence of solvents and end up on the part being painted, which will force the craftsman to remove them from the surface of the body, creating additional work for him.
In order to completely clean the spray gun, it is necessary to perform a number of sequential operations:
- First of all, unscrew the tank and put it in the sink.
- Next, remove the air cap, which also unscrews easily and simply.
- Then we need to remove the nozzle, before doing this, be sure to press the trigger all the way. This is necessary in order to move the needle away from the nozzle, otherwise the needle may be damaged when unscrewing.
- If the air distribution ring is also dirty, for example, with paint or dirty solvent, then you can clean it with a brush, without soaking it in any case, since its sealing ring begins to swell during soaking, making it difficult to insert it back into the gun.
- To pull out the needle, fully press the trigger again, push the needle back and pull it out of the spray gun body.
- Now you need to clean all open openings and channels in the gun. To do this, wash them with the brush that is included in the delivery kit along with the spray gun.
- After washing, the gun should be blown with compressed air to remove any remaining dirty solvent, otherwise it may dry out and remain inside the sprayer.
- After purging, we begin to reassemble the gun: insert the needle and screw it on, put on the distribution ring and fix it. Then screw the nozzle on, pressing the trigger all the way so as not to damage the needle. And tighten it with a wrench. We put on the air cap, adjust it, and then put on the tank, tightening it.
All operations are carried out simply and quickly and do not pose any difficulty.
Source: kraskopulti.ru
How to clean a spray gun
A prerequisite when using a spray gun is to wash it after each use. First comes the preparatory part (preparing materials, draining the remaining paint), then the main part of the procedure, which includes several stages - disassembly, cleaning, drying, assembly.
Disassemble the spray gun
Before you begin disassembling the tool, you need to drain the remaining paint from the tank. Some recommend first pouring solvent into a paint container and driving the solution, and only then removing the parts and washing them. In this case, you should draw the solution into the tank and connect it to the air hose. You need to blow until clean liquid comes out without paint residue. To prevent the room from becoming filled with solvent, it is recommended to spray it into a rag or carry out the procedure outside. You can try another option - first disassemble it, then soak the parts and wash the gun.
Step-by-step instructions for disassembling the spray gun:
- The first thing to start with is to unscrew the tank and put it in a container or sink.
- The next step is to remove the air cap and place it in a container as well.
- Next you need to remove the nozzle, but before that you need to press the start button all the way. This action is performed in order to move the thin needle away from the nozzle.
- After the user has removed the tank and nozzle, an air distribution ring appears. This element does not need to be washed because it does not interact with materials. The exception is when dirty solvent or paint comes in during disassembly.
- The last disassembly step is to remove the needle. To do this, press the key all the way. At the same time, the needle is fed back, then pulled out of the spray gun body.
- Be sure to check the holes in the air cap. If clogged, you can use a toothpick.
- Now the gun design is completely prepared for washing - all air and material channels are accessible, they can be easily cleaned with a brush.
When disassembling, you need to take out the needle especially carefully. It bends quite easily, and if possible damage requires replacement along with the painting head.
Clean and dry
After the parts are disassembled, they must be washed under running water. In case of severe contamination, they can be soaked in a prepared container. To clean the tank, you need to pour ½ of the volume of solvent. Afterwards, shake thoroughly so that the remaining paint is completely dissolved, and drain the solution. The gun body is washed with water and cleaned with a brush.
The air distribution ring has a seal, which begins to swell upon prolonged contact with water. Then it is difficult to insert this part into the spray gun. Therefore, the air distribution ring does not become wet. It is cleaned with a brush-brush.
The next step after washing is blowing with compressed air. The procedure is needed to eliminate residual dirty solvent. After this step, you need to wipe all parts and the needle with a rag, inside and out. Now the pistol design and its parts are ready for assembly.
Assemble the spray gun
The final stage of the procedure is assembling the spray gun. The user must adhere to a clear sequence:
- Insert the needle and carefully tighten it.
- Then insert the air distribution ring with the seal. There are special guides on the part and the body of the structure that allow you to connect the parts in the correct position.
- Tighten the nozzle by pressing the trigger all the way and holding it until the last turn. Then tighten it with a wrench.
- Screw in the air cap and adjust.
- The final step is to put on the tank.
During assembly, a special lubricant can be applied to the needle. You just need to do this carefully so that the composition does not get on the sharp part of the needle. Also, when washing, moving elements that do not come into contact with the paint must be periodically lubricated.
The spray gun is a special painting technology device that ensures uniform application of the composition. In order to obtain a high-quality paint coating in the future, it is necessary to properly wash the tool. To do this, it is important to carry out the procedure at all three stages - disassembling, cleaning and drying, assembling the paint sprayer.
Source
How to clean a spray gun?
Unscrewing the paint head
- Use a lint-free rag soaked in solvents to clean any remaining paint from the inside of the spray bottle.
- Remove the strainer from the base of the reservoir opening (for spray guns that have one).
- Pour solvent into the reservoir, filling it about halfway. Close the lid and shake the spray gun so that the solvent in the tank acts on any remaining paint.
- Connect the spray gun to the air hose (if it is not connected) and spray the solvent that was poured into the tank.
You can spray it on a rag to prevent the room from becoming filled with sprayed solvent. It is not necessary to spray all the solvent; you can spray until clear solvent is blown out. This will help clear the channels that carry paint as you spray. If you are using a gun with an overhead paint tank, you can do the same cleaning procedures without an air hose attached. You can turn the paint supply control to maximum, pull the trigger and the solvent will flow through the nozzle, cleaning the paint channels. Cleaning the paint channel - Pour out any remaining solvent from the reservoir.
- Wipe with a clean, lint-free cloth inside and outside the spray gun tank. Don't forget about the tank cap.
- You can remove the spray gun tank and clean the channel through which paint flows from the tank to the spray gun. If you clean fresh paint on time, this item is not necessary.
- Unscrew and remove the air cap of the sprayer along with the seal.
- Unscrew the paint supply regulator and remove the needle and spring.
- Using a suitable wrench, unscrew the spray head and nozzle.
- Place the needle, paint head and air cap in a small container of solvent. Remember that you can soak some parts of the spray gun in solvent, but not the entire spray gun.
- After soaking the above-mentioned parts of the spray gun in solvent, use a special brush to clean them.
- Use a special small brush and solvent to clean the paint channels.
- Check the holes in the air cap. If they become clogged, you can use a toothpick.
- Wipe the needle thoroughly with a rag.
What and how to clean, wash, rinse out the paint that has dried inside the spray bottle?
Any instrument must be handled with care, love, and proper care. After use, the spray bottle must be immediately rinsed thoroughly to remove any paint. If you forgot and the paint dried out and polymerized, then you can say goodbye to it. But you can try to clean it, rinse it. Each paint has its own solvent, and you need to rinse the spray bottle in it.
To do this, disassemble the spray bottle if possible and first soak all parts in solvent and then rinse. The main thing is to clean the nozzle, nozzle, and needle. Soft brushes, special brushes, and sets of needles are sold for cleaning spray guns and spray guns.
Work execution algorithm
The parts through which the paintwork moves are washed:
- dye tank;
- material supply channel;
- nozzle;
- painting head;
- needle-dosage.
First stage
When painting is completed, the remaining paint is drained from the tank before cleaning the spray gun.
- 100 grams of solvent is poured into the container . Use grade 646, solvent or acetone. You can replace the solvent with A95 gasoline. But this is in case there was no solvent on hand at the time of processing. Because after gasoline, the container is still washed with solvent.
- The trigger of the spray gun is pressed. At this point, the solvent from the tank passes through the parts that were the paint conductor and washes them. The procedure takes a few seconds.
- The nozzle is closed with your finger. The trigger is pulled again. The remaining dye is washed into the tank and merged with the solvent.
- The steps are repeated with a new clean solvent.
Useful video on the topic:
Second phase
Don’t forget to clean the channels in the nozzle head. This is where the flame forms.
- The nozzle head is removed.
- In the upper part of the head, 4 holes are cleaned. Soft materials are used (wood, plastic, aluminum wire is allowed). The holes are small, so they can be cleaned with thin objects. But most often, brushes or brushes from the spray gun kit from the manufacturer are used.
- When the holes of the head are cleaned, it itself is washed with freshly poured clean solvent.
Finished washing the spray gun after painting.
Immediately after cleaning, it is not recommended to force the tank onto the mounting thread. It may happen that after the parts dry, paint particles stick to the thread. And before cleaning the spray gun next time, it will be difficult to unscrew this thread.
Which spray gun should I choose to cover the cake?
For confectioners, a tool with a maximum liquid viscosity of 60 DIN is suitable. If this parameter is higher, this is good, but such devices are more expensive. The second parameter that is important is the size of the jet, which is controlled by the size of the nozzle. If the nozzle is small, a drop of chocolate simply will not pass through.
Interesting materials:
How to spray roses in autumn? How to spray roses against spotting? How to spray thujas in early spring? How to process a pear in the fall? How to decorate an open balcony from the inside? How to finish Penoplex inside? How to turn off the tap? How to soak the nut? How to soak a stuck bolt? How to clean a rusty bolt?
Advice from professionals
Skimping on solvent quality will result in longer cleaning times.
- A low-quality solvent does not wash spray gun parts well. As a result, when working with it, the surface will be painted unevenly, and smudges may appear.
- A special solvent is used. The unit is washed every time after working with CM.
- It is recommended to use two spray bottles. One applies a layer of primer (rough work), the other applies paint (finishing).
- Do not use hard brushes for cleaning. The air cap will be damaged.
- Silicone-free lubricant lubricates all moving elements that do not come into contact with paintwork materials and varnish. The procedure is carried out regularly.
- Once a year, the spray gun is inspected for wear of parts. Manufacturers produce sets of parts that can be replaced.
- The spray gun is completely disassembled once every 7 working days. The device is thoroughly washed.
How to rinse the spray gun after painting
To keep your working tool always clean, you need to know how to rinse the spray gun after painting.
This is very important for creating a good torch, thanks to which a high-quality coating is achieved, creating an even layer without smudges and unpainted areas.
If the tool is poorly cleaned, then it will perform much worse, to the point that particles of paint remaining from the last time will fly out of it.
Some are trying to save time on cleaning, while others would like to save on solvent. Both lead to an uneven layer of coating, unpainted areas of the surface and smudges. It is best to keep 2 spray guns for work, one of which will be used for rough ground work, and the other, ideally clean, only for final finishing painting.
Complete disassembly and thorough cleaning of the spray gun
Cleaning the spray gun without completely disassembling it can be done no more than 3 times. If this is done constantly, then such a device performs rough work. When the time comes for final painting without completely disassembling it and thoroughly cleaning it, problems may arise. If the primer or varnish is not washed out in a timely manner, they will clog the spray gun channels.
There is no need to talk about high-quality paint spraying. In this case, under the influence of the solvent, particles of dried old paint flake off during painting and fall onto the new layer of the painted surface. These pieces of debris need to be removed. Often the surface has to be repainted again. This will lead to overuse of paintwork materials and loss of time.
Before washing the spray gun thoroughly after painting, you need to disassemble it thoroughly, performing the following operations:
- The unscrewed tank is placed in the sink.
- Unscrew the air cap and remove it. Actions are easy to perform.
- When the trigger is pressed all the way, the nozzle is removed. If the trigger is not pulled, the needle will not move away from the nozzle, and it will be damaged when unscrewing.
- A dirty air distribution ring can be cleaned with a brush. It is strictly forbidden to soak it. Otherwise, the adjacent seal ring will swell when soaked. In this form, it will no longer be possible to put the air distribution ring back in its original place.
- When the trigger is pulled again, the needle moves back and is pulled out of the sprayer body.
- All channels in the device became open. To clean them, the spray gun kit from the manufacturer includes a special brush.
- To ensure that no dirty solvent remains inside the gun, it is blown out with compressed air. Dirt particles will dry inside the spray bottle if these steps are not taken.
Interesting video on the topic:
When the purging is done, the steps for assembling the spray gun are performed in the reverse order:
- The needle is inserted and fixed.
- The distributor ring is put on and fixed.
- By pressing the trigger all the way, the nozzle is screwed on.
- The nozzle is fixed with a key.
- The air cap is put on and adjusted.
- The tank is screwed on.
Disassembling, cleaning and assembling the spray gun is not difficult. This does not take much time, but guarantees the quality of the coloring.
Any new model of spray gun must be washed with a solvent, since it goes on sale lubricated with transport oil or a special lubricant. The pistol is completely disassembled beforehand. You only need one key to operate.
We recommend videos on the topic:
Disassembling a Chinese gun for cleaning
In the work you will need a set of keys, and you need to add a 9 mm socket.
Disassembly is performed sequentially:
- The tank unwinds.
- The needle is pulled out from behind through the hole that appears after unscrewing the adjusting screw.
- The air cap is dismantled.
- The key for unscrewing the injector is selected. The key from the set unscrews the nozzle.
- The next step requires caution in your actions, since the platform has a left-hand thread. In this case, the distributor ring is tightly twisted. You will need a hex wrench and a 9mm socket wrench. They dismantle the ring with the gasket.
The sprayer is assembled in reverse order. It is important to mount the ring gaskets as bridges over the air holes. Air entering the chamber will create turbulence. Parts that come into contact with each other are treated without silicone lubricant.
How to clean a spray gun
A prerequisite when using a spray gun is to wash it after each use. First comes the preparatory part (preparing materials, draining the remaining paint), then the main part of the procedure, which includes several stages - disassembly, cleaning, drying, assembly.
Disassemble the spray gun
Before you begin disassembling the tool, you need to drain the remaining paint from the tank. Some recommend first pouring solvent into a paint container and driving the solution, and only then removing the parts and washing them. In this case, you should draw the solution into the tank and connect it to the air hose. You need to blow until clean liquid comes out without paint residue. To prevent the room from becoming filled with solvent, it is recommended to spray it into a rag or carry out the procedure outside. You can try another option - first disassemble it, then soak the parts and wash the gun.
Step-by-step instructions for disassembling the spray gun:
- The first thing to start with is to unscrew the tank and put it in a container or sink.
- The next step is to remove the air cap and place it in a container as well.
- Next you need to remove the nozzle, but before that you need to press the start button all the way. This action is performed in order to move the thin needle away from the nozzle.
- After the user has removed the tank and nozzle, an air distribution ring appears. This element does not need to be washed because it does not interact with materials. The exception is when dirty solvent or paint comes in during disassembly.
- The last disassembly step is to remove the needle. To do this, press the key all the way. At the same time, the needle is fed back, then pulled out of the spray gun body.
- Be sure to check the holes in the air cap. If clogged, you can use a toothpick.
- Now the gun design is completely prepared for washing - all air and material channels are accessible, they can be easily cleaned with a brush.
When disassembling, you need to take out the needle especially carefully. It bends quite easily, and if possible damage requires replacement along with the painting head.
Clean and dry
After the parts are disassembled, they must be washed under running water. In case of severe contamination, they can be soaked in a prepared container. To clean the tank, you need to pour ½ of the volume of solvent. Afterwards, shake thoroughly so that the remaining paint is completely dissolved, and drain the solution. The gun body is washed with water and cleaned with a brush.
The air distribution ring has a seal, which begins to swell upon prolonged contact with water. Then it is difficult to insert this part into the spray gun. Therefore, the air distribution ring does not become wet. It is cleaned with a brush-brush.
The next step after washing is blowing with compressed air. The procedure is needed to eliminate residual dirty solvent. After this step, you need to wipe all parts and the needle with a rag, inside and out. Now the pistol design and its parts are ready for assembly.
Assemble the spray gun
The final stage of the procedure is assembling the spray gun. The user must adhere to a clear sequence:
- Insert the needle and carefully tighten it.
- Then insert the air distribution ring with the seal. There are special guides on the part and the body of the structure that allow you to connect the parts in the correct position.
- Tighten the nozzle by pressing the trigger all the way and holding it until the last turn. Then tighten it with a wrench.
- Screw in the air cap and adjust.
- The final step is to put on the tank.
During assembly, a special lubricant can be applied to the needle. You just need to do this carefully so that the composition does not get on the sharp part of the needle. Also, when washing, moving elements that do not come into contact with the paint must be periodically lubricated.
The spray gun is a special painting technology device that ensures uniform application of the composition. In order to obtain a high-quality paint coating in the future, it is necessary to properly wash the tool. To do this, it is important to carry out the procedure at all three stages - disassembling, cleaning and drying, assembling the paint sprayer.
Source
Video text
Video instructions on how to properly rinse the spray gun, disassemble it, change gaskets - maintenance of the spray gun. Subscribe to our channel and watch even more videos on car painting: https://www.youtube.com/user/AUTOgrap.
In this video: - we show how to wash the spray gun - how to properly disassemble the spray gun - the algorithm for properly washing the spray gun using the example of manual washing of Walmec spray guns - the main mistakes when washing the spray gun - what not to do when washing and disassembling - critical mistakes that can lead to failure building a spray gun
Any technical questions about the products of TD "AUTOGRAPH": Skype: TD AVTOGRAPH Technical Support WhatsApp, Viber: 8 931 236 5104 Free call throughout the Russian Federation Join our communities on social networks: MENZERNA: https://vk.com/menzernarus JETA PRO: https://vk.com/jetapro WALMEC: https://vk.com/walmeckraskopulty RUPES: https://vk.com/rupesshop USEAL: https://vk.com/useal Quickline: https://vk. com/lkmquickline TD AUTOGRAPH https://vk.com/kuzovremontclub Instagram: https://www.instagram.com/tdavtograph/
We invite you to open testing of products from our range - in our technical department. center or at other sites in St. Petersburg. You can always report your desire to test any of the products by calling 8 931 236 5104.
Source: www.youtube.com
How to use a spray gun: a practical guide
When planning a repair, many people study in advance how to use a spray gun correctly. Such a responsible approach can only be welcomed, since these devices are quite complex, and working with them requires certain skills.
However, after fundamental theoretical training it will be much easier to master the painting technique, so we strongly recommend that you carefully study this article.
To achieve such a result, you need to be well prepared!
Device classification
Before you start studying specific issues (how to dilute the paint for a spray gun, how to adjust the nozzle and how to rinse the device after work), it is worth at least familiarizing yourself with the design of the device in general terms.
Based on the type of material supply, paint sprayers are divided into three large categories:
- Mechanical devices . Previously they were used almost everywhere for whitewashing and painting ceilings with water-based emulsion; today they are used much less frequently. This spray gun is a cylinder with a hand pump that provides pressure. The paint is poured into the tank and supplied using a spray head on a boom.
- Electric spray guns . The most popular variety used in everyday life: compact size and low price are the main factors ensuring the demand for electric spray guns. There are airless (paint is supplied by the action of a piston) and air (powered by a built-in compressor).
Semi-professional model with remote compressor
Note! Semi-professional models of electric spray guns are equipped with a remote compressor. Thanks to this design, they occupy an intermediate position between electric and pneumatic devices.
- Pneumatic devices . The spray gun itself in this case is a system for adjusting the paint supply. Pressure is pumped into the device through hoses connected to a massive and fairly powerful compressor. Such devices are used for finishing large areas, as well as for applying paint with high quality requirements (modeling, car painting, airbrushing).
As practice shows, the last two groups of devices are optimal for doing DIY repairs. Despite the fact that the design differences between them are quite significant, the general operating algorithm will be approximately the same. The following sections will be devoted to this.
Preparing for work
Device assembly
So, we have a spray gun, we also purchased paint and solvent, it’s time to start finishing.
You need to start working by assembling the device:
- As a rule, household models are not distinguished by their design complexity. To bring them into working position, simply select the appropriate nozzle with a needle from the set and install it in the mount.
- Pneumatic models are somewhat more difficult to assemble. In addition to installing the nozzle, we attach a hose for supplying compressed air to the handle.
- The container at this stage needs to be connected only if it is located on top. We connect the lower tank to the paint supply system after filling.
- When all the parts are assembled, you can perform an idle start of the device (with water poured into the container). In this case, we pay the closest attention to the place where the hose and nozzle are attached: there should be no air leaks!
Photo of the installed nozzle
Dilution of paint
To work effectively, you need to know how to prepare paint for a spray gun. This is due to the fact that small diameter nozzles work well only with material of a certain viscosity, and this viscosity will be lower than that of paint from a can.
That is why the pigment must be diluted.
- The easiest way to dilute is to use special containers that come with the device. Typically, the instructions for the sprayer contain recommendations on the proportions of mixing pigment and solvent for certain tasks.
- If there is no such capacity, then our task becomes more complicated. However, you won’t have to bother with water-dispersed compositions even in this case. The thing is that the permissible maximum for these pigments is 10% water (by weight), so it will be difficult to miss.
But we’ll tell you below how to dilute paint for a spray gun when working with a solvent:
First, pour a small amount of pure pigment into a container and spray it onto the surface.
- If the pigment falls on the base in large drops or does not splash at all, add about 5% of the appropriate solvent to the paint and mix thoroughly.
Containers for mixing paint
Note! To dissolve the paint, you should use the compositions recommended by the pigment manufacturer.
- We perform a test painting again, control the quality of the surface and add solvent. So we can experimentally establish the optimal proportion for any composition in just a few minutes.
- Ideally, we need to achieve a consistency such that, on the one hand, a fine mist will fly out of the nozzle, and on the other hand, a solid film of sufficient thickness will form on the surface to be painted.
Advice! If we interrupt work for a while, then before starting the next pass it is worth stirring the paint in the tank or adding a small amount of solvent. It is especially important to follow this recommendation when working with volatile compounds.
The last point that we need to complete before starting the work itself is setting up the device. You can figure out how to adjust the spray gun by eye, but we will still give some tips here.
Electric spray gun FERM FSG-75
FSG 75 is an electric spray gun from a company from the Netherlands - FERM, for use at home.
Specifications
The figure below shows the structure of an electric spray gun:
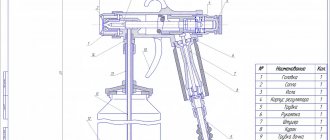
Electric spray gun diagram FERM FSG-75: 1 - Motor housing; 2 — Spray control knob; 3 - Switch; 4 - Handle; 5 - Container for paint; 6 - Basket-shaped spray nozzle; 7 - Flexible extension for nozzle; 8 - Spare valve; 9 - Cup for checking viscosity;
Painting with a spray gun
Operating instructions: how to paint with an electric spray gun?! Work procedure and tips for painting.
Surface preparation
In order to get the best result after painting, it is very important to prepare the surface before painting with an electric spray gun and dilute the paint and varnish material to the required viscosity. The surface to be painted should be free of dust, dirt and grease, and it is also worth checking that areas that will not be painted are securely covered.
For high-quality paint spraying, the paintwork or spray liquid must be well mixed and free of lumps and other particles. Before painting, be sure to read the manufacturer's recommendations.
Dilution
Most paints require dilution for painting with an electric sprayer, so the manufacturer of the spray gun includes a container to determine the viscosity you need.
To determine the viscosity, fill the bowl with paint material up to the rim, and time the time it takes for the paint to flow back into the jar. The table below shows the recommended times for different types of paint material.
| Type of painting material | Time, seconds |
| Plastic and latex paint | 24-28 |
| Water-based paint | 20-25 |
| Primers | 24-28 |
| Lucky | 20-25 |
| Oil paints | 18-22 |
| Enamels | 18-22 |
| Aluminum paints | 22-25 |
| Anticorrosive for cars | |
| Primer for wood | 28-35 |
| Antiseptics for wood | No dilution required |
| Wood stain | No dilution required |
If the paint flows out over a longer period of time than recommended in the table, it must be diluted. You need to add a little thinner and recheck the viscosity to the required result. Since some paint materials contain lumps, it is worth straining them before pouring them into the paint container.
Spraying
After you fill the container with thinned and strained paint, connect the paint sprayer to power and point the paint gun at some test material to test the quality of the paint, then press the switch until the paint begins to spray.
To obtain the desired spray volume, adjust the spray control knob (2). To reduce paint consumption, turn the knob clockwise (B); to increase paint consumption, turn the knob counterclockwise.
Spray methods
To get the best results, you need to hold the electric sprayer level and parallel to the surface you are painting. Hold the nozzle 25-30 cm from the surface and apply the paint evenly, smoothly and evenly from side to side or up and down. Do not spray at an angle as this will cause the paint to bleed. When painting large surfaces, paint as shown in the figure below.
Methods for the correct painting trajectory
Avoid stopping and restarting the paint sprayer while painting a surface, as this will result in over or under spraying of paint material. It is recommended not to tilt the sprayer more than 45°.
Installation and use of flexible nozzle
To paint flat and horizontal surfaces, as well as in hard-to-reach places, use a flexible nozzle extension.
Cleaning the electric spray gun
After each painting, clean the sprayer thoroughly, as the next time you paint, it will not paint properly due to clogging.
Electric spray gun cleaning and maintenance
After each use, the following steps must be performed:
- Pour the remaining paint out of the container
- Clean the container thoroughly with the thinner that was used for the paint itself, as well as the paint tube, filter, basket and nozzle
- Pour a small amount of thinner into the container and blow through the nozzle until only thinner comes out of the nozzle.
Malfunctions
The engine hums but does not spray, or the spray is irregular:
- The vortex head is worn out - it is necessary to replace the vortex head
- Paint pick-up tube in the wrong position - adjust the paint pick-up tube
- The paint tube is clogged - clean it with thinner
- Nozzle clogged - clean the nozzle
- The filter is clogged - clean it with thinner
- Control knob requires adjustment - adjust
Use and care
Spray painting
Well, our device is configured and ready to go.
Now it’s time to master the painting technique itself:
- First, let's do a test run. Of course, some of the paint has already entered the system during testing, but if we want the pigment to adhere perfectly to the base, then it is worth finally blowing out the nozzle.
- Then we apply the first coat of paint. In this case, we position the nozzle of the device so that the torch hits the surface at a right angle.
Recommendations for moving the torch
Note! Painting at sharp angles means that small drops do not linger on the base, resulting in unsightly streaks.
- When performing finishing work, the first pass is usually made from top to bottom. In this case, the nozzle must be moved slowly and smoothly, so that the torch moves evenly, and there are no gaps or “puddles” of paint left on the base.
- Large areas have to be painted in stripes. In this case, the edges of the stripes must partially overlap each other, so this fact must be taken into account and the intensity of the painting must be controlled.
- In most cases, one pass is not enough. The second coat of paint is applied only after the first has completely dried (the time depends on the type of composition and room conditions). In this case, experts recommend applying the top layer perpendicular to the bottom, i.e. moving the nozzle to the left or right.
While working, do not forget about safety precautions:
- We work exclusively in a respirator, gloves and safety glasses.
- During the painting process, we ventilate the room.
- If paint gets on the skin or mucous membranes, wash off the composition with plenty of water.
If precautionary measures do not help and you feel unwell, stop working and go out into the fresh air. If it doesn’t get better, quickly see a doctor!