Probably everyone who has had to do their own repairs has at least once encountered the problem of uneven painting. It seems that he tried hard, selected paint and tools, prepared the base, and the result was stains and stains, clearly visible in bright daylight. The “saving” thought immediately comes to apply a second layer. However, this, as a rule, does not solve the problem, but, on the contrary, aggravates it. Make at least five layers - it won't do any good. Stains and stains will become even more noticeable. What is the reason for the failure? How to fix the situation? What rules for painting the ceiling will allow you to avoid streaks and stains?
Stains and stains on the ceiling after painting: what is the reason and how to fix it?
Probably everyone who has had to do their own repairs has at least once encountered the problem of uneven painting.
It seems that he tried hard, selected paint and tools, prepared the base, and the result was stains and stains, clearly visible in bright daylight. The “saving” thought immediately comes to apply a second layer.
However, this, as a rule, does not solve the problem, but, on the contrary, aggravates it. Make at least five layers - it won't do any good. Stains and stains will become even more noticeable.
What is the reason for the failure? How to fix the situation? What rules for painting the ceiling will allow you to avoid streaks and stains?
Stains and stains after painting the ceiling: possible causes
There are a lot of nuances. A negative result can be the result of one mistake or several at once. Having found out the main reasons for stains on the ceiling, you will certainly understand what your mistake was.
1. Thick paint. It is much more difficult to distribute viscous paint evenly than liquid paint. It is especially important to dilute it when applying the first, base coat.
Paint manufacturers recommend diluting them by no more than 10%. Often they even write on the cans that the paint is completely ready for use. The buyer believes what is written and... gets streaks on the ceiling.
So, be sure to dilute the paint with water! Moreover, the amount of water may be higher than ten percent recommended by the manufacturer, but not more than twenty.
You need to look at the consistency: the paint should flow gently from the roller, and not flop around viscously.
For the first layer it can be more liquid, for the second - a little thicker.
2. Slow work. If the painted areas dry out too quickly, you simply do not have time to roll the boundaries between them.
As a result, stripes appear in these places. They are clearly visible after complete drying.
Types of water-based paint
Water-based paint is a water-based emulsion that contains polymer particles undissolved in water. The composition also includes pigments and various additives that change the characteristics of the final product. After applying the paint, active evaporation of water occurs and a thin polymer film remains on the surface.
Painting the ceiling with water-based paint begins with choosing the composition. They use four types of polymers:
- Acrylic. An aqueous emulsion based on acrylic resins allows you to obtain a smooth surface, has good hiding power, and hides small surface defects, even cracks up to 1 mm wide. Its disadvantage is its high price, but it is easier to work with. In their pure form, acrylic compositions are hygroscopic and can only be used in dry rooms, but they do not interfere with the passage of steam. To create a waterproof film, latex is added to the acrylic water-based emulsion. The same additive increases the elasticity of the dried film. Such compositions can be used in damp areas.
- Silicates. This type of water-based paint is based on liquid glass. The coating is resistant to precipitation and does not interfere with the release of vapors, has a long service life (10 years or more), and can be used for outdoor work.
- Minerals - lime or cement. Mineral water-based emulsions have good adhesion to any surface, but are quickly washed off. As a result, they are gradually losing popularity.
- Silicone. Silicone-based water emulsions are the latest achievement in the industry. These compositions are good because they “tighten” cracks up to 2 mm thick. As a result, the surface painted with them, even without excellent preparation, turns out to be even and smooth. The film turns out dense, but vapor-permeable. Silicone water-based emulsion can be used to paint ceilings in bathrooms and other wet areas. The disadvantage of this type of paint is its high price.
Latex can be added to any of the compositions. Latex water-based paint is water-repellent. It is not afraid of moisture and can be used in damp rooms.
Based on the main characteristics of these compositions, you can choose the best type of water-based paint for yourself. Each case requires its own properties and the “best water emulsion” is different each time.
Defects on the ceiling after painting
Repairing a room is a labor-intensive and troublesome task. When the result does not meet expectations, the mood deteriorates; you want to understand the mistakes and correct the mistake.
Painting the ceiling is the initial, most important stage of the entire restoration cycle. The flaws are striking; correcting them requires emptying the room of furniture. Why do stains appear on the ceiling after painting, how to correct defects in the work?
Reasons for the appearance of stains and stains on the ceiling after painting
Why did the ceiling become stained after painting? The origin of stains and stains that appear after the paint has dried has a different nature.
They can appear due to the fault of the painter, lighting, low-quality building materials, as a result of fungal infection, or traces of old stains.
The most common reason is lack of qualifications, deviation from technology. Nature of the mistakes made:
- poor preparation of the base for painting
- failure to follow instructions for using paint materials
- incorrectly selected tool
- incorrect application of the paint layer
An impeccably prepared surface for painting is the most labor-intensive and important operation that determines the uniformity of the coating.
Encountered shortcomings:
- preserving the remains of old paint and plaster
- uneven plastering
- violation of the technological cycle (poor drying)
Thorough cleaning, plastering, and sanding are the key to a smooth surface, on which it is easier to apply an even layer of coloring material.
The manufacturer's instructions always indicate how to use the building material.
Deviation from the proposed recommendations is the reason for poor painting: poor spreading of latex or water-based emulsion due to excessive thickness, lack of painting when the consistency is too thin.
Painting tools are of great importance: the width of the roller, the length of its handle, pile, and the size of the tray.
A working surface that is too narrow will increase the labor intensity and time required for painting, which will lead to uneven drying and hence the appearance of stains.
The optimal length of the pile and the telescopic handle will allow you to roll out the layer evenly.
The direction of the applied stripes and the speed at which the work is performed influence further color perception.
There is a rule according to which the final coloring should always coincide with the direction of the sun's rays.
The entire area must be painted quickly, preventing dry areas from appearing before the process is completed.
The angle of incidence of sunlight and artificial light can create the illusion of an unevenly painted surface, dark or light shades.
Painting materials manufactured in violation of technology or with an expired expiration date will not provide a high-quality coating. Fungus may appear in damp places, especially in corners and where water and heating pipes pass.
Black stains will not disappear if you do not carry out the entire range of measures to destroy spores and mycelium.
Places of leaks after a break in a neighbor's water supply from the upper floors cannot be painted over in the usual way and require special treatment.
Preparation is one of the most important stages of work.
Even before you start painting, you will need to perform some actions on the surface to be painted. You have to perform the following manipulations:
- Clean the floor from all peeling or crumbling fragments of the old finish. This is the most important stage, after which it will be possible to move on to further actions.
- Next, you just need to clean the entire ceiling plane from dirt and dust. If there are other contaminants, they should also be removed.
- After cleaning, unevenness and other defects may form that must be repaired with plaster or putty. However, before this you need to carefully prime the entire surface of the floor.
- When the putty dries, it is leveled with a grater and the surface is again cleaned of any dust that has formed. This moment cannot be skipped, since subsequently dust particles will negatively affect the coloring result.
- Next, apply a second layer of primer, which will allow you to apply the paint more evenly and reduce its consumption.
How to fix unevenness on the ceiling after painting: the main mistakes of painters – Stroim24.info
From the author: Hello, dear reader.
Have you discovered unevenness on the ceiling after painting and are wondering how to fix it? Then this article is for you.
Today you will learn what mistakes painters most often make when working, and how to avoid possible troubles associated with painting.
General characteristics of the work ahead
We all know that the best way to correct a mistake is to prevent it from happening. Therefore, the answer to the question of what to do with an uneven ceiling in a room can be simple and unambiguous - level it.
Modern technologies allow you to level the ceiling in various ways.
You can resort to using suspended ceilings, you can install a glass suspended ceiling, or you can choose plasterboard.
This is a broad topic that deserves its own article, so we won’t cover it in detail now.
But, nevertheless, if you decide to resort to painting, then most likely you will use ceiling plasterboard for leveling.
The fact is that leveling a ceiling, which is initially uneven, without the use of drywall (or other technology) is a difficult task, requiring enormous labor costs on your part.
Yes, the floor and walls are leveled using beacons - this is normal, this is correct.
But with the ceiling, things are somewhat different: gravity simply interferes with the alignment process.
Therefore, using technology that is used to adjust floors/walls is an impractical solution.
However, it is not so important what is on your ceiling. Our current topic is painting an uneven ceiling. Of course, maybe yours is even. But there are general rules that everyone who decides to pick up a roller or brush needs to know.
In addition, after poor-quality painting of even a smooth ceiling, unevenness, bumps, craters, spots may remain on it - there really are a lot of options. How to hide uneven ceilings after painting? That's what we'll talk about now.
Why does a flat ceiling look uneven after painting?
There are many reasons why, after painting even a smooth ceiling, visible defects remain on it. But the most common of them are the following:
- incorrect paint consistency. Most often, it is for this reason that marks remain on the ceiling;
- unsuitable tool for painting. We assume that everything is clear here. For any specific job you need your specific tool; and this especially applies to painting;
- low quality primer. You can't skimp on this. The unshakable truth that says: “the miser pays twice” reminds us of itself here too. A low grade primer will simply fly off the ceiling when you roll it. If you notice such an effect when painting, prepare for the fact that the work will most likely have to be redone. Choose only high-quality materials for repairs - then the work will be more efficient and faster;
- applying layers of primer without proper rolling. This causes the paint to build up in chunks. The consistency of the paint should always be uniform, and the roller should be rolled well - then there will be no bumps on the surface.
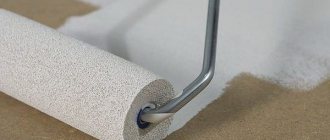
Roller selection
The roller is a cylindrical roller rotating around an axis, which is fixed to the handle. A special material is wound onto the cylinder, which is removable. Rollers of different sizes and with different materials can be attached to one handle-holder - woolen fabric, polymer material, artificial or natural fur.
The following types of rollers are distinguished:
- With short artificial pile;
- With fur covering;
- Universal fur rollers;
- Foam-coated;
- With relief patterns and designs.
Any type of roller must be of high quality, since it has a direct impact on the surfaces being painted. If there is a need to increase the working area, you can additionally purchase a rod with a screw handle and a high-quality replacement nozzle. A well-chosen nozzle allows you to reduce paint consumption. If you plan to paint smooth surfaces, then use a roller with a pile half an inch long, and for rougher surfaces (for example, putty walls, wallpaper for painting, textured plaster, textured ceilings, etc.) I use a roller with a length of ? inches. For semi-gloss paints, rollers with any pile can be used.
As for the paint container, it is recommended to use not a paint tray, but a large bucket with a hanging grid to drain excess paint. This container is more convenient because it is more stable and can hold more paint. Small paint trays can come in handy if you need to do some minor painting, such as contouring.
In addition to the roller itself, you will also need to stock up on brushes, since a roller is not very convenient for painting the joints of walls with the ceiling and floor, as well as corners and places near radiators. Brushes must be of different sizes and of good quality, otherwise their bristles will fall out and remain on the paint.
Stains and stains on the ceiling, causes and methods of correction
Probably everyone who has ever done their own repairs has encountered the problem of uneven paint.
It seems like he tried hard, carefully selected tools and paint, prepared the base, and the result was stains and stains, which were clearly visible in bright daylight.
Most of those who have encountered this effect immediately come to mind with the “saving” idea of applying a second layer. But, usually, such a solution is not the best solution. It will only get worse.
Paint it at least five times in a row, the effect will be the same. Stains and stains will only become more noticeable. What is the reason and how to paint the ceiling without streaks correctly? Our tips will allow you to do this job efficiently.
Stains and streaks on the ceiling and how to prevent them from appearing
So, how to paint the ceiling correctly. This, like other types of work performed during repairs, has its own subtleties, so to speak, the secrets of painting.
A negative effect can occur as a result of one mistake or several at once.
After familiarizing yourself with the main reasons for the appearance of stains on the ceiling, you will understand why this happened.
Reason one, thick paint
Viscous paint is much more difficult to distribute evenly than liquid paint. It is most important to dilute it before applying the base (first) coat.
Paint manufacturers recommend diluting them by a maximum of 10%. Although most often the cans indicate that the paint is ready for use and does not need to be diluted.
Choosing paint
There is no particular point in talking about the types of different paints and their properties in this article. Let us only note that water-based paint or, as it is also called, “water-based paint” is best suited for residential premises. Why this particular paint? It's simple. Here is a list of its significant advantages:
- relatively low cost,
- the effect of perfect whiteness after painting. Let’s just say that whitewashing also gives a similar effect, but “water-based emulsion” is still more practical than chalk, and moreover, it is more durable than its predecessor, which is a thing of the past,
- versatility. This paint interacts well with both concrete and wood,
- water resistance. The surface painted with water-based paint is resistant to moisture,
- compliance with environmental standards. The paint is completely safe for the health of people and animals, does not have a sharp specific odor and does not cause allergic reactions in the body.
How to paint a ceiling with water-based paint? It is also worth noting that working with water-based emulsion does not require special knowledge or professional skills. It will be enough just to read the instructions and not violate its provisions. The instructions are really important, because there are different types of emulsion paint, for example, some of them need to be diluted with water, some do not. You should not experiment here, so as not to ask questions later, like “why do the stripes remain?!” or “why is the paint layer uneven?!”
We've decided on the paint, let's move on. Let's talk about what tools we need for the job.
BuildRemPlan. Stains and stains after painting the ceiling
Probably everyone who has had to do their own repairs has at least once encountered the problem of uneven painting.
It seems that he tried hard, selected paint and tools, prepared the base, and the result was stains and stains, clearly visible in bright daylight. The “saving” thought immediately comes to apply a second layer.
However, this, as a rule, does not solve the problem, but, on the contrary, aggravates it. Make at least five layers - it won't do any good. Stains and stains will become even more noticeable.
What is the reason for the failure? How to fix the situation? What rules for painting the ceiling will allow you to avoid streaks and stains?
| No matter what anyone says, it is difficult for a novice master, armed only with video instructions on how to paint a ceiling, to achieve perfection in this matter. Small stains, stains, and unevenness spoil the impression of a freshly renovated room. But don’t rush to call a paid technician to fix the problems. This article provides ways to solve many problems. How much does it cost to correct mistakes when painting a ceiling? Call! Problem 1. Yellowness after dryingDirty yellow stains on the ceiling can be caused by a number of reasons. It is necessary to paint 2 times, the cost of work is from 200 rubles. per sq. m. 1. If there was flooding from above, moisture will seep through any number of layers of primer and putty. They will absorb it like sponges, and rusty spots will appear on the surface. The decision was to use a special primer, Aquastop. It will create a film barrier between moisture and subsequent layers. The area with the stain must first be treated with an antiseptic to destroy bacteria and prevent the growth of fungi. 2. A popular method of dealing with yellow spots after flooding on the ceiling and walls is chlorine-containing preparations, for example, inexpensive Whiteness. If you wet the wall with it, after a few minutes the dirt will dissolve a little. The room is ventilated, the surface is moistened again and this is repeated until the result is achieved. Problem 2: Spotted ceilingThe ceiling may acquire a spotted color for the following reasons: 1. If the room is smoky, nicotine tar deposits look like gray spots, which, if you sniff, smell like tobacco smoke. When treated with a regular primer and when using water-based paint, nicotine dissolves and, accordingly, appears. For such a case, Aquastop or a similar blocking material is purchased. The surface is treated with an antiseptic and primed.
To remove these stains, mix a teaspoon of ammonia with 100 ml of water and add a little dishwashing detergent. The dirt is washed with this solution until it is removed. The ammonia mixture can be replaced with kerosene. 3. Smudges on the surface may appear if the primer or putty is not thoroughly mixed or the primer is not applied evenly. In this case, you need to wash off the paint, re-prime it, putty it, sand the flaws with an emery tool, apply another layer of primer and paint. 4. If shadow-like spots are visible in refracted light, this is a putty defect. They check it this way: in a dark room, they direct a flashlight beam from below at the problem area. If the stain disappears, it means the ceiling is uneven. You need to thoroughly rub the defect with a 240-320 grit sanding tool, putty, then apply a layer of primer and paint. Problem 3: Stripes on the ceilingZebra most often appears due to incorrect paint consistency. If spots or streaks are visible after the first coat, there is no point in painting over them. You need to rinse and prepare the surface again. 1. Paint that is too thick does not apply evenly, and traces of a roller or brush are clearly visible on the dried ceiling. The paint, even if the instructions say Ready for Use, must be diluted with water (the solution behaves unpredictably with a primer) to a consistency at which drops from the whisk fall into a bucket and immediately spread without forming lumps. It is better to use a velor roller with medium pile, trimmed at the edges. 2. Excessively diluted paint dries faster than the painter can apply the second coat. The edges of the layer tear when applying the next one, changing the texture. After drying, folds will be noticeable in the direction of the roller stroke. Solution: the ceiling is washed out, primed, and repainted using the correct technology. If the room is large, it is better to paint with several hands. Before work, you should close the windows and doors of the room and wash the floor; high humidity will prevent the layers from drying quickly. You need to complete all the work in 20–30 minutes, without smoking breaks or lunch breaks. The tools are prepared in advance so as not to be distracted during the process. 3. Streaks on the ceiling mean that the paint was not mixed properly. To do this, it is better to use an electric mixer or drill. |
Choosing water-based paint
The type of paint we are considering is a suspension of water-based particles. Simply put, water emulsion is an aqueous emulsion consisting of pigment particles and a binder base. This composition is extremely stable in its form and is difficult to disintegrate from external influences.
Let's look at the main types of water-based paint:
- On an acrylic binder base.
- On a silicate base;
- On a silicone binder basis;
- Mineral based.
The most common and in demand acrylic-based paint. As the name implies, this paint contains acrylic resins, providing a balance between price and quality. The addition of latex substances gives the entire composition the property of elasticity. This ability ensures the closure of cracks on the treated surface. The size of cracks that such paint can cope with is no more than 1 millimeter. It is worth noting the increase in price provided by the addition of latex.
The silicone binder gives the paint increased water resistance and impermeability. Accordingly, this type of product should be chosen for surfaces of rooms with high humidity and dampness. For example, it is ideal for a bathroom ceiling. The composition of the paint, as the name implies, contains silicone resins, which determine these features. The size of the cracks that the product in question can cope with increases to 2 millimeters. The cost is correspondingly higher.
The most unpopular type of water-based emulsion is paint based on a mineral binder. The flaw lies in the fragility of the surface created by this product. The reason for the composition is the content of slaked lime or even cement. The cost of the product is the lowest among other representatives of finishing materials.
So, the choice is not difficult. The modern industrial sector provides every opportunity to find the option that best suits your goals.
When purchasing water-based paint, you should pay attention to the marking - coverability. The higher this indicator, the fewer layers you will need to apply to the ceiling to achieve an ideal result. On the label, the manufacturer often indicates recommended rooms in which the best results can be achieved by painting.
On the label, the manufacturer often indicates recommended rooms in which the best results can be achieved by painting.
What to do with old stains
There are long-term stains that appear from long-standing leaks and are not eliminated. No matter how much you make repairs, they will show through the paint again and again.
To remove these unsightly places, they should be thoroughly cleaned and washed. Then the problem areas need to be treated with any biocidal solution (a means for destroying fungus, mold, etc.). There is no need to rinse off the solution!
Be sure to wait until it is completely dry to ensure that re-cleaning is not necessary.
Next, a blocking primer is applied to the areas. It is waterproof and will reliably protect your walls and ceiling from stains and smudges. After drying, you can begin painting.
Other things to consider
Stains appear more often when working with glossy and semi-gloss finishes. If you are not confident in your skill, use matte paint. Follow the link to learn how to make matte paint from glossy paint.
Flaws are best shown in white. To protect yourself from possible failure, do not take a snow-white coating or add a little color to it.
Over a large area, there are more defects. The larger the surface to be painted, the more responsible you need to approach the work.
To paint the walls, take the paint that you like best. For the ceiling, take the highest quality one. The ceiling is the most finicky of all planes, especially since you cannot cover the flaws on it with furniture or paintings.
The main components of an excellent result: a well-prepared base, a non-viscous coating and adherence to painting technology. But at the same time, know that the ideal does not exist, which means you shouldn’t squeeze all the juice out of yourself to achieve it.
The most common mistakes
In order for repair work to be successful, it is necessary to avoid the most common mistakes:
- Using paint that is too thick or applying it in a thick layer can easily lead to stains on the ceiling.
- The presence of soluble salts and efflorescence, which will subsequently appear on the surface, is always noticeable to the naked eye and worsens the appearance of the room.
- The ceiling primer must be of good quality, and the applied paint must be of the correct concentration.
- Carrying out work on a layer that has not dried is fraught with disastrous results.
- The presence of rust stains will be noticeable even through a significant layer of paint.
- An incorrectly selected roller will result in uneven application of the material.
Elimination of defects
If spots, stripes and other defects do appear on the surface, consider their causes and methods of correction:
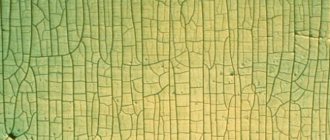
If wrinkles appear after painting the ceiling, you will have to remove the paint layer and paint it again.
- Traces, stains and stripes from the tool appeared. Reason: the paint was not rolled out evenly enough over the surface and was applied in too thick a layer. To eliminate this, clean the area with sandpaper and paint the entire ceiling with another layer.
- Stripes and stains at paint joints. Reason: painting the adjacent area “wet on dry” or insufficient mixing of the paint. To correct the situation, you need to clean the area with paper and repaint.
- Defects: folds and unevenness. Reason: thick layer of paint. It will have to be cleaned, replastered if necessary, primed and repainted.
- Rusty spots after painting. The reason is possible old flooding by neighbors. In this case, everything is stripped down to the base, puttied, primed with a matte white alkyd primer and repainted. There is no other way to deal with this defect.
- Spots of unknown origin remained. The reason is improper preparation of the base or the consequences of previous finishing. To fix it, you need to wash the stains with acid or alkali, dry, then re-prime and paint.
- "Marble veins" on the surface. The reason is gypsum putty and its insufficient priming. Removable by grinding. Then apply primer and paint.
- Stains in the form of soluble salts. The reason is applying paint to an undried base. The surface is properly dried, sanded, primed with an alkyd primer and repainted according to technology.
Thus, if you follow all the technological steps, you will be able to paint the ceilings at home with high quality yourself, as well as eliminate possible shortcomings. This experience will undoubtedly be useful when painting work on other surfaces, since the basic technological principles have much in common for different paint repair jobs. We wish you success!
Causes of stains
Many people who do not often deal with repair work, having discovered a stain on the ceiling after painting, decide to apply another layer of material on top to hide this puncture. But this is not the right decision, which leads to a worsening situation. But how to fix ceiling painting?
First you need to understand what caused the defect. Often, an unprepared surface has a significant impact on the quality of the work performed. Therefore, in order to neutralize the bleak consequences and carry out high-quality painting, it is necessary to properly prepare the surface.
Also, the lighting in the room can affect the appearance of various traces, but then they will move throughout the entire ceiling and change in size throughout the day. To solve the problem, experts recommend purchasing thicker curtains and changing the lighting (increase or decrease).
Alternatively, you could simply buy low-quality materials. How to fix the ceiling after painting in this case? In this situation, you will need to wash out the applied layer and repaint it with new, good paint.
Before you start, you need to choose the right tools. The roller must be made of foam rubber or velor, which will significantly reduce the likelihood of defects.