Priming the surface for its further finishing not only helps to remove dust. The primer penetrates deep into the base and adds strength to the surface, improves adhesion, reduces and evens out the absorbency of the base.
The last listed advantage of the primer is especially important when performing work on floor screed, plastering walls and ceilings. The primed surface absorbs moisture much less, thanks to which moisture does not leave the cement-sand mortar and gypsum plaster so quickly. This helps prevent cracks in floor screeds and plastered walls and ceilings.
After completing the plastering work and pouring the screed, they must be primed; the primer will add strength and reduce absorbency. This will improve the quality of further work performed. On a primed surface, tile adhesive and putty adheres much better and does not rub up when applied in a thin layer.
By priming walls and ceilings before painting and wallpapering, you will not only reduce the consumption of paint and wallpaper glue. If you glue wallpaper with open windows in the summer, the glue will not dry on the wall so quickly and you will not have to apply additional glue to the drying areas of the wall. If you begin to adjust the pasted strip on an unprimed wall and tear it away from the wall, small particles of putty may come off along with the strip of wallpaper.
When painting an unprimed ceiling with a roller, small particles of putty may move away from the base, and the putty may also swell. And all the work will go down the drain and you will not get the desired result.
How to prime walls and ceiling
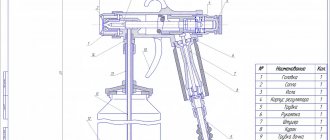
Paint gun mechanisms
The spray gun consists of the following parts:
- Spray head. This element ensures the spread of paint and varnish material over the surface being treated. Thanks to the protrusions with holes made in them, air flows are provided that form the so-called torch (primer flow). In the absence of side air flows, the jet of the composition will be round in shape, and in their presence, it will be elliptical. The amount of air also affects the width of the torch. The torch is controlled by means of a special valve.
- Nozzles. It is a strictly calibrated hole. The nozzle performs several tasks: it doses the flow, gives it direction and acts as a groove for the needle. In some models, a diffuser (deflector) is responsible for the direction of the airborne flow. For materials with different degrees of viscosity, different nozzles with different hole diameters are used. Typically, manufacturing companies indicate the possibility of using a nozzle when working with a particular composition. For primer, the nozzle diameter can range from 1.4 to 1.8 millimeters.
- Needles. This element allows you to organize a dosed supply, increase, reduce or completely shut off the flow of paint and varnish material. The needle is controlled by moving the trigger. The needle must be compatible with the nozzle, since these parts are adjusted to each other, so each nozzle corresponds to a specific needle, and these parts are usually sold together.
- Housings and handles. This is the largest part of the spray gun. Devices from the middle and higher price categories are made from aluminum alloy. Moreover, the alloy is a single piece in which internal channels are made. Thanks to this manufacturing principle, it is possible to achieve high calibration accuracy. Pistols in the lowest price category are produced by casting, as indicated by the presence of a seam on the body.
- The torch control valve provides control over the air supply to the second air channel. If the valve is open, the air flow moves towards the ridges and the spray width becomes as wide as possible. When the valve is closed, the soil stain will have a round shape and small size. The valve may be located on the back of the device above the paint supply control valve or on the side of the spray gun.
- The soil supply valve is designed to control the amount of material. It can also be used to regulate the flow by narrowing the needle. This element is always located in line with the needle on the inside of the spray gun. The valve is controlled by limiting the stroke of the trigger and needle.
- The air supply valve is located under the trigger. Used to direct compressed air into the spray gun channels. The valve can be equipped with a quick-release fitting or a pressure gauge.
- Trigger. The trigger controls the process of applying the primer. After pressing the trigger presses on the air valve, as a result of which compressed air begins to move through the device. If you pull the trigger harder, the needle will move and the air flow will pick up the primer.
Tips and tricks from experts
When choosing a spray gun, it is important to follow the advice of experts. They recommend taking into account the purpose, material of manufacture and volume of the tank. An equally important criterion is the ergonomics of the device. If the device is difficult to operate, it will be difficult to hold it in your hands for a long time. In addition, the mechanism must be selected taking into account the diameter of the nozzles.
Which spray gun model did you like? Share your review.
- What kind of compressor is needed to paint a car in a garage?
- Which set of tools is better to buy for a car?
- Which sealant is best for the engine?
- Automotive electric pump rating best models
- Car battery rating
- Best H4 Halogen Bulbs
Preparing paint for work, selecting viscosity
The first rule that should be followed when diluting paints is to strictly follow the manufacturer's instructions. However, after thorough stirring and (for certain compositions) filtration, the final adjustment of the instrument is made. To properly dilute spray paint, it is recommended to create a test bench.
To test the operation of the sprayer, hang (for example, in a doorway) a sheet of cardboard. A newspaper is hung over it. After this, the viscosity of the paint for the spray gun is selected as follows.
- You must prepare the starting mixture following the manufacturer's instructions. The resulting composition is poured into the tank, about 80% of its volume.
- The maximum air supply and flame width are set.
- The newspaper is sprayed.
- The presence of large splashes and uneven streaks is visually determined, which indicates the need to dilute the paint.
- About 5% of the volume of solvent recommended by the manufacturer of the specific paint is added to the tank.
- Testing is again carried out by spraying a torch onto the newspaper to determine the nature of the paint application.
The steps of checking and adding solvent are repeated until a stain without defects is obtained after spraying. The ideal preparation of paint for a spray gun can be described as achieving a uniform, fine mist in the spray area. The selected parameters (amount of ingredients) are recorded and used to prepare the next batches of paint.
Some technicians may insist that the manufacturer's instructions are sufficient to obtain optimal characteristics of the working mixture. However, for work of increased complexity, it is recommended to carefully determine the viscosity of the paint using the method described above. This will ensure optimal results, for example when working with stencils. Also, paint for a metal spray gun (for applying thin layers) must be sprayed with a uniform, finely dispersed spray.
Preparing walls and spray gun for painting
Before you start using the spray gun, you need to prepare the walls. If there is old coating on them, it must be removed. The plane of the wall must first be leveled, puttied and covered with a layer of primer. It is the primer that ensures high-quality “paint adhesion” to the wall surface. It is important that the primer is dry before starting work. Otherwise, after painting, various defects may appear on the wall.
Also at the preparation stage you need to dilute a sufficient amount of paint if you are using color. This is necessary in order to avoid a situation where the supply of the substance is insufficient to cover the entire area of the walls. In such cases, non-professionals often make a mistake: when preparing a new “portion” of paint, a smaller or larger amount of color is added and the color takes on a different shade from the previous version. Thus, when working with coloring, you initially need to prepare a sufficient volume of the product. If you are using ready-made colored paint, you can omit this preparation step.
Device Specifications
Car spray guns are characterized by:
- Power. Models with ratings up to 500 W are suitable only for simple work in small volumes.
- Pressure. The normal value for applying most types of paints and varnishes is 4-5 atm. Liquid putties are applied using a large nozzle, because... the gun may not be able to handle the load and will fail. Pressure allows you to change the speed of paint distribution over the surface and the volume of its loss in the form of dispersed mist. If the key criterion is the efficiency of the equipment, you should focus on models with a pressure of 0.6 bar.
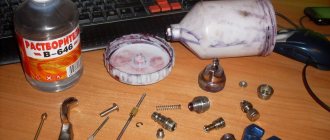
- Features and components. The basic equipment includes a paint tank, a gun and a power supply device. Also sold with the spray gun are various tanks, sealant for sealing joints and a set of needles that allow you to clean the air ducts or nozzle.
Imprimfix
Deep penetration acrylate primer. Strengthening.
1 hour between coats
15 minutes, touch dry
For interior and exterior use
Advantages
- Water-dispersed
- Evens out the absorbency of the substrate
- Improves paint adhesion
- Vapor permeable (breathable)
- Reduces finishing coat consumption
Application area:
For priming walls and ceilings of premises before painting and decorative finishing with water-dispersion paints and varnishes, puttying, wallpapering and other finishing works in buildings and structures of all types - A, B, C, including preschool educational, educational and medical organizations, as well as for priming of facades of buildings and structures. The primer is applied to mineral substrates (concrete, asbestos-cement, cement-bonded particleboard, ceramic brick masonry), gypsum plasterboard, gypsum plasterboard, plastered (except for lime plasters) and/or putty (except for oil-based putties and their varieties) surfaces.
Compound:
Aqueous dispersion of acrylic copolymer, additives, water.
Consumption:
- From 0.05 to 0.14 l/m per layer depending on the porosity of the surface.
Packing:
- 2.5 l.
- 9 l.
Tinting:
- Not tinted
Best before date:
- 4 years from the date of manufacture in unopened original packaging at a temperature of plus (5-30) °C.
Precautions, disposal:
- Store in tightly closed containers out of the reach of children. Use rubber gloves to protect your hands. When applying with a spray gun, use protective goggles to protect your eyes; to protect your respiratory organs, use an ShB-1 “Lepestok-5” respirator or a filtering anti-aerosol half mask with class FFP1. Do not pour into sewers, drains, water bodies or onto the ground. Remaining material, as well as material with an expired shelf life, should be taken to a specialized recycling point.
Transportation and storage:
- According to GOST 9980.5-2009 and at a temperature of plus (5-30) °C.
Surface preparation
Priming of new concrete bases and plasters, as well as putty surfaces, should be carried out after a set of strength properties: concrete bases and cement plasters - no earlier than 28 days, lime-cement, lime-gypsum and gypsum plasters, as well as putty surfaces - after sufficient curing them according to the manufacturer's instructions. It is not allowed to prime substrates that have rust, efflorescence, oil and bitumen stains, as well as other substances that reduce adhesion, for example, layers of wax, etc. without pre-cleaning them. Surfaces painted with chalk, lime, glue and silicate paints must be completely cleaned of the paint layer. The surface quality must be no lower than category K3 for painting with deep matte and matte paints, and no lower than category K4 for painting with semi-matte, glossy paints and decorative finishing with paints and varnishes that form thin coatings (SP 71.13330.2017).
HVLP spray gun category
HVLP (not HLVP!) spray guns are characterized by high volume and low pressure. They were developed in the 80s of the last century, and one of the goals of their creation was to minimize harm to the environment.
The arrangement of air channels in HVLP system paint guns provides for the transfer of at least 65% of the sprayed material to the working surface without loss.
This effect is explained by the high level of pressure at the inlet - 2.5-3 atm. – and its low output value – about 0.7 atm. It turns out that during the operation of HVLP type spray guns, about 25-35% of paint or varnish is lost in the air.
But concern for the environment is not the only quality of these paint sprayers. The advantage of the HVLP system (which is sometimes mistakenly called HLVP) is the significant savings in paint and varnish material, achieved due to the low speed of the paint at the exit. Because of this, less fog is formed, but it is necessary to spray the material at a close distance - no further than 15 cm.
The pros and cons of HVLP spray guns are summarized in a table.
| Advantages | Flaws |
| Saving paint | You need a lot of air (360 l/min or more), which means a powerful compressor |
| Good environmental performance | Air duct diameter increased |
| Doesn't produce much fog | Requires the installation of additional filters to clean the air from moisture and oil due to the use of a powerful compressor |
| Minimum debris on the work surface | Requires high skill to avoid leaks |
Disadvantages also include the short range when spraying paint.
About the features of interior decoration
High-quality interior finishing involves applying a primer material to each layer of the treated area. So, you should prime the surface before plaster, then before puttingty, then before wallpapering.
Before applying paint, you should use an acrylic primer, not an alkyd one, then the paint will adhere better (without bubbles) to the surface.
Long gone are the days when one type of primer was used for all types of finishing work. Today, a large assortment of modern primers are supplied to the construction consumer market in dry form and ready for use.
Selecting a spray gun
The most accessible and cheapest devices are ordinary hand-held spray guns . They usually consist of a kind of hand-applied tank that pumps paint under pressure using compressed air for spraying, pressure and suction hoses, and a special fishing rod. One hose is immersed in a container of paint, and at the end of the other there is a spray gun.
Hand pumps are quite easy to use, but their performance is low - they are more suitable for small and uncomplicated work.
Hand spray gun for paint
There are also electric spray guns . They operate on a standard voltage of 220 volts, are very compact, and can be secured with a special strap.
The best manufacturing companies
The top best suppliers of guns for painting cars include the following brands:
- GAV produces budget devices suitable for beginners who are mastering all the intricacies of painting. They allow you to apply base coat and acrylic.
- Walcom - presents elite spray guns for auto repair shops. Various models of guns for dispensing a wide range of coatings have been produced since 1945.
- SATA produces wear-resistant equipment with a long service life.