How and with what can you paint surfaces after puttying?
Painting of putty surfaces is done with oil or some types of water-based paint. The preparation of walls for painting must be done efficiently to ensure an even coating with the dye.
The work is carried out in stages:
- The walls are inspected and the scope of repair work is assessed. The consumption of finishing materials is affected by the quality of the base. The deviation from the vertical of the wall is assessed using a rule.
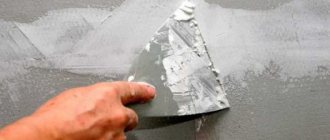
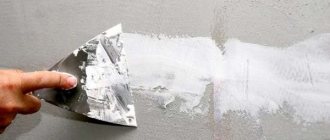
- Puttying is carried out with 2 compounds (starting, finishing), the work is carried out with a spatula, which is held at an angle of 30°.
- The starting putty is applied in a layer of 50 mm, the finishing putty is applied in a layer of 2 mm.
- The finished base is rubbed with fine-grained sandpaper.
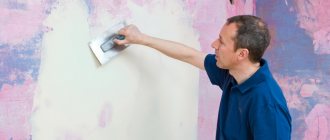
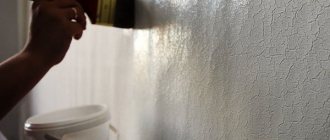
- After the putty has dried, the coloring composition is mixed in a container and applied with a roller to the wall.
- The first layer is dried, then the painted base is re-tinted.
- Corner areas are painted with a thin brush.
- The treated base is dried.
Determine what paint to paint the surfaces in accordance with the characteristics of the putty composition, which can be:
- polymer;
- plaster;
- cement.
Polymer compositions
Polymer putty is optimal for the finishing layer before painting. The composition is intended for interior work. Using the solution, the surface is smoothed, making it easier to paint the walls. The thin structure of the product helps eliminate minor deformations. This type of putty has high adhesion to the surface and does not peel off during use. It is necessary to take into account the high cost of polymer materials.
Plaster
Gypsum solutions are used for interior work; the product is suitable for eliminating cracks, small defects, and joints. Gypsum putty is painted with acrylic or polyvinyl acetate water-based paint.
The advantage of putty is its affordable cost, economical use, environmental friendliness of components, and ease of sanding. Gypsum putty hardens quickly, so work is carried out in small areas. The mass is not used for concrete bases and for finishing rooms with high levels of air humidity and building facades.
Cement
Cement mixtures for puttying before painting are strong, durable, resistant to temperature changes and air humidity. In addition to cement powder, the putty contains lime, which increases the plasticity of the mass. The putty mixture is affordable and easy to apply. The structure of cement putty is coarse-grained. Surfaces are painted with water-based and powder paints.
How to properly putty with your own hands: step-by-step instructions
Any puttying begins with preparing the working surface:
Starting layer
You can distinguish the starting putty from the finishing putty by its coarse fraction. The work is also simplified if you use a universal mixture that is suitable for both start and finish.
Initial puttying is carried out to eliminate visual defects of the walls, such as cracks, gouges or other irregularities. This may require laying several layers, each of which is applied after the previous one has dried.
To ensure that at the end of the work the mixture does not shrink after drying, and therefore does not crack, it is advisable to use a painting mesh that is attached to the wall.
If the deviation of the surface is large, then it is leveled and puttied along the beacons. However, almost no one does this, since it is difficult to imagine how much time and money it will take to apply a few centimeter layer of putty.
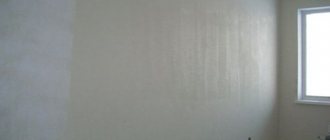
After drying, it is necessary to smooth out small irregularities with sandpaper and prime them for further work.
Finishing putty
The finishing putty is applied in a thin layer (up to 2 mm) to the leveled surface to achieve ideal smoothness due to its finest fraction. After drying, the wall is brought to perfection by mechanical sanding with fine-grained sandpaper, and then primed again for painting or wallpaper.
Reinforcement of seams or the entire surface with web
Reinforcement with cobwebs or painting mesh is required. It is carried out in order to avoid peeling of the putty or plaster from the wall, and also to prevent cracks from occurring or the composition falling out of the seams due to shrinkage of the mixture after drying.
The mesh sticks to the surface with a small adhesive layer, and then is simply covered on top. In some cases, it can be further strengthened with a construction stapler.
If it is necessary to putty with plaster, then the web is laid only on the seams between the sheets, but in cases where a starting layer is required, it is applied to the entire surface of the wall.
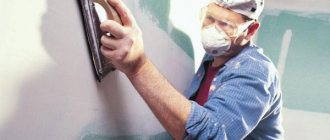
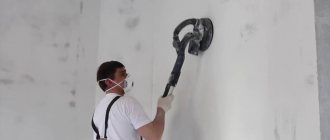
Grinding: the right technology
Sanding after puttying is done to remove unwanted grain and perfectly align the joints of the mixture.
It is best to carry out sanding by hand using regular fine sandpaper or a special block on which it is attached. In this case, the result will be more ideal, and the risk of accidentally rubbing the hole is minimal.
Grinding should be carried out in good lighting, constantly assessing the result from four sides. What kind of rubbing movements: circular or longitudinal is not so important, but the pressure should be controlled so that pits do not form, otherwise the finishing layer will have to be applied again.
In addition to the sandpaper, a special mesh is sold for grouting putty, which leaves less dust and does not clog longer, which increases its service life.
Final putty “clean” for painting or gluing
Finishing putty “clean” for wallpaper or painting is carried out with a very thin layer of any finishing or universal mixture, depending on the room, followed by sanding. No matter how thin the applied layer is, before and after its application it is necessary to prime the surface well
Wall painting options
You can paint the walls in your apartment using putty using tinted varnishes, waxes or paints. Some plasters are offered by manufacturers tinted, while other materials are colored during the preparation process using pigments.
Taking into account the texture of the putty and the design project, you can use the following painting options:
- plain tinting of wall panels;
- tinting surfaces in several shades;
- painting walls to resemble polished marble and Venetian plaster;
- the “dry brush” technique allows you to create artificially natural unevenness on the base;
- toning with the effect of highlighting individual areas.
Types of paints
You can determine which paint to use for putty by color, composition, texture, purpose, characteristics of water resistance, strength, layer density (hiding power), and wear resistance. Products must be environmentally friendly and safe for people. Paints for putty substrates are produced for interior and exterior (facade) work.
In the latter case, it is optimal to use the following paints:
- acrylic with high moisture resistance;
- silicone elastic;
- silicate moisture-resistant, easy to clean.
These coatings are durable and resistant to precipitation due to the presence of a film layer on the surface. Many compositions have a white tone, which can be changed through tinting. Several coloring pigments are added to the material to obtain the required tone. The mass is mixed using a construction mixer.
Coloring agents differ in the type of base.
For tinting putty surfaces, it is better to choose the following paints:
- Water-based. Requires application in 2 layers. After drying, a matte film is formed.
- Acrylic. Available in glossy, specialized and glyphthalic (with acrylic resin). This dye is non-toxic and has a creamy consistency that is easily distributed on the walls. The material dries quickly, maintaining a rich shade. The dye is also suitable for creating complex compositions with areas of painting, decoupage, and ornament.
- Latex. Dry quickly and are aesthetically pleasing. However, the material is only suitable for rooms with stable air temperatures (living rooms, bedrooms) and is not used for kitchens.
Useful tips
Whether it is worth using dye over putty and plaster depends on the design project. Design solutions are being developed with tint building mixtures, inserts of tiles, wood, stone, etc. Surface tinting is a more budget-friendly option and allows you to implement standard and custom projects.
Painting walls is a quick and inexpensive way to give them an attractive appearance. With a successful selection of colors and shades and perfectly evenly plastered walls, the surface will look no worse than after finishing with other types of materials. In this article we will look at what paints are used to cover the walls after leveling them with plaster, as well as how to do the painting work yourself.
Choosing paint for plaster
To paint interior walls and decorate facades, paints of different compositions are used. After all, the requirements for them differ significantly.
For interior work
The following types of paints are most often used for painting plaster indoors:
Water-based: form a matte surface, easy to apply, economical, do not contain toxic substances, but are able to absorb moisture and quickly wash off upon contact with water, therefore they are not recommended for wet rooms. Water-based paint can be applied to various types of surfaces: plaster, concrete, wood, brick, wallpaper, plastic elements. Available in a variety of colors and white for mixing with water-based coloring pigments. You can dilute with regular clean water. Material consumption per 1 m2 is 0.1 - 0.15 liters. That is, one 10 liter can of paint is enough to paint approximately 80 m2 of surface in one layer. Drying time no more than 1 hour.
Acrylic dyes are the same aqueous dispersions, but due to the higher acrylic content they provide a more durable and durable coating, which can be easily wiped with a slightly damp cloth, but excess water ingress is also unacceptable. Fits well on all types of surfaces. Consumption is slightly higher than that of water-based emulsion.
The coating can be either matte or glossy. For example, Tikkurila acrylic paint is suitable for interior work in dry rooms and with high humidity, for example, in the kitchen or bathroom, preventing wet walls from damaging the plaster. Also suitable for painting ceilings.
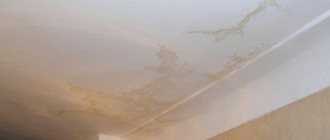
Latex: more expensive, environmentally friendly, form a glossy or matte waterproof film on the surface, can be used in bathrooms and other rooms with high humidity levels. Suitable for painting walls and ceilings made of all types of materials, including those plastered with gypsum, cement or lime mixtures.
Latex paints are thicker than water-based paints, so sometimes their consumption when painting (hiding power) is indicated in g/m2. Different manufacturers' products often differ in consistency, and dye consumption varies widely from 90 to 200 g/m2. They can be diluted with water up to 5% of the initial volume. Drying time 1 - 5 hours.
These paints are often used as a finishing coat for decorative plaster. After painting, they highlight the volume and texture of the surface well.
Alkyd (enamels) and oil : provide a very durable wear-resistant coating that is resistant to mechanical damage. Walls coated with this composition do not require special care and can be easily washed with any soap solution. The disadvantages include a small selection of colors, increased consumption, increased fire hazard (they easily ignite). Alkyds can release toxic substances when applied. In general, these materials are suitable for interior decoration of both wet and dry rooms. After drying, they create a durable glossy finish.
You should not immediately paint walls plastered with cement-sand mortar - the paint will lie unevenly. First, it is better to cover them with a thin layer of finishing putty. If this is still necessary, it is better to whiten them with ordinary lime or cover them several times with acrylic paint.
Types of putties
There is a huge selection of putties on the building materials market, which differ in different parameters.
Depending on the degree of readiness, dry and ready-made mixtures are distinguished. Dry mixtures are attractive due to their low price, and the finished compositions have an ideal homogeneous consistency, do not take time to mix, and do not require additional tools and containers.
All these parameters rather determine the ease of use of the putty in each specific case, and the main thing when choosing a material remains the scope of its application. This could be a kitchen, a bathroom, or even a wall in an open gazebo, that is, a surface in conditions of high humidity and temperature changes. Or you need to paint the walls in a children's room, where the harmlessness and hypoallergenicity of finishing materials is especially important.
The scope of application of the mixture is determined by the binder in its composition ( cement, gypsum or polymer ). Let's take a closer look at each of them.
Gypsum putties have a number of advantages: low cost, huge range, vapor permeability, hypoallergenic, good adhesion to paints, wallpaper and other finishing materials, ease of application, no shrinkage. This putty sets quickly, so it requires some skill in application. Despite all its advantages, the scope of application of gypsum putty is limited to heated rooms with normal humidity levels. So, it is ideal for bedrooms, children's rooms and living rooms.
In polymer mixtures, the binder is acrylic resins or latex. Only this type of putty is sold both dry and ready-made. The range includes models that can be used in both dry and wet areas. For example, dry polymer putties Starateli Finishnaya Plus and Osnovit Ekonsilk PP38W are for rooms with any level of humidity, and ready-made polymer putty Danogips SuperFinish is only for dry rooms. Polymer putties fit well on plasterboard bases and can be applied in an ultra-thin layer, reducing material consumption. The mixtures are supplied in sealed plastic buckets, which can be stored for a long time even in a humid environment, unlike plaster and cement ones, the paper packaging of which easily gets wet. The price of polymer putties is much higher than gypsum and cement putties. But the wide range of choice, ease of use and guaranteed high quality of the putty surface will justify the investment.
So, we figured out the scope of application. We found out that only cement putties are used in exterior work. For wet rooms you need to choose from cement and polymer compositions. And for dry rooms, any putty is suitable, but gypsum or polymer are considered the best option.
1.1. Starting putty
1.2. Finishing putty
The finishing putty for painting can be ready-made polymer (such as Starateli Superfinish Paste, 15 kg with an application thickness of 0 to 2 mm), dry cement ( Weber.Vetonit VH, 20 kg with a layer thickness of 1 to 3 mm) or dry polymer ( Knauf Polymer Finish, 20 kg with layer thickness from 0.2 to 4 mm).
1.3. Universal putty
Using two types of putty can be a difficult task for a novice craftsman: you need to choose the right materials to combine, correctly calculate the required amount, spend twice the time drying each layer, and also financial costs. To simplify the task, universal putties are designed, which have a medium grind and have absorbed the best properties of starting and finishing mixtures. With their help, it is easy to make the surface for painting smooth (though you have to sand more), and a layer can be applied, if necessary, up to 1 cm.
Universal putty is suitable for both types of work, but more often it is used to close joints of sheet materials (gypsum plasterboard, gypsum board, gypsum board, chipboard and others) or to seal cracks and holes.
Gypsum compositions are universal (for example, Knauf Fugen, 25 kg with a layer thickness from 1 to 5 mm) and polymer ( Starateli PoliArt superwhite, 20 kg with a layer thickness from 0.2 to 5 mm).
Tools for work
Having chosen what to paint the walls with, let’s consider what tool you will need for this. In addition to the paint itself, you will need:
- brush or roller for priming;
- two brushes for applying paint – one wide, for the main surface, the second, narrow, for hard-to-reach places; a wide brush can be replaced with a paint roller;
- to create a decorative surface (for example, grainy or patterned), you can use rollers with attachments;
- if necessary, color of the desired shade to dilute the white base;
- grater for polishing small irregularities;
- large capacity (tray);
- ladder;
- personal protective equipment: gloves, a respirator when using a spray gun, a hat when painting ceilings.
Practical point
Washable paints will cost more than regular non-washable paints, but there is another side to the coin. Over time, the ceiling will still get dirty - either a mosquito was killed, or the champagne shot out, or from grease and soot, if we talk about the kitchen. And here the question arises: what is better - to wash it again or to repaint it again? Everyone chooses for themselves what is best for them and what is more practical for a particular room.
For the bath and kitchen it is necessary to take moisture- and steam-resistant compounds, otherwise you will have to repaint everything very soon.