Wallpapering cement plaster
So, answering the main question, it should immediately be said that everything depends on the quality of the plaster itself.
However, if we are talking about whether it is possible to glue wallpaper on cement plaster, then the answer will be negative. The fact is that such a rough finish without further processing has a too grainy surface. Of course, if the canvases are thick, then they can smooth out some defects, however, it is better not to take risks.
Elimination of defects in cement plaster
In addition, there are other reasons why wallpapering on plaster is not allowed:
- The base absorbs moisture well, including liquid from the glue. As a result, the coating will quickly begin to peel off.
- If the canvases are light, then the dark gray walls may show through, leaving you at risk of getting a spotty surface.
- During renovations, most often the old wallpaper is replaced with new ones; accordingly, the basis is the old plaster, on which cracks and other defects appear over time.
Thus, if you are in doubt whether it is necessary to plaster the walls before gluing wallpaper with the finishing composition, but at the same time you want to carry out the repairs to the highest quality, then you should not hesitate.
However, it takes too much time and money to properly prepare the walls, so many people try to complete the finishing as quickly and cost-effectively as possible.
Surface preparation
If you also decide to take the simplest and fastest route, then you can glue wallpaper onto the plaster, doing at least the required minimum. Of course, this is only possible if the walls have no defects.
The work consists of several stages:
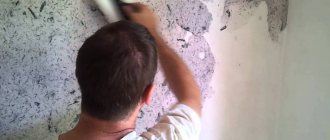
- First of all, you need to remove the crumbling surface of the plaster using grout or a rough brush.
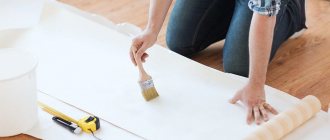
- After this, the walls need to be treated several times with impregnation or special glue.
- Then we glue the wallpaper onto the plaster. If the first canvas does not stick, then it is necessary to apply glue to the wall in one or two layers.
This is the necessary minimum, without which wallpapering on plaster is simply unacceptable; however, these procedures will not replace complete surface preparation. Therefore, it is advisable to spare no time and money and cover the cement with a finishing layer of plaster.
Priming the walls
Choosing a new coating
When choosing decorative products, be guided by the following criteria:
- Condition of the walls in the room. If there are defects in the base, it is advisable to purchase dense, two-layer products with a relief front surface and an applied pattern that will help visually hide the unevenness.
- To decorate a room of a non-standard shape, with various niches, recesses, avoid decorative material with a large pattern - such canvases look beautiful in large rooms (how to calculate the amount of wallpaper per room?).
- Wear resistance and resistance to fading under the influence of ultraviolet radiation. If you are going to renovate a room with high traffic, a suitable option would be canvases that can be washed and painted (what kind of wallpaper is suitable for painting?). For a room where the sun's rays constantly fall on the walls, choose wallpaper with a protective layer against ultraviolet radiation.
If the windows in the room face south, materials in cold or dark, rich colors will help create a cool atmosphere. And vice versa: orange, beige, apricot, coffee shades will visually make a house with windows facing north “warmer” (how to choose the right wallpaper color?).
Try to purchase rolls from the same batch to eliminate possible material discrepancies in color.
Important An important criterion for choosing wallpaper is the type of walls being finished: any concrete base, even if it appears even, will have minor roughnesses that thin, plain products will not hide.
Counting the amount of wallpaper and glue
How much should I take?
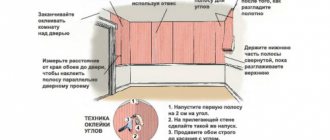
Let's count the rolls. Most often, rolls with a width of 53 and 106 cm are available for sale. They are also called “half-meter” and “meter-long”. European manufacturers also produce wallpaper with a width of 68 cm. The length of the canvas per roll is 10.05 m. It is most common. Vinyl wallpaper with a width of 53 cm is sometimes sold in rolls of 15 m, and non-woven wallpaper for painting a meter wide is also supplied in 25-meter rolls. We remember the school geometry course, pick up a tape measure, measure the room and calculate the perimeter by summing up the length of all the walls. For example, for a room measuring 3x4 m, the perimeter will be 3+4+3+4=12 m. Multiply the perimeter by the height of the ceilings. We subtract the area of windows and doors from this and get the total area of the walls.
S=(a*b)-((c*d)+(e*f)). S is the required area of the walls of the room, a is the perimeter of the room, b is the height of the ceiling, c is the width of the window, d is the height of the window, e is the height of the doorway, f is the width of the doorway.
We calculate the number of strips as follows: divide the perimeter of the room by the width of the roll. For example, we divide our 12 m perimeter by the roll width of 0.53 m. We get 22.6. Round up and get 23 stripes. For wallpaper with a large ornament or pattern that needs to be combined, designers recommend multiplying the perimeter by a factor of 1.18 when calculating.
Dependence of the type of plaster and wallpapering without putty
Many people think about how to apply wallpaper correctly, in what order, and with what tools. And this is absolutely correct, because every beginning builder should be interested in such things. First of all, to the question of whether it is possible to glue wallpaper on plaster without putty, you can answer in the affirmative - yes. However, you need to take into account the fact that among the wide variety of putties, there are those on which it is not recommended to stick a coating.
These include, for example, decorative plaster. If you stick paper on a similar material for finishing walls, it will not bring anything good, because decorative plaster is already the final finish, as a result of which we can conclude that its adhesive properties (that is, the ability to adhere) are not enough to the paper held tightly to the surface of the walls.
Decorative mixture
The decorative mixture is called that way because it has a decorative purpose. That is, in order to decorate the interior with bright colors and not bother with wallpapering, people plaster the walls with this type of putty and enjoy what they have.
It is strictly contraindicated to glue onto a decorative layer, otherwise you will simply waste your time, effort and money.
Cement based mixture
Cement is intended for finishing facades or for “rough finishing”. Under no circumstances should paper wallpaper be glued to cement material, as it will not have time to stick due to the increased ability of cement to absorb moisture. The fact is that when the glue is applied, it will be instantly absorbed, which in turn will not allow the paper to stick.
Another disadvantage of this material is that even despite a layer of putty, it still penetrates into it and the wallpaper, especially light shades, seems like Dalmatians. Because in some places natural colors predominate, but the appearance is spoiled due to black “spots”.
Concrete contact as a means of preparation
Often, to treat walls before wallpapering, a special dispersed primer is used, which has a high resistance to alkalis and contains quartz sand. Thanks to concrete contact, it is possible to significantly increase the adhesion of the concrete surface and finishing material. Efficiency and simplicity are the main advantages for which this type of primer is valued.
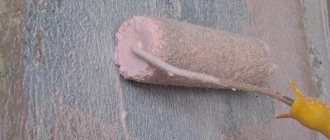
Working with a primer is quite simple - you just need to purchase the material and start processing: the mixture is mixed well, then poured into a special tray and systematically applied with a roller to the surface of the walls.
You can also use a brush, but in this case the process is less comfortable. The most important thing in this case is to cover the wall with concrete contact as evenly as possible, working with vertical movements. It must be applied in overlapping layers, eliminating the possibility of untreated areas appearing.
If the question arises about how to properly hang wallpaper on concrete walls without putty, then the answer here is to cover it with concrete contact. The mixture makes the wall surface completely homogeneous and guarantees good adhesion of the finishing material to it. Like a primer, only much better and more effective.
Paste light non-woven wallpaper onto concrete
Is it possible to stick light non-woven wallpaper on concrete walls? How to prepare the walls so that the concrete does not show through? I want to add water emulsion to the primer so that the walls become light. Is it possible? Maybe something else can be done to avoid puttingty the walls ?The walls are smooth. Previously, silk-screen wallpaper was pasted directly onto the concrete, it was light, nothing showed through, only after 5 years did the wallpaper begin to unravel at the joints. How can I glue it now so that it doesn’t come apart at the joints? It is recommended to coat the edges of the wallpaper with PVA glue
Using paint as a base for finishing materials is not at all an option. On concrete walls, the base layer should be at least putty. No need to include Kulibin)) - each material has its own area of application. Although if you want, experiment. Good luck!
First of all, non-woven wallpaper can be breathable or not. You can distinguish one from the other quite simply - breathable ones do not have a continuous decorative outer covering
This is important to know, since they dry differently - breathable into the room, not permeable to the wall. You will definitely need a seam roller, a rolling roller (you can just use a new paint roller), a penetrating primer, a wide brush, a wallpaper knife, a plumb line - head and hands Preparing the walls - peel to the ground (you can pre-wet them), remove the covers of sockets, switches, seal them with tape - so that it does not extend onto the wall beyond the mounting box, check the straightness of the corners
If everything is OK, we move on to the primer. Primer – wash the walls with a roller (regular warm water), take a primer “under non-woven wallpaper”, go over the corners with a brush, paint the walls with a roller – let them dry. Now just “by eye” - we cut off a small piece of wallpaper (20 centimeters across the width of the roll), moisten it with water and apply it to the wall, wait 15-20 minutes and see whether the concrete has appeared or not - if OK, glue it. Features of gluing - special glue is applied not to non-woven wallpaper, but DIRECTLY TO THE WALL. THE ONLY WAY. The sequence of leveling is to hit a vertical line with a plumb line, lay the sheet on the wall, spread it with a paint roller from the middle to the edges, roll the top part with a seam roller, apply the next sheet, spread it out - and roll the joint between two sheets with a seam roller (if everything is primed and spruce for fizelin - there is no need to coat the seams with anything additional. Now about the amount of glue on the wall - if the wallpaper is not breathable, the glue will dry “into the wall” and the main thing here is not to “overfill” the glue, otherwise the wallpaper may crawl, as a tip, first try on two sheets - if not It worked out - not a big loss, but you will be sure how much glue to apply to the wall. The corners are glued in an overlap - then they are cut with a wallpaper knife, the excess is removed, and the corner is pressed together with a seam roller. Good luck
You cannot add water-based emulsion to the primer. If the walls are concrete, and you want there to be no gap through the wallpaper, then it’s better to putty. Suitable putties KNAUF_UNIFLOT, PUFAS, Farvest façade CME-01. As for wallpaper joints, it is better to take a mixture of PVA and glue for heavy vinyl wallpaper, this is a proven mixture. Before gluing the seams, the seams must be soaked.
Aren't you afraid that you won't be able to hang wallpaper and lose time? Putty for a day, sand, prime for another day, hang for another day - three days at most gives a normal result. without reinventing the wheel, there is a miracle of the master, of course. For example: mix PVA and boostilate in one bottle they glue joining wallpaper, overlapping the canvas onto the canvas, overlapping onto the baseboard and even onto the baguette. - Amazing result. The funniest thing is that they found money for the wallpaper, but not for a bag of Vetonite (putty), well, wit and perseverance work wonders, although the stingy pays twice.
No, it’s better to go through 1m layer of putty. No primer. you can paint it but it will be expensive
first primer, plaster putty and then wallpaper
Ready-made glue is available for joints. You can mix white paint with the primer.
paint with emulsion, this is also a primer
Concrete is porous; there is no need to dilute the soil. Either paint the entire wall, and then wallpaper, or finish it off, there is an option - to cover the wall with whatman paper first (but I haven’t tried it). You don’t need glue on the edges, it will be noticeable on light-colored wallpaper. Just apply special glue for the interlining and the joints with a brush. And I hope your wall is dry and doesn’t freeze. Good luck!
All the same, you need to putty the concrete - it cannot be without cracks and cavities, then a high-quality primer, then a sticker
Paste light non-woven wallpaper onto concrete
Forum on repair and construction. Paste light non-woven wallpaper onto concrete
How long will the results last?
Wallpaper on concrete will last a long time if properly prepared with rough materials.
The absence of putty, concrete contact or priming substance leads to rapid cracking of the cladding and peeling off of the canvases.
If the foundation has been prepared properly, there is no reason to worry - the new look of the room will not deteriorate for the next few years.
Wallpaper will not lose its original appearance if you periodically clean it with a dry cloth or vacuum cleaner.
The visual process of wallpapering a room is shown in the video:
How to glue wallpaper to concrete: a guide
After completing the work on the base, proceed directly to gluing the canvases. This stage has its own difficulties and nuances.
Glue selection
The choice of glue depends on the type of wallpaper and the financial capabilities of the owner of the room being repaired. Popular brands are:
- "Kleo" Optima (paper).
- Special Vinyl Quelyd (textile, vinyl).
- Lex “FliziLex” glue (non-woven fabrics, glass wallpaper).
Where is the glue applied - on the wallpaper or on the wall?
The method of applying glue is always clearly indicated in the instructions. In most cases, it is recommended to apply glue to the wall; paper and vinyl, on the other hand, must be coated with glue. But there are often discrepancies between theory and practice. The point is that glue should be applied to a thoroughly primed surface that does not have residual effects in the form of old coating, etc. Otherwise, the glue will quickly be absorbed into the base and the wallpaper will not stick well.
When working on a base with residual effects, you can apply a small amount of glue to the canvases themselves, regardless of their type. Experienced craftsmen recommend following the instructions indicated on the packaging of the finishing material, but always taking into account existing realities.
Do I need to prime before gluing?
Priming is a necessary step that ensures better adhesion of the surface material and finishing. In addition, it significantly reduces glue consumption, saving money. In addition, the primer layer will prevent excessive absorption of the glue and, accordingly, reduce the risk of air bubbles.
Technique for gluing invisible seams
To make the seams less noticeable, use the following technique. The canvases are not joined along the edges, but placed on top of each other, after which a thin strip is removed using a ruler and a sharp knife.
Nuances and subtleties
Before you start gluing the canvas, take into account some of the subtleties and nuances of the material used and the technology of its application. The key to further success is a properly prepared surface, which must be perfectly flat and carefully processed. To do this, the surface is puttied and primed.
It is important to properly prepare the adhesive base and cut the wallpaper according to the design.
An important step is the correct preparation of the adhesive base. Be sure to follow the instructions on the package and let the prepared solution stand for 20-30 minutes. To prevent spreading, you need to pay attention to the joints in the corners, which must be correctly laid out and taped. When cutting a roll, pay attention to the pattern and design, which should match when joined. Such wall decor should be carried out without drafts in the room, otherwise it will lead to the appearance of bubbles, delamination and spreading of the joints.
Not all wallpaper coverings have the same application technology. For example, when working with non-woven wallpaper, you should not apply glue directly to the wall with concrete and to the back side of the canvas - this leads to lagging and stretching of the material. Before starting work, thoroughly study the instructions and features of the materials used.
How to glue non-woven wallpaper: step-by-step instructions
- Using a special knife, sheets of the required size are cut from the roll.
- If the pattern requires adjustment, this distance should be taken into account when cutting the panel.
- For convenience, you can mark the wall, marking vertical lines on it along which the sheets will be glued.
- Before immediately starting work, glue is diluted in water at room temperature, in accordance with the instructions.
- When the composition is ready, it is evenly applied with a roller to the surface (wall or ceiling) exactly as much as is required for gluing one sheet.
- Wallpaper should be glued end-to-end so that the direction of the sheets is along the main light rays.
- When gluing the sheet to the wall, you must try to ensure that there are no air voids underneath it.
- After the sheet has covered the wall, it is carefully pressed to the surface using a rubber roller and leveled, moving from the center to the edges.
Next, the procedure is repeated with the next sheet, trying to do this as carefully as possible so as not to stain the one already glued. Special attention is paid to joints. For reliability, they are pressed again with a roller. The hardest part is to glue the corners.
For example, if the ceiling is covered with wallpaper, then the sheet is glued so that the edges extend slightly onto the wall. After this, it is leveled and then, guided by a ruler or spatula, the edges are cut off at the corner.
Expert advice
Experts do not recommend gluing wallpaper over old ones. Although it may seem to you that the old wallpaper is holding tightly, you still need to remove it, because after additional load in the form of glue and a new coating, it will begin to pull away from the wall.
There are several ways to remove old wallpaper:
- You can pry the edges with a spatula, and then remove the strip with your hands; to make the work easier, help yourself with a spatula.
- If the wallpaper is glued very well, then moisten it with plain water using a roller, spray bottle or sponge, wait 5-10 minutes and remove it as in the previous case. If the wallpaper is waterproof, then before applying water, you need to remove its top layer.
- Instead of water, you can use special compounds that are absorbed faster; you can buy them at any hardware store.
- If the wallpaper holds tightly, then in these places a damp cloth is placed on it and steamed with an iron. If you have a steam generator, the job will be even easier and faster.
If the walls have significant unevenness, bumpy cracks or drilled holes, then the use of plaster may be necessary to level them. The better you prepare the concrete surface, the easier it will be for you to glue the wallpaper.
Reasons for pre-preparing concrete foundations
The photo shows the surfaces to be finished
Of course, wallpapering concrete walls is possible, but the problem is that the result may not suit you for a number of reasons. The fact is that bases cast from concrete only seem smooth at first, but in fact they have many microcracks, cavities and other reliefs, the presence of which is unacceptable.
It doesn’t matter what exactly you glue to such a base, as the paper dries, it will outline all the irregularities, and the relief will be visible through the surface of the finished finish. Moreover, over time, around the shells and microcracks, the glue will begin to dry out, and the paper will come off with the formation of air bubbles
However, the presence of unevenness is not the most important reason for preliminary preparation. Much more important is that the structure of most concrete is porous, and therefore wallpaper glue applied to the surface will most likely be absorbed unevenly. Consequently, after the glue has completely dried, gray or whitish spots will appear on the wallpaper, which subsequently cannot be removed.
Methods for preparing the base
As previously said, we are interested in preparing concrete walls for wallpapering using available means, so we list the common methods as the complexity of the process increases:
- impregnation of the base with wallpaper glue;
- use of water-dispersion primers;
- the use of special soils to strengthen concrete;
- use of putty leveling mixtures.
So, let's talk about each of the above methods in more detail.
Impregnation of the base with glue
In the photo - glue for non-woven fabric in standard packaging
Have you decided to put wallpaper on concrete walls, but are you afraid that the result will be sloppy and short-lived?
It turns out there is a budget-friendly way to solve this problem. When purchasing a finishing material, it is enough to purchase one and a half to two times more glue than indicated in the instructions, and the problem of the porous structure of concrete can be partially solved.
Immediately before starting finishing work, you need to dilute the glue to a state twice as thin as it is necessary for installing wallpaper. We distribute the adhesive mixture evenly over the previously cleaned wall. After complete drying, a thin hydrophobic layer forms on the surface. As a result, the glue will be absorbed evenly when gluing the paper covering, which means there will be no stains or darkening.
However, this method has a significant drawback - the layer of adhesive impregnation is not able to fill the microrelief of the concrete surface. Therefore, despite the preparatory work, the wallpaper will still peel off in areas of shells and cracks.
Application of primers
Applying primer with a roller
Special primers have proven to be more effective in preparing concrete foundations. Primer compositions can be divided into surface and deep penetration agents. If the first penetrate into the thickness of the material to a depth of 0.5-2 cm, then the impregnation capacity of the second type of soil is several times higher.
Applying thick primer with a spatula
Considering that wallpapering is carried out indoors, there are no special requirements for the soil, and therefore a modification with varying degrees of penetration is suitable, the main thing is that a dense film forms on the surface of the base after complete drying.
The best choice would be acrylic primers, the use of which supports the following functions:
- strengthening porous and loose surfaces;
- increasing the degree of moisture resistance;
- preventing an increase in the size of microcracks due to the adhesive properties of the soil;
- increasing the adhesion of the base in relation to adhesive compositions;
- preventing the development of fungal infections and mold.
Applying primer is not difficult. The base is cleaned of contaminants, after which the primer is applied in one or more layers using a brush, paint roller or sprayer.
How to immediately paint concrete walls without finishing
Is it possible? The fact is that the apartment is in a new building, and I don’t have much finances and, accordingly, I want to find a solution that will allow me to move into the apartment at minimal cost. I read that someone suggests going over the walls first with a deep penetration acrylic primer and then acrylic varnish on the marks and that’s it. What do you think? Does anyone have such experience with life hacks? =)
You won't find it cheaper. I can help you move into an apartment at very minimal cost. Even with the finishing, and most importantly, everything will be according to technology and will last long enough. I won't tell any secrets here. I am involved in business. I am not an intermediary or a company
We guarantee quality, accuracy and deadlines and are not expensive by providing a fixed document, which, you see, is important for you
Over 20 years of experience in the construction industry. We work within the city. For a free order and call, call Tel.: Anatoly Ivanovich.
depending on the amount.
Good afternoon. Yes, you can paint bare concrete without finishing (plaster and putty), but keep in mind that the appearance of the walls will be appropriate - that’s how it is without the “relief” finishing, so it will be, only in a different color. 1) To remove dust from concrete, walk over it with a deep penetration acrylic primer. 2) I don’t understand why I use acrylic varnish - it will have the effect of wet concrete, no more (although the varnish can be tinted), but still, purely my opinion - it’s better to paint with acrylic paint (water-based) - you want it white, you want it tinted. 3) When painting, you can use two or three tones of paint and the “color-wash” method of applying (rubbing paint), in combination with concrete it will be more interesting than just painted concrete. Good luck with the repair, if you have any questions please write.
There will be no minimum costs. What will this polish give you - shine and that's it. No beauty, no warmth. You have 2 options. Start living as you are, and do everything thoroughly, gradually. The second option is buy the cheapest wallpaper. Glue it on the walls as is, without putty. In Soviet times, they glued it that way.
Not everyone sees warmth and beauty in wallpaper. I do the same thing, only I had to plaster the walls. I was pleasantly surprised by the effect of the concrete wall, I decided to leave it like that - acrylic primer, deep penetration. As a last resort, if you get tired of it in the future, you can glue anything on these walls. Good luck!
You can prime it and paint it with cheap but opaque paint. But it’s better to putty it yourself (it’s easy - there are a lot of videos - and quite cheap, if you don’t strive for absolute evenness and 90 degree angles)) and glue the wallpaper. You can also make decor from putty. plaster and it’s interesting to paint it. A couple of hours a day - and you’ll get everything done in a month or a month and a half.
I have money for primer. I think you’ll find money for cheap wallpaper! No need to split hairs, do it right. I had the practice of gluing wallpaper directly onto bare logs and the walls were pleasing to the eye! good luck to you.
If you cover it without finishing, the walls will look bad. Then life will be uncomfortable (It’s better to save money and do everything right)
How to plaster concrete
The first step is to decide which mixture is most suitable for plastering concrete walls. The general rule applies here: when choosing a solution, you should start from the conditions in which the finishing will be located.
The properties of plaster depend on the binder in its composition. According to this criterion, mixtures are divided into several types:
- cement;
- limestone;
- cement-lime;
- gypsum;
- polymer.
Cement mortar is considered universal, but it is not very convenient to use. Its main advantages include strength and moisture resistance, as well as an affordable price.
Disadvantages - low ductility, long period of complete hardening, low adhesion to a smooth concrete surface. I use it for finishing the street side, plastering wet rooms: kitchen, bathroom, toilet. After applying cement mortar, the walls become rough from the sand in the composition, so subsequent puttying is necessary in residential areas.
Lime compositions are easy to apply to walls and are highly resistant to cracking. Disadvantage: low strength. To create a durable coating, reinforcing components must be added to the mixture.
Sometimes lime is added to cement plaster to improve its properties. This composition improves adhesive and plastic characteristics.
Lime also has antiseptic properties and prevents the development of mold.
Gypsum plasters are a favorite among plasterers. They improve sound and heat insulation in rooms, contribute to the formation of a healthy microclimate and are easily applied to walls and ceilings. In addition, they dry much faster than cement plasters.
However, gypsum is afraid of water and cannot be used to decorate a swimming pool or bathroom. In general, this is an excellent option for finishing residential premises with wallpaper, painting or decorative plaster.
Polymer compositions have very good performance properties, but are much more expensive than others and are not used for leveling walls. Their main purpose is as a finishing decorative coating.
How to put wallpaper on concrete walls?
In principle, some types of wallpaper do not require a perfectly prepared wall and you can do without preliminary putty.
But I would still advise you to putty, because concrete is porous, plus the color of the concrete is gray (it can show through the wallpaper and at the joints) and if the wallpaper is thin, then both the pores and color can become a problem.
Also, do not forget that those very holes and pores in concrete can cause the formation of bubbles on the surface of the wallpaper.
If without putty, then do this:
Drying primer.
Marking, vertical line along the level, line from the window, take into account the width of the wallpaper roll.
Next, wallpapering the father-in-law down, we expel the air to the sides.
If with proper preparation, then add the following points:
Drying primer.
Putty with drying.
Grinding.
Primer for wallpaper with drying.
And then we glue the wallpaper according to the scheme described above.
Don’t forget to dry the primer thoroughly, concrete is a weakly absorbent base and the primer will take longer to dry than, for example, gypsum putty.
Let's start gluing
You can begin finishing the premises if the conditions are met. Work is not carried out at temperatures below +5 degrees. The optimal indicator is +15 degrees. Neglect of this rule will result in the canvases ending up inside a cold room.
It is necessary to exclude drafts - close doors and windows.
Even after the work is completed, they wait 10 hours. During this time, the adhesive will adhere quite firmly.
Choosing glue
It is purchased according to the type of wallpaper purchased. There are many varieties of universal compounds, but craftsmen do not recommend their use - what is good for paper is bad for vinyl or non-woven material and vice versa.
You need to take a separate mixture for non-woven, paper, vinyl, liquid or other types of coating.
There is also a choice - to take a dry mixture or a ready-made solution. Here you need to focus on work preferences and the overall budget for finishing work. There is a coating with an adhesive layer on the reverse side. To paste it, just remove the protective layer from the back side, place the sheet in the desired place, press tightly, and smooth it out.
What tool will you need?
To work, you will need a plumb line, a building level, a tape measure, a simple pencil, scissors or a stationery knife.
For the glue you need a free container, clean water, a wide brush, and a paint roller.
Smooth the sheet with a plastic spatula, rubber roller or wide brush.
It is important to quickly remove excess adhesive with a clean cloth.
We purchase and prepare material
The number of rolls must be calculated with a margin. You can look at the official websites of construction stores to see the length of one roll and its width to get an answer to your question.
You can measure it with a roll of old wallpaper, apply it to the wall, and walk around the entire room, counting the number of “steps.” All that remains is to calculate the quantity based on the average size of one sheet.
Cutting blanks involves measuring each sheet separately, if we are talking about a pattern with a fit, or cutting off the first piece as a guide - then the rest can be cut according to it.
If the ceilings/floors are uneven, you will need to measure each piece. For this you need a tape measure. This increases the risk of error or each time you have to stand on a stepladder, apply the blade, and actually cut it off.
You will need to leave a margin of 1-2 cm, which can then be easily cut off or hidden behind the baseboard. The main thing is that there is enough length.
Technology of work execution
The cut sheet is covered with glue diluted according to the manufacturer's instructions on the reverse side. You need to wait the time indicated on the wallpaper packaging for the canvas to soak.
The next step is to lift the workpiece by the upper corners, bring it to the top of the base, and press it tightly.
Now you need to take a plastic spatula or rubber roller and secure the top of the sheet.
The process of wallpapering walls
The first segment must be glued plumb, to prevent the line from bending.
Afterwards, with a smoothing tool, movements are made from the center to the edges at an angle, according to the herringbone principle. This removes air bubbles.
If this is not done carefully enough, the air will cause the canvas to bubble. Sometimes a simple puncture with a needle does not help.
The next sheet is glued end-to-end or overlapping with the first.
Surface Requirements
Unfinished concrete walls have a rough surface that contains depressions and cavities. There is a separate question about the curvature of the walls - if it is significant, it will not be possible to glue paper and other canvases smoothly. The granular structure forms a microrelief, the canvas will bulge, this can lead to pieces of it falling off.
If you stick paper or other wallpaper on “bare” concrete, the following troubles will arise:
- Concrete comes in a variety of shades, but the most common is dark gray. Over time, it will change the color of the pasted wallpaper, not for the better.
- Uneven distribution of glue will cause white spots to appear.
- As the adhesive dries, it forms bubbles near the shells and cracks. This spoils the appearance and also leads to peeling of the decorative layer.
- The joints will not turn out neat, this will affect the choice of wallpaper - their circle will be limited to a simple pattern.
Before gluing any material to a concrete wall, you will have to do minimal preparation. Its complexity depends on the type of material:
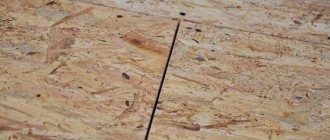
- Expanded clay concrete blocks usually require putty, and in advanced cases - plaster.
- Monolithic reinforced concrete blocks have a slightly smoother surface; here you can only get by with putty.
- Foam-, gas-concrete is similar in surface to the previous variety.
- Large-panel houses have the smoothest surface, but for thin wallpaper you will have to apply a layer of putty.
Particular attention should be paid to the corners - this is where canvases on curved walls are most likely to come off. The front of the preparatory work is individual in each case, the main thing is to get the result in the form of a flat surface without cavities and cracks
Leveling walls with putty
If the wall has a lot of unevenness and strong curvature, you will have to resort to serious methods. Putty will be the solution to how to properly glue wallpaper on a concrete wall. The variety of its types is great; a simple option would be a gypsum composition for finishing plastering. Before applying it, you need to prime the wall and repeat the layer after puttying.
When selecting a suitable putty mixture, it must meet several criteria:
- Elasticity. This property will allow you to smooth out microcracks.
- Resistance to temperature changes. This will improve the quality of finishing, especially for non-insulated end walls.
- Environmentally friendly. The composition should not contain substances toxic to humans or animals.
- Thixotropy. When applied, the mixture becomes more viscous, which increases strength.
After priming and puttying work, doubts will disappear as to whether it is possible to glue various wallpapers to concrete walls. This preparatory stage is more important than the gluing itself, because it largely ensures its success - leveling the walls needs to be taken seriously.
Features of gluing
The procedure for wallpapering walls has a number of rules. To obtain the desired result, you must follow the instructions. Let's look at how to properly hang wallpaper on walls.
- The temperature in the room to be pasted should not fall below 5 degrees. The optimal value is about 15 degrees.
- It is forbidden to open windows or create drafts during and after gluing.
- Cut the rolls into pieces of the required length in advance so that they rest and do not curl into the roll.
- Apply glue to the pieces before gluing. You can apply the adhesive base to their surface using a brush or roller.
- The wallpaper is glued end to end, not overlapping, so that they do not show through under each other.
- After gluing one strip, the bubbles that appear are smoothed out with a plastic spatula, and the seams are smoothed with a rubber roller.
- After completely pasting the room, you need to set aside several days for drying. Then you can grease the corners and seams.
Preparing walls for wallpapering
Now, having figured out whether it is necessary to plaster the walls before gluing the wallpaper with the finishing layer, let's look at how to do it. The work consists of several steps, each of which contains a number of nuances.
Tools
Before you start working with your own hands, you need to prepare the following set of tools:
- Building level;
- Roller;
- Spatula;
- Wire brush;
- Container for diluting putty.
In the photo - sanding walls
Preparing the base
Preparation of the base is one of the most critical stages, since the final result directly depends on it.
The instructions look like this:
- First of all, it is necessary to prepare the base - remove the remnants of the old finish, oil stains or paint, poorly secured areas, etc. To remove the old material, you can use a spatula and a wire brush.
- If there are nails or screws in the wall, they should be pulled out or deepened. The remaining holes should be sealed with plaster.
- Then it is necessary to apply a primer to the plaster, completely covering the entire surface of the walls.
Plastering and puttying
After preparing the walls, you can begin to level them and eliminate defects.
The work is performed in this order:
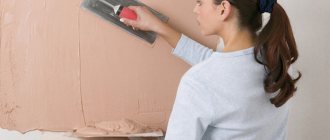
- A leveling compound is applied to the walls; for example, gypsum plaster is an excellent option. The mixture is first placed with a narrow spatula on a wide spatula, and then applied to the wall. At the same time, all cracks, irregularities and other defects are sealed.
- If the plaster is fairly even and smooth, then you can immediately use finishing putty, which is applied in a thin layer. In this case, you should try to level the mixture as carefully as possible so that there are fewer streaks.
- After the composition has completely dried, the surface must be sanded using sandpaper.
Prepared walls for wallpapering
Preparing to wallpaper walls
When deciding whether it is possible to glue wallpaper onto gypsum plaster and sanded putty, you should make sure the quality of the surface. To do this, shine a flashlight or spotlight on the wall.
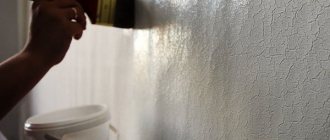
If the walls have no defects, then you need to apply an antiseptic primer, and it is best to do the priming twice, this will ensure the best effect of the solution. To perform this procedure, a roller is usually used, but you can also use a brush.
Wallpaper glue
Leveling with putty
Putty is recognized as the most effective leveling of surfaces. This type of building material is a means for leveling surfaces, helping to level out severe unevenness.
To process concrete, it is necessary to choose elastic products that will fill all the cracks and even out the microrelief.
The thixotropy of a substance refers to how viscous the material is. The higher the indicator, the stronger the coating.
To ensure that the quality of the work performed does not deteriorate over the years, choose a substance that is resistant to temperature changes.
Surface Requirements
Unfinished concrete walls have a rough surface that contains depressions and cavities. There is a separate question about the curvature of the walls - if it is significant, it will not be possible to glue paper and other canvases smoothly. The granular structure forms a microrelief, the canvas will bulge, this can lead to pieces of it falling off.
If you stick paper or other wallpaper on “bare” concrete, the following troubles will arise:
- Concrete comes in a variety of shades, but the most common is dark gray. Over time, it will change the color of the pasted wallpaper, not for the better.
- Uneven distribution of glue will cause white spots to appear.
- As the adhesive dries, it forms bubbles near the shells and cracks. This spoils the appearance and also leads to peeling of the decorative layer.
- The joints will not turn out neat, this will affect the choice of wallpaper - their circle will be limited to a simple pattern.
Before gluing any material to a concrete wall, you will have to do minimal preparation. Its complexity depends on the type of material:
- Expanded clay concrete blocks usually require putty, and in advanced cases - plaster.
- Monolithic reinforced concrete blocks have a slightly smoother surface; here you can only get by with putty.
- Foam-, gas-concrete is similar in surface to the previous variety.
- Large-panel houses have the smoothest surface, but for thin wallpaper you will have to apply a layer of putty.
Particular attention should be paid to the corners - this is where canvases on curved walls are most likely to come off. The front of the preparatory work is individual in each case, the main thing is to get the result in the form of a flat surface without cavities and cracks
Is it possible or not?
Many people ask this question. The answer is quite simple - it is possible, but it is important to take into account some points. Wallpaper can be applied to concrete walls only on a prepared base.
Practice shows that wall preparation is one of the most important stages when working with any coating. As for concrete, the arguments in favor of preparation are as follows:
- Most often, the finished concrete surface has its own curvature and unevenness. It is impossible to paste paper wallpaper on such walls. The finished result will be disastrous. If you do not level the surface in advance, then the ideal sticker of the canvas will not work. In addition, it will also not be possible to join the strips close to each other; gaps will form. You won't want to look at such a wall.
- Ready-made concrete without finishing has a granular, rough structure (microrelief). After wallpapering, all these bumps and grainy structure will be clearly reflected on the surface, spoiling the appearance. They will be especially visible if you use thin single-layer wallpaper.
- The concrete is dark gray in color. In some cases it may be a light gray shade. But even so, light paper wallpaper on a dark wall can change its shade. The end result may not please you.
- White spots will be visible on the surface. This happens as a result of uneven distribution of glue on the wall.
- As the glue dries, bubbles will form around the holes and microcracks in the finished finish. This may result in partial peeling of the products.
- If you glue paper materials to an untreated wall, then most often there is a risk of mold growing on the surface.
These are the main reasons why before gluing paper wallpaper to concrete walls, they must be carefully prepared. If you stick paper wallpaper on a concrete wall, then all your efforts may be in vain.
In this case, how to glue wallpaper on concrete walls correctly? They need to be prepared. Let's find out in more detail several ways how this can be done.