Applying liquid wallpaper, taking into account all the features of the finishing material, is not a difficult process to master. The length of its service depends on the correct preparation of the wall, preparation of the mass and application of silk plaster. Surely each of us has performed unfamiliar work at least once in our lives. Only after completion do you understand that everything was much simpler - you just had to follow the technology and study the issue a little in advance. We tried to make our article just such a methodological guide.
Surface preparation
The durability of the coating, first of all, depends on the quality of surface preparation carried out before gluing liquid wallpaper. “Liquid” material is not intended for leveling the wall, so you need to take care of priming and cleaning the base in advance. It is possible that during the preparatory work circumstances will become clear that prevent the use of wallpaper material, and it will have to be replaced with decorative plaster or other finishing.
Depending on the condition of the walls, it is necessary to perform one or more of the following operations.
- Remove paper wallpaper from the wall and wash off the whitewash. Such coatings cannot be used as a substrate. The paint layer is checked for strength of adhesion to the walls; if peeling or peeling, the paint is removed.
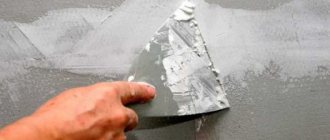
- Examine the plaster. Be sure to tap the walls to look for peeling areas and other defects. If the paint and plaster are in poor condition, they are removed completely or locally, and the plaster is repaired.
- Small cracks in the plaster can be easily covered with wallpaper, while large cracks can be repaired.
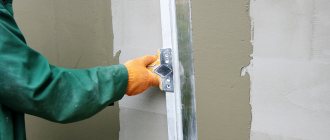
- If the surface of the wall is too uneven, then you need to level the base with a layer of plaster along the beacons. Small differences will be covered with wallpaper paste.
- Places where mold or rot has settled are washed with mandatory treatment with fungicidal liquids. The rust is cleaned off. Metal products are painted over for insulation with oil paint or other insulating agent. The efflorescence is washed off and the cause of its appearance is determined. It may be necessary to waterproof the area.
- Since the wallpaper mass weighs little and is applied in thin layers, there is no need to reinforce the base. However, at the joints of structures, you can pre-glue sickle tape followed by putty.
The smooth paint layer is sanded to increase adhesion.
A primer is required before applying liquid wallpaper. For example, smooth surfaces are primed to increase adhesion. You cannot do without applying a primer in the case of wooden and porous walls.
Liquid wallpaper requires a primer with quartz sand. Typically these primers are white in color and do not require white painting. If the paint or other finishing on which a lot of liquid wallpaper is applied is not white, then for light wallpaper the wall must be painted with white paint or covered with white putty. The areas where the rust has been removed are also painted as a preventative measure.
The primer is applied in two or three passes. Each time the wall is dried.
The frames of windows, doors, sockets and switches are sealed with masking tape. The wiring is de-energized. The floor and abandoned furniture are covered with film. Although the wallpaper mass remains plastic for a long time and is washed off, it is better to take care of protection.
The most “successful” base materials:
- leveled plaster;
- fiberglass;
- clay;
- drywall (preliminarily putty the entire surface);
- primed polystyrene foam;
- concrete or stone.
Less “successful”, but also suitable after priming:
- metal;
- OSB;
- tree;
- Fibreboard, chipboard, MDF.
Liquid wallpaper compositions cannot be applied directly to plywood, since the top plywood layer “shrinks.”
Is it possible to glue
Liquid trellises (decorative plaster) are a dry mixture of cellulose, silk, cotton, glue and some decorative components, which must be diluted with water for use. This material is durable, flexible and easy to apply to the surface of drywall.
Thanks to its good plasticity, plasterboard walls and ceilings will not crumble or crack for a long period of time.
The advantages of decorative plaster over ordinary wallpaper are:
- no seams;
- ease of use;
- easy replacement of damaged areas;
- wide selection of colors;
- absence of harmful substances in the composition;
- increasing the thermal insulation of the room.
This type of finishing can be used during the renovation of any premises, including residential buildings. The process takes little time; it is enough to carry out the preparatory work and apply the material to the desired surface.
Application of liquid wallpaper
Stock up on tools in advance. Applying liquid wallpaper is impossible without tools; you will need a metal or plastic (preferably transparent) grater, spatula and trowel. Compositions of a less thick consistency can be applied using rollers (ribbed or sparsely piled). If the mass is not applied manually, then you need a cartouche (texture) gun connected to a compressor.
You will also need:
- container for diluting dry mixture;
- tape measure for marking the wall (not in all cases);
- clean rags;
- roller or brush for priming;
- masking tape;
- knife for opening containers;
- water dosage measure;
- container with water.
It is advisable to apply the composition starting from the light corner towards the dark one. Finishing is carried out in daylight and artificial light.
You can apply wallpaper mass:
- mechanically;
- trowel or spatula;
- roller;
- just with your hands, immediately forming the stucco molding.
The composition, prepared in advance, is applied in sections, applying a layer of solution of 2-3 mm. The applied mass is immediately leveled. Then cover the adjacent area, achieving the same layer thickness over the entire surface. The main thing is to get a seamless finish.
In case of unsuccessful application, the composition can be further moistened and removed with a spatula. After this, a new portion of the solution is applied, comparing the thickness of the layer with the surrounding finish.
Final smoothing is best done with a plastic float. Before use, the instrument is wetted. During leveling, the grater is also moistened with water periodically. This makes it easier to achieve a smooth surface.
Let us consider in detail each of the above methods.
Plastic trowel
The tool is good because it is light. Correct application of liquid wallpaper is accessible not only to experienced plasterers, but also to beginners. The mass is applied to the trowel with a spatula, then, holding the trowel at an angle to the wall, the composition is transferred to the base. This is done in the same way as applying plaster mortar. You can even apply the wallpaper composition using a grater. If the composition sticks to the tool, the working surfaces are moistened with water.
There is no need to apply excessive pressure on the trowel. There is no need to rush. The composition can be corrected at any time: add (if necessary) dough where the layer thickness is lacking, remove excess. It can take from 12 to 72 hours for the material to set.
Periodically look at the laid coating at an angle, illuminating the surface from the side. This helps identify processing deficiencies. Against the light, voids or poorly executed transitions are clearly visible.
The application sequence is as follows:
- preparation of the composition;
- wall preparation;
- applying the mass manually;
- leveling with a grater or trowel;
- drying the coating.
With a cartouche pistol
To create a seamless coating, it is unacceptable to join together already hardened wallpaper and fresh mass when creating a finish (this is only possible during repairs). Therefore, it is better to process large-area walls using a texture gun (installing a large nozzle).
Some compositions are produced specifically for application with pneumatic tools. With the help of a mechanical assistant, the application of liquid wallpaper is accelerated. With experience, the applied mass can be laid evenly. If there is no experience, then additional leveling with hand tools will be required. The lifespan of the composition allows you to do this slowly.
For a cartouche pistol, you will need a compressor capable of delivering 2-3 atm, with a capacity of 250 l/min.
Subsequence:
- preparing the solution;
- preparation of the base;
- preparation of equipment (connection to a compressor);
- applying the composition;
- surface leveling;
- disconnecting the gun, washing and drying the device parts;
- drying the walls.
In reality, such a tool is most often used by professional finishers when working on large areas.
Drawings with liquid wallpaper
The material allows you to create various images. These can be oriental ornaments, abstract pictures, plant and floral motifs, figures of people or animals. In children's rooms, the walls can be decorated with a castle or a fairy-tale plot. Here you can completely surrender to the creative process. The technique of applying patterns on the wall with your own hands depends on the clarity of the shapes and what you ultimately want to get.
Working with material
Many people get confused just before work, thinking about what to do and in what order. Some rules may help you with this:
- Make a consistent plan for your work. This point should not be neglected. In the plan, be sure to indicate a diagram that will indicate the location of the material, design and other details. You can do this using various computer programs (Google SketchUp, Graphite, FloorPlan3D). Of course, you can do everything on paper, but many electronic versions will be able to carry out additional necessary calculations.
- Prepare tools and devices that may be useful to you in your work (buckets for diluting material, spatulas, gloves, rags for cleaning up accidental spills, etc.). When everything you need is at hand, things will go much faster.
- Buy materials only from trusted manufacturers. You should not buy liquid wallpaper in bulk from dubious retail outlets.
The choice of material must be approached responsibly - Prepare the walls for painting. Ideally, if you can do this work before purchasing materials. If shortcomings are identified during preparation, most likely, the picture of the next actions will be slightly changed. For example, additional work will be required to eliminate defects using special solutions.
Important point! When purchasing wallpaper, pay attention to the production time. This period at the time of purchase should not exceed one and a half years. In some cases - two years, if you are confident in the manufacturer.
Prices for various types of liquid wallpaper
Liquid fights
Video - How to choose liquid wallpaper
Preparing the walls for wallpapering
Preparation for the application process is the most important stage in wall design. The first step is to prepare the surfaces for the upcoming decoration. Here's what you'll need to do:
- achieve a perfectly flat, uniform surface without any defects. Although, as already mentioned, liquid wallpaper can hide the imperfections of the walls, they do not level the structure, and this must be taken care of separately, before applying it;
- give the walls a white tint. This can be achieved using finishing putty and primer;
- the area that will be used for work must become homogeneous, without any applied mixtures, peeling paint, or pieces of old wallpaper;
- strengthen the walls or correct any defects, if any. For example, you need to fix areas that are starting to crumble or fall apart.
Remember that liquid wallpaper is an expensive material, and if you don’t do everything correctly, you will soon have to remove everything, repair and re-decorate the walls, spending the same amount of money.
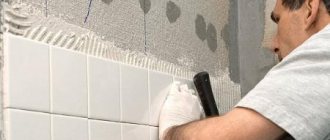
It is easy to apply the coating if the wall is flat and smooth
Preparation for applying liquid material involves the following steps:
- Removing old coating (paper wallpaper, plaster). It is recommended to remove the top layer of plaster in any case so that the wallpaper lasts longer. This needs to be done especially carefully in old houses. We will look in detail at how to remove wallpaper from walls, step by step, with instructions and tips, in a special article.
- Check for metal structures inside the walls (they are often found in concrete surfaces). If you find metal, you should paint it with oil paint and let it dry, otherwise rust may appear.
- If the quality of the walls is poor, it is advisable to lay the plaster in two layers. This will help achieve a more even surface, since any bumps or holes in the walls will be visible after applying the wallpaper.
- If your walls are made of concrete or brick, then professionals advise using a gypsum mixture as a coating. This material will save you from future absorption of wallpaper by the walls. As a result, you will get a uniform color that will not change over time.
- Apply priming in two layers - absorbent (first) and fixing. In this case, the primer should be white and only one that will not change color after use.
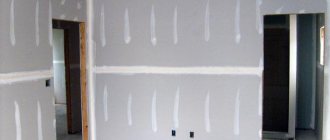
Treating walls before wallpapering - Walls made of plasterboard will also need to be completely plastered. Some people believe that finishing requires only the seams between sheets of material, but this is wrong. With this approach, after a while, stripes may appear on the wallpaper that has already been applied, which will ruin the appearance of the room. After puttying, you need to apply white water-based paint.
- With wooden surfaces things are much more complicated. First you need to seal all the joints between the material. After this, the surface is primed with a solution that is able to penetrate into the material. Then you need to cover the surface with water-based paints. If all these procedures are not carried out, the walls may change due to increased humidity.
Prices for deep penetration antiseptic primer
Deep penetration antiseptic primer
All actions must be done one at a time - this applies to primer or putty. If the procedure is carried out in several layers, be sure to wait until the previous layer has completely dried.
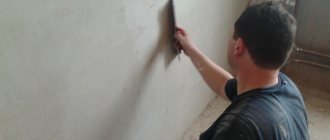
It is important to properly prepare the foundation
Important point! Often the finishing of an apartment is carried out along with the replacement of doors and their openings. If you also combine these things, then do not forget that you first need to make slopes, and only after that proceed to wall cladding.
Wallpaper breeding
It is easy to dilute liquid wallpaper; this must also be done in a special sequence, following the necessary rules. The main thing is to let the already diluted composition brew for ten to twelve hours. Only after this time has passed will the material be ready for application.
As already mentioned, liquid wallpaper consists of three ingredients. Manufacturers in this regard are divided into two types: some immediately mix all the components and sell a homogeneous mass, while others package the ingredients in separate bags, which you then have to mix yourself.
Step-by-step instructions: how to dilute liquid wallpaper
Step one: carefully read the instructions for the wallpaper you purchased. This is important because each manufacturer has different proportions and dilution requirements. The main thing is to rely only on the instructions for the purchased material, and not to take information from other sources.
Instructions for using the coating
Step two: dilute the wallpaper with water. Do not divide the volume of dry matter into parts - knead the package at once, otherwise the wrong consistency may be obtained.
Dilute in a large container
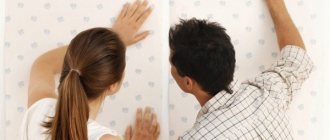
Step three: knead the composition. Mix only with your hands! Even if the manufacturer’s instructions indicate mixing with a mixer, use it first, and then mix with your hands. Don't worry, the composition is harmless. Mix only as much material as you can apply to the walls in one go (in bags). For example, if you paint only one half of the wall, and the other half later, the transition will probably be visible.
Knead with your hands
Step four: consider product consumption. For every square meter there is one kilogram of composition.
One area should be covered with wallpaper at a time
Important point! If your wallpaper is packaged in bags, then start mixing with the decorative components, and then add the rest.
Video - Diluting the coating composition
Wallpaper application
To get started, you need to prepare all the tools. To do this, you will definitely need the following devices:
- plastic or metal grater;
- ironer;
- trowel;
- spatulas;
- spray.
To apply wallpaper you need a spatula
After preparation, you can proceed directly to work. The material application process includes the following sequence:
- Check the consistency of the wallpaper. After 10 hours after diluting the composition, the mixture may harden. In this case, you need to add one liter of water at room temperature and mix thoroughly. In this case, the room temperature must be at least 17 degrees.
- The mixture is applied from the corner to the middle of the wall using a trowel. To make imperfections visible, it is better to apply wallpaper from the light side of the room to the darker side.
- Leave the material to dry for 60 minutes. After a while, return to the room and position the switched-on lamp so that it is at a slight angle with respect to the wall. Next, wet the spatula and go over the uneven surfaces, smoothing them out.
- You can ventilate the room without creating drafts. Heating is prohibited, as it will dry out the material.
The mixture should sit for 10 hours
If you have a special spray bottle, the work will go faster. You can apply wallpaper using this device. Of course, at the end you will still have to level the surface, but you will finish the finish faster. But for this you need to practice first, otherwise you can ruin the wall.
Liquid material can be applied with a spray bottle
Prices for spray guns
Spray
Video - Applying wallpaper to the wall
How to breed at home
The packaging containing the dry mixture contains instructions for proper mixing and preparation of the mixture for use.
The manufacturer’s recommendations should not be violated, since their implementation guarantees the receipt of a high-quality finishing mass.
We provide only general information. The entire volume of the mixture contained in the package should be diluted at once.
Instructions for preparing the mixture
You will need clean warm water. Tap water or strained rainwater will do. Heat is necessary to soak and swell the adhesive granules and form a gel. In a cold liquid, the process will proceed slowly, so the specified holding time may not be enough.
pour the dry mixture into a container
to stir thoroughly
- The water is not poured all at once. Leave about half a liter. This liquid is added after the curing mass has been kept for the required time.
- Having poured water, add separately purchased decorative components (glitter, mother-of-pearl, granules) into the container and mix. The dry mixture is kneaded in a bag and poured into a container.
- If you use a mixer for mixing, the fibers of the mixture are torn during stirring and the decorative inclusions are damaged. The structure of the wallpaper will be damaged. Therefore, the mixture is stirred and kneaded with hands. Separately added glitter should be evenly distributed throughout the entire mass. While stirring, the mixture swells and becomes similar to mashed potatoes, which must be made without lumps.
- The entire mixture is placed in a plastic bag and tied tightly, or the container with the mixture is hermetically covered with film. Leave to “simmer” for the time specified in the instructions (approximately 8-12 hours). Only after this the mass will be ready.
- If you need more mixture for application than can be obtained from one package, then after preparing the first batch, put the composition on film, and dilute another batch in the empty container. We combine the resulting masses, mix on the film and roll up a “package” from the film. We seal the edges of the bag with tape to create an airtight seal.
- After waiting for “readiness”, put the required amount of mass into the container, add the reserved water and mix the mixture again before applying.
For mechanical application, the consistency of the mixture is made similar to thick sour cream.
For a seamless finish, you need to prepare enough dough to cover the entire wall.
How long can you store diluted?
This question worries those who are getting acquainted with the material for the first time. The finished composition is stored for approximately 2-4 days in room conditions. The main thing is that it is closed hermetically. No refrigerator is needed for storage.
How to remove wallpaper
If you need to change the coating, you must first remove the old one. Regular wallpaper is quite easy to remove. The liquid option may cause some difficulties. If they are not coated with a special protective varnish, then the coating can be removed using ordinary water or a prepared solution. It is important what kind of glue was used for cladding. For example, you can prepare a solution for PVA at home yourself.
If the choice falls on water, it is recommended to heat it before use. To prepare a special solution, just add a small amount of laundry soap, shampoo or hair conditioner to the water.
The prepared solution or water is applied to the surface using a brush. For hard-to-reach areas, it is recommended to use a sponge. It is necessary to remove the lining after the liquid penetrates deeply into the structure of the material. If necessary, it is permissible to wet the surface several times. Particular attention is paid to cleaning corners.
Using the described method, you can remove standard liquid wallpaper. If they are coated with a protective varnish, they will be more difficult to remove. To do this, you will need a drill with a special attachment and personal protective equipment. You can use a grinding machine. You need to work slowly, taking regular breaks. The process is lengthy and requires a lot of effort and time. Using the selected tool, the layer of varnished liquid wallpaper is removed until it disappears completely.
If they are not coated with a special protective varnish, then the coating can be removed using ordinary water or a prepared solution.
It is worth noting that the surface on which the cladding is applied is important. A wooden or concrete base requires a special approach when dismantling such cladding. The surface is easy to damage. To remove material from wooden walls, you need to use an industrial hair dryer. To remove wallpaper from concrete walls, it is recommended to use a sanding machine equipped with a suitable attachment.
You can also use modified glue. It is diluted with water and applied to the surface. After 30 minutes, remove the lining with a spatula. After removing the old coating, it is definitely recommended to putty the entire area.
To remove wallpaper from concrete walls, it is recommended to use a sanding machine.
Liquid wallpaper is an original and modern material. Thanks to the wide range, they allow you to experiment in room design. You can choose the right option for any style. The products have many advantages. The plastic material hardens on the surface without forming seams, allowing you to create a feeling of integrity in the room. In order for the cladding to turn out to be of high quality, it is important to properly prepare the rough surface and choose the right spatulas for the job. The product does not require special care, which adds to its advantages.
Protective varnish
To protect against accidental ingress of moisture during the operation of liquid wallpaper, varnish is applied to the wall. In this case, be sure to take into account the characteristics of the wallpaper. For example, after coating, the surface takes on a rougher appearance, and the color tone may even change slightly.
The charm of the softness and airiness of fabric upholstery disappears. The finish loses vapor permeability. Therefore, it is recommended to use varnish only where contact with water is possible (in the kitchen sink area, in the bathroom).
Finishers do not recommend varnishing materials from the Recoat 1 (2, 3) liquid wallpaper collections. This material contains wood and other adhesives that may cause stains.
Special varnishes are produced for varnishing silk plaster. You can apply regular acrylic varnish (it is advisable to do a test). Apply the varnish with a brush or medium-pile roller in two or three layers. After each pass, dry the varnish for at least 6 hours. Drying time for the last layer is up to one and a half days (according to the instructions).
What is the best wallpaper to use?
Determine whether it is possible to glue wallpaper onto plaster, taking into account the characteristics of the materials used. The composition of the canvas has requirements for the rough surface, fixation rules, humidity level and temperature conditions in the room.
The following types can be glued to plastered surfaces:
- vinyl;
- non-woven;
- paper
Vinyl wallpaper is two-layer, dense and heavy, so experts recommend priming the surfaces. In the absence of puttying and a large design area, it is not advisable to use vinyl sheets. The material is optimal for combined finishing when gluing to one wall, decorating an opening, arched structures, etc.
Non-woven wallpaper is made from polymer components and cellulose fibers. The material is dense and can be used for gluing to plastered walls treated with rotband and primer mixture. Non-woven fabrics are resistant to fading, simple installation, the ability to be re-dyed, environmentally friendly composition, and a long shelf life.
The fabrics can be entirely made of non-woven fabric or have a non-woven backing. Non-woven materials are multi-layered with a relief texture that reproduces a fine pattern. This type of canvas is designed to be dyed several times.
Non-woven fabrics have an additional paper, textile or vinyl layer. Original canvases are made using hot stamping technology. It allows you to make a three-dimensional image with imitation of printed fabric and artificial leather. The ornament can be stenciled using foam vinyl.
Paper wallpaper sheets are budget-friendly and come in a wide range of shades. However, it must be taken into account that the material quickly gets wet even when exposed to direct sunlight. The canvases are fixed without puttying or plastering. Paper materials are single-layer and can be used for finishing children's rooms, hallways, and living rooms. Canvases are not recommended for use in kitchen decoration. These materials are easily cleaned during repairs and replaced with sheets of a different color and texture.
Liquid wallpaper is made from cellulose fibers, water and fillers. Surfaces may not be puttied before application. It is enough to apply a suitable primer.
Also in demand are luminous wallpapers that contain powder components with glitter, phosphorus diodes, etc. These materials are glued onto a leveled base, which can be covered with a plaster mixture and primer.
Repair of liquid wallpaper
Silk plaster is not as durable as true decorative plaster, so it is more easily damaged. It is less resistant to abrasion. If the finish is damaged or the expiration date has expired, then restoring liquid wallpaper with your own hands will not be difficult. Especially if you have dried excess stock.
The damaged finish is removed, and the cleaned area is covered with a new solution.
Application to whitewash
It is unacceptable to cover whitewash with decorative material; this can change the characteristics of the solution for the worse. Many people think that if such walls or ceilings are treated with a high-quality primer, the problem will be solved, but this is a mistaken opinion.
The lime component included in the solution becomes significantly saturated with moisture, and the whitewash begins to crumble. This also leads to the appearance of yellowness (spots) which, after a certain period of time, will appear through the liquid wallpaper and spoil the appearance.
To prevent troubles, it is advisable to clean or rinse it off:
- The coating is carefully sanded or scraped with a spatula completely to the base, after which the surface is treated with an oil-phthalic agent.
- Old whitewash is easily washed off with warm soapy liquid using a hard sponge or rag. Next, a waterproof primer is applied.
Mixture consumption
In practice, the mixture consumption declared by the manufacturer is often exceeded. Therefore, it is necessary to calculate the number of packages that need to be purchased for repairs with a reserve. About 20% of the supply should be enough even for a beginner. The excess will be useful in the future, and you won’t find yourself in a situation where you can’t find an identical mixture to finish the rest of the wall.
Consumption depends on several conditions, for example, the thickness of the applied layer, the volume of waste due to lack of experience. When calculating the area of the walls, it is better to calculate the number of packages, reducing the number of squares that can be covered according to the manufacturer's figures.
Base – plaster
Plaster is not a good option for a base under a silk decorative layer. To begin with, it is still better to prepare the walls, putty them, and then proceed with installation.
- Clean the entire area intended for applying the decorative layer from chips, dust and dirt. It is especially worth paying attention to crumbling elements.
- Apply at least three coats of primer.
- Dilute PVA glue and apply it to the entire surface, and then you can stick the desired material.
Advice: in any of the above cases, it is better to use already proven methods, even if not the fastest. Then the result will be extremely durable, and it will be easier to glue the wallpaper.
Is it possible to apply liquid wallpaper to plaster?
This is a frequently asked question, to which we will devote a short, but hopefully very informative paragraph. So, a combination of two finishing materials: a plaster base and applying liquid wallpaper on top of it is the best of other combinations. However, you should check the existing plaster for strength and defects.
Applying liquid wallpaper is much simpler and easier than plastering walls. You won’t have time to get too tired, and you’ll create the finished finish in less time. If you follow the instructions, the liquid wallpaper applied by yourself will be pleasing to the eye and will last as long as possible for this material.
Advantages and disadvantages
Advantages of liquid wallpaper:
- level the walls;
- the structure of the wallpaper makes it possible to make cracks invisible;
- applied without joints;
- a very important plus is the flight of your imagination, you decide what design and decor to create;
- repel dust;
- The service life is unlimited, they are not susceptible to sunlight, and they retain their original structure and color for many years.
Disadvantages of using liquid wallpaper:
- high price;
- dry for more than a day;
- do not tolerate high humidity and water.
Dye
If your walls are covered with water-based paint, then you can do without removing it from the surface. However, if the paint does not adhere well and falls off, then for an ideal result you still need to peel it off.
- Painted walls must be sanded
- If the paint is falling off in some places, clean those areas.
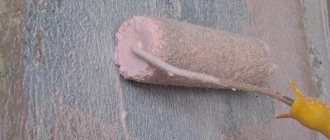
- Start priming the walls
- Level them up, putty them
- Reapply primer
- Wait until completely dry
- You can glue a decorative layer
Paint is not a death sentence, the main thing is to ensure a smooth surface and good adhesion to the wall surface and you can glue everything!