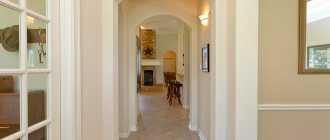
Recent years have been full of designer inventions and tricks in creating unusual interior design. There are ideas that are very popular in the construction world. One of the highlights of the corridor design is the arch in the corridor, which radically changes the interior of the room. Guests will be pleasantly surprised by the unusual design of the hallway.
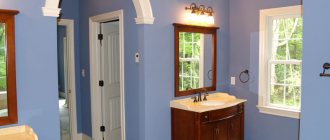
An arch in a doorway instead of a door.
Types of arches in the interior of the hallway
Arches can be based on any variety of geometric shapes.
Square (rectangular)
These designs are similar to a regular doorway, which fits perfectly into any interior. This design of the passage will be a good option for a style solution that does not imply smooth transitions and lines.
The photo shows two rectangular arches in the interior of the hallway.
Round
The standard, regular rounded shape of the arch with clean and smooth lines is the true embodiment of strict elegance and elegance.
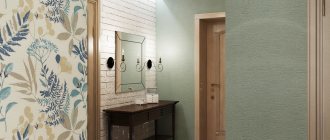
The photo shows the interior of a small corridor with a round arch.
Elliptical (oval)
The ellipse taken as a basis gives the arch a more elongated shape, which will be most appropriate in a hallway with low ceilings.
Half-arch
Such an asymmetrical passage provides a lot of wide decorative possibilities, with the help of which you can create a fairly individual design that matches almost any stylization.
Trapezoidal
It is a rather bright and unusual solution, giving the interior of the corridor some dynamism.
Curly
Fantasy arches in the shape of a wave and other unusual solutions will become a completely unique decor for the room. Curly designs favorably emphasize the originality and aesthetic subtlety of the hallway design, adding a certain zest to it.
The location of the arch in the interior of the apartment
Popular options for arch placement.
Between the kitchen and the hallway
For a kitchen and a corridor, made in the same style, an arched opening will be a particularly excellent option, which will allow you to combine two rooms, not only visually, but also physically. This decorative technique will completely change the interior perception and create a more harmonious atmosphere.
The photo shows a rectangular arch between the kitchen and hallway with a staircase.
To the living room from the hallway
The arch allows you to visually smooth out the transition from the corridor to the hall and make the spatial composition much more holistic.
Corridor division
Arched structures are considered an excellent solution for zoning space. They allow you to create a visual partition of various arched, rectilinear or semicircular shapes, which will be in harmony with the overall style of the hallway.
In the wall
With the help of a decorative arch in the wall, it turns out that you can not only give the room character and expressiveness, but also create a truly picturesque decoration of the corridor, which can be used to frame mirrors, paintings, photographs, or use a niche to place other things or pieces of furniture, such as a dressing room .
The photo shows a corridor in light colors and an arch in the wall equipped for a wardrobe.
Nuances you need to know about
Since after the arch is designed, the space between the kitchen and the adjacent room is united, following the laws of physics, cooking smells may well spread throughout the apartment. This is why it is very important to install a hood in the kitchen before installation: it must purify the air before it moves to other rooms.
There are also other nuances:
- the arch is not recommended to be installed in apartments equipped with gas stoves;
- due to the open space, there is a problem of constant noise, which is especially important if there are small children at home;
- the transition between rooms requires decent lighting so that all decorative details are emphasized and the overall impression is enhanced;
- if you have low ceilings (less than 2.5 meters), you should think about installing a regular door, since the arch in this case risks turning from a potentially beautiful interior decor into an overly intrusive accent;
- The smaller the apartment, the less noticeable the opening should be designed so as not to get the effect of narrowing the space, as often happens with Khrushchev-era buildings.
What material can be used for corridor arches?
The choice of material determines the appearance of the entire structure, as well as its functionality and durability.
- Drywall.
- Tree.
- Plastic.
- Metal.
The photo shows white plasterboard arches in the hallway interior.
Materials used
Various materials are used - wood, natural stone, bricks, blocks. Of course, a lot depends on the taste preferences of the homeowners and the budget allocated for renovation. But nowadays, drywall is especially popular.
This material has the following advantages:
- Environmentally friendly. For the production of gypsum boards, only natural raw materials are used.
- Easy to install and fix. The material can be easily attached to supporting structures of any type.
- Easy to process structure. This makes it possible to create elements of different shapes.
Therefore, it is not surprising that many people prefer this material.
Shapes and sizes of the corridor and hallway
Design options for corridors of different shapes and sizes:
- Narrow. An arched opening in a narrow room will visually divide the space into functional zones, give it proportionality and make the most efficient use of the entire usable area.
- Long. For a long corridor, an effective solution would be round arches with an enfilade arrangement, with the help of which it is possible to advantageously emphasize the length of the room and turn this planning disadvantage into an advantage.
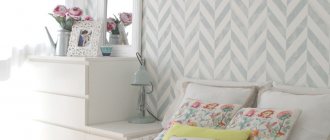
- Small hallway. Arches in a small room instead of a door allow you to visually expand the space without weighing it down or cluttering it.
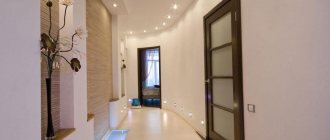
The photo shows the interior of a small hallway with a white rectangular arch.
Functions
Arch decorated with decorative stone in the hallway.
When installing an arch in the corridor, you need to answer yourself what goals are being pursued. Using the arch you can perform the following tasks:
- An arch can simply act as an element of decorating a room; a non-standard design of the area appears at the entrance to the house. It can set the style of architectural design of all rooms. She was a favorite of architects at all times.
- The so-called distribution of zones or zoning is carried out, where the corridor and hallway are separated into separate zones using a built-in arch.
- The lightness in space created by the arch provides passage to other rooms. Moreover, rooms with different functionality are not combined into one space. This option is convenient for small studio apartments.
Interior arch with plasterboard finish.
Decor of a plaster arch using sculptures.
With the help of little tricks (the shape of the arch) you can achieve a visual change in the layout of the apartment. The small area of the room will visually increase if you place the arch in the corridor. Bypassing the installation of doors, freedom in spatial use increases. A rounded arch will change the perception of ceiling height.
Rounded arch with trim in the hallway.
An arch as a decorative element is a very beautiful decoration of a room. The right shape and materials for its manufacture can make it also useful. You need to decide on the functional tasks that the arch will perform when installed in the corridor.
Arch design
Design ideas for decorating arched passages.
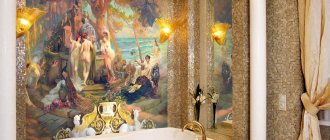
From stucco
This arched structure has an impressive, graceful and luxurious appearance and, thanks to the molded relief and carved details, does not require additional decor.
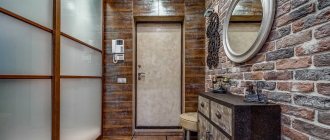
Decorative rock
With the help of stone masonry, you can unusually decorate and emphasize the arched element, giving it a certain antiquity and medievalism. A rather interesting solution is the artificial creation of decorative chips, due to which the finish takes on an even more natural look.
Backlit
Original arches with lighting in the form of spotlights, light bulbs or LED strips look lighter, airier and more technologically advanced and perfectly serve as a full-fledged lighting element.
Tile
It is a very interesting and at the same time universal and easy-to-use material, simulating various stone, brick, marble or other surfaces. The tiles make the arch more expressive, which adds visual variety to the corridor.
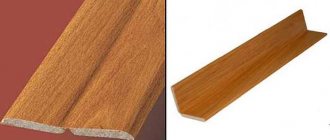
Wood finish
Refined, luxurious and natural wood finishes, thanks to a variety of textures and shades, guarantee the creation of a harmonious and truly environmentally friendly design. However, solid wood is a fairly expensive material, so veneer is often used for finishing.
The photo shows a modern hallway and arch decorated with wooden trim.
Non-standard design
There are a huge variety of decoration options, for example, you can decorate an arched opening with textiles and give the interior more coziness, decorate it with relief elements, molding or baguette, simulate through windows next to the passage, decorate with materials in the color of the walls and make it almost invisible, or vice versa, use contrasting a highlight that will become a real highlight of the hallway.
The photo shows a spacious hallway and a wooden figured arch with columns.
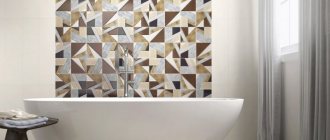
Mosaic
With the help of bright and aesthetic mosaics, you can decorate the entire arched structure or apply partial decoration. This geometric pattern will give the room design a completely new look.
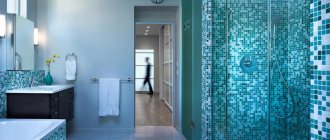
Mirror
Openings decorated with reflective elements create a beautiful play of light in the room and add special sophistication to the interior. The mirror design undoubtedly attracts attention and adds additional spaciousness and lightness to the space.
The photo shows elliptical arches with a mirror design in the interior of the corridor.
Brick
It looks quite unusual and has a simple and very stylish look at the same time. Various brickwork gives the vaulted passage massiveness and solidity.
With shelves
A wide arched opening with shelves, small side or corner shelves, provides convenient placement of decorative elements or storage of various small items.
How to make a plasterboard arch with your own hands
Once you understand what type of arch and what finish will be used, you can begin creating your own arch structure. But before that you need to prepare the necessary tools and purchase materials. To make a bow with your own hands you will need:
- putty solution for plaster;
- fiberglass mesh;
- metal support profiles;
- Dowels;
- self-tapping screws;
- Drywall: thin plasterboard - 6.5 mm. and wall plates - 12 mm;
- chainsaw or jigsaw;
- Knife;
- Sandpaper;
- Arched corner;
- barbed roller;
- Spiritual level;
- Blade;
- metal scissors;
- Pliers;
- Hammer;
- Exercise;
- Screwdriver;
- roulette;
- jellied grater;
- Carpenter's Square;
- Pencil.
Installing an arch consists of several steps that must be performed sequentially. First you need to carefully calculate the diameter of the arch and its height.
- Then prepare the doorway for installing the arch. It is necessary to clearly disassemble the door according to plan, observing all proportions. After this, it is necessary to carry out work on installing the profile.
- Then you need to monitor the installation and finishing work. Take the UW profile and cut it into 3 parts. The first should be attached to the ceiling, and the second and third - on the sides of the arched structure. Profiles should be mounted on the dowels.
- Then you need to take two rectangular arched sheets and cut them into the required shape according to the finished element.
- Two plasterboard boards should be attached to the opening on both sides of the room and a U-shaped metal profile should be placed in it.
- You will need a U-shaped profile, on which you need to make cuts 1 cm wide so that this profile becomes flexible and takes any shape.
- Now secure the prepared drywall with self-tapping screws and a screwdriver.
- Now you need to prepare the drywall for work; it needs to be sewn into the bottom of the structure. Thin sheets are suitable for this; they are flexible and thin, making them easier to bend. Then make 1cm wide cuts in the sheets of drywall. Work carefully as the sheet is held in place by only one piece of cardboard.
- Prime the surface and apply a layer of putty to smooth out the corners, do not forget to lay down the mesh for strength.
- The putty is applied with a spatula in two stages.
- After complete drying (12 hours), you can begin finishing. The arc should be smooth and even.
- The next stage is decorative finishing. This could be wallpaper, paint, stone or wood. It all depends on the fantasies and desires of the owner of the room.
Corridor design in various styles
A universal arch can be a great addition to any style direction, for example:
- Modern.
- Classical.
- Provence.
- High tech.
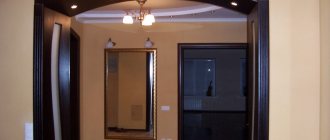
The photo shows a rectangular arch in the interior of a hallway made in a modern style.
With the help of modern materials and various finishes, it is possible to construct a truly unique and unusual arched opening that will successfully fit into any stylistic solutions.
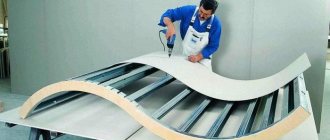
We install drywall on an arched frame
After the arch frame is installed, it needs to be sheathed with plasterboard. Start with the side parts: screw the prepared sheets to the metal guides with self-tapping screws in increments of 15-20 cm.
Installation of drywall on the frame
Advice. Screw in the screws so that their heads “sink” into the drywall - this way they will not interfere with finishing work and will not subsequently spoil the appearance of the arch.
Next, you need to secure the drywall to the curved top profile. This is the most difficult procedure, since the material, on the one hand, bends poorly, and on the other, can quickly deform under force. The best way out of the situation is to slightly wet the drywall and, carefully bending it, adjust it to the frame. When the required arch radius has been reached, attach the plasterboard elements to the curved profile using self-tapping screws. Then the finished upper part of the arch must be connected with the same screws to the side walls of the structure.
Jumpers on the frame will facilitate further installation of drywall
This completes the rough work. Next comes finishing and design.