Finishing
Finishing is an essential part of completing any construction or renovation work. Attaching corners to the window frame slopes is a finishing procedure.
Corner
Material characteristics
Why choose plastic finishing elements when there are the usual metal and wood, known for durability and environmental friendliness?
Causes:
- Ease of handling. Plastic parts are easy to cut, sand, and process.
- Strength. The thickness of the element is sufficient to protect the slope from mechanical damage.
- The plastic is resistant to ultraviolet radiation, moisture, and durable - the slope will last 20 years or more.
- Ability to smooth out unevenness. The part will turn any angle into a straight line, the profile has 90 degrees in measurement.
- Ease. The weight of the parts is important. Plastic allows gluing rather than screwing - the adhesive strength is sufficient to hold the part. The weight allows you to transport a lot of plastic elements.
- "Undemanding" No need to paint the corners. You can remove stains using regular home remedies.
- Wide palette.
- Affordable price.
Disadvantages - instability to fire (when melted, harmful substances are released that poison the air), fading after the expiration of the service life. However, there are more advantages, because plastic finishing materials are in demand.
Shapes and sizes
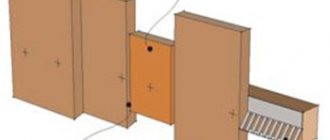
Finished corners usually have an angle of 90°. The corner itself is not always sharp; there are options with a rounded one. By type, corners for protecting wall corners are divided into:
- hard external;
- internal;
Universal corner made of MDF
Questions can only be about universal ones. These are two strips of plastic or MDF connected by a thin strip of flexible material of the same color. Thanks to this connection, you can draw an obtuse or acute angle, internal or external - without much difference. But in terms of reliability of protection it is inferior to rigid ones - after all, the flexible part is quite thin.
You should also know that the corners may have shelves of the same or different widths. They are more often found with the same ones, but it is quite possible to find those in which one is wider than the other.
Types, shapes, sizes
The width of the shelf varies from manufacturer to manufacturer. Plastic ones, for example, can have shelves from 10 mm to 50 mm. MDF corners are made with a minimum shelf width of 20 mm, metal ones - from 10 mm, but the maximum shelf length is 90 mm (aluminum). So there is plenty to choose from.
Types of plastic corners
Speaking about the characteristics and use of elements in the design of a slope, it is necessary to touch upon the issue of varieties. There is no strict classification; we are talking about part of the classification branch - plastic products.
What types of plastic products are there? There are plain ones, which allow you to decorate the window in one color, and textured ones - like marble or stone.
The standard part is L-shaped. The length of the shelves is asymmetrical. They are produced at angles of 90 and 105 degrees. There are for internal and external parts. Often painted on both sides, allowing elements to be used both inside and outside. However, it is undesirable due to the difference in texture between the “front” and “back” of the plastic part).
Dimensions
Plastic is more durable when the shelves are longer.
T-shaped ones are designed to mask the gap between the slope and the wall. Removable ones “close” with a click, allowing you to carry out minor repairs without removing the corner from the window/wall.
Arch finishing
Arch design is often challenging. In general, there are not many external corners in the apartment, but the arch should have them. And in the aisle they are touched very often. Then furniture, then other cargo, or a resident who simply couldn’t fit into the opening. And if there are no questions with the straight part, then the rounded part may be a problem.
And not only in the doorway can there be an arched vault
In general, you can use universal corners for an arch. They are flexible, which is very convenient. There are flexible, non-universal ones - plastic, made from a special polymer with increased elasticity.
But in general, corners with different shelf widths are used to decorate arches. They are even called arched. They have one shelf 10 mm (external) and the second - internal - 30 mm or more. They bend easily. You can’t twist it into a donut, but it’s not difficult to get an arc of any curvature. You just need to use a secure hold while the glue dries.
This is an arched plastic corner
If you want to bend a regular corner, you can do this by heating the plastic. For this work you need a hair dryer. The usual one - for hair - will not work, since its temperature is too low. We also need a template according to which we will bend the plastic corner. Take a piece of fiberboard, tighten screws or drive nails, forming the profile that you require.
This way you can decorate the corners of the arch with protective corners
They start bending from the middle. Warm up the area, constantly pressing on the middle, and using a hairdryer, moving from the center to the edges. So you need to bring the corner to the desired curvature and leave it in this position to cool. To prevent it from straightening out, holes are made in parallel with a row of screws for the second row. The distance between the rows is equal to the width of the corner shelf. After the plastic has bent, insert and lightly tighten the screws. After the plastic has cooled, remove them.
Types of adhesives
It is necessary to consider the types of glue suitable for finishing the window. They differ in characteristics and application.
- Liquid Nails.
Durable composition. Spot or zigzag application is allowed. Liquid nails will preserve the window for 20 years and will not cause chemical reactions leading to darkening or yellowing.
Liquid Nails
The composition comes in different colors, colorless is preferred.
- Silicone sealant.
Poured into joints and gaps. Contains no toxic chemicals. However, it tends to darken over time.
- Polyurethane glue.
Durable, elastic, hardens quickly.
- Liquid plastic.
Robust, durable, suitable for plastic surfaces only. It won't stick to a brick wall.
Glue selection
Before gluing corners to slopes or other architectural elements, it is necessary to select the correct installation composition. Today there are 4 solutions to the problem. Let's look at each of them in more detail.
See also: Catalog of companies that specialize in decorative forms.
Liquid nails and sealant
In modern construction markets, sealants with liquid nails are presented in gun tubes or tubes. Moreover, they have the same volume. Buyers often get confused in this variety.
For installing lightweight plastic, only 2 options are suitable: liquid nails or adhesive-sealant. Here it is necessary to pay attention to the fact that the composition also exhibits good adhesion to the base. So, for absorbent surfaces you can use acrylic-based or neutral adhesives. They practically do not emit odor, can be wet cleaned before drying, and dry quickly. If work is carried out on concrete, plastic, metal or glass, you will have to make a choice in favor of universal compounds.
Universal composition Source stpulscen.ru
Sealants are often used to install corner profiles. This is justified by additional waterproofing. However, this approach is incorrect due to the weak adhesive ability of the material, and the dry residue can only fill the voids. A corner fixed with sealant does not always last for a year.
Liquid plastic
Liquid plastic is sold in the same containers as liquid nails. But the cost of the composition differs significantly from them in a larger direction. This is justified by high performance and technical characteristics. So, among the advantages the following are highlighted:
quality indicators and shape remain unchanged 10 years after installation of the fittings;
color change under the influence of ultraviolet rays, oxidation does not occur over time;
Due to minimal shrinkage during the drying process and good adhesion, a monolithic structure is formed, which additionally protects the base from moisture penetration.
Liquid plastic Source pvcwindow.ru
Liquid plastic belongs to the group of universal building materials. They can be used for gluing corners on slopes and filling/sealing joints between the window frame and adjacent planes. In addition, the composition is characterized by high mechanical stability, which allows it to be used for fastening window sills and sheet finishing of the opening. The only drawback against the background of numerous advantages is that the use is limited to PVC bases.
Polyurethane glue
Before gluing the plastic corner to the plastic panel, you should find out in advance about the color of the synthetic glue from light beige to dark brown. If the work surfaces are white, then the excess will be visible here. It can only be removed using organic or special solvents until it dries. Before using the material, you also need to find out about the working time of the glue in the open state.
Classic version of polyurethane glue Source sdelais.ru
The main advantages of polyurethane adhesive are as follows:
- resistance to biological damage and corrosion, which is important for areas with variable humidity;
- low thermal expansion allows the glue to be used in conditions from -60 to +150℃, which is not typical for the listed analogues;
- resistance to oils and organic solvents allows the composition to be used for finishing in laboratories and industrial enterprises;
- plasticity helps maintain the characteristics of the dry residue under vibration load;
- high adhesive ability determines the versatility of the glue to work with any substrate.
They also note the uniqueness of the polyurethane composition regarding the drying process. The higher the relative humidity, the more active it is. This allows you to install decorative corners for slopes in the bathroom without prior ventilation.
Preparatory work
The surface (window, slopes) must be cleaned of dirt and dust and degreased.
Will you need tools for installation? It is better to use a glue gun for glue. This will eliminate excess surface contamination.
To work with a corner, you will need scissors, a stationery knife, masking tape, a square, and a measuring device - a construction ruler or tape measure.
Sometimes the instructions mention a tool - a miter box. Allows you to make workpieces at an angle of 45 degrees. However, it is difficult to get. It’s possible to cope without it! You can follow these recommendations, the work will turn out to be of high quality.
Purpose of perforated corners
What are perforation angles?
A perforated corner is a special device that acts as a frame for applying putty. A solid base allows you to achieve ideal geometry in both horizontal and vertical planes.
Among other things, a perforated corner for wall corners performs a protective and strengthening function. Fixed to the wall under wallpaper or another type of covering, this detail prevents premature destruction of the wall due to damage when carrying furniture, being hit by a heavy object, or frequent contact with the body of household members.
Material of manufacture
Currently, manufacturers produce many modifications of corners for wall putty. The purpose of the perforated corners for putty is determined by the base material and the shape of the product. Various materials are used as raw materials for their manufacture, each of which has a unique set of characteristics.
Among the main advantages of aluminum corners for putty are long service life, mechanical strength, and environmental friendliness.
The advantage of such products is considered to be low cost, and also, due to the synthetic base, resistance to rotting and chemical attack. Their light weight greatly simplifies finishing work.
Due to the zinc coating, steel parts last for ten years. They are resistant to corrosion, are not afraid of moisture and temperature fluctuations.
Configuration of perforation angles and their characteristics
Depending on the layout of the room, two types of perforated corners for putty are used for finishing walls:
Such devices are necessary when arranging curved structures and surfaces. Using such products, you can achieve clear edges when plastering arches, niches, two-level ceilings and all kinds of partitions. They favorably emphasize the elegance of the architectural form, hiding minor finishing defects, which especially often arise during DIY repairs.
- Arched.
- Direct.
Their purpose is to level and reinforce straight planes. They are also used when you need to hide joints that are not tightly adjacent to each other.
Preparation for installing corners for putty for wall reinforcement
Before fixing the part to the wall, it is necessary to pre-treat the surface. To do this, you need to clean it from dust and dirt particles using a degreaser.
If you plan to reinforce an area where wallpaper is already covered, you should remove the strip of covering before installing the element. To do this, attach the structures tightly to the corner, mark the lines with a pencil, and then carefully make cuts with a stationery knife. After this, apply a primer and then secure the part completely.
Options for installing corners on walls
How to design a slope? Installation methods:
- To the wallpaper.
Suitable for non-relief, simple wallpaper. Deep embossing creates cracks that fill with dust, weakening the bond between the corner and the wall.
- Detailed.
This involves cutting out part of the wallpaper on the slope and applying glue to the wall surface. It is called “detailed” because it looks like a whole composition, but is an assembly of parts - pieces of wallpaper, corners, glue.
Detailed installation plan:
- The corner is placed in place, marks are made with drawing tools.
- The strip of wallpaper is cut according to the marks. Clean the wall at the slope.
- Apply glue to the cut plastic piece, press it to the slope, and hold until the composition sets. Press it to the wall with tape for a day.
- After 24 hours, the tape is removed and the installation is considered completed.
The main purpose
As noted above, the main reason for attaching a protective PVC corner for wallpaper, arches and tiles to the corners of walls is not only the decorative function, but also the protection it provides for certain construction or finishing materials in the interior of apartments and houses. With this design, you can protect various vulnerable areas from damage that can be caused by impacts from pieces of furniture of various sizes, careless handling of household appliances, and sometimes overly playful children and pets.
Attention! If you decide to stick on a decorative plastic corner, then be sure that this mounting element will not only provide safety for wallpaper, PVC panels and window slopes, but will also make the interior of the room more “complete” and attractive. So, let's look at the gluing process in more detail.
Types of plastic corner
It should be noted that in terms of its purpose, as well as in appearance, this fastener may be different. The following types can be distinguished: external, internal, perforated, colored, decorated “like wood”. In addition, some of its types can be used for work on the ceiling.
Advice! If you are not satisfied with the color of the PVC corner and want to paint it, then you should use the same rules and instructions as when painting other PVC surfaces.
As for which size is better to choose: look at the situation, guided by both aesthetic and practical considerations.
Installation of corners on windows or doors
How to do self-installation? There are no tricks - strict instructions, if followed, the result will be high-quality, beautiful.
Installation
How to cut correctly
The inner part of the workpiece is cut at an angle of 45 degrees, the outer part is left at 90, installed higher, overlapping. The size is double checked by measurements.
How to glue
Installation:
- An adhesive composition is applied to the part.
- The profile is pressed against the slope until the glue sets.
- Secure the part with construction tape.
- The adhesive tape is not removed throughout the day.
With tape
Even if the glue packaging says that it dries quickly, a day is the minimum for complete hardening.
How to cut a corner of a ceiling plinth - proven methods and techniques
Ceiling plinths are very often used for decorating rooms. They give the ceiling a complete look and allow you to convey a particular style in the interior. In addition, they serve to mask the joints between walls and ceilings, where two different materials meet. Although such elements are not always present in the premises, they make the interior more complete. In the following material we will describe in detail how to cut the corner of a ceiling plinth, since in such places the joining of individual elements often poses a problem for inexperienced builders.
If the room has a simple shape, then only the internal corners will need to be cut. But in rooms of a more complex configuration, with columns, partitions and niches, there will also be external corners. In order for decorative elements to look beautiful, trimming must be done correctly and carefully, otherwise the appearance of the ceiling will be ruined.
To cut the ceiling plinth in the corners as best as possible, you can use high-quality and sharp tools or other means. The type of tool that will be used to cut skirting boards depends on the type of material they are made from. Thus, ceiling plinths are made from PVC, polystyrene foam, polyurethane and wood.
The cheapest option is PVC skirting boards. They are soft, so it is easy to leave dents and creases on them that cannot be corrected in any way. In addition, this material has the property of attracting dust. A hacksaw or sharp knife is suitable for cutting such skirting boards.
Another fairly cheap type of material is polystyrene foam skirting boards. They crumble easily, so to cut the corners of the ceiling plinth you should only use a sharp knife or a hacksaw. Movements should be soft, without pressure.
Cutting plinths to decorate the ceiling
Another type of ceiling plinths is made from extruded polystyrene foam. They are much denser than ordinary foam plastic products (therefore they do not crumble), they cost a little more, but they are also somewhat more difficult to cut. For work, you can use the same knife or hacksaw for metal.
The most expensive skirting boards are made from polyurethane. These are elastic, strong and moisture-resistant products that are very easy to cut with a construction knife. True, they cannot be used in all rooms, since polyurethane is sensitive to high temperatures - it deforms, begins to crack or crack.
To work with wooden baseboards, only a hacksaw with fine teeth is suitable; you can use a metal tool.
However, many novice craftsmen are interested not so much in what, but in how to correctly cut the ceiling plinth in the corners. This process requires careful calculations and accuracy from the performer. In some cases, if the interior of the room allows, you don’t have to think about how to cut a corner on the ceiling plinth, but use ready-made corner elements. They can be purchased at construction stores. In this case, the plinth is simply cut straight and inserted into the corner element. All irregularities and flaws will be hidden.
Using a miter box to cut baseboards
In carpentry, a special device made of wood, metal or plastic is often used - a miter box. It contains special slots that allow for even cutting at 90º, 45º, and in more complex devices – also at 60º. There are also professional miter boxes equipped with a rotating mechanism. In them, the cutting tool can be installed and fixed at any angle to the workpiece. Before you make ceiling plinths in the corners, you need to understand the details.
To cut the inner corner of a ceiling plinth using a miter box, you must:
- First, you need to attach the baseboard blank to the ceiling surface and mark the length.
- Now the piece of plinth is placed in the miter box in the same position as it should be placed on the ceiling.
- The plinth is pressed tightly against the back wall of the miter box.
- Hold the workpiece with one hand so that it does not move during cutting.
- The hacksaw is installed at an angle of 45º to the workpiece.
- Cut the plinth, controlling the degree of pressure of the hacksaw so as not to damage the product.
- Then they move on to cutting the counter piece of plinth. It is also applied to the far wall of the miter box.
- The workpiece is pressed and held by hand so that it does not move.
- The hacksaw is installed at an angle of 45º to the workpiece so that the cutting direction is opposite to the first element of the plinth.
- Cut off the corner of the plinth.
Recommendations from the experts
Recommendations for beginners to make the task of attaching slopes less problematic.
- “Measure twice, cut once,” says the proverb. You need to take accurate measurements so that there are no gaps.
- It is not recommended to fasten joints with silicone. The composition darkens over time and stands out unattractively in relation to the plastic profile, disrupting the aesthetics of the finish.
- You need to measure the corners. An angle of 89 degrees is not straight, the joints will have to be processed differently.
- In the absence of experience, it is wise not to immediately glue the corners, but to first secure them with tape, comparing measurements, identifying gaps.
- It’s easier to make an arch using a hair dryer. The plastic profile bends well when heated.
Decorated
Gluing the corners is not difficult. No skills are required to beautifully decorate a plastic window. You need to select and install a profile according to the instructions.
Voted over 395 times, average rating 4.2
Comments
Unfortunately, there are no comments or reviews yet, but you can leave your...
Add a comment Cancel reply
We recommend reading
Finishing Modern lamination on window sills: pros and cons of the coating Most modern windows are equipped with classic window sills ...
Finishing How to putty the surface of slopes on plastic windows with your own hands High-quality putty directly depends on how exactly it was ...
Finishing How to foam all the cracks around a plastic window with polyurethane foam Sealing windows using high-quality ...
Finishing Step-by-step instructions for siding windows of various types: photos with examples of work In construction, a professional term is used - siding. IN …
Optimization of slope plastering
Hello, dear readers! I would like to start this post with an apology. What am I talking about? The fact is that in April I published a lesson “Plastering slopes”.
It’s not that everything is described there incorrectly, it’s just that all this can be done twice as fast! Yes, exactly twice, no less! And the result will be much better.
I myself don’t understand how I could work for more than two and a half years in finishing and not understand this! Damn it...
Previously, I wrote that, for example, window slopes are plastered after the entire wall is plastered. After that, rules are set on them, a solution is applied and leveled with a template.
After setting, the rules are removed, and the sagging on the walls is cramped. Then protective corners are installed on the outer corners. Which spoiled the whole plane, and we had to put up with it.
What nonsense!
In this article, I will give you an optimized method for installing a charger, which will save a lot of time, effort and give excellent results.
I will not delete the first lesson, since the template alignment technology is still relevant)
We will combine the process of installing metal corners with the actual plastering of the slopes! This is brilliant! We'll just use the corners as a beacon instead of a rule. But there will be an important caveat. Not just any memory can be used. Here, for example, are low-quality ones:
Nowadays they save on everything, and all sorts of crap comes out. You need to use Knauf ones, they are very strong and you can’t bend them that easily. Here's what they look like:
The essence of the technology is that we will install them at the stage of installing beacons, and possibly instead of them. Let's look at an example, quite simple.
Option without beacons
We have a short wall with a doorway. The left slope is wider than the right by as much as 3 cm, and besides, the wall itself does not shine with evenness. This is understandable; monkey labor was used as usual. Tell me: why the hell do developers plaster if it only makes the walls worse?! Why not remove it and save thirty thousand? Or do it straight through the beacons, we’ve already had enough.
So, on our wall, just the corners will be enough; the beacons here will be superfluous. We will place one on the edge, and three more on the slopes. All four must be in the same plane, so the outermost ones are set first, and then the central ones. Here I set the charger to the left slope, using a laser for convenience:
Installing corners as beacons is much more difficult than installing the latter. Which are exposed only in one vertical plane. The charger, which is placed on the outer corner, must set the vertical for two walls at once, that is, also for the adjacent one:
As soon as the solution (any gypsum plaster or Fugenfüller putty) has set under our extreme corners, you can set up the intermediate ones. This is a little easier to do. In a plane perpendicular to the wall, we set the vertical, and in the plane of the wall the charger is installed by pressing it with a rule, focusing on the outer “beacons”.
In our example, the width of the corner profiles was just enough for a layer of 3 cm. So, we have set the plane for plastering. Now we level the wall as usual using the rule, and the slopes using a template.
After the process is completed, we will get ideal, clear angles, and nothing will stick out anywhere and spoil the plane.
This way we saved about an hour, or even an hour and a half of time, “killing two birds with one stone” at the same time.
Option with beacons
Now let's look at the case when the corners will be installed together with plaster beacons. Let's take a window as an example this time. I’ll say right away that the window sill must already be installed to use our technology (read how to install a window sill here). Otherwise, we will not have the opportunity to properly install corner profiles on the side slopes.
First, all the beacons are set, they will give us the plane of the wall into which we will have to “build” the memory. As soon as the beacons are set, you can start sculpting. In the previous lesson, I told you how to set a solution for slopes.
Everything is the same here. The only difference is that instead of rules we have memory.
The corners are installed into the plane of the wall by pressing them with a long rule with emphasis on the beacons, and we set the vertical/horizontal using a bubble or laser level.
That's it, now we can plaster both the wall and the slopes, to choose from. And we’ll plaster around the window sill at the same time, even here it’s saving money. Ideal plane, no trimming or “pulling” with putty. We immediately get results! Damn, how long it took me to achieve this!)) And how much money I lost while I was struggling with these corners! Punishment for stupidity. I’m writing to you obvious things...
But it’s better late than never) If I come up with something new, I’ll write a post right away. To avoid missing out, subscribe to new lessons. Here is such a short but very succinct article today. See you on the pages of the site, good luck with the repair!
Source: https://siteproremont.ru/shtukaturka/metallicheskie-zashhitnye-ugolki-ustanovka.html
We cut the ceiling plinth in the corners at home without a miter box correctly: Review + Video
Ceiling plinth is a narrow decorative demarcation between the ceiling and adjacent walls.
They are very convenient for masking joints on walls and ceilings, especially if they have a different structure and are not made very carefully.
Its presence makes the room design clearer and more complete.
People often wonder: how to properly and accurately decorate a room with ceiling plinths?
This is especially true for those cases when the home owner prefers repairs done with his own hands.
Ceiling plinth - fillet
To do this correctly, it is important to strictly follow existing recommendations and rules for finishing work. And then the result will please you.
There are no difficulties in attaching the fillet (this is the name of this element): virtually all types of products are attached with reliable glue.
Even inexperienced repairmen have no difficulty hanging the ceiling plinth. They are worried about something completely different: how to properly cut the ceiling plinth? In fact, almost every room, no matter how intricate its shape, is equipped with corners.
How to install correctly?
We suggest you understand the rules for installing corners, because the operational period of the entire coating depends on this. The following conditions are met:
- the corner is installed on a solid section of the wall;
- the installation site is covered with a primer mixture, like the main surface;
- The corner is fixed using beacons;
- the entire perforation is filled with the mortar mixture;
- when installing the product vertically, use a building level;
- if plastering is to be done with a thin layer, the corner is installed on screws or dowels;
- corner areas are plastered at the final stage;
- in their work they use special tools that are used to finish corner areas;
- Such places are rubbed one at a time; it is recommended to ensure that the corner slats do not protrude outward.
The main feature is that the corner pad must be installed correctly. There are some nuances here, knowledge of which will help you cope with such work without any problems.
Internal corner areas are finished alternately or simultaneously, the procedure in any of the cases remains the same:
- spray and a layer of soil are applied, the area is leveled using the rule, movements are directed from the corner in both directions. Markings are made on the mixture, after which the formation of the corner begins;
- the edge of the trowel is applied to the wall surface at thirty to forty degrees, the tool is brought to the inner corner, laid on the wall and grouted. After this, the trowel is pressed with its edge onto the fresh solution with its base;
- when pressing the tool, a force is created, due to which the device is cleaned;
- As soon as the primer has dried, apply a coating and level the layer with a grater. At the final stage, the tool is positioned so that one edge of it is on the plaster layer, and the second is lightly passed over the freshly applied mortar;
- with a grater they work vertically around the entire corner, creating a strictly even edge.
External corners are finished as follows. Some use metal profiles, with the help of which the action is performed simultaneously on both sides. The second option is to process the plots one by one.
The corner is installed on the applied solution, after which the primer is applied after drying. The corner slats are attached in a thin layer, and all edges from the floor covering to the ceiling are lubricated with the solution. The excess part of the corner is cut off with metal scissors.
The areas around window and door openings are also plastered using corners. To ensure that the layer is applied evenly, the work is carried out in several stages:
- areas for installing profiles are cleaned and primed;
- a plaster solution is applied to the prepared surface using a spatula;
- profile guides are installed and the mixture is coated on top;
- dried slopes are cleaned with sandpaper.
How to cut a plinth at any angle and without gaps - 3 working methods from a practitioner
There are now more than enough tips on how to cut a baseboard at 45 degrees on the Internet, the only bad thing is that most of them are given by people who have never done this. Next, from a practical point of view, I will tell you how to cut skirting boards at the corners with your own hands in 3 options, and you will learn about both traditional methods and folk universal recipes.
The science of how to properly trim ceiling moldings in corners is not as complicated as it may seem.
- A few words about tools and materials
- Three working methods for trimming skirting boards
- Method number 1. Classic miter box
- Method number 2. Trimming according to a template
- Method No. 3. Applied universal
- Important nuances
- Conclusion
A few words about tools and materials
Floor skirting boards are now made of wood or polyvinyl chloride (PVC), in other words, plastic. For ceiling fillets, the list is a little longer:
The range of ceiling plinths is much wider than that of the floor type.
- Polyurethane - these skirting boards have good elasticity and can bend around radial and other curved surfaces, but in any case they need to be trimmed to precise angles;
- Foam plastic is the simplest budget option, the price of foam skirting boards is low and they are very easy to cut;
- PVC - the principle is the same as that of floor skirting boards, but the model range is much wider;
- Wooden - similar to floor ones, only here there are also wide models;
- Gypsum - with the advent of polyurethane and foam plastic, gypsum ceiling fillets faded into the background, firstly, they are heavy, and secondly, fragile. But to be fair, they are worth mentioning.
Since it is impossible to correctly cut the ceiling plinth and its floor counterpart without a good tool, we will dwell on this issue in a little more detail.
The best, almost ideal tool for trimming any skirting boards and more is a miter saw with a rotating bed. The high-speed disc makes smooth and precise cuts, and the bed in these units rotates to any angle. The only problem is the serious cost of this tool.