Tile adhesive for the kitchen - choice of glue and grout
Speaking about tile adhesive for the kitchen, it is worth noting that the line of tile adhesives does not include such products as special tile adhesive for the kitchen. Any adhesive designed for laying tiles in the bathroom (humid environment) is suitable for tiling in the kitchen. However, if you have poor tiling skills, you will have to make frequent adjustments to your tile installation. Therefore, you should not choose fast-setting glue. This adhesive allows you to lay tiles from top to bottom.
The correct choice of grout is important. There is no need to skimp on money and buy cheap grout. Tile grout must be moisture resistant and resistant to frequent washing.
We pay special attention to tile floor adhesive. To lay tiles on the floor, you need to choose an adhesive, the packaging of which must indicate that it is suitable for tile work on the floor. Here, the adhesion strength of the adhesive is important.
Material calculation
At first glance, calculating the amount of material needed is not difficult, and this is true, but partly. Determining the area to which ceramics need to be glued is quite simple: multiply the height by the length, then divide by the area of the single element, the resulting number is rounded up. However, the following points should be taken into account:
- seam size;
- possible waste.
The distance between the tiles is specially made, this is done for the correct geometry. When making ceramics, the dimensions of individual elements cannot be made identical, although there will certainly be at least a slight difference. If you place the samples close to each other, the connection line will become more and more distorted, and the seam makes it possible to move individual elements and achieve a more uniform layout.
In this regard, after calculating the total number of tiles, the total thickness of the seam is subtracted. This will be easier to do if you think in advance which crosses will be used, these are plastic parts inserted into the gap between the ceramics, their thickness is indicated on the packaging. To make the calculation more accurate, determine the number of tiles in one row. For this distance, walls or floors are divided by the length of an individual tile. It is necessary to determine whether there will be seams in the corners; some tilers join them closely. The resulting number is multiplied by the number of rows and inter-row seams are added.
The second method is simpler. Since the seams are on all four sides, the length and width of the tile is increased by double the width of the seam, its area is found and the quantity is calculated in the usual way. This method does not take into account the absence of seams in the first and last rows, as well as in the corners.
Advice. In small areas, the width of the seam can be ignored, because the error will be insignificant.
Unfortunately, it is rarely possible to fit a whole number of tiles into one row; as a rule, they have to be cut, and the cut-off part cannot always be used later, thus resulting in waste. Sometimes the picture can be slightly improved by adjusting the width of the seam, but this problem cannot be completely solved. Moreover, the waste increases as the size of the tile increases.
The photo shows how the cut part changes along the wall.
Again, to more accurately calculate costs, it is necessary to draw up a drawing to scale. Then it will be easier to determine how many cuts there will be. Such a drawing will help you see other possibilities for reducing waste, for example, changing the structure of the masonry from straight to diagonal.
Diagonal masonry
After all the measurements and calculations, the required material is purchased.
Attention. To ensure that individual tiles are as identical as possible, you should purchase ceramics from the same manufacturer and from the same batch.
Tile adhesive brands
Today, the market for dry construction mixtures is saturated with products from both domestic and foreign manufacturers. Many foreign companies open branches for the production of mixtures in our country. Products of domestic brands are somewhat cheaper than imported analogues, but are not inferior in quality or ease of use.
Related article: Laying tiles on the kitchen floor in a diamond pattern
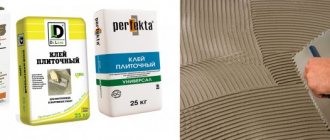
The Russian market of dry construction mixtures is represented by the following domestic adhesive manufacturers:
“Eunice”, “Bolars”, “Kreps”, “Glims-Production”, “Otley”, “Jeness House”, “Prospectors”, “Lakra Decor”, “MasterOk”, “Beers” and some others.
How to glue fallen tiles on the floor?
Glue
You can use “liquid nails”, 88 glue, the same PVA, “Moment – Installation” white, silicone sealant and so on.
the tiles
with crosses and load them on top.
Interesting materials:
How often can you dye your hair with Garnier dye? How often can you dye your hair with cream dye? How often can diclofenac be applied? How often can a newborn baby's hair be washed with shampoo? How often can laminate floors be washed? How often can you use hair conditioner? How often can you use an anti-cellulite scrub? How often can you use tampons? How often can adults take Espumisan? How often can you rinse your nose with hydrogen peroxide?
Tile adhesive layer thickness
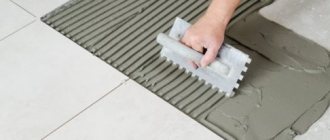
The properties of tile adhesive include the permissible thickness of the tile adhesive layer. The thickness of the adhesive layer for tiling must be certain. Typically, the glue is applied to the prepared base and spread over its surface with a notched trowel. If a small slab is attached, the thickness of the tile adhesive layer should be no more than 3 mm.
In order to apply adhesive to a wall of a fixed thickness, the length of the teeth on the spatula used must correspond to the desired thickness of the adhesive. When gluing medium-sized tiles or mosaics (25x25 cm), the thickness of the adhesive layer for tiling work should be slightly larger. The height of the teeth of the spatula used should be 5 mm.
Tile adhesive consumption
The properties of tile adhesive indicated on its packaging also include adhesive consumption. However, the consumption on the packaging is not calculated depending on the degree of uniformity of the base, as well as the ceramics used. The manufacturer indicates on each package the approximate consumption of glue for installation on a flat surface.
At the same time, the maximum permissible thickness of the tile adhesive layer is indicated, which is on average 8 mm. A competent approach to the process of leveling bases and filling voids is required. If the difference in surfaces is more than 4-5 mm, you need to take care of this in advance. Even before facing work, it is advisable to level the surface using plaster and putty mixtures. It must be remembered that universal paste compositions usually have limited water resistance.
Examples of apron design in the kitchen (photo)
Similar articles
- Insulation of walls with foam plastic from the inside
The most effective option for insulating a house is external cladding of the facade and walls with effective thermal insulation, for example, polystyrene foam or... - How to make a semicircular porch
The porch is a necessary element of every home and, in addition to practical functions, also performs aesthetic ones. This is why many home owners... - Installing plastic lining with your own hands - a guide with photos and videos
If the walls or ceiling need repair, and the budget does not allow the use of expensive finishing materials, modern manufacturers offer...
Grouting compounds for tile joints
For grouting joints between glued tiles, grouts are better suited than tile adhesive - special cement-based compositions that include modified additives. The prepared solution is very elastic, moisture resistant and also does not shrink.
The grout should be used no earlier than 24 hours after finishing. Currently, grouts are produced by almost all manufacturing companies in various colors. You can purchase grout for joints in Yekaterinburg in the Orso Bruno online store.
Properties of popular brands of tile adhesive
Let's look at the properties of tile adhesive, popular brands.
Properties of UNIS tile adhesive
Unis is the highest quality tile adhesive from a reliable manufacturer. It is used for gluing heavy slabs of porcelain stoneware, natural stone and ceramics. Suitable for both external and internal work. It should be taken into account that to ensure a good result, the weight of the glued boards should not be heavier than 800g per 100cm2.
Related article: Laying porcelain tiles on the kitchen floor with your own hands
Types and properties of tile adhesive “Unis granite”
The properties of Unis Granite tile adhesive differ from ordinary Unis adhesive. It has high adhesive ability. This allows you to work on complex foundations using the top-down method. In addition, it has increased strength characteristics.
The properties of Unis brand tile adhesive are especially valuable, allowing it to be used in a “warm floor” system. This composition does not lose its beneficial properties at temperatures from -15°C to +70°C. In addition, the glue is not afraid of direct contact with water and is environmentally friendly, since it does not emit substances harmful to the environment and human health.
Leveling the kitchen walls with your own hands
This work is carried out in several stages. In addition, there are several options for carrying it out:
- if the kitchen walls are cracked or uneven, then they are covered with plasterboard and tiled with ceramic tiles;
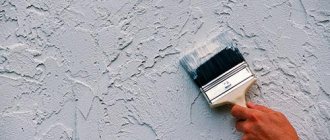
- when the walls are covered with paint, you will need to remove it and plaster the walls;
- If the walls are smooth, then initially you need to plaster them a little with your own hands.
The work begins with filling all the unevenness and cracks with putty. All protruding parts are also removed. Deep cracks and potholes must be covered with cement mortar. After this, apply the plaster and wait until it is completely dry.
To level walls that have large unevenness or displacement, the rule is used
A wide spatula is necessary for applying finishing layers of putty to the walls.
Now you need to apply a deep penetration primer with your own hands. You will also need to wait for it to dry completely. After this, you can begin laying the tiles.
Characteristics of tile adhesives
Almost all modern construction tile adhesives are of high quality and have a number of common characteristics. With rare exceptions, they are applicable for both external and internal work. Many brands of adhesives have increased impact resistance and crack resistance.
Tiling adhesives with high adhesion to the surface can be used for laying tiles using the top-down method. Some adhesive mixtures can be used in a “warm floor” system, but for this, their composition must contain special modified mineral additives that ensure that they (the mixtures) retain their beneficial properties even at high temperatures. The viability of solutions is on average 1-2 hours.
Tile adhesive “Prospectors”
Tile adhesive of the “Starateli” standard is a guarantee of the highest quality products at reasonable prices. Today, the company has successful cooperation with enterprises not only within its homeland, but also in neighboring countries. Tile adhesive of the “Starateli” standard is a wide range of dry construction mixtures, high-quality service and a system of discounts for regular customers.
Tile adhesive “Star”
Star tile adhesive, made on a cement base, contains special modified additives that increase the beneficial properties of the product. The adhesive composition is intended for cladding brick, concrete and plastered surfaces. Tile adhesive “Star” is used for gluing tile, mosaic and ceramic tiles in rooms with medium and high humidity.
Yunis tile adhesive
The manufacturer of Yunis tile adhesive guarantees high quality and ease of use. A solution of this brand can be used when working with complex surfaces. It is also possible to adhere the slab to the surface using the “top-down” method. The manufacturer of tile adhesive Yunis has partnership agreements with many wholesale trading enterprises in the country.
For external and internal work, high-quality Yunis tile adhesive is used in the process of covering floors and walls with various types of slabs. The price list of products of this brand can be found either on the official website of the company or in the information and reference resources of friendly companies. All types of adhesive mixtures from this manufacturer have the qualities necessary for convenient work: water resistance, frost resistance, high adhesion and elasticity.
Related article: Laying mosaics on a wall apron with your own hands
Tile adhesive “Fliesenkleber” (Knauf)
Fliesenkleber tile adhesive is made on a cement base. It has high quality characteristics and is used for facing tiles and natural stone. Due to the fact that the adhesive contains an elasticizing additive, it can be used for lining heated floors, terraces and staircases. The basis for Fliesenkleber tile adhesive can be brick, concrete and plasterboard.
The shelf life of the finished solution is no more than five hours. After the period of work with the solution exceeds the specified time, the effectiveness of the adhesive properties of the product decreases. It should be noted that in order to increase the effectiveness of the gluing result, the surface must be prepared before starting work.
Basic tile laying work
Initially, ceramic tiles are purchased on the construction market. To find out how much it will be needed, you need to measure the area of the kitchen walls and add about 20%, which will be spent on trimming the ceramics. These leftover materials can be placed behind the cabinets, where they will simply be invisible.
There are three ways to lay out tiles correctly with your own hands:
- lay the tiles diagonally. You will have to cut a lot of tiles, so you will need the same amount of material.
- Install tiles along the seams. This method is the most common and simplest.
- Dressing. The upper rows are shifted relative to the lower ones by half the size of the tile.
Once the method has been found, you can begin laying the tiles. It would be best to place one row of tiles along the kitchen walls so as not to make a mistake with the dimensions. First you need to lay the ceramics next to the windows and doors.
In order for the apron to be level, a metal profile is used, attached to the wall in accordance with the horizontal level
Laying tiles on kitchen walls is not such a labor-intensive process if everything was prepared correctly and in advance
Further work will be performed as follows:
- A horizontal line is drawn at the height of the kitchen table;
- The metal profile from the plasterboard is fixed with nails to the wall at the level at which the line was drawn. You will need to leave about 4 centimeters in reserve and check with a level whether the installation is done correctly.
- The vertical line is drawn in the same way. The tile must be applied to the upper edge of the wall, a plumb line must be attached to it and the places where full-fledged plates of the material will be installed must be marked. Also measure where the tiles will need to be cut.
- Using a tool such as a tile cutter, cutting tiles is much easier. If it is not available, you can use a glass cutter. After this, you can break the ceramic on the corner of the stool or table. Since there is a possibility of cutting yourself on sharp corners, this must be done extremely carefully.
- It is important to choose the right spatula. Its width directly depends on the dimensions of the tile. To prevent the glue from remaining on the spatula, this tool must be constantly immersed in a bucket of water.
- On one of the corners of the tile you can find an image of a special arrow. Therefore, the tiles must be laid out in such a way that this arrow is located on one side of each tile. After this, a mark is made from the end with a pencil. This method marks the top and bottom of the tile.
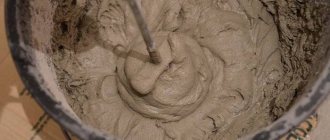
- Now you need to knead the adhesive mass. This can be done by following the instructions on the package. The mixture should be plastic and soft. To carry out this operation, you may need an electric mixer or a drill with a screw attachment. After this, you can apply the glue to the wall yourself using a spatula. You can use aluminum rules to make sure the layer is even.
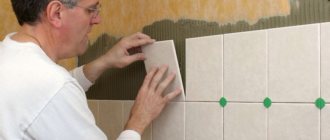
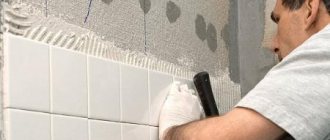
- Now take a flat spatula and apply glue to the back of the tile. The spatula is held in your hands only perpendicularly.
- The tile is applied to the wall and pressed evenly. Using a building level, you will need to check whether everything is done smoothly.
- The second one is laid next to the first ceramic tile. The aluminum rule checks the laying plane. In the same way, you can lay the rest of the tiles to the end of the wall.
- The glue sets within 10 minutes. This time should be enough for the tile to be adjusted if necessary.
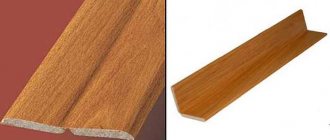
- Using a plastic square, slopes and corners of the walls are formed.
- After all the tiles have been laid, the adhesive should dry completely.