Before laying tiles on gypsum plaster, you should study the advantages and disadvantages of this method. Tile is not only an aesthetically attractive material, but also quite durable and easy to maintain, but when laying on a gypsum surface, certain problems may arise. To prevent this from happening, you can use the advice of experts and avoid possible mistakes. Ceramic tiles can be combined or used independently, and if you give preference to the original models, you can get an interesting finish and beautiful renovation.
Laying tiles on a gypsum plaster base: how and with what to glue
When finishing walls with tiles, the question may arise: is it possible to lay ceramic tiles on gypsum plaster? It goes without saying that the surface must be prepared, but if it was leveled with just such a material, certain problems may arise.
To lay tiles on gypsum plaster, it is necessary to take into account some features of this material
How to prepare a plaster base.
Still, when wondering about the possibility of gluing tiles onto gypsum plaster, the answer most often is positive. Thanks to modern building materials, it is possible to correct minor plaster imperfections and properly prepare the surface for final work.
A specialist involved in preliminary and preparatory measures always sets the task of increasing the strength, adhesiveness, and also reducing the water permeability of the plaster. In cases where we are talking about further laying tiles, first of all, it is necessary to level out rough surface defects.
Gypsum is used to cover all potholes and existing chips, which requires the use of a fairly thin layer of glue when laying tiles on plaster. The formed protrusions are ground off with a grouting mesh, and if this is impossible, in areas of greatest differences, an additional layer of gypsum mass is applied.
The possibility of working with a plastered surface arises only after the time required for it to dry completely.
Important: The walls must be treated with a primer and an antifungal agent, carefully covering every centimeter of them.
You can buy these products together with plaster to ensure maximum comfort. This is one of the main and important points in the preliminary preparation of walls. Thus, the question of whether it is possible to lay tiles on gypsum plaster can be answered unequivocally - yes.
Leveling walls with plasterboard for laying tiles
One of the options for leveling walls under tiles is finishing with plasterboard. For wet rooms, use only moisture-resistant gypsum plasterboard. You can attach it in the usual way to a metal frame or directly to the wall using glue. If the unevenness is significant, then only the option with a frame is suitable. In other cases, it is better to glue drywall to the walls, since the frame method “eats” 5 cm of space on each side of the room.
To complete the work you will need:
- metal profile rack and guide, hangers;
- level, grinder or metal scissors, screwdriver or drill;
- GKLV sheets (green), masking tape, self-tapping screws.
Procedure:
- Draw up a diagram of the frame. It consists of two horizontal guide profiles and rack-mount vertical ones. Two sections of the rack profile are mounted in the corners, the rest are installed in increments of 60 cm. If you subsequently plan to hang cabinets on the wall, then the increment is made smaller (up to 40 cm) and additional horizontal transverse sections of the profile are installed in the place where the furniture is supposed to be fastened.
- Apply markings to the walls according to the drawn up diagram.
- Using a grinder or metal scissors, cut the profile into pieces of the required length.
- Using dowels, attach the upper guide profile to the ceiling.
- Using a plumb line, determine the position of the lower guide profile and screw it, also with dowels.
- Use self-tapping screws to attach hangers to the walls to secure the rack profile. During work, check their position with a level.
- Install and secure the vertical profile with screws according to the markings. Check that each element is installed correctly by level.
- Secure the gypsum board sheets to the resulting frame with self-tapping screws. The joints between the sheets must fall on the rack profile. They need to be sealed with sickle tape.
- Also cover the corners with sickle tape.
- Putty the seams and screw heads with a special putty for drywall.
- The water-repellent properties of gypsum board can be enhanced by treating the sheets with a water repellent for drywall.
- To improve adhesion, be sure to apply a gypsum board primer under the tile adhesive.
If you decide to glue drywall without installing a frame, then proceed in the following order:
- Apply primer to the walls.
- Clean the surface from dust and dirt.
- Apply handfuls of drywall adhesive onto the sheets or wall in 30cm increments.
- Attach the sheet to the wall and set it level.
Leveling mixtures - self-leveling floors ↑
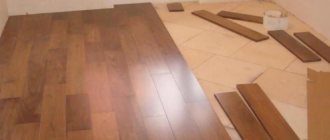
In the case of a small difference in floor levels of no more than 3 cm, floor leveling mixtures are used, which are divided into two types. Some are able to spread over the surface of the base on their own, which is why they are called self-leveling mixtures. Another type of mixture requires human intervention, who manually spreads it on the floor using a spatula.
Self-leveling mixtures intended for finishing floors are otherwise called self-leveling floors, floor levelers, self-leveling mixtures, etc. The main purpose of these mixtures is to prepare floors made of various building materials (concrete, wood, gypsum) for finishing with floor coverings such as :
- linoleum;
- carpet;
- PVC materials;
- cork;
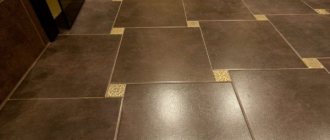
- ceramic tile.
They produce dry self-leveling mixtures on a cement base containing special modifying additives that increase the plasticity and fluidity of the mixed mortar. Some compositions contain fibrous reinforcing additives that inhibit the development of microcracks. After drying, self-leveling floors form a fairly dense and durable layer. However, they are not intended for use without a floor covering, since an unprotected surface can become dusty and absorb moisture, oil, etc.
Thin-layer self-leveling mixtures are available for sale, which are intended for finishing. You can also buy special mixtures suitable for rough leveling of bases that have significant unevenness. These mixtures are applied in a layer, the thickness of which can reach 30-40 mm. At the same time, polypropylene foam tape is laid around the perimeter of the room, which relieves the stress created by the self-leveling floor. Since these mixtures have reduced fluidity, it is not possible to obtain a perfectly flat surface. Therefore, a thin layer finish is usually applied on top.
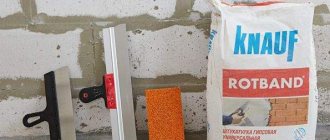
Preparation rules and is it possible to lay tiles on Rotband
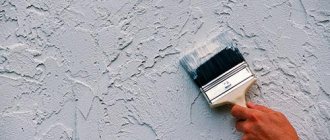
In order for the tiles laid on Rotband to hold firmly and look attractive, you need to carry out the preparatory work correctly. The first step is to remove all decorative coatings made on top of the plaster - old wallpaper or paint. Next, if necessary, you need to level the surface of the walls using gypsum-based plaster, after complete drying, using a chisel or a small hatchet, make small notches, trying to prevent severe damage.
Then they choose which tiles will be laid, because the further preparation of the walls depends on this.
It is also necessary to carry out the marking itself correctly, this will allow you to calculate the required amount of material, as well as think through the treatment of the most inaccessible places. The most suitable material for installation is glazed ceramic tiles, up to 6 mm thick, they are quite light and have an attractive appearance. After complete drying, the Rotband must be primed with approximately 3 layers of primer mixture, this is necessary for deeper penetration and adhesion of the materials to each other. Primers should be applied using a roller or brush, then wait until each layer is completely dry for up to 8 hours. After it has completely dried, the ceramic tile itself can be laid directly on the lime putty.
Nuances:
- To ensure that the tiles adhere firmly to the gypsum surface, it is better to glue them with an adhesive that has moisture-resistant properties. It will not only strengthen the surface, but also give it greater resistance to the aggressive effects of a humid environment.
- The rules for preparing such mixtures are indicated on the packaging; properly made adhesive will hold the tile firmly and not cause problems during operation.
- If heavy tiles are to be laid on a putty wall, then the base must be prepared more carefully. In addition to priming, as in the previous version, you also need to drill holes up to 5 mm in diameter along the entire prepared surface of the walls, preferably in a checkerboard pattern, then small dowels are inserted into them, onto which a galvanized steel mesh or fiberglass mesh is attached. Then plastering is done on top with a cement-sand mortar, this is necessary so that the heavy tiles hold on better and do not fall off under their weight.
Rules for plastering with tile adhesive together with gypsum
In order for the tiles to adhere well to the gypsum base, it is necessary to use high-quality materials to strengthen the surface, then the expected result will be obtained. If the surface puttyed with gypsum is not reliable, it is better not to take risks, otherwise the whole work will be ruined - tiles on a weak and porous base will disappear.
Related article: Instructions for cutting ceiling plinths in corners
In order for the tiles to last a long time, you should use high-quality materials from manufacturers who use modern technologies in their manufacture.
Experienced builders began to use the remaining tile adhesive and gypsum plaster together for work; such an experiment has certain advantages:
- This primer is durable and abrasion resistant;
- It's easy to work with and fits well;
- This is a more economical option than several layers of plaster and strengthening mixtures.
But there are also some disadvantages - it’s hard to calculate the proportions on your own, without specialists, how much you need to use, so you can make a mistake and waste money.
How to glue tiles to gypsum plaster
We are studying how tiles are laid on gypsum plaster so that they stay strong and last a long time. There is a technology that cannot be violated.
- First, prepare for gluing the plaster itself.
- Perform markings.
- Ceramic plates are glued (in order).
- Grout the joints.
- Allow the glue to gain strength.
How to prepare gypsum plaster for tiles
Let’s say that based on the results of the inspection (as well as tapping), it turns out that the coating is held firmly. It can be used, but there are minor defects - cracks, potholes, open joints, stains.
Preparation comes down to a series of sequential operations:
- Potholes, depressions, and cracks are repaired. The protrusions are ground off using a grout mesh.
- The surface is cleaned of stains. If the stains are not only on the surface, but have become “ingrained” into the plaster layer, remove the layer of plaster at the spot of the stain, and then cover it with a plaster mixture.
- Unnecessary hardware is removed and those left behind are isolated.
- Remove dust.
- If the room has a normal humidity regime, and the cladding is ordinary tiles, the plates of which weigh little, apply a primer that penetrates deeply into the pores (deep penetration). The primer is applied in 3-4 passes. This mixture will strengthen the plaster surface. Be sure to dry each of the applied layers.
- To ensure reliable adhesion and increase strength (when porcelain stoneware is used), apply a thin layer of tile adhesive using rubbing movements.
- Finally dry.
- Perform markings.
If you need to prepare a wall for facing with porcelain stoneware, you will need to additionally install and fix a galvanized mesh on the surface to increase the strength of the finish.
Features of preparing walls in wet rooms
If a bathroom is being prepared for tiling, the application of a waterproofing agent is added to the stages of preparation for laying tiles on plaster using the “dry scenario”. That is, for bathrooms, after similar priming, 2-3 layers of waterproofing are applied (craftsmen recommend liquid mastic, sold in buckets). Dry again, and this completes the preparatory work.
Not all waterproofing is suitable for coating gypsum walls; for example, cement waterproofing is not applicable. Cement, “meeting” gypsum, behaves unfriendly. Compounds that decompose cement stone are released from the gypsum composition; instead, a new “swelling” mineral is formed at the point of contact - ettringite. The adhesion of the cement-containing layer to the gypsum layer drops almost to zero. Therefore, waterproofing compounds are used on a different basis - polymer-acrylic or bitumen.
Mastic compositions are applied with a brush (can be applied with a roller), like paint. In this case, successive layers of mastic are applied in a cross direction. This allows you to obtain a waterproofing film of even thickness. Mastic compositions are selected according to the material of the tile adhesive, and that - according to the material and size of the ceramics. A mistake in choosing the composition will undo all the work. Be attentive to the purpose of the products indicated by the manufacturer.
Laying tiles on gypsum plaster
This stage begins when:
- mechanical damage and stains of the plaster coating have been eliminated;
- strengthened the plastered surface of the wall, increasing its strength;
- reduced the ability of the surface to transmit moisture into the plaster layer;
- we increased the adhesiveness of the surface so that the tiles stick tenaciously and reliably to the gypsum plaster using glue;
- the kitchen or other room to be tiled is marked.
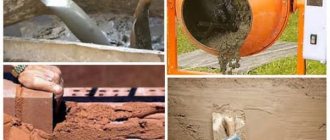
The next step is to prepare the tile adhesive. It is more rational to use a ready-made composition for interior work, then the quality of adhesion will be sufficient to glue the tiles “tightly”. Ready-made formulations usually include hydrophobic and antiseptic additives. When preparing glue, follow the instructions.
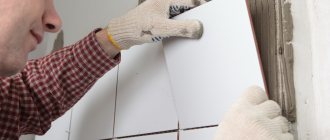
Sequence of gluing the cladding:
- A galvanized guide profile is mounted horizontally on the wall, on which the tiles of the second row (in a row) from the floor will be placed.
- The glued side of the tile is wetted (this prevents dehydration of the tile adhesive).
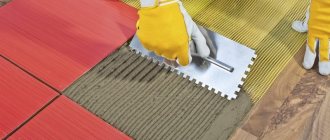
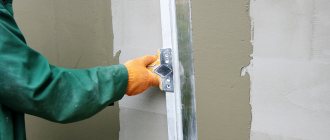
- Apply tile adhesive to the glued side of the tile with a spatula, then level the adhesive with a notched trowel.
- The plate is glued to the wall, pressing evenly along the plane with your hand. If you need to level the adjacent one accordingly, use a short level like a plank.
- Remove excess solution (residues are easily washed off).
- Install crosses to regulate the size of the seams between the tiles.
- The outermost (cut) plates in the corners should be laid last.
- You can lay the tiles in 3 rows at a time, after which they take a break to allow the glue to strengthen. Otherwise, under the weight of the cladding laid above, the lower one will creep.
- The last row to be filled, after removing the profile, is the first row.
- The glued tiles are allowed to harden for a day or more. Then the seams are rubbed.
Rules for choosing an adhesive composition
Experienced builders know very well that there is simply no universal means for fixing tiles. To install ceramics in the bathroom with high quality, you should abandon the cheapest products. The correct choice of adhesive depends on several factors:
- Terms of Use. Compositions are available for sale that can be used both indoors and outdoors. Such adhesives are resistant to high humidity and periodic temperature changes.
- Material, size and operational features of ceramics.
- Surface type.
Modern adhesives necessarily include various plasticizers and chemical additives that provide maximum adhesion to both cement-sand and gypsum bases. Most often, dry mixtures are available for sale, which must first be diluted with a certain amount of water. The most effective adhesives are those made from petroleum products, some additives and latex.
Available tile adhesive
Installing tiles on a wall surface
In accordance with a certain layout scheme, the tiles are laid out in rows on a wall or partition:
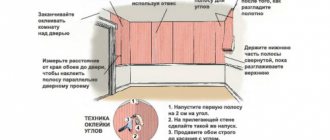
- Markings are made horizontally and vertically. A horizontal line is drawn along the perimeter of the room at the height of one tile from the floor. The beginning and end of the horizontal markings must coincide. A distinct vertical line is obtained using a plumb line or building level.
Craftsmen recommend attaching a galvanized profile at the level of the horizontal line. The initial row of tiles (second from the floor) is laid out on it. Using wooden planks does not ensure accuracy.
Laying out the initial row of tiles
- To ensure uniform and symmetrical gluing of the tiles, the cladding should be laid from the center. The corners are covered with cut elements.
- Laying the tiles begins after covering the wall surface with the adhesive mixture. Do not immediately glue dry tiles to the wall. It is pre-coated with glue. This is how to improve the quality of adhesion of the tile to the surface on which it is attached. Then the tile is pressed against the wall and fixed in level.
- The subsequent rows of tiles should be laid on gypsum plaster or plywood in the same way. This is done carefully, without the use of effort. It happens that tiles break. Use a mallet with a rubber striker. Then the tile is securely fastened and remains intact.
- The installation of the trimmed parts is left to the final stage. If you need to make holes in the tile for a switch or socket, then this is done in advance, before installation. This protects gypsum plaster or plywood from unnecessary loads.
Installation of beacons
To avoid problems during installation work, you can install beacons and decide on control guides. First you need to decide what the layout will be. You will need to draw a diagram of the room and indicate possible options. In the future, it will be possible to transfer the image to the wall, leaving gaps for seams. The markings are applied to the surface of the wall; this will require plumb lines and a level. Typically, masonry work begins with the second row from the bottom, so that the upper rows consist of whole tiles. Once you have decided on the line, you need to secure the support bar, which will help you stay on level and prevent the tile from sliding down. You can use a wooden stick or a metal profile.
Two main advantages of Rotband
The first advantage is a thick layer at a time. Rotband plaster can be applied to the surface in a thick layer of up to 50 mm without the spraying stage. That is, if you need to level the wall by 4-5 cm, place beacons on the wall and plaster it with Rotband mixture in one pass.
The second advantage is that no puttying is required. With high-quality mixing and repeated tightening, you will usually get a smooth wall, which, after covering and simple grinding, does not need to be puttied.
Note: The gypsum mixture can be applied in several layers, waiting for the previous layer to dry completely. This allows you to level walls (ceilings) with unevenness of more than 50 mm.