Many owners of suburban areas install wells of various types on their property. This design does not always require exterior finishing. Typically, decorative components are needed when installing a shaft well. A special house is being built for him. You can build a well from natural stone with your own hands quite quickly. To do this, you will need to understand the technology of work.
Well made of stone
Many owners of suburban areas install wells of various types on their property. This design does not always require exterior finishing. Typically, decorative components are needed when installing a shaft well. A special house is being built for him. You can build a well from natural stone with your own hands quite quickly. To do this, you will need to understand the technology of work.
Independent work
No less often, the idea of buying or ordering a wooden structure is replaced by a completely reasonable decision to build a house for a well with your own hands.
All that is needed for this is to make a drawing and purchase the necessary tools and materials. The main building material will naturally be wood. It is easy to handle, looks great and will last a long time.
The building materials for the house will require a certain amount of wooden beams, edged boards, block houses or wooden linings. Any of the last two materials can be an excellent finishing element.
The roof can be made of metal tiles, polycarbonate or roofing felt. As a covering, many people use siding, profiled sheets, euro slate and other types of roofing surface coverings.
Among other materials, you will need a log and a metal rod to make the gate. To process wood, you will need to purchase antiseptic compounds, varnishes and paints. Next you will need a door and door hinges for it.
For a rigid grip you will need short metal corners. Additionally, you will need metal bushings made from pipe trim (2 pieces). A metal chain is required to lift the bucket.
The construction of the house begins with a detailed study of the drawing. Moreover, most of those who are going to build a well on their own find drawings on construction sites. And of course they require detailed study. You can also find detailed technology for performing such work on the Internet, from frame installation to finishing work.
Everything is not so difficult if you approach the matter in good faith. As a result, you will create a wooden miracle with your own hands.
Why do you need a house?
A well containing a shaft is a structure under which a hole of a certain depth is dug. Usually she is not distinguished by external attractiveness. The houses must be built to create the necessary protection for the mine from dirt and debris.
Advice! The well at the dacha is decorated with various decorative elements in order to decorate the design of the site.
When choosing a material for a well, you should pay attention to the following materials:
- Brick.
- Aerated concrete. Also, for the construction of a well house, you can use similar materials with similar properties.
- Foam blocks.
- Tree. This material is often used in the construction of well houses. When using wood, additional cladding of the house is not needed.
- Stone wells are very popular today. They are characterized by great durability and strength.
When choosing stone finishing, you should pay attention to the following materials: shell rock, quartzite and slate.
Advice! In order for the house to serve well for many years, it is necessary to choose materials that can withstand strong temperature changes.
You can line the well with various materials:
- siding or plastic - this solution will make the house modern and original;
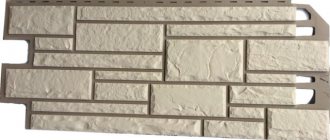
- artificial or natural stone - this finishing option is becoming more popular;
- Decorative plaster is an excellent solution when choosing a finishing material.
Finishing a well with stone is considered one of the most common in recent times.
How to line a well with bricks with your own hands: a step-by-step guide
The laying of wells of all types follows the same principle. The nuances vary depending on the purpose of the design.
Brick sewer well
The most difficult thing to install is a brick sewer well due to its specific purpose. First of all, it is important to choose the right installation location. It is removed from the foundation of a residential building at least 5 m, the maximum depends on the characteristics of the site. It is not advisable to move away too much. The flow through the pipeline will become more difficult. It is important to place the sewage pit in a straight line from the sewer exit from the house. Turns in the pipeline are more often clogged with solid deposits.
It is important to provide a method for pumping out sewage. When using a sewer truck, consider the access to the drainage pit. Leaky structures with a filtration bottom are separated from water sources by up to 30 m.
Sewage facilities also include inspection wells that help maintain working units. They are placed on long routes. The minimum distance from the house is 3 m, and the maximum is 12 m.
Another important nuance of a sewage storage tank is its volume. This parameter must be clarified before calculating the number of bricks. It is assumed that one person per day can consume up to 200 liters of water. To calculate the volume, you need to multiply the indicator by the number of people living in the house. To the result obtained, the water consumption indicator of each household appliance (washing machine and dishwasher) is also added.
Calculations for ordinary sewerage are performed taking into account the amount of wastewater per day. If you build a septic tank out of brick, the resulting volume is further multiplied by 3. This is due to the work of bacteria. In three days, microorganisms process organic matter in a septic tank. This means that brick chambers must accommodate the entire volume of sewage received over 3 days.
The depth of sewer wells is made up to 3 m, provided that the groundwater is deep. It is not advisable to go deeper, as maintenance will become more complicated. If it is necessary to increase the volume of the pit, it is expanded. For septic tanks, this occurs due to the construction of additional brick chambers.
Clay, well-fired bricks are used to lay the walls of the sewer structure. In order not to make mistakes in the calculations, it is first easier to calculate the number of bricks per row of a round well, and then multiply the result by the number of rows of the shaft.
The step-by-step construction process consists of the following actions:
- The future pit is marked on the site. Excavation of the earth is carried out manually with a shovel. It is problematic to throw out soil from great depths. A second person will be required. The soil is removed using a bucket tied with a rope. The pit is dug in size larger than the dimensions of the brick mine. The gap is needed to plaster the walls from the outside and provide communications.
- The bottom of the pit is equipped taking into account the purpose of the well. If the sewer pit is sealed, a cushion of sand and crushed stone 20 cm thick is poured. An armored mesh made of rods with a diameter of 10-12 mm is laid on the linings of half bricks. The bottom is filled with concrete. After hardening in about 2 weeks, the monolithic base will act as a foundation. Brick walls are immediately laid on it.
- The bottom of the filter well is arranged according to a different principle. First, the formwork is installed under the foundation. The reinforced frame is connected from rods in the form of a box. The metal structure is placed between the walls inside the formwork, and concrete is poured. The thickness of the foundation is sufficiently 20 cm. After laying out all the rows of the shaft with bricks, the bottom is covered with sand 20 cm thick and crushed stone - 40 cm. The backfill forms a filtration layer.
- When the foundation hardens, all that remains is to lay the well out of brick with your own hands, raising the walls to ground level. The laying is done using cement mortar. Using a plumb line or level, check the verticality of the structure. The finished walls are plastered on the outside and inside, and the solution is allowed to harden.
- While the plaster hardens, trenches are dug up to the well and sewer pipes are laid. The insertion points are marked on the walls. Use a puncher to carefully punch holes. After the pipe is inserted, the gaps are sealed with concrete.
- The next step is to lay the neck of the well out of brick, which should protrude above ground level. It is enough to go through several rows, gradually narrowing them to the diameter of the inspection hatch, which is laid on top of the brickwork.
Now all that remains is to fill the gaps with earth between the walls of the pit and the well. A hole is drilled in the ceiling and a plastic ventilation pipe with a diameter of 50 mm is inserted. A protective cap in the shape of a fungus is put on top.
Brick well for water supply
By purpose, a water well is considered an inspection well. Inside the shaft there are shut-off and control valves, a station, and a well with a deep-well pump. To lay a brick well under a water supply system, similar steps are performed, but there are some nuances. The depth of the shaft depends on how deep the unit requiring maintenance is. The width for a home structure is determined individually according to your body type. It should be convenient for a person to maintain equipment and operate shut-off valves.
The composition of the mortar for bricklaying similarly consists of cement and sand, but the proportions depend on the type of soil on the site. If the soil is dry - 1:4, wet - 1:3. If the groundwater is deep, even plastering and waterproofing are not necessary. Only thoroughly rub all the seams with the solution. If the groundwater level is high, plastering and waterproofing of the walls must be carried out on both sides.
To descend into the mine, a hole is built. The most common options are installing an extension ladder or making steps. In the second option, brackets are bent from sections of reinforcement. They are embedded in the seams between the bricks at a distance of 35 cm above each other.
Brick drainage well
The general concept hides a group of wells used in storm drainage. According to their purpose, they come in three types:
- Inspection drainage structures are installed at pipeline turns and at the intersection of several branches. They can be located on a straight long route every 40 m. Drainage wells are equipped with a drain. If it is not there, as it is filled, they organize pumping and clean out solid deposits mechanically.
- Water intake drainage structures are the end point of storm drainage. Here water is collected from all branches of the system. The bottom is usually made airtight. As the wastewater is filled, it is pumped into the general sewer system or used for household needs. The optimal width of the shaft is from 70 to 100 cm. Inside there is a ladder and a pump for pumping out wastewater.
- Filtration drainage structures are installed in areas where the absorption of large volumes of water is required. A striking example is the car wash. Wells are installed on the site, sprinkled around with permeable material, for example, crushed stone and sand. A similar pillow 30 cm thick is installed at the bottom of the shaft. The incoming water is filtered through the bulk layers and absorbed deep into the ground. If the drainage filtration structure does not cope with its job, excess wastewater is pumped out with a pump.
The well is usually laid in half a brick, and sometimes in brick, if technical conditions require it.
DIY decorative brick well
The purpose of the decorative structure is clear from its name. The well acts as a decoration for the site. They don't dig a mine for him. The foundation is poured under the brickwork. The easiest option is to remove the turf layer with a shovel. The pit is filled with sand and gravel. An armored mesh is laid on top from rods and filled with concrete mortar. To prevent red brick walls from attracting dampness, the monolithic base is covered with roofing felt before laying.
The next step after erecting the walls is to create a house for the well made of brick, that is, a roof. The head is decorated with a roof with two, four or more slopes. The decorative structure is used for flower beds and storage of equipment is organized.
Features and properties of the material
Stones, regardless of whether they are artificial or natural, have similar characteristics. However, it is worth considering that the mass of such products differs. Natural agglomerate is the heaviest. In addition, it costs much more than decorative stone.
Advice! Externally, artificial products resemble natural agglomerate. Purchasing them will be a profitable solution in terms of saving money.
Advantages of artificial slabs:
- The material is highly durable, which allows it to withstand various impacts and the weight of additional decorative elements (for example, forged products).
- The durability of the material ensures its serviceability for at least 10 years. An important role is played by the correct installation of the material.
- High moisture resistance. Natural stone has a surface that is not able to absorb moisture and change its appearance. When liquid gets on it, the material may darken a little, but after drying the original color returns. You can protect decorative stone using a special product.
- The material is easy to use. It does not require careful maintenance.
Advice! Sometimes gypsum stone absorbs moisture. To avoid this, the coated surface should be varnished.
- The wear resistance of the material used to finish the well is quite high. The appearance of the surface and texture of the stone does not change during use.
- Fire resistance. This material does not burn and does not react to high temperatures.
- Frost resistance. The stone does not lose its properties under the influence of low temperatures. For this reason, it is often used in exterior decoration.
- The material can be laid on any surface. The only condition that must be met is that it must be level.
Artificial products can be made in tiled form, so you should not build house structures from them, because it will turn out to be quite fragile. Due to the external finishing, the building can be well insulated. To line a well with stone, you will need to know the specifics of the installation process.
Choosing a suitable design
Ideally, a well house should perform the following functions:
- protect water from external pollutants - precipitation and wind-borne debris;
- play a decorative role, enhancing the concrete head protruding above the ground;
- serve for manual or mechanized lifting of water.
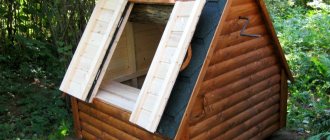
In the vast majority of cases, canopies are made of wood, since metal rusts rather quickly from constant contact with water and its fumes. It is customary to sheathe the roof of a wooden booth or horizontal doors covering the water supply source from above with roofing iron. The simplest and at the same time beautiful option with clapboard cladding and wooden covers is shown above in the photo. It is well suited for a shallow pool in a country house, when water is simply scooped up with a bucket or pumped over with a pump.
The following photo shows an open well house with a traditional design - a manual gate, gable canopy and log facing. If you have logs left over from the construction of a log house or bathhouse, then this option is perfect. Also, the cylindrical concrete part can be finished with timber, folded in the shape of a hexagon, or lined with stone.
The third type is a completely enclosed house with inclined doors built into one of the roof slopes. We'll look at how to build it yourself next. More diverse ideas for decorating country wells are shown in the following video:
A natural stone
Natural stone has long been used for finishing wells of any design. It can have any size and shape. For example, rubble stone is used to decorate the walls of a structure. There are also tile products, the installation of which on the surface is quite simple.
Selection tips:
- To install rubble stone, you need to make a base for it. It is built around the perimeter of the well at some distance from the pit. It is better to make the base at a distance of 30 cm from the well.
- The foundation is made of monolithic or columnar type. The choice is made in accordance with the characteristics of the soil.
Advice! Any soil is conducive to installing a pile foundation.
Quite often, sandstone, granite and shell rock are used for the external decoration of a well. It is better to install such materials on a brick or concrete wall. They are made in the form of slabs. The surface of the walls must be thoroughly prepared before installation.
Technology
Lightweight masonry requires precise calculations and concentration on the process.
Main stages of work:
A waterproofing layer is laid on the foundation.- On top of the waterproofing, 2 rows of bricks are laid, pressed tightly against each other, without voids. They will be the basis for subsequent rows and the bottom for wells.
- Two walls are laid out - external and internal - with the required distance between them. The thickness of the void should be such that the insulation fits into it, no more.
- Jumpers are made every 50-120 cm. It is advisable to install them under future floor beams.
- To get a single structure, you need to connect the walls with reinforcement.
- On the 5th-6th row, begin laying and compacting the insulation.
- Openings for windows, doors and the last rows must be mounted with continuous masonry using reinforcing mesh.
- Waterproofing is laid on top of the constructed wall, and then supports are installed under the floor beams.
as insulation :
- Expanded clay. The minimum distance between two walls should be from 10 to 30 cm. Expanded clay is poured every 5th row, carefully compacted and cement is poured on top.
- Minvata. To prevent it from getting wet from moisture, it is recommended to additionally wrap it in a waterproofing film.
- Styrofoam. The sides of the material must be filled with mortar or foam so that it adheres tightly to the walls.
- Foam concrete is a liquid mixture that is poured into the space between the walls 12 cm thick. Density of foam concrete = 250 kg/m3.
- Polystyrene concrete. The walls on the sides serve as formwork for this insulation. The solution is poured into the well from a concrete pump hose, and a Ø 4 mm mesh is used for reinforcement.
- Sawdust concrete. The solution is also poured from a hose. When creating sawdust concrete, industrial wood waste and concrete of at least M10 grade are used.
Surface preparation
Before lining the well with natural stone, it is necessary to strengthen the structure. This is due to the large weight of the material. For this purpose, it is necessary to install a reinforcing mesh on the surface, which will allow the finishing slabs to be securely fixed.
Features of surface preparation:
- The reinforcement frame is installed using concrete mortar.
- The solution is applied in the same way as plaster is applied.
- During the work, a building level and a spatula are used.
The time after which the solution dries completely can be several days. After this, it is necessary to apply a primer and only then proceed with the installation of natural stone.
Advice! If the surface on which the natural agglomerate is mounted was made of building bricks, there is no need to further strengthen the wall.
How to make a blind area around the head
When the clay castle is ready, you can begin constructing the blind area. It will protect the structure from gullies and prevent the formation of ground failures. The blind area is made on top of the clay castle. There are several options for its design, it is worth highlighting the following:
- monolithic concrete covering;
- paving slabs;
- asphalt blind area;
- laying natural stone around the shaft.
If in the future it is planned to build a house over the well, the blind area will serve as the foundation. It is better to use wood to build a decorative house.
This is interesting: Examples of design of country wells - we look carefully
Laying
The work of lining a well with natural agglomerate is quite simple. The procedure has several features:
- For work, you can only use concrete mortar that is not exposed to climatic and weather factors.
- Concrete should be applied in a thin layer. If the mortar is laid out too thickly, there is a possibility of the tiles peeling off.
If you take into account these features of installing natural stone, you can line the well quite quickly.
Brick laying scheme
Build the walls of the structure taking into account clearances for the introduction and removal of pipes. They use half-brick masonry with the usual ligation of rows. The first row of bricks, pre-soaked with fresh water, is laid on freshly prepared cement mortar 10 mm thick. The initial and second ones are laid using the butt method. Then they continue to lay out brick blocks, alternating spoon and butt rows. Particular attention is paid to bandaging the seams, which guarantees the strength of the masonry. In order for the building to have the correct shape, it is necessary to make a template according to which the blocks must be laid. The circuit is secured using hooks; they are placed on the row of bricks being laid. Having laid out a layer to the end, they begin another, while placing the stencil opposite the next row.
You should carefully ensure that the frames are aligned strictly vertically and horizontally. Verticality is established using anchors and checked with a plumb line. Laying is stopped 0.5 cm before the intermediate ring. This distance is filled with cement mortar, adding crushed stone or gravel. Having reached the surface, the neck of the well is made of brick, which is covered with a lid. Perform waterproofing work. They clean up the area.
Decorative stone for a well
This material is quite reminiscent of natural stone. It can have different shapes and sizes. Installation of decorative elements on the surface is much simpler than in the case of natural agglomerate. This is due to its low mass.
Subtleties of laying natural stone:
- The stones are attached to a flat, well-prepared surface.
- During work, you should follow certain instructions, according to which a number of actions are performed. Artificial stone is usually made from acrylic, gypsum, sand and synthetic materials.
Advice! For exterior work, you should use gypsum stone, which in most cases does not have a special protective layer. It absorbs moisture quite well and can also be deformed under mechanical stress.
Assembling an open well canopy
First you need to make a supporting part - a frame with racks, shown below in the drawing.
To fasten the gate, use a beam at least 50 mm thick or knock down several thin boards. Make the blocks for side fastening from the same lumber, and the frame from bars with a cross-section of 4 cm. The step-by-step procedure looks like this:
- Cut the pieces to the previously determined sizes. At the ends of future posts, make cuts at an angle of 45 or 60° and 2 holes Ø25-30 mm for the gate shaft.
- Cut grooves across the thick beam into which the frame elements will fit. Also saw the latter at the ends to join them into half a tree.
- Assemble the frame using self-tapping screws and nail the side blocks to it.
- Attach the posts to the center of the frame, then install the ridge board.
- Carefully treat all wooden parts with an antiseptic composition, and after final assembly, paint.
The structure is attached to the well in any convenient way - through bolts or anchors. The next step is to install a gate made of logs Ø20-25 cm, as shown in the diagram. To do this, you need to sand the wood and make holes on the sides for the shaft, sticking to the center. Make the collar from a steel rod with a diameter of 25 mm. Then place the drum, attaching washers at the ends and inserting shafts on both sides. To prevent the wood on the posts from wearing out, steel sleeves can be hammered into the holes.
To install the canopy, put together a simple rafter system with two beams and braces, as shown in the drawing. The angle of inclination and length of the rafter legs are arbitrary, but in fact the roof must completely protect the well shaft. And the last stage is the manufacture of flooring from boards nailed to the frame from above and the installation of doors on regular hinges.
Installation process
All work performed during the installation of natural stone is carried out using a specific set of materials. To begin installation, you should use the following kit:
- Adhesive composition for ceramics, used for exterior decoration.
- A level that ensures even installation of each part.
- A tile cutter that cuts artificial stone quickly and conveniently.
- A spatula that allows you to apply the solution to the surface.
The principles of installing artificial stone on a well house are very similar to installing natural agglomerate.
Assembling an open well canopy
First you need to make a supporting part - a frame with racks, shown below in the drawing. To fasten the gate, use a beam at least 50 mm thick or knock down several thin boards. Make the blocks for side fastening from the same lumber, and the frame from bars with a cross-section of 4 cm.
The step-by-step work order looks like this:
- Cut the pieces to the previously determined sizes. At the ends of future posts, make cuts at an angle of 45 or 60° and 2 holes Ø25-30 mm for the gate shaft.
- Cut grooves across the thick beam into which the frame elements will fit. Also saw the latter at the ends to join them into half a tree.
- Assemble the frame using self-tapping screws and nail the side blocks to it.
- Attach the posts to the center of the frame, then install the ridge board.
- Carefully treat all wooden parts with an antiseptic composition, and after final assembly, paint.
The structure is attached to the well in any convenient way - through bolts or anchors. The next step is to install a gate made of logs Ø20-25 cm, as shown in the diagram. To do this, you need to sand the wood and make holes on the sides for the shaft, sticking to the center. Make the collar from a steel rod with a diameter of 25 mm. Then place the drum, attaching washers at the ends and inserting shafts on both sides. To prevent the wood on the posts from wearing out, steel sleeves can be hammered into the holes.
To install the canopy, put together a simple rafter system with two beams and braces, as shown in the drawing. The angle of inclination and length of the rafter legs are arbitrary, but in fact the roof must completely protect the well shaft. And the last stage is the manufacture of flooring from boards nailed to the frame from above and the installation of doors on regular hinges.
Additional finishing
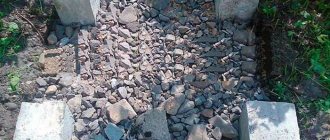
Since the soil almost always remains moist along the entire perimeter of the well, a ground cover should be constructed. It can be done in 2 ways - pouring and pouring concrete. It is worth deciding in advance what the well will be covered with.
The choice should be made in favor of materials that cannot absorb moisture. It is better if they divert it effectively. Pebbles, crushed stone and gravel are most suitable for this purpose. Such stones may vary in color.
It is important to use stones when finishing the soil around the structure. This will not only remove moisture, but also make the appearance of the well more interesting.
Advice from professionals
To line a well with stone with your own hands, you will need to know the procedure. The technology is quite simple, but when designing the design, certain rules must be followed. For example, you can use almost any natural stone. It is usually assembled with your own hands, but you can also buy it. It is better to choose flat stones that have dimensions from 8 to 12 cm. Such indicators will allow them to better adhere to the surface of the walls of the structure.
Cement for the mortar should be used grade M400. You will also need quarry sand for the solution. PVA glue must be added to the water with which the composition will be diluted. This will make the solution more durable and strong.
You should not lay out all the stones at once. The lower ones can float under heavy load. For this reason, no more than 15 stones should be laid at a time. After each installation, you must wait until the stones are fixed. This approach will result in an even and balanced finish.
In addition, it should be noted that the line solution must be removed without waiting for it to dry. This is due to the fact that it will be quite difficult to wipe it off afterwards. The seams should be rubbed down immediately. To do this, you can take a thick sponge or spatula.
After finishing the well, it should be treated with a special varnish. This will give the surface shine and a wet stone effect. Thanks to this design of the well, garden paths will look effective in the garden area.
General recommendations for building a brick well
The well can be round or square, depending on the purpose. The sewer intake well is most often round in shape. This is due to the fact that it is easier to clean it from accumulated waste. The sewer inspection well is intended for inspection of particularly critical elements of the drainage system, for example, pipe joints. A water well solves not only the problem of water supply, but also serves various purposes. The following structures are divided:
- Inspection. Through them, the operation of nodes and sections of the system is monitored.
- For stations. Such underground structures are built to house equipment.
- Drainage Needed for collecting and draining water.
Despite the different functionality of these brick structures, they are built according to approximately the same principle. To lay a brick well, a red or burnt block is used, which is called iron ore. Silicate products are not suitable because they quickly deteriorate in a humid environment. The walls of the well are laid in a circle using a solution of quartz sand and cement. In addition, fittings, brackets and round frames will be required.
The sequence of actions for the construction of the facility is as follows:
You need to dig a hole for the future structure.
- Dig a hole and carefully level its bottom.
- Install frame structures.
- Rigid fastening of the frame is ensured by the use of logs, boards and other available materials.
- Brick laying is carried out in the usual way.
Having determined the volume of the structure to be erected, they mark the territory and continue to dig the foundation pit. They dig it with a shovel or call in special equipment. When performing work manually, maintain the selected shape with the greatest accuracy. It is important that the bottom of sewer wells must be laid out strictly horizontally.
conclusions
When finishing a well, you can use both artificial and natural stone. Typically, sandstone, shell rock and granite are chosen for this purpose. They are attractive and have a large number of positive properties. When finishing a well, you should take into account the features of landscape design. This will make the design more original.
- DIY greenhouse from old window frames
- Making a garden bench with your own hands
- Dimensions of a booth for a shepherd, alabai and other dogs
- How to make a homemade smokehouse with your own hands