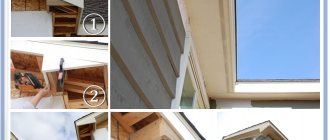
Often, cosmetic finishing of the roof is left “for later” or this stage is completely missed. However, such a simple manipulation will not only give the roof an aesthetically complete look, but will also help secure other structural elements more reliably. If you don’t want to bother too much, then you can resort to one of the simplest and most accessible operations - filing the roof overhangs. Very quickly, without much effort and special skills, you can finish finishing the entire house yourself. After which both the roof and the house as a whole will be transformed. In addition, the entire structure will become stronger, and the facade will be protected from excess sunlight and precipitation.
Roof overhangs: main purpose
An overhang or eaves is the lower part of the roof, which necessarily protrudes beyond the walls of the house. In other words, an additional canopy over the house. They perform a protective function. Firstly, overhangs protect from summer sun rays. At the same time, the winter sun warms up the rooms. Secondly, they protect external walls and foundations from leaking. And snow or icicles won’t fall on your head. As a rule, their width varies from 40 cm to 1 meter. It is believed that this part of the house does not require mandatory filing.
But it is worth considering that in this case the windage of the structure will increase, a strong gust of wind can break the eaves. And it also depends on how the overhangs were installed. In some cases, they are not specifically hemmed so that the decorative supports that serve as part of the exterior are visible. Then the work is done as carefully as possible. But it’s better to hide the rough work under a file so that friends and neighbors don’t point their fingers at the roof every time. The lining will also improve the thermal insulation of the house.
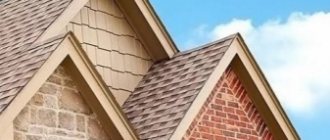
Types of eaves: eaves and frontal There are two types of eaves in total: they can be eaves or frontal. A design option when the overhang is formed by the lower part of a sloping roof is usually called eaves. The front overhang is formed by the side of the slope.
Types of cornices
Most modern houses have gable roofs. With this design, the building has two side walls and two front walls. Moreover, the side ones are located on those sides where the roof rafters descend, and the front ones do not have overhangs.
It is necessary to install cornices both on the side walls and above the front ones too. After all, overhangs perform a number of functions:
- decorate the house by covering the rafter structure;
- protect the roof from wind, cold and humidity penetrating through the open ends of the rafters;
- are part of the ventilation system of the under-roof space: through holes in the eaves, air penetrates under the roof, ventilates the layers of thermal and waterproofing, and then is discharged through the ridge;
- cover the upper part of the walls from winds and slanting rains, preventing the house from getting wet.
Hip roofs have no frontal cornice, because here the rafters extend onto all four walls of the house. In gable roofs, the front cornice is the side slope of the sloping roof. Such an overhang is made by attaching load-bearing crossbars to the rafters that protrude above the walls.
You can often find a design in which the overhang is a continuation of the sheathing, which is pressed onto the vapor barrier layer. Then the cornice board is attached directly to the sheathing boards.
The side cornice is formed by rafters protruding beyond the walls. All pitched roofs have such overhangs, their sizes can be different, the norm is a cornice from 40 to 70 cm. To create an overhang, the lower parts of the rafters are cut to the same size and connected by a board to which the cornice sheathing will subsequently be attached.
It is very important to observe the roof ventilation mode during the process of filing the eaves. If this is not done, warm air will begin to condense into water, thereby damaging the materials of the “roofing cake” and the walls of the house.
Eaves overhang
This type of construction complements the lower part of the sloped roof. It is designed in such a way that air can reach higher under the roof. As a rule, this works on attic roof options. In mansard roof types, air leaks through the air layer of the roofing pie (a system of several layers of roofing material), right up to the ridge, ventilating the entire roof. If air channels are not provided, the ventilation process will be completely impossible, which is extremely bad. The filing should not be done “tightly”.
But it's still worth doing. Otherwise, there is a risk that mice, birds, insects or other living creatures will get under the roof. And then the rafters will have to be carefully treated with water-repellent paint, otherwise moisture will spoil them over time. It is important! The eaves overhang must have a ventilation system. There are several ways to install a ventilation system: The easiest way is to leave a small gap between the walls of the house and the sheathing. For corrugated sheeting, the minimum thickness of the slots is 6 mm, the maximum is 12 mm. The gap under the lining or siding should be 10-15 mm. There are special grilles that allow air to enter, which are inserted directly into the cladding material.
They can be used with almost all types of hems. In cases where the overhang is sheathed with boards, it simply leaves small gaps (5-10 mm) between them. Small holes can be made in the soffit panel, which will serve to ventilate the entire roof. Tip 1: the total number of ventilation holes must be at least 1/500 of the total area to be ventilated. When working with bitumen or seam roofing, the width of the holes should be larger than for clay tile roofing, as it has the ability to “breathe”. Tip 2: the ventilation holes must be covered with a grille (in the case of cracks, with a mesh). Otherwise, the holes will quickly become clogged with insects, small animals, dust or anything else.
Why is the cornice hemmed?
- After laying the roofing material, part of the rafters and other layers of the “roofing cake” are visible from the bottom of the ends. This does not look aesthetically pleasing - the lining of the overhangs improves the roof, covering all the internal parts, and gives a complete look to the entire structure.
- In addition to the decorative function, hemming the eaves protects the roofing system from damage due to strong winds.
- Another important task is solved - proper under-roof ventilation is ensured, thanks to which the appearance of condensation, mildew and mold is eliminated. Accordingly, the service life of the structure increases.
Overhang edge processing
Both types of overhangs have open elements at the ends. At the front overhang, the ends of the sheathing are unprotected, and at the eaves, these are the end parts of the rafters. In order to prolong the life of the entire structure, these parts should be treated. The eaves overhangs still need to install additional drainage paths along them. In this case, the protection of the end area will be the edge finishing. The protective layer is made depending on the roofing material used. Manufacturers usually include a special edge protection kit in the packaging.
Before installing the lining, one more step must be taken: all protruding rafters and fillies should be trimmed vertically (strictly along one contour). At the same time, the distance from the wall should be the same, this is important. Afterwards, the ends of the rafters need to be connected with a strapping wooden panel, on which the front board is then nailed. Most often a metal board is used. Metal, ceramic or bitumen tiles, include a frontal board. If you don’t have one at hand, then you can make it yourself from wood.
Only the board will have to be carefully treated with a water-repellent compound, since drainage paths will be installed on it. The procedure for processing the front overhang is as follows: First, all protruding sheathing boards must be cut off. It is important that the edge contour is transverse to the wall. The next step will be installing the end panel. We nail a board of wood or metal to the end of the ridge beam and the aligned edges of the sheathing structure. Finally, the end area of the board should be covered with roofing material. The length of the roofing sheet must correspond to the length of the eaves.
The most popular options for hemming eaves You can hem eaves in different ways. To do this, they came up with a lot of ways: parallel or perpendicular to the eaves, using solid sheets or individual strips, using certain materials and fastening systems. But these are all variations of the two main filing methods.
Stage III. Fixing chamfers and profiles
Now we proceed directly to the installation of spotlights. Let's look at what tasks require special profiles and chamfers, which are always included:
- J-profile is the main hanging element. They frame the eaves overhang and join two panels of soffits along the length.
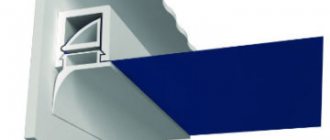
- The L-shaped panel is needed for the front trim. Available in sizes 15, 20 or 25 cm, less often - 45 cm. This strip allows you to hem the roof at an angle.
- A J-bevel is a windshield with a J-profile. It allows you to hem the overhang perpendicular to the wall, and is available in sizes 15, 20 and 25 cm, sometimes 40 cm.
Here's how to work the J-bar. It needs to be installed parallel to the wall of the house, and to do this, measure the distance between these planks and subtract 6 mm for temperature changes in the size of the panels. Next, install the cut panel into the grooves and nail the strip so that later the fasteners do not interfere with the free expansion of the material. Connect the panels together in a lock.
Lay the panels in a horizontal or inclined position. Keep the distance between the fastening points at 30 cm. And at rotation angles of 45°, install two J-bars, which will be connected by the rear walls and H-profiles.
Here's where all these elements are specifically recorded:
The J-bevel method is more aesthetically pleasing, because all the fasteners are hidden so well. Here's how to work with it:
- Step 1. From the wall side, install the J-profile directly on the board using self-tapping screws in increments of 50-60 cm.
- Step 2. Next, fix the finishing strip along the top line of the front board. If necessary, trim off the excess by adjusting the length of the flat part.
- Step 3. The J-bevel should then be inserted into the finishing strip and secured. This will avoid waviness of the chamfer itself.
As for the finishing strip, you can do without it if you use short gutter hooks. Such hooks are attached directly to the front board, and the J-chamfer is fixed with self-tapping screws. If the end or front board will remain open for decorative purposes, then use two J-profiles.
Also, if the J-bevel needs to be rotated, then follow these instructions:
- Step 1. Start installing the soffits on the roof eaves from the corner, and to do this, mark the fold line in advance where the strip will be bent at the turn where 150 mm remains from the edge.
- Step 2. Now cut the groove to the fold and leave only the folding at the bottom shelf.
- Step 3. Make a 45° cut on the bottom shelf. Now bend the chamfer so that the edge of the bottom shelf is on the outside. Now the short edge of the plank does not need to be attached to the sheathing, because it will be pressed to the front board by the next bar.
If you will then additionally run holders or cables, then in such casing you need to leave a hole 5 mm larger than needed for the drill. This is also necessary for contraction and expansion.
Hemming directly to the rafters
This method is the easiest. There is only one nuance: the lower ends of the rafters must have one common plane. As a rule, this method is used to hem structures for roofs with a slight slope (up to 30 degrees) and the offset should be 40-50 cm. We attach the sheathing to the rafter posts. Any wooden planks or beams are suitable for its manufacture. Hemming panels can be screwed transversely to the wall, along the end of the rafters, or perpendicular to the surface of the rafters. You need to look at the situation.
Horizontal filing
This method is ideal for steeply sloped roofs. The installation process takes significantly less time and material is used more economically. To do this, you will need several pieces of beams, from which you need to twist a small structure called a box. Next, it is attached to the rafters and the wall (top and bottom). So that splashes of water that fall on the overhang drain easily. The beam, which on the wall should be 1 cm higher than the beam on the rafters.
After that, boards are nailed between the corners of the roof and the house. There is an important nuance here: if the overhang is more than 45 cm, then an additional longitudinal beam will need to be installed in the middle. Other longitudinal beams need to be reinforced with bars, securing them with nails perpendicular to the surface of the wall. The front overhang is hemmed exclusively along the sheathing. It does not matter how the eaves overhang is hemmed. Planks or beams are attached directly to the sheathing. After this, sheathing strips are attached to them.
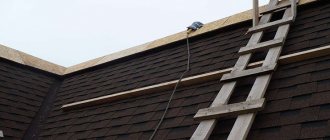
Stage I. Pre-installation of sheathing
Let's start from the very beginning. So, it is necessary to hem the roof overhang before laying the roofing material. You should also first insulate the walls so that there are no unprotected areas between the walls and the roof.
And first of all, they calculate and install the sheathing. The simplest and most common way of lining a roof with soffits is horizontal. For this task, bars are pre-attached to the rafters or their continuation in the form of fillies, forming the frame of the box.
At this stage, it is extremely important to control the future plane of the filing using a level and plumb line. Here are several options for exactly how to place the sheathing bars on the overhang of a standard roof:
It cannot be said that the horizontal or diagonal arrangement of the sheathing is better. Here, it most likely depends on which overhang seems more aesthetically pleasing to you and whether you plan to place communication cables in the soffits and build in lamps. Then the horizontal option is more appropriate, of course.
The sheathing needs to be laid along the perimeter of the overhang, parallel to the wall, and the suitable material is a galvanized profile or wooden slats. If you prefer wood, then make sure that the bars are sufficiently dry, with a moisture content of no more than 15-18%, without knots and bends, and if metal, then choose either aluminum or anti-corrosion steel.
There should be a distance of no more than 30-40 cm between the slats. If it turns out that the overhang still exceeds 40 cm, you will need to install an additional rail - between the inner and outer ones.
Nail two boards on the side of the front board and the wall, onto which you will then fix the soffit strips and additional elements. For overhang lengths greater than 80 cm, use three attachment points. In this case, the boards must be of sufficient width for the installation of soffits and additional elements more than 100 mm wide.
Choosing material for hemming
The material can be chosen at your discretion. The only thing is that you need to choose it to match the style of your home. Because white plastic will not match a wooden house in any way. Which board is best? It is better to give preference to planed coniferous boards, and if this is not available, then you can use edged boards of any species. The width of the board should be between 50-250 mm and a thickness of 17-22 mm. It wouldn't hurt to treat the boards with paint or varnish. Ideally, before installation, the boards should lie for 25-30 days under a canopy outside. Then they will have the optimal degree of humidity. When covering, it is important to remember to leave gaps (10-15 mm) between the boards so that air can circulate. With perpendicular installation, the boards are attached on both sides.
When the overhang is larger than usual, you can add a third screw in the center. If the installation is parallel, then the boards are fixed after 1 meter.
Wooden lining Lining has one big advantage over boards - it is treated with an antiseptic. There is a moisture-resistant type of lining. Considering that it will be used outdoors, it is better to choose this one. Before installation, the lining must also remain under a canopy outside for 25-30 days. Otherwise, the installation of the lining proceeds in the same way as the boards. You just don't have to leave any air gaps. When working with lining, you can use special ventilation grilles. They are placed at intervals of 1.5 m.
Polyvinyl chloride (PVC) siding
Siding must be moisture resistant. Making hemming using siding is very convenient. Because you can purchase various fastening systems, corners, air grilles and everything you might need for it. The installation of the planks occurs perpendicular to the walls. Depending on the width of the eaves, they are attached in several places (2-3-4). It is not advisable to mount the planks along the wall, since this material is not as rough as wood, so they may sag, or a significant number of fasteners will be needed.
Sheet metal
The composition of metal sheets may vary. Among them there are sheets of galvanized or polymer steel, copper and aluminum. The length of such sheets is up to 6 meters. Ventilation can be done using a special grille or perforated pieces of metal. Steel sheets must be treated with an anti-corrosion coating in the cut areas. Aluminum and copper do not need this. The disadvantage of metal sheets is that they are quite difficult to cut. You will need a special tool.
Plywood and OSB When choosing plywood sheets for overhangs, use grades with water-resistant properties. The material is quite rigid, so it allows the use of large slabs for installation. However, you will have to assemble a wooden box from blocks, to which sheets of plywood will be screwed every 1-1.5 m. For ventilation, ready-made grilles are sewn into the sheets. Plywood does not look very attractive, so it is advisable to paint the finished overhang.
Fitting overhangs with soffit is the fastest and most durable way
Soffits are usually called strips made for lining overhangs, so working with them is the most convenient. They are made from various materials: metal (copper, aluminum, steel), PVC. Which have a wide color palette and rich texture, thereby allowing you to select soffits for any home design. The set of spotlights consists of the following elements: - Soffit panels. — Frontal strips (chamfers). — Profiles with J-shaped grooves. — End strips. Many manufacturers produce spotlights and their components, so they may differ in appearance. According to their characteristics, soffit panels come with one layer, double, triple, perforated (eaves) and solid (for front-line work). Anyone with minimal experience working with wood, fasteners and construction tools can install soffits. You need to cut the panels and install them perpendicular to the wall of the house.
Errors during roofing.
Working with spotlights is a real pleasure for the masters of their craft. The ease of assembly attracts many non-professionals to actively use them. Based on the popular mistakes they make, we will give a number of useful recommendations:
- We follow the installation process and strive for accuracy in design.
- We securely fix the soffit panels. We do not skimp on fasteners. Otherwise, a strong wind will tear down the entire structure;
- We carry out the filing after installing the gutters, after completing the design and insulation of the external walls;
- We use stainless steel fasteners to prevent rust stains from spoiling the aesthetic appearance.
- We observe the technological gap - we fasten the panels with indents.
Thus, when decorating your home or making cosmetic repairs, you need to approach the choice of building material wisely. Do not buy, for example, lining that is too thin or planed boards that do not meet the technical parameters.
In the absence of experience, it is better not to learn from your mistakes yourself, but to involve specialists in your field - builders, architects, designers - in the design process. This is the only way to make your home fashionable, stylish, elegant, and not spoil expensive building material.
Do-it-yourself soffit filing: detailed instructions
There is no strict standard for fitting soffits, so the installation process may vary slightly. Before installation, be sure to read the instructions. Below we will discuss the installation process using vinyl soffits as an example. As a rule, soffits are installed horizontally, but in some cases longitudinal fastening along the rafters is used. Horizontal fastening involves the construction of a special lathing frame. Instructions for its manufacture are given above in the text. Afterwards, all other elements for installation are attached to the sheathing. The first step is to measure the size of the J-shaped profile.
To do this, it is applied across the overhang and a mark is applied. The easiest way to cut the profile is with an angle grinder. Cuts in seconds and leaves a smooth cut. Next, the profile is installed on a wooden frame using screws. When all profiles are recorded, the distance between them is measured. Based on these measurements, the soffit strips are cut. The planks should first be inserted into the wall overhang, and then into the eaves. And finally fix them to the sheathing frame using screws. If the hemming process occurs without a J-bevel, the frontal part should also be hemmed with soffits.