Michel
18835 0 2
Michel October 28, 2016Specialization: plumber with 10 years of experience, computer repair specialist, powerlifting coach. I have extensive experience in construction, interior decoration, and making homemade furniture. Hobbies: sports
In this article I want to talk about how to install a profile under drywall and what types of it are used in different cases. The reader and I will have to study three basic structures - a suspended ceiling, an interior partition and an arch.
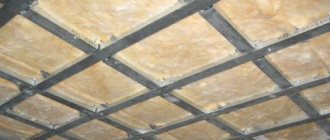
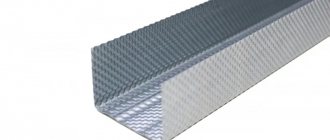
Frame of a multi-level plasterboard ceiling.
Technology
Sequence of work. Installation of the frame for plasterboard, and subsequently the plasterboard itself, should be carried out before installing clean floors. All wet work - screed, plaster, self-leveling floors - must be completed. Electrical wiring, plumbing and sewerage must also be separated. The room temperature should not be lower than 10 degrees.
Frame type. The frame for the wall can be assembled from two types of profiles - ceiling and rack. In this article we will look at the most common and labor-intensive option of a 60x27mm ceiling profile. Therefore, the tools and components will be selected specifically for this type of frame. And it is labor-intensive because when using such a profile, it is necessary to use additional fasteners in the form of hangers, at least 2 pieces for each profile. When assembling a frame from a 50x50mm rack profile, such hangers are not needed.
Despite the larger volume of work, a frame made of a ceiling profile allows you to save space. This is especially true for small rooms. If the apartment is large, or it is an industrial premises, then you can safely use a 50x50mm rack profile; in this case, saving 3-4 centimeters in wall thickness is not significant, but the work will happen noticeably faster.
Before starting work, it is important to remember the following rule:
There should not be a single screw on the front side of the frame!
Self-tapping screws, even the flattest ones with a press washer, will still stick out relative to the entire plane of the frame. Drywall should not rest on the convex heads of the screws, as this will lead to deformation of the wall plane.
One or two? It is best if the installation of the frame, and drywall too, is done with a partner. It is not always convenient for one person to make markings, work with a plumb line, install and screw profiles. Together, it’s definitely faster and more convenient.
What does the frame consist of? As a result, you should get a grid of guide and ceiling profiles, reinforced with hangers and jumpers.
Frame made of ceiling profile for plasterboard on the wall
- Guide profile
- Ceiling profile
- Direct hangers
- Ceiling profile lintels
The figure shows a general view of the frame. We will tell you everything about the sizes of parts, types of components and screws, the distance between profiles, jumpers, in detail below in the article. For now, let's talk about the tool.
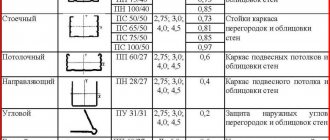
Installation diagrams for the corners of a plasterboard partition
In the diagrams below you can see how the external and internal corners of a plasterboard partition are mounted, during industrial installation, over large areas and using a PS profile from 75 mm. Installation of the corners of a plasterboard partition according to the Knauf technological map. Partition types C111 and C112.
©Gipsokart.ru
Other articles in the section: Plasterboard partitions
- Tall plasterboard partitions
- How to make a doorway in a plasterboard partition
- Interior partition made of plasterboard with a door
- Installation of a plasterboard partition
- General information about plasterboard partitions
- DIY plasterboard partition
- Partition made of two layers of plasterboard: technology of covering 2 layers of plasterboard
- Rules for installing plasterboard partitions
- Profile for plasterboard partitions
- Calculation of a plasterboard partition
Installation tool
Basic list. To mark and install the profile frame, you will need the following tool:
- 5 or 10 meter tape measure
- Pencil or marker
- Construction plumb
- Marking cord with pigment
- Nylon thread
- Screwdriver
- Hammer
- Drill bits for concrete and wood
- Hammer
- Metal scissors
- Level from 1.5 meters
- 2 meter rule
68 tools for working with drywall
Read
This is the most necessary minimum set of tools for working with metal profiles. If a person at least sometimes does something in the house with his own hands, then this entire list can easily be found in his garage. And if not, then any tool from the list can be purchased inexpensively at the nearest hardware store.
Suitable for either novice craftsmen or home craftsmen who decided to cover the walls with plasterboard at home.
Extended list. In addition to the basic list, for faster marking and fastening, you will need the following tool:
- Cutter
- Laser level
- Construction pistol
- Electric shears for metal
- Mounting belt
A laser level will speed up the process of marking and installation, making it as accurate as possible. The cutter will allow you to save on screws, and will also make the joints smooth, without convex parts. A construction gun instantly attaches hangers to a concrete or brick wall, speeding up the process significantly. Well, the mounting belt allows you to keep fasteners and tools always at hand.
An expanded list of tools is more suitable for professional craftsmen who make money by covering rooms with plasterboard and do this regularly. For a one-time job, there is no point in buying a tool from the extended list, but for professional, high-quality and fast work, it is a must.
Means of protection. When working with metal profiles, it is necessary to protect your hands and eyes. For this you will need:
- Gloves
- Glasses
Many masters neglect this point. But do not underestimate the importance of protective equipment and abandon them.
The edges of the profiles are sharp as a blade, and the screws are like needles!
Gloves will protect your hands from cuts on the sharp edges of profiles and from puncturing your fingers on screws, and glasses will protect you from metal shavings and plaster dust. Glasses will be especially useful when working with a frame on the ceiling.
Believe me, when dust and shavings start falling into your eyes, or when you get the first cut on your hands, you will still go to the store for glasses and good gloves. Therefore, it is better to purchase everything in advance.
How to attach a drywall profile to a wall. Crocodiles
The question of how to attach a drywall profile to a wall begins with attaching U-shaped hangers, in common parlance - crocodiles. In the previous lesson, we marked on the wall the places where the crocodiles will be attached:
If the wall is old wooden or made of plaster, then the hangers should be attached to the wall using a screwdriver and wood screws. If the wall is concrete or brick, then to attach the hangers to the wall you will need a hammer drill and dowel-nails 60×40 or 60×50.
So, we take the suspension and place it against the wall so that the central vertical marking line runs exactly in the middle of the suspension (as if dividing it into two parts), and the horizontal line goes through the holes in the suspension through which we will attach the suspension to the wall:
We mark with a construction pencil (felt-tip pen, marker) two marks for future holes. Next, we drill these holes with a drill with a diameter of 6 mm:
After the holes are drilled, take the hanger and dowels, attach the hanger to the wall and insert the dowels into the drilled holes. We hammer in the dowels with a hammer. And then we hammer the nails themselves into the dowels. The first suspension is fixed:
Next, the remaining suspensions are secured using exactly the same actions:
We continue to study the topic: how to attach a drywall profile to a wall.
After all the hangers are secured, you need to check their reliability. To do this, you need to bend the suspension from a straight position to a U-shaped one and slightly shake it up and down.
If the suspension wobbles, you need to secure it better. To do this, you can hammer another dowel nail into the additional hole in the suspension, having previously drilled a hole in the wall with a hammer drill. You can also use a trick: take a self-tapping screw and carefully screw it into the very base of the dowel with a screwdriver:
If required, you can tighten another screw nearby. The self-tapping screw acts like a wedge and expands the hole. As a result, the suspension stops dangling.
Selection of components
List of components. Before starting work, you need to purchase all the parts for the frame.
- Guide profiles 27x28mm
- Ceiling profiles 60x27mm
- Direct hangers
- Sealing tape 30x3mm
- Dowel-nails 6x40mm or 6x60mm
- Self-tapping screws for metal, with a sharp end, with a cylindrical head or a press washer, at least 9 mm long
- Crabs
- Side connectors
- Extensions (if necessary)
If you want to better study the components for the frame, we recommend articles about the types of profiles and fasteners for drywall.
To understand how many parts you need to purchase, first calculate the number of components according to the size of your wall.
Quantity calculation. For example, let’s take the same frame drawing from the beginning of the article. Let the height of the room be 2.7m and the width of the wall 3m. We will make the frame standard, with a strut pitch of 60cm. For these dimensions we will calculate the quantity of all components.
Calculation of the number of components for the frame
In the figure we see 2 guide profiles of 3 m each, 6 ceiling profiles of 2.7 m each, 5 lintels of 60 cm each, 12 suspensions, 6 T-shaped and 2 X-shaped connections.
Why are jumpers needed? Since the ceiling height is 2.7 m, and the plasterboard sheet has a length of 2.5 m, it is necessary to cover the remaining 20 cm with an additional piece of plasterboard, and the jumpers are installed exactly at the joint.
Now we count. Guides and ceiling profiles are on sale at least 3 meters long. The guide profile is fastened with dowel nails in increments of 50cm. For each suspension there are two dowel-nails and two self-tapping screws. There are 8 screws for each crab. There are 4 self-tapping screws for each T-joint. Sealing tape is sold in minimum quantities of 30 meters.
- Guide profile: 2pcs x 3m = 6m
- Ceiling profile for racks: 6pcs x 3m = 18m
- Ceiling profile for lintels: 5pcs x 0.6m = 3m
- Pendants: 12pcs
- X-shaped connection (crab): 2pcs
- T-joint (side connector): 6pcs
- Dowel-nail for guide profile: 14pcs
- Dowel-nail for hangers: 24pcs
- Self-tapping screws for hangers: 20pcs
- Self-tapping screws for T-shaped connections: 24pcs
- Self-tapping screws for crabs: 16pcs
- Sealing strip 30mm wide: 6.84m
The length of the ceiling profile allows you to cut solid racks, so extensions were not needed in this scheme.
Total: 6m of guide profile, 21m of ceiling profile, 12 hangers, 2 crabs, 6 side connectors, 38 dowel-nails 6x40mm, 60 sharp self-tapping screws 4.2x13mm with a cylindrical head or press washer, 30m of sealing tape 30mm wide.
The number of parts has been determined, you can go to the hardware store.
Features of mounting to the ceiling and wall
The markings for the ceiling, as well as for the wall, must first be carried out in great detail on paper. It is easier to draw the markings for the ceiling on the floor, and then transfer them to the work surface.
Small plasterboard structures such as a screen for a battery, which are not required to support much weight in the future, can be installed directly on the guides. They are easily inserted into each other and are fixed with self-tapping screws at the beginning, in the middle and at the end.
We have already written that in addition to the mounting methods recommended in the instructions, you can use your imagination. Do it as you feel comfortable, the main thing is to make a strong connection.
Installation algorithm
The tools have been prepared, the profiles and fasteners have been purchased - it’s time to start installing the frame. For clarity, we first present a list of all actions for installing the frame in order of priority.
- Dismantling the old coating
- Markings for hangers
- Marking for guide profiles
- Installation of hangers
- Installation of guide profiles
- Installation of ceiling profiles
- Aligning the frame plane
- Installation of jumpers
Now we perform each stage sequentially.
It's time to get to work
The installation of profiles varies depending on which corner needs to be sheathed:
- interior. Has 90 degrees;
- external;
- non-standard.
90 degree angle
◄ Back
Forward ►
Image 1 of 3
Level angle
Let's look at each of the options in more detail.
Preparing the wall
To install a profile frame on a wall, no complicated preparation is required. The most important thing is that the screws or dowel-nails hold firmly in the wall. It is important that the foundation is strong. Do not attach the frame to loose and swollen plaster or tiles. It is better to completely dismantle such a coating.
If the base is solid - concrete or brick with strong plaster, wood, plaster, then no surface treatment is needed.
There is no need to prime the walls!
On the Internet you can find recommendations to coat the wall with a primer. When installing a metal frame using dowels and nails, such processing is meaningless.
Useful tips
After completing the marking stage, you should move on to arranging communications that are planned to be masked with finishing material (electrical wiring, for example). Thanks to the markings, the networks are laid so that they are not damaged in the future during the assembly of the frame.
If the profile is not long enough, it is built up end-to-end or overlapping. In the first case, you will need an additional piece or end part of the guide profile. The connection area is worked out on the sides with self-tapping screws; as a result, the latter will not become an obstacle to a tight fit of the sheet finishing to the frame.
A paper plan for the installation of profiles and communications with exact adherence to scale should be kept: after finishing, the joints of the sheet material will not be visible, and if you need to hang something on the wall, it is better to know in advance where the frame or wiring is located.
Marking
Suspensions. First of all, you need to make horizontal markings for straight hangers. The recommended vertical distance between hangers is 60-90cm.
To find out the number of horizontal lines and the distance between them, measure the height of the room and divide into so many parts so that the resulting value is between 60-90cm. For example, for a ceiling height of 2.7 m we get three segments of 90 cm, and for a height of 2.4 m we get three equal segments of 80 cm. For a height of 3.2 m, you will get 4 segments of 80 cm each.
When the length of the segments and their number are known, markings can be made. It is better to draw horizontal lines for hangers using a laser level or a tapping cord with a coloring pigment.
The height of our room is 2.7 m, only three sections of 90 cm each. Using a tape measure, measure 90cm each and make marks in different parts of the wall, right and left. After this, we connect the marks using a marking cord. After pulling out the cord, shake off excess paint and press it against the wall with your fingertips. We pulled the cord, aligned it with the marks, beat it off - the line was ready. If there is no cord, then draw a line with any long object - a rule, a batten, a profile or a plinth. This is what you should get:
Horizontal markings for hangers
All suspensions will be located on the red lines. Thus, with a room height of 2.7 m in the middle, there are two hangers for each profile.
What about the top and bottom, are suspensions needed here? No, they are not needed. Since the ends of the ceiling profile will be inserted into the guide profile, it will act as suspensions. As a result, we get 4 attachment points for each vertical profile - the floor, two suspensions in the middle, the ceiling.
The horizontal lines are drawn, but that's not all, now we need vertical markings to get all the mounting points for the suspensions. The vertical lines will coincide with the pitch of the ceiling profile.
Ceiling profile. Mark vertical lines. All joints between sheets of drywall must fall on the profile. Since the width of the gypsum board is 1.2 m, the distance between the vertical profiles can be either 60 cm for a standard frame, or 40 cm for a reinforced one.
Why do you need a reinforced frame? It makes sense to strengthen the frame with additional racks when, after sheathing with sheets of plasterboard, it is planned to lay tiles or decorative plaster. In this case, the load increases and the frame needs to be strengthened. For finishing for painting or wallpaper, a standard frame with a step of 60 cm between the posts is sufficient. For our wall we will make a standard frame.
Which side should you start marking vertical lines on, right or left? If the side walls are smooth, then there is no difference; if they are curved, then choose the straightest wall and start marking from it.
Start vertical markings from the flattest side wall.
Measuring 60cm from the side wall, place a mark at the bottom and top. It is very important to maintain the vertical for the first line, so make the second mark using a plumb line, laser or bubble level. Then you connect with a marking cord, a rule, and a profile. The first vertical line is ready. The rest are marked in 60cm increments from this first one. The result is a grid like this:
Marking for hangers and frame posts
If you look closely, it becomes clear that the far right and far left red lines do not match the markings. Why? The edges of the drywall sheets will be attached to these profiles. Therefore, the profiles in these places are installed as close to the side walls as possible, and do not participate in the general marking. For the extreme lines, it is enough to set only the vertical using a bubble level.
Let's clear our drawing from the drawing with dimensions and see what happened:
Gimbal attachment points
Each crosshair of the grid, marked with a dot, is the central point of attachment of the gimbal.
But that is not all. We will attach the hangers to two dowels, so we need to make markings for the holes as well. To do this, attach the suspension so that the crosshair of our mesh is exactly in the center of the slot, and the horizontal line passes through all the mounting holes, as shown in the figure:
Trying on a hanger for marking holes
After attaching the hanger, mark any two holes with a marker. We will note the internal ones.
Marking holes for hanging
The central mark will remain untouched, and at the right and left points we will drill a hole for the dowel-nails.
Each suspension has four round mounting holes with a diameter of 6.2 mm and one longitudinal one in the center. To attach the suspension to the wall, two holes are enough, internal or external - it doesn’t matter.
Why two holes? If you look at the Knauf or Gyproc documentation, then in the drawings the hangers are fastened with one dowel or self-tapping screw through the central slot. This can be done either on wooden walls, or when the walls are of good quality, the plaster does not crumble and the suspension on one dowel holds tightly and does not dangle. But in practice, walls are not always of good quality, so for reliability it is better to fasten the suspension with two dowels.
Repeat the markings for each reticle crosshair. This is what you should get:
Markings for hangers and dowels
Guide profile. The markings for the hangers and racks are ready, all that remains is to draw two lines for the guide profiles on the floor and ceiling.
Why only on the floor and ceiling, but what about the side walls? Indeed, if you watch training videos on installing a frame from a profile on YouTube, in almost every one of them you will see how craftsmen attach a guide profile around the perimeter - on the floor, ceiling and both side walls. This option is probably quite acceptable, but we will not use it. We studied the documentation of Knauf and Gyproc and did not find a single drawing where the guide profile was attached to the side walls. According to the official technologies of the manufacturers, all corners or connections to the wall are made using racks from the ceiling profile. This is where two additional side marking lines appeared:
Marking for corner profiles
We will talk in detail about how a corner or abutment to a wall is formed in another article. Now we will continue marking for the guide profiles.
How much to retreat from the front wall? If you plan to fill the void with mineral wool for sound insulation or install wiring behind the frame, markings must be made at least 50mm from the wall. If you don’t plan to fill it with anything, 35-40mm is enough. The width of the frame will be 30mm, but there is no need to mount it close to the wall; there should be a small gap of 5-10mm between the frame and the wall.
Be sure to check the curvature of the wall before marking!
If the front wall is curved, where should you measure the offset? In this case, take the most convex part of the wall as the zero point and retreat from it 50mm or 35-40mm if the frame is without mineral wool. You can detect such a bulge using a tape measure and a plumb line or a laser level. The figure shows a vertical section of the front wall:
Finding wall irregularities
- Roulette
- Plumb
- Front wall
You need to set the vertical line with a plumb line and use a tape measure to measure the distance to the wall in different parts of it. The shortest distance from the wall to the vertical will be the most convex place. This is the zero reference point.
The arrows in the picture show that in our room the blockage is inward at the top of the wall. Having retreated 50mm from the convex part at the top, we place a point on the ceiling and transfer it to the floor using the same plumb line. Now, at the maximum distance from the first point, we place the second one, also at a distance of 50mm, and transfer it to the floor. As a result, we have four points - two on the ceiling and two on the floor. Let's connect them. The marking for the guide profile is ready. This is what it looks like in the picture:
Marking for guide profiles
If the frame is on all four walls, then you need to draw the front line for the guide profiles on all sides at once. After this, check the angles, equality of opposite lines and diagonals. If necessary, adjust the markings.
Do not use nylon thread when installing the guide profile!
Sometimes, when installing a guide profile, instead of a drawn marking line, craftsmen use a nylon thread stretched across the entire wall between two self-tapping screws. It may seem that such a thread is the smoothest and the plane will be perfect. But it is not so. During the installation process, you can imperceptibly press down the cord with the profile and it will move, you will lose its flatness. Upon completion of installation, checking the plane with a long rule, you will find that the profile is secured with waves. In this case, you will have to unscrew the screws, align the profile and screw it on again.
In order not to lose the plane during installation, the line must be drawn. It’s difficult to stray along the drawn line.
Cover the markings on the floor with film or newspapers.
Since the hangers are installed first, during drilling the pre-drawn line on the floor will inevitably be covered with dust and trampled. You can mark the lines for the guide profile after installing the hangers. Or you can draw everything at once and cover the line on the floor with film or other material. Choose the option that suits you. We will mark everything at once and cover the markings with film.
After all the marking steps, we should end up with a grid like this:
Marking for hangers and guide profile
At this stage, all markings for the frame are completed. It's time to pick up a hammer drill and start assembling the frame.
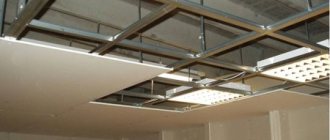
Multi-level ceiling
First of all, they decide on the shape that the future ceiling should have. They measure the dimensions of the room and begin to create a schematic plan, on which they mark the location of the guides and supporting structures for each level, and determine the location of the hanging consoles. Design work is carried out independently, or using a specialized computer program. The working drawing is transferred to the ceiling base.
To mark curved elements, a padding cord is used; for straight lines, a laser level or spirit level is used. The guide fixation lines are marked on the walls at a distance of up to 15 cm from the lowest corner point. If the project provides for masking of communications, then the indentation is made larger. The pitch for parallel lines of laying load-bearing elements is 40 cm, for suspensions - 60 cm.
Installation of hangers
Soundproofing. Before installation, the suspensions need to be noise-free. To improve sound insulation qualities, a sealing tape is glued to the suspension at the junction with the wall in accordance with its width.
Sound insulation of direct suspension
- Direct suspension
- Sealing tape
Please note that the sealing tape covers all mounting holes. In this case, contact of the suspension with the wall is excluded. This significantly reduces the conductivity of noise from the gypsum board through the frame from the profile to the wall. This is especially true for apartments and residential buildings. If you are a customer and good noise insulation is important to you, be sure to require the master to follow the technology.
Installation. The marks for the holes are ready, now you can begin installing the hangers. What to fasten with? There are several options:
- Self-tapping screw for wood 3.8x32mm
- Dowel-nail 6x40mm
- Dowel-nail 6x60mm
- Concrete nails 3.05x19mm
What to choose depends on your walls. If the wall is wooden or plaster, then for fastening take 3.8x32mm wood screws and a screwdriver. If the wall is brick or concrete, then you will need dowel-nails measuring 6x40mm if the wall is solid, or 6x60mm if the wall is loose. Well, a hammer drill, respectively.
Concrete nails are an exceptionally professional option for concrete monolithic walls or panels. To work with such nails you need a construction gas pneumatic gun. A nail 15-20mm long is driven into the concrete so firmly that it is impossible to pull it back out. A suspension secured with such nails will not dangle.
Let's consider the most difficult option. Let's assume that our wall is brick and finished with plaster. The plaster holds up well, there is no need to dismantle it, but when drilling with a hammer drill, the beginning of the hole always crumbles a little and becomes slightly larger than the diameter of the drill. In this case, we take longer dowel-nails, 6x60mm in size, and attach the hangers with their help. We take a concrete drill and drill all the holes according to the markings.
Holes for mounting hangers are drilled
Now we take a thick awl, a nail or a construction knife and pierce the sealing tape through the mounting hole of the suspension. We first fasten the suspension with dowels, and then drive in the nails with a hammer.
The suspension is fixed
You should not immediately bend the suspension after fixing it; do this when installing the ceiling profile racks. Attach the remaining hangers to the wall.
All hangers are installed
Please note that the hangers on the far left and right profiles only have one blade. The profiles on the right and left, according to Knauf and Gyproc technology, are attached only on one side, since there is simply no room for a screwdriver or a screwdriver on the side wall. Therefore, the second blade can be cut to the nearest mounting hole using metal scissors. As a result, when bending the blade, we get not a U-shaped, but an L-shaped suspension. In the slang of builders and finishers, it is also called a “crutch”.
Test of strength. After installing all the hangers, be sure to check the strength of each of them. If the suspension dangles, the entire frame will dangle. To do this, grab the edges of the suspension blades and swing them up and down. If there is play, it must be eliminated.
There are three options for strengthening the suspension. Looking ahead, I will say that the third method is the most reliable and economical, it is purely personal experience and I like it the most.
- Dowel nail. The hangers have two additional holes through which you can screw in more screws or hammer in dowel nails. Reliable. But you will have to drill and waste dowel-nails.
- Self-tapping screws. They can be screwed into the same hole with a dowel-nail, but only under a plastic dowel. This fills the space inside the hole and the dowel stops dangling. It looks extremely unaesthetic. You shouldn't do that.
- Toothpicks. Yes, yes, have a pack of toothpicks in your suitcase; they will come in handy more than once when the wall is loose or the hole is too large and the dowel simply does not stay inside, even with a screw or nail screwed in. Unscrew the self-tapping screw or threaded nail, insert a couple of toothpicks into the dowel and break them off so that they do not stick out, or better yet, recess them a little inside. After this, screw in the screw or nail. Important! The threaded nail is also screwed in, not driven in. If a couple of toothpicks is not enough, add another one.
From my personal experience, the third method is the most economical, simple and, at the same time, reliable. Wooden toothpicks perfectly wedge the dowel and fill the excess space. Try it and you will be surprised at the result.
Strengthening suspensions. If standard hangers seem too flimsy to you, you can replace them with homemade ones made from a 27x28mm guide profile. A homemade suspension is called a “boot” or “shoe.” The walls of the profile are cut to the base, then the profile is bent and an L-shaped part is obtained. A dowel-nail is attached to the wall, to the ceiling profile with a self-tapping screw, and the excess is cut off.
Construction of a multi-level frame for drywall
The first level of the frame is constructed according to the same scheme as a single-level suspended one. At this stage, it is advisable to hide communications. They are placed in cable or corrugated channels, from which wiring is supplied to the places of future lamps with a margin up to the planned level.
Work completed
When covering with plasterboard, take into account that the sheets of material should extend 25 cm into the area above the second-level frame. The seams are puttied.
The procedure for installing the second and all subsequent levels:
- Applying precise markings;
- Fixation of guide profiles;
- Fastening of suspensions and load-bearing elements;
- Load-bearing structural elements are attached to suspended consoles and then inserted into guides;
- Installation of drywall.
When installing curved elements, the technological process has a number of features. The starting profile is cut along two edges and given the desired bending arc in accordance with the contour of the frame. Grooves are cut in the starting profile into which the main profile slats are inserted. The length of these segments is equal to the height of the corresponding level, and the fastening pitch is 200-250 mm. A lower starting profile, curved along the same contour, is attached to the vertically fixed slats. The lower plane of the resulting structural element is reinforced with the main profile. To do this, it is inserted into the base guide and connected with suspensions to the ceiling base.
From the article it becomes clear how to make a corner from plasterboard and mount a structure from profiles for this. Even a non-professional builder can do this with our recommendations.
Installation of the guide profile
Noise insulation. Before installing the guide profiles, be sure to seal them with sealing tape. It is glued from the outside to the back wall.
Sound insulation of the guide profile in a vertical section
- Wall
- Floor
- Guide profile
- Sealing tape
The floor and ceiling are insulated from noise and vibrations, since all frame elements are sealed with sealing tape.
Installation rules. Now you can begin installing the guide profiles on the floor and ceiling.
The marking lines are the front part of the guide profile. That is, the profile is attached inside, between the line and the wall.
Top view of the guide profile and markings
- Wall
- Guide profile
- Dowel nail
- Floor
- Marking line
The figure shows a top view in a horizontal section. It clearly shows how the profile should be positioned relative to the wall and the marking line.
If your markings on the floor are not covered with film, then installation should begin strictly from the floor. If you start installation from the ceiling, then the line on the floor can be trampled or covered with dust when drilling with a hammer drill. If the line is covered, you can start from the ceiling, in this case the order is not important.
Dimensions. Since we are assembling a frame from a ceiling profile, the guide profile of the ceiling system has the following dimensions:
Profile dimensions - 27x28mm. The dowel pitch is 40-50cm, but not less than 3 pieces per part.
The size of the guide profile is 27x28mm. Measure the length from wall to wall, cut it with metal scissors and screw it on. Depending on the coating, either with self-tapping screws or dowel-nails. The front edge of the profile is aligned with the marking line and screwed. If the profile does not have holes, then the pitch between screws or dowels is 40-50 cm, but not less than three pieces per part. We screw the profile to the ceiling in the same way.
Docking. If your wall is longer than the profile, you cannot do without joining. The profiles need to be connected with a slight overlap, tucked one into the other, and secured with a dowel-nail.
Overlapping guide profile joining
Checking the plane. After installation, we check the flatness with the rule of 2-2.5 m along the entire length of the wall. We apply the rule from the front side to the guide profile and move it along the wall. View from above:
Checking the plane of the guide profile
- Rule length 2-2.5m
- Guide profile
The profile along its entire length should fit snugly to the rule, without depressions or bumps. If a concavity or convexity of the profile is detected, you need to remove the dowel-nail in this area, adjust the position of the profile and secure the dowel-nail again by drilling a new hole.
After installing the guide profiles, our wall looks like this:
Suspensions and guide profiles are fixed
The hangers and guide profiles are fixed, now everything is ready for the installation of racks from the ceiling profile.
What is a cutter
This tool is widely used in the construction of buildings and their cladding. Otherwise, the device is called profile fastening pliers or profile clamp. The instrument is a complex device consisting of several components:
- staples with two handles, in which there is a stop with a recess;
- a movable handle mechanically connected to a punch and a lever;
- fixed handle attached to the bracket.
It is better to purchase a tool whose design is made of chrome-vanadium alloys. They provide the product with long service life and reliability. This model allows you to fasten the profile in corner joints.
There are three types of cutters for metal profiles:
- Reinforced. It has a removable cutting element and can be used under periodic loads.
- Manual. It has comfortable handles, which allows you to work while holding it in one hand. The cost of this type of tool is favorable compared to others. This staple profile is suitable for craftsmen who do repairs themselves.
- Professional. Used in large-scale construction work. It is expensive and large in size.
The cutter operates on the principle of a stapler. To connect the profile, place the pliers in the desired position, move the handles apart and mark the location of the hole. Then the handles are sharply brought together and the profiles are fastened together. A furrow is formed on the inside. Then the tool handles are moved apart again and work continues.
The cutter firmly connects the drywall profile. This design will withstand heavy loads.
Popular models of ticks are:
- "KB Prok" made of steel . They are characterized by a convenient design and reliable connections. Suitable for long periods of work.
- KNAUF . Designed for frequent use.
- Knipex kn-9042340 . Mechanism with thick wall material. Not suitable for long-term work.
The EDMULTRAPROFIL steel cutter is a professional type. Sold complete with replaceable punches for materials of different thicknesses. The bracket is adjustable according to the depth of the profile. There are two screws.
Installation of rack profile
How to choose a profile? When choosing a ceiling profile, the most important parameter is the thickness of the metal. It should not be less than 0.6mm. It doesn’t matter whether it’s Knauf or another manufacturer, the main thing is thickness. On sale you can find a super-economy profile with a thickness of less than 0.6 mm. In this case, be prepared for the fact that the screws will constantly turn during installation, and the frame itself will turn out to be very flimsy and unreliable. A difference of even 0.05 mm in thickness may seem insignificant, however, if you try to break such a profile by bending and unbending, then metal with a thickness of 0.55 mm will break in 4 cycles of bending and unbending, and metal with a thickness of 0.6 mm will break in 9 cycles. Agree, the difference in thickness is not significant, but in strength it is more than double. Impressive.
Therefore, we either buy branded profiles, or come to the store with a micrometer and check the thickness of the metal.
Profile cutting. The length of the ceiling profile should be 1 cm shorter than the height of the wall, and in seismically unstable regions 2 cm shorter. Firstly, such a gap makes it easy to install the profile, and secondly, it allows the materials to freely shrink and expand. New buildings and wooden houses can shrink, so it is not advisable to cut the racks end-to-end from floor to ceiling. In our case, with a wall height of 2.7 m, the length of the profiles will be 2.69 m.
When all the racks are cut, you can install them in their place, without fixing them with screws for now. This is what it looks like:
Installation of ceiling profile racks
To install, tilt the profile slightly diagonally, insert it into the guide profile at the bottom and top, with the back facing outward, straighten it vertically, and move it to the middle of the hangers.
Rack fastening. All racks are attached only to hangers. The guide profiles and racks are not attached to each other in any way, neither with a cutter, nor even with self-tapping screws.
Before screwing all the posts to the hangers, you need to set the plane of the frame. To do this, we align the right-most and left-most profiles vertically using the rule and screw them to the hangers. After this, we stretch the nylon thread 10-15 cm above the level of the lower hangers, securing it with self-tapping screws to the outer profiles.
Leveling the plane of the frame using nylon thread
In the figure, the left and right profiles are already fixed to the hangers; a green nylon thread is screwed and stretched to them. We will use it to align all other profiles.
Why do you need a thread when you can use a rule? The question is logical, because we aligned the extreme left and right profiles vertically as a rule, why not do the same with the rest? Indeed, a long rule will perfectly align the profile vertically, but it is difficult to control the parallelism of the backrest relative to the general horizontal plane, and skew may result. The difference is that the outer profiles are attached only on one side, while all the others are attached on both sides. That is, even if the outer profile is slightly skewed, then when sheathed with plasterboard, the plane of the profile will be leveled, since there is only one attachment point and the profile remains movable within small limits around its vertical axis. But if there are two fastening points, then the profile will no longer align and when covering the gypsum board, the distortion can cause deformation of the sheet. Therefore, you need to check the plane only with a stretched nylon thread.
Alignment of the frame plane. Nylon thread - both short and long walls. The rule is only short ones, no more than 2.5 m long.
You can use the rule for setting the plane only if its length is sufficient to rest horizontally against the outer support profiles already screwed to the hangers. In this case, the rule will play the role of a nylon thread. This option is more suitable for short walls. On walls longer than 2.5 meters, the plane is set only with thread. And one more advantage - if you can work with a thread alone, then the rule is only together with a partner.
Why a thread and not a rule, figured out. Now you need to avoid touching the thread and profiles. To do this, bend the blades of all hangers towards you, press each profile inward by 0.5-1 cm so that it does not touch the thread and lock it with a self-tapping screw through the hole in the hanger.
Locking the suspension with a self-tapping screw
Please note that the rack needs to be locked, not screwed. Don't make extra holes.
When all the profiles are moved away from the thread and blocked, you can begin to align and fix them. To do this, we unlock each profile in turn and align it relative to the thread. The figure in horizontal section shows the correct and incorrect position of the racks relative to the thread:
Correct and incorrect position of the stands relative to the thread
- Wrong. The stand should not touch the thread, much less put pressure on it, otherwise the plane will be disrupted.
- Wrong. It is also impossible to move the profile far inward.
- Wrong. Distortion of the profile relative to the thread is not allowed. The back of the profile must be strictly parallel to the thread.
- Right. The back of the profile is parallel to the thread, the minimum distance is 0.5-1mm.
We set the profile as shown in the figure in the 4th version and fasten it on both sides with 4.2x13mm self-tapping screws with a press washer and a sharp end without a drill. The protruding blades of the suspensions are either bent inward or cut off. This is how it should look:
The stand is screwed to the suspension
When the bottom row of hangers is completely screwed to the profiles, we do the same with the top one, having first hung the thread below the top row by 10-15 cm. Upon completion of fastening the racks, remove the nylon thread; we will no longer need it. We get this frame:
All hangers are screwed to the posts
An important detail is that there is no need to rigidly fasten the guide and rack profile, neither on the ceiling nor on the floor. In new buildings and wooden houses, shrinkage occurs, resulting in pressure on the frame. This may cause cracks to appear later. The racks are attached with self-tapping screws only to the hangers.
If the length of the drywall allows you to cover the height of the wall without joints, then the installation of the frame is complete. In our case, the height of the wall is 20 cm greater than the length of the gypsum board, so horizontal jumpers must be installed at the junction. We continue to work.
Let's take on the appearance
Typically the outer corner is also 90 degrees. Installation here is almost the same as at the internal corner:
Installation of external corner
- install a profile on the floor on each side of the wall;
- we connect it by joining each other or simply applying them;
- We fasten them with self-tapping screws.
There is also another installation method:
- we cut two profiles obliquely by 4 cm so that they are joined by these cuts during installation;
- We install them on the floor and fix them with self-tapping screws.
After this, we carry out similar manipulations for the ceiling and connect the corners of the guide together. Here the fastening of the drywall sheets is somewhat different. The difference is that one sheet should protrude the width of the second. As a result, the angle will be even.