Metal tiles are one of the most popular budget roofing materials. It is valued for its light weight, aesthetics and ease of installation. If it is extremely difficult to lay classic ceramic tiles yourself, then laying metal tiles usually does not cause difficulties even for a person with little experience in construction. The main thing is to know the construction of metal roofing and install the roofing pie according to all the rules.
The sequence and purpose of the layers of the roofing pie with thermal insulation
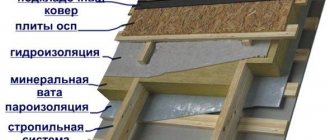
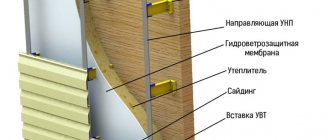
A roof pie made of metal tiles with insulation consists of several layers, each of which has its own purpose:
- External covering . Metal tiles or its budget version - metal profiles (profiled sheets, corrugated sheets). It is recommended to use metal profiles to cover outbuildings and technical structures in roof structures without insulation;
- Lathing . A wooden frame to which the outer covering is attached;
- Waterproofing . Protects the rafter system and thermal insulation from moisture;
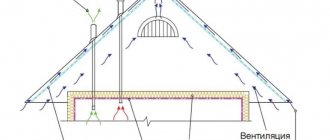
- Counter-lattice . Wooden slats that create a ventilation gap between the outer covering and the insulating materials. Thanks to the counter-lattice, moist air and condensate do not come into contact with the thermal insulation;
The result of installing roof thermal insulation without counter-lattice and external waterproofing Source spb-artstroy.ru
- Sound and vibration insulation . Damping elements are part of the roof frame of a large area. It is allowed to use such brands as Isoplast bi-not, Sylomer, etc. Roofing structures of small and medium sizes can do without them, provided that the load-bearing base (flooring) is carefully installed, fiber thermal insulation is used and the metal tile fastening technology is strictly followed;
- Rafter system . The set of load-bearing elements of the roof, which is the basis for fastening all layers of the roofing pie;
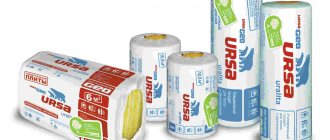
- Thermal insulation . Reduces heat loss from the building. It is recommended to use fibrous thermal insulation materials that have a high degree of sound insulation: mineral wool, basalt wool, glass wool;
- Vapor barrier . Protects the roofing pie from moist air coming from the interior of the structure;
- Internal counter-lattice . Wooden slats of small cross-section, creating a ventilation gap between the vapor barrier membrane and internal finishing materials;
- Sheathing . Rough: plywood, OSB, plasterboard, intended for fastening decorative and finishing materials. Decorative: plastic or wooden lining, false beams, decorative panels.
Layout diagram of roofing pie layers with insulation Source legkovmeste.ru
Vapor barrier
This layer protects the thermal insulation from contact with heated moist air. The use of a vapor barrier is very important when laying fiber insulation, since mineral wool can absorb moisture, which negatively affects its performance characteristics.
The most popular budget vapor barrier material is glassine. But it has a short service life and low strength indicators. It would be more appropriate to use a “woven” membrane made of polypropylene. It effectively protects against condensation.
Sequence of cold roof layers
The technology for arranging a cold roof is much simpler than an insulated one:
- is attached to the rafters using a construction stapler ;
- strips are installed along the rafter legs ;
- The sheathing elements are fixed perpendicular to the rafters;
- is fixed - metal tiles.
Cold roofing is used for technical structures, garages, warehouses and other outbuildings.
Sequence of layers of roofing pie of a cold roof Source ria.com
See also: Catalog of companies that specialize in roofing materials.
Drip edge and cornice strip
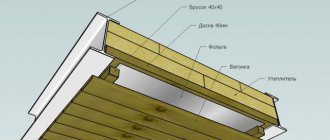
The eaves strip and drip are used to provide ventilation and perform decorative tasks. These elements are needed to fully ventilate the space under the roof and protect it from the penetration of foreign objects. Usually we are talking about V-shaped rectangles.
The cornice strip and drip edge are made so that the edges on one side are curved. This provides the necessary strength to the elements and protects the protruding edges from deformation.
These strips perform different functions. The cornice strip protects the front board of the cornice light from the negative effects of moisture. This happens when water drains from the roofing material and a small part of it can fall on the fascia board (if there is no flashing). The product also provides natural ventilation of the roof. The eaves strip is a visible element, the presence of which increases the attractiveness of the roof.
The drip tray is designed to remove moisture from the waterproofing material. The element protects the boards from condensation. The ends of the waterproofing are attached to the drip, which makes the task easier and allows you to achieve the desired result. The use of a drip line significantly extends the service life of the eaves overhang.
Main characteristics and features of the use of roofing elements
Rafter frame
For a metal roof, a standard rafter system for lightweight roofing materials is used. The section of the beam is 50x150 mm, the pitch of the rafter legs is 600-950 mm. As a rule, a pitch of 600 mm is adopted for ease of installation of thermal insulation materials. This distance allows you to place entire insulation slabs between the rafters without gaps and without the need to cut them, which will significantly speed up the installation process.
In the northern regions of Russia, it is recommended to use timber with a cross section of 50x200 mm for rafters. This is due to the need to withstand increased snow and wind loads, and also allows for thicker insulation to be placed between the frame elements.
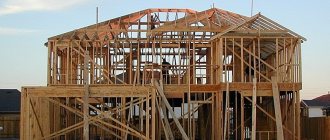
Rafter frame of complex design Source amtframe.org
Waterproofing
The choice of waterproofing material included in the roofing composition for metal tiles depends on the purpose of the structure. The use of ordinary polyethylene film, glassine or roofing felt is allowed for the insulation of non-insulated roofing structures used in unheated technical buildings.
In residential buildings, it is recommended to use waterproofing membranes, despite their rather high cost. For roofs under metal tiles, as a rule, the following types of waterproofing are used:
- Two-layer polymer - consists of two layers of polyethylene film with a reinforcing mesh between them;
- Superdiffusion membrane – characterized by one-sided vapor permeability. Its location during installation is with the permeable side towards the insulation, so that moist air is removed from the thermal insulation into the ventilation gap.
- Waterproofing with a fleecy coating is also a diffuse material that removes moisture. In addition, it prevents the formation of condensation. Installed with the fleecy, vapor-permeable side facing the insulation.
Any of the waterproofing membranes is laid on the roof plane parallel to the ridge, starting from the bottom. The overlap between the panels is 10-15 cm and is additionally glued with construction tape. Fastening to the rafters is carried out with a construction stapler.
The waterproofing membrane is laid from the bottom of the slope to the ridge Source es.decorexpro.com
Counter-lattice
It is located between the sheathing elements and rafters, forming a gap between the waterproofing layer and the roofing material. It is made of wood in the form of bars 30x50 mm. If the roof has a complex structure, a large area or a significant length of the slope, then bars of a larger cross-section - 50x50 mm - are used for the counter-lattice. It is located along the rafters and attached to them with nails or self-tapping screws 50-75 mm long.
The counter-lattice beam is fastened on top of the waterproofing membrane Source hotwell.com
Lathing
It is a load-bearing base for metal tile sheets. It is made of boards with a section of 50x200 mm or timber 40x60 mm, located perpendicular to the rafters. In practice, these elements are often used together, if it is necessary to especially firmly fasten the outer sheets of metal tiles, in case of increased wind loads in the region and/or high windage of the roof structure. In this case, the main area of the roof is covered with timber, and the lower part of the slope is covered with a continuous plank flooring. The pitch of the sheathing elements depends on the wave of the metal tile and is 800-1000 mm. Fastening is carried out using nails or wood screws (self-tapping screws) 60-75 mm long.
Important! All wooden elements of the roof structure must be treated with antiseptic (against fungus, mold, rot) and fire retardant (increases flame resistance) impregnations. Manufacturers of construction chemicals also offer universal products for treating wood, which significantly increase the service life.
Fastening the roofing sheathing boards Source orchardo.ru
Waterproofing
To protect uninsulated roof elements in buildings without a heating system, glassine, polyethylene or roofing felt are usually used. But in residential buildings it is necessary to install waterproofing membranes. Typically, when installing a roof under metal tiles, the following solutions are used:
- polymer two-layer insulation - a pair of layers of polyethylene, between which there is a reinforcing mesh;
- material with a fleecy surface - ensures moisture removal and prevents condensation;
- superdiffusion membrane - can pass steam only in one direction, ensuring the removal of moist air into the ventilation space.
Video description
In the video you can see the rules for installing a roofing pie:
Roof covering
High-quality metal tiles have a thickness of 0.4-0.6 mm and several layers of protection. It is almost impossible to visually check the presence of internal protective layers, so when purchasing roofing material, ask the seller for a certificate. To protect against corrosion, metal tiles are painted on the inside, and on the outside they have a polymer coating, which resists external influences much better than paints and varnishes. The durability and cost of the roof depend on the type of external protective layer. The most common types of polymer coatings are:
- Polyester . The thickness of the protective layer is 25-30 microns. It has an affordable price and relatively high performance characteristics. The warranty period for metal tiles with polyester coating is 8-10 years;
Metal tiles with polyester coating Source satu.kz
- Polyurethane . It is characterized by resistance to mechanical damage, temperature changes and various chemicals. When the sheet is bent, such a coating does not lose its integrity;
- Polyvinyl chloride . Demonstrates high resistance to mechanical, chemical and thermal influences. Has high plasticity. Metal tiles with this coating are recommended for installation on textured surfaces. It is advisable to use in regions with extremely hot climates;
- Plastisol . Consists of polyvinyl chloride with the addition of a plasticizer. It is applied in a layer of up to 200 microns, which allows you to apply a relief pattern to the surface of the metal tile. They have low resistance to high temperatures, which does not allow its use in regions with hot climates.
Metal tiles coated with plastisol - Solano model Source takinado.com.ua
Interior decoration
A ventilation gap is also formed between the vapor barrier membrane and the sheets of plasterboard or OSB. For this, wooden slats with a cross section of 20x30 mm are used, attached to the rafters perpendicularly.
Thermal insulation requirements
The high resonating ability of metal tiles is a feature of the material that must be taken into account when composing a roofing cake. To reduce noise during gusts of wind, rain or hail, roof insulation with such a coating must also perform a sound insulating function. Therefore, the following requirements are imposed on it:
- The insulation must have a high noise absorption coefficient, at least 0.5. Therefore, foam plastic is not used for thermal insulation of metal tiles. Basalt fiber, glass wool, and mineral wool have good sound-absorbing properties.
- The thermal insulation material must have a low dynamic modulus of elasticity. This indicator reflects the relationship between the density of the insulation and the speed of propagation of sound waves in it.
- It is important to choose elastic insulation that retains its shape well and does not wrinkle.
- Low hygroscopicity. Insulation with low hygroscopicity will not lose its thermal insulation properties when wet, which will serve well in case of leaks into the rafter frame.
Please note that most thermal insulation materials lose effectiveness when wet. The thermal insulation properties of insulation with increasing humidity are reduced by more than half, so reliable membrane waterproofing and vapor barrier are included in the roofing pie for metal tiles.
Noise absorption index of glass wool
Efficiency of single-layer insulation
As for the method of laying insulation, for a long time there was an opinion that cross-insulation is more effective.
id1932564FORUMHOUSE Member
Tell me what to do: the roof is attic, the insulation is 200 mm in size for the rafters, I bought rolled mineral wool insulation for the roof. There is an idea to add 50 mm cross-insulation from the inside. The builders did not approve. Does this make sense? Tatarstan region.
Anatoly Zemyanko Technical Specialist
It is better to insulate in one layer than in several. Increasing the speed of work by reducing the number of technological operations, reducing waste due to cutting layers when performing run-ups.
Six fragments of walls with stone wool slabs were tested in the climatic chamber of NIIMosstroy:
- In three layers and in one layer - the plates are joined without a gap (good installation).
- Three layers and one layer - slabs with a gap of 2 mm (normal installation).
- In three layers and in one layer - a gap of 5 m (everything is bad - it needs to be redone).
A seam width of up to 2 mm is acceptable in most building structures and appears in the standards. This is due to the fact that under climatic conditions, convection at a seam of such width is not intense. Therefore, it is not detected by a thermal imager as a cold bridge. Previously, there were studies on the uniformity of two-layer and single-layer insulation while maintaining the width of the seam.
The research revealed the following:
- Single-layer and multi-layer insulation used in external enclosing structures are equivalent in their effectiveness.
- A gap of 2 mm between adjacent insulation boards has virtually no effect on heat transfer resistance.
Anatoly Zemyanko Technical Specialist
Advantages of minimizing thermal insulation layers (2x100 mm and 1x150 mm are better than 4x50 mm and 3x50 mm):
- reduction of labor costs during the preparation and installation of insulation;
- reduction of material scraps during work;
- insulation with a thickness of 100 mm or more is less prone to deflection than a thickness of 50 mm, due to which it is more securely held in the frame, which is important when installing on vertical and inclined surfaces;
- A single-layer solution is ultimately cheaper than insulation with two or more layers.
What to do with a complex roof shape?
Let's tell you frankly: metal tiles are far from the best roofing material for a roof with a complex shape. Therefore, since there is already one and it needs to be insulated, be sure to think about the ventilation of all its parts. Definitely everyone!
The fact is that certain areas without ventilation will be warmer; snow will melt on them and flow down to the eaves, where there is ventilation and the roof covering has a lower temperature (especially on the overhang, under which there is no insulation). And with metal tiles for water, it’s not difficult to find an entrance to the under-roof space.
Further, the melted snow will encounter unmelted snow and remain there, eventually turning into ice. And putting it on is not only a danger for people living in the house when they go outside at the wrong time - it is also a constant destruction of the drain.
This is why the ventilation of a complex roof must be 100%, without missing a single section. To do this, install an intermittent counter-lattice, which allows air flows to move not only in one specific direction, but also in different directions, reaching all zones. Also, a couple of additional aerators will not be superfluous.
And after finishing the insulation, also make sure that the air intake hole in the eaves is always open. It cannot be hemmed with a board, but it can be covered with a slightly bent gutter drip.
As a last resort, we advise you to insulate such a roof from the inside using polyurethane foam, which penetrates into all cracks and hard-to-reach places (and a complex roof always has them), and is not afraid of moisture:
Tools and supplies for installing a cold attic
It is noteworthy that laying metal tiles does not require overly complex professional construction tools. You can use a basic set that every man has in his household.
In addition to lumber for the rafter frame, sheathing and counter-lattice, an insulating membrane or film for vapor and waterproofing is required, as well as a sufficient number of metal tile sheets purchased from one batch.
All elements are fastened using staples, self-tapping screws, galvanized nails and even anchor bolts. However, it is worth remembering that they must be of high quality so that the roof does not begin to collapse ahead of time.
As for laying the roofing, in addition to profile sheets, you will need ridge elements, valleys (internal and external), cornice and wind strips, as well as snow retainers and gutters.
The main difference between a cold roof and a warm one is the presence in the latter of a layer of insulating material placed between layers of hydro- and vapor barrier. It is advisable to install a cold roof only if the attic will not be used as a living space.
Calculation of the amount of metal tiles
To calculate the required number of sheets of material, you first need to decide on the type of profile and the manufacturer of the metal tile - you will need the exact dimensions of the material itself, and each profile has its own. Then you need to make accurate measurements of the slopes - length, height, if any, you need to measure all the protrusions or other decorative elements that will need to be sheathed with roofing material. If the roof has a complex shape, it is better to draw a plan, put down all the dimensions and then start doing the calculations.
Number of rows
It is best to look for metal tiles not in stores or markets. It is advisable to contact the manufacturer directly. The point is not only the price - it may not differ very much, but the fact that many workshops/factories offer to cut sheets of the required sizes. The minimum sheet height is 0.7 m, the maximum is 8 m. That is, you can order the required number of sheets covering the roof slope from the ridge to the overhang (taking into account the eaves overhang).
This option is good because a metal tile roof will not have horizontal joints, which means there will be less chance of leaks. The second plus is a minimal amount of waste and a smaller amount of material itself (due to the absence of horizontal overlaps, several square meters are saved). Disadvantages: difficulties with delivery, lifting long sheets to the top, inconvenient installation.
Calculation of a rectangular roof slope
When using sheets of standard sizes, the height of the roof slope is divided by the useful length of the sheet. The resulting figure is always rounded up. The useful length is obtained after subtracting the amount of horizontal overlap from the total length - from 100 to 200 mm. The flatter the slope, the greater the overlap of the sheets is necessary so that precipitation cannot get into the under-roof space. On roofs with a slope of up to 12°, one sheet overlaps the other by at least 200 mm; with a slope of 12° to 30°, the overlap is 150-200 mm, more than 30° - 100-150 mm. The specified amount of overlap is subtracted from the total length of the sheet, this will be the “useful length”.
An example of calculating the number of rows of metal tiles on a roof. Let the length of the slope be 4.5 m, the useful length of the sheet is 2.3 m. Divide 4.5 by 2.3, we get 1.95, round to the nearest whole number - we get 2 rows. In this case, only a small part of one sheet will go to waste, but there are times when more than half is cut off. This is very unprofitable, since this piece cannot be used anywhere else.
Number of sheets in a row
Take the length of the slope and divide it by the usable width of the sheet. This parameter is indicated in the technical specifications for metal tiles. Most often it is 110 cm (1.1 m). We round the resulting number up to obtain the number of sheets in the row.
An example of calculating metal tile sheets in a row. Let the length of the overhang be 8 m, the useful width of the sheet 1.1 m. When dividing, we get 7.27 pieces, but round up to a larger integer and we get 8 pieces in one row. Moreover, more than 2/3 of one sheet will go to waste.
Features of hip roofs
Hip roofs have slopes that are triangular or trapezoidal. Here it is necessary to select the length of the sheet in order to minimize the amount of waste.
An example of the layout of metal tile sheets on a hip roof
The height is selected so that no more than half goes to waste. It is quite difficult to do this manually, and there is still a significant error - there will be 20-25% more waste than when calculated using programs. They are usually available from sellers and manufacturers. It is better to provide them with an accurate calculation, and first measure the parameters of the roof at home (or call a measurer), and then try to select the dimensions yourself. Then you can compare the amount of material needed, calculated by you and proposed.
Determining the number of additional elements
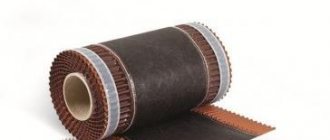
A metal tile roof requires a large number of different additional elements (additions), which form the ridge, the edge of the overhang, the sides of the slope, the passage of the pipe, the valley (the junction of two adjacent roof slopes). The more complex the shape of the roof, the greater the amount of additions required. With a simple gable roof, ridge elements and caps, cornice and pediment strips will be needed. That's all.
What types of additional elements are there for metal roofing and why are they needed?
Despite the wide variety of extras, they are all considered the same. Take the length of the surface on which it needs to be mounted and divide by the useful length of the element. It is usually standard and is 1.9 m (total length 2 m). The result obtained is rounded up.
Installation technique
After calculations and selection of all necessary materials, the most important stage comes - installation of the roofing pie. Both types have their own characteristics, so when choosing a “cold roof” you can immediately proceed to the third stage. In the case of a “warm roof” you need to start from the very first point.
- A vapor barrier layer will protect the roof from the harmful effects of steam from a warm room under the roof. Different types of vapor barriers require a certain gap during installation (which may vary from product to product). Therefore, for such cases, a counter batten (thickness - 30 mm) is first installed along the joist. A vapor barrier is attached to it using a construction stapler or counter-lattice. It must be laid along the slope from its lower part to the upper. Each row of the vapor barrier overlaps the previous one (100-150 mm). Exactly the same applies to longitudinal joints.
- On the outside of the frame, insulation is stuffed between the joists. Space for air gaps must be provided.
- A mandatory step not only for a “warm” roof, but also for a “cold” roof. A waterproofing film is attached along the joists using a vertical counter-lattice (beam 30x50x50 mm) with a nail pitch of 30 cm. A ventilation gap is also required here - the material must sag by at least 1-2 centimeters.
- And the sheathing is already installed on the counter-lattice. Its pitch, as mentioned earlier, should not exceed 45 cm. In valleys, ridges and various junctions it is laid completely.
Please note that all wood materials of the pie must be calibrated and dried under natural conditions before installation. Treatment with fire retardants and antiseptics is highly desirable. Finally, be sure to pay attention to the roof of your house at least twice a year
Regular preventive maintenance and, in particular, monitoring of additional elements, joints and junctions in advance will help to avoid possible problems with the roofing pie
Finally, be sure to pay attention to your home's roof at least twice a year. Regular preventive maintenance and, in particular, monitoring of additional elements, joints and junctions in advance will help to avoid possible problems with the roofing pie
Conclusion
In order for a pitched roof to fulfill its purpose and reliably protect the house not only from external influences, but also from increased operating costs due to heat loss, it must be well insulated. In this case, living in the attic will be as comfortable as possible without overpayments, and the need for major repairs will not arise soon.
About single-layer insulation - in the previous material. Owners of wooden houses will find the article about insulating a timber house with stone wool useful. The video shows how to choose and lay stone wool correctly.
Subscribe to our Telegram channelExclusive posts every week
Stone wool for attic insulation
One of the most common insulation materials in pitched roofs is stone wool, as the optimal material in terms of performance and cost. It has such properties as:
- low thermal conductivity;
- biostability;
- fire resistance;
- non-flammability;
- sound absorption;
- minimal hygroscopicity;
- durability;
- practicality (and ease of installation, and preservation of the original parameters for the entire service life).
When vapor passes through the fibers, the stone wool is not moistened, its thermal conductivity and volume remain unchanged, that is, during operation the insulation remains dry and effective and does not lose its properties.
ra093FORUMHOUSE Member
Please give advice on how best to insulate the attic of a 10x10 m timber house, Middle Urals. The pie is now standard: flexible tiles, ventilation gap 50 mm, membrane, rafters 200x50 mm. The attic is quite low, I don’t want to lower the ceiling too much.
I see options:
- 200 mm stone wool. Then straight finishing. The rafters look like cold bridges. But how much heat do they take away, considering that 200 mm, and my house itself is made of 190 mm timber, essentially like a cold bridge.
- 50 mm gap between the wool and the membrane, 150 mm of wool, there is already a 30 mm pier plate on the rafters. It turns out more expensive, but it seems to me it should be warmer than 200 mm of wool. The downside is that the ceiling will be lowered a little more.
What other options are there that are not too expensive? Of course, I would like to blow out everything with 150-200 polyurethane foam or lay it all out with slabs, but the price turns out to be very high. Can he handle the entire feast with 100 mm slabs? Judging by the advertised thermal conductivity, it will be like 200 mm of wool.
Anatoly Zemlyanko Technical specialist of ROCKWOOL company
Definitely the first option. 200 mm stone wool, which is the most effective vapor-permeable and breathable material. All other materials will act as a vapor barrier, so it is not advisable to mix these insulation materials. Logs are not cold bridges, since the thermal conductivity coefficient of wood is quite low, which indicates its effectiveness.
