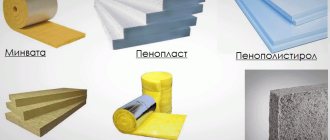
Metal tiles are one of the most common roofing materials, which is made from aluminum, steel or copper profiled sheets coated with a layer of zinc and polymers. This structure gives the material strength and resistance to negative environmental influences. In order for the tiles to retain their original appearance for as long as possible, all stages of its installation must be approached with full responsibility. First of all, this concerns the installation of sheathing, which is the basis for the roofing.
Preparation
Experienced craftsmen know well how to properly make sheathing for metal tiles. The process begins with detailed planning and selection of suitable building materials. The sheathing is the load-bearing structure included in the roofing pie. It creates additional stiffening ribs and serves as the basis for roofing material, vapor barrier and insulation. Spruce or pine beams are used for its manufacture.
Lumber
When working, you should determine in advance which board to use for lathing under the metal tiles. Coniferous trees are best suited - they are characterized by increased plasticity and resistance to temperature changes. If there is no other option, the use of hardwood is allowed.
What quality wood looks like Source vales.net.ua
Make sure that the boards and beams are thoroughly dried and have not been subject to rot or insect infestation. If you purchase building materials from trusted suppliers and do not neglect the rules of their storage, then such problems will not arise. Otherwise, due to uneven drying or loss of integrity, the wooden structure will warp or collapse. The dimensions of the beams depend on the type of roofing structure:
- standard small roofs without superstructures – 25*100;
- laid using tiles, the base of which is covered with thin galvanization - 32*100;
- When arranging a roof with a pitch exceeding a meter, beams with a section of 50*50 or 40*60 are used.
It is important that the dimensions of the bars correspond to the expected load. If the thickness is exceeded, this will not affect the integrity in any way - it will be significantly higher than calculated, which will only lead to unnecessary costs. But thin bars should not be used if they cannot support the weight.
“Bare” roof Source stroymatika.kh.ua
Lathing calculation
Before purchasing materials, you need to draw up a project and determine how many building materials will be needed during assembly. This way, it will be possible to avoid the unpleasant situation with a shortage of timber during construction - work will completely stop, and it is quite difficult to urgently purchase components for the roofing cake.
When performing calculations, the master takes into account the nuances of the chosen design. For example, an additional board is installed at the bottom of the cornice for additional strength. If you do not know how to calculate the sheathing for metal tiles, use the services of specialists who have the necessary skills. They will draw up a project that takes into account all the components of the roofing pie, which will allow you to purchase the necessary building materials with high accuracy, avoiding shortages or unjustified costs.
Note. The required volume of lumber when purchasing should be increased by 10%. During construction, mistakes are made, and the beams themselves sometimes bear traces of defects that prevent them from being used for their intended purpose.
Several examples of lathing schemes for metal tiles Source kakpostroit.su
Tools
During the work, lumber is trimmed, brought to the desired shape or fastened together using a number of tools. You will also need tools for measurements, determining the horizontal position relative to the Earth's axis. The complete set consists of the following devices:
- yardstick;
- hydraulic level;
- hammers and small sledgehammers;
- hacksaw - electric or manual;
- drill with screwdriver function;
- Bulgarian;
- markers.
For efficient and accurate marking, a dye cord, a tool that applies equal sections, and a template are used. As soon as the construction plan is drawn up, you should purchase building materials and acquire the necessary tools. To complete the work, all that remains is to learn how to properly make sheathing for metal roof tiles.
If necessary, the profile is shortened with metal scissors Source i.ytimg.com
Step calculation
The size of the beam and the distance between the rafters is one of the most important parameters. They are selected based on the length of the segment between the lower points of the tile waves and the characteristics of the profile used. An experienced craftsman, before making sheathing for metal tiles, will find out what type of roofing material will be used.
Features of profiled sheets
Depending on the weight of the roof and the connection points of its components, the support points and the most vulnerable places are determined, under which a reinforced base is installed. The greatest strength of the profile is in the lower part of the wave, so this is where it is attached to the sheathing.
Suppliers produce profiles that differ in wavelength and depth. Let us determine, using an example, what is the pitch of the sheathing for metal tiles if the board width is 100 mm. Considering that they are used when installing simple structures on small houses, a 0.4 mm roofing sheet and 25*100 mm boards are taken here. Having carried out the appropriate calculations, it turns out that the rafter pitch is 60-90 cm. If the width of the board is 150 mm, the pitch of the sheathing for metal tiles can exceed a meter.
Schematic representation in 3D Source kakpostroit.su
Junction places
The areas in which the roof comes into contact with walls, facade elements, pipes or other structures are called abutments. This is where there is the greatest likelihood of leaks, leading to damage and destruction of the ceilings.
If you know how to properly make sheathing for metal tiles, it will not be difficult for you to create protection for them. Here you will need additional beams and casings, made so that their shape completely covers the contact areas. For complete sealing, windproof membranes, sealants and other similar elements are used.
How it should NOT be Source metaldom.com.ua
See also: Catalog of projects of narrow houses with a combined roof.
Step calculation rules
If the sheathing is designed correctly, then the attachment points will always be under the wave of metal tiles. During installation and calculations, the following rules should be observed:
- The pitch of the transverse wave of the roof must be identical to the pitch of the sheathing along the entire length of the structure. You can find out the relevant information in the product passport, or in the recommendations from the manufacturer;
- the extreme strips on the eaves side are installed closer to each other - by the amount of metal tiles produced in relation to the front board;
- if there is no frontal board, the release is measured along the cut of the rafter leg or filly.
Before making sheathing for metal tiles on the roof, its strength indicators will be correlated with the average precipitation in the region. To protect the roof from heavy rains and snowfalls, the boards are fastened at a distance of 1 meter from the edge of the roof with a complete absence of spread. This will maximize the strength of the structure and allow the snow retainers to be secured.
How roof snow guards work Source goodkrovlya.com
In regions with heavy rainfall, it is recommended to install continuous sheathing. However, the pitch of the rafters to which the fastening will be made is still measured. If necessary, the corresponding boards are marked with a marker.
Sheathing for metal tiles: choice of material
Lathing is a continuous flooring (when the gaps between the rows of slats are no more than 1–2 cm) or a lattice structure laid on top of the rafters. A solid base is used when laying flat slate, rolled materials, as well as metal tiles at the intersections of slopes, on the ridge, valleys, ribs and grooves. In other cases, a sparse sheathing is made.
When installing a roof made of metal tiles, a sparse sheathing is made, except for the junctions of the slopes, the passage of valleys and the lines of cornices and ridges
Install the sheathing in 1 or 2 layers. The first is mounted horizontally, parallel to the ridge. The second layer - for continuous flooring - is made in the direction from the ridge ridge to the slope or diagonally. To cover a roof with metal tiles, the first layer is sufficient. The sheathing can be wooden (from beams or boards) or metal.
Video: template for installing sheathing under metal tiles
Metal sheathing
Metal sheathing is made from a special steel profile, which provides undeniable advantages over traditional wood solutions:
- free access to all structural elements;
- reduction of wind load by reducing the total area of the sheathing.
But this is not the main advantage of the metal profile. When installing sheathing made of perforated steel pipes, the natural ventilation of the under-roof space and the removal of condensate, the formation of which is inevitable due to day and night temperature changes in the off-season, are greatly improved. That is why the wooden sheathing for laying metal tiles is carefully protected from dampness. Meanwhile, even the best hydro- and vapor barriers deteriorate over the years and require replacement. And if this is not done in a timely manner, the wooden sheathing will rot with all the ensuing consequences. Alas, sad and costly.
This cannot happen with metal profile sheathing. In addition, it is perfectly flat, which is important for strong fastening of the covering material. The metal profile itself is convenient to transport and store, as well as simple and easy to install.
Metal sheathing for metal tiles has a lot of advantages, the main one of which is ensuring good natural ventilation of the under-roof space
Hence the conclusion:
- the metal structure under the metal tile is not afraid of moisture, and also retains its qualities in the most unfavorable weather conditions;
- interior spaces are dispensed with without additional ventilation;
- the roof lasts longer and does not need repairs for a long time.
Wooden sheathing
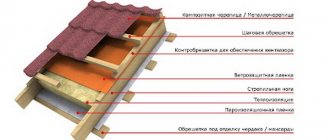
Wood lathing under metal tiles is used much more often than metal lathing. Although, in principle, there are no advantages over metal profiles - neither in price nor in the requirements for arrangement. Rather, it is the mentality, tribute to traditions and trust in the tree that affects it. Before we talk about wooden sheathing, let's look at the structure of a metal tile roof. It consists of:
- rafter system and cornice strip;
- vapor barrier layer;
- initial sheathing;
- thermal insulation material;
- main battens and counter battens;
- waterproofing;
- metal tiles.
The structure of a metal tile roof consists of exactly the same layers as roofs made from other coatings
As in the design for laying any other roofing covering, here it is also necessary to provide a gap between the metal tiles and the waterproofing for ventilation of the under-roof space. Insulating materials are placed in exactly the same order. To install a cold roof, a heat insulator is also not installed.
When installing a roofing pie on an uninsulated roof, you can do without laying thermal insulation material, however, a waterproofing layer and a ventilation air layer are necessary
The only difference is that the sheathing step is made for a specific tile. That is, the structure of the sheathing depends on the type of roofing and is packed under the purchased covering.
The pitch of the sheathing does not depend on the material of the structure. It must match the wave size of the selected metal tile.
This individuality of the step is explained simply: different manufacturers and models - different sizes.
The pitch of the sheathing must match the size of the transverse wave of the metal tile
It is necessary to mention one more nuance - the first sheathing board is mounted higher than the others by the size of the transverse wave of the metal tile. Usually it is 10–15 mm.
The first (cornice) row of sheathing is made thicker than the others by the height of the transverse wave
Sometimes information slips through that a completely continuous sheathing can be made under the metal tile covering. Indeed, sometimes they do. However, if anyone thinks to save money on this and replace the wood with cheaper materials, then nothing will work. We are not talking about any plywood, chipboard or fiberboard as a continuous flooring. Continuous sheathing for metal tiles means only a small step between the boards (up to 2 cm). So in any case, natural wood is used, the type of which developers choose at will.
More often it is spruce, fir, pine, larch. In terms of price-quality ratio, it is preferable to use pine. This can be a timber or edged board that is well dried and has high characteristics. It’s not worth saving on lumber, so as not to create unnecessary problems for yourself in the future.
Table: comparison of wood species by shrinkage coefficient and mechanical strength
| Wood species | Dryness coefficient, % | Mechanical strength for wood with 15% humidity, MPa (kgf/cm2) | ||||
| in the radial direction | in tangential direction | for compression along the fibers | bending | radial shearing | shearing in the tangential plane | |
| Coniferous trees | ||||||
| Pine | 0,18 | 0,33 | 43,9 | 79,3 | 6,9 (68) | 7,3 (73) |
| Spruce | 0,14 | 0,24 | 42,3 | 74,4 | 3,3 (33) | 3,2 (32) |
| Larch | 0,22 | 0,40 | 31,1 | 97,3 | 8,3 (83) | 7,2 (72) |
| Fir | 0,9 | 0,33 | 33,7 | 51,9 | 4,7 (47) | 3,3 (33) |
| Hard-leaved and soft-leaved tree species | ||||||
| Oak | 0,18 | 0,28 | 52,0 | 93,5 | 8,5 (85) | 10,4 (104) |
| Ash | 0,19 | 0,30 | 51,0 | 115 | 13,8 (138) | 13,3 (133) |
| Birch | 0,26 | 0,31 | 44,7 | 99,7 | 8,5 (85) | 11 (110) |
| Aspen | 0,2 | 0,32 | 37,4 | 76,6 | 3,7 (37) | 7,7 (77) |
| Linden | 0,26 | 0,39 | 39 | 68 | 7,3 (73) | 8,0 (80) |
| Black alder | 0,16 | 0,23 | 36,8 | 69,2 | — | — |
Let's dispel another stereotype - supposedly metal tiles have the worst sound insulation. Because of this, some people refuse such a wonderful covering material. And completely in vain. Firstly, not a single roof is 100% silent. And secondly, studies conducted by metal tile manufacturers have shown that the reason is not the coating itself, but an incorrectly assembled sheathing, errors in its filling and installation of the covering material. And also in the small angle of inclination of the slopes, savings on materials and screws, which we will talk about a little later.
Video: analysis of errors when installing metal tiles
Even the type of wood for the structural elements of the roof does not play a special role. If the structure is assembled correctly and all stages of installation are completed without violations, then the metal tile roof will last for a very long time, delighting with its beauty and good performance.
The type of wood for the sheathing and rafter system does not affect the durability of a metal tile roof; the main thing is to do the installation without any damage
The procedure for installing the sheathing
Having prepared the necessary building materials and tools, you can begin to work. Installation is carried out in several stages, each of which has its own specifics.
Waterproofing
Sheets of waterproofing film or membrane are laid on top of the rafters. It will prevent the penetration of moisture from the air into the insulation, and will also provide complete protection for thermal insulation in the event of a violation of the integrity of the roof.
Fixation is carried out using a construction stapler with staples over 30 mm long. To exclude the possibility of water penetration through the protection, the rolls are laid overlapping, with an overlap of 10 cm vertically and 15 cm horizontally. The joints are additionally taped with butyl rubber tape.
Craftsmen stuff the sheathing over the waterproofing Source www.stroy-kotedj.ru
Installation of counter-lattice
This component provides the structure with additional stiffening ribs, increasing its load-bearing capacity. This measure is used if you plan to lay an extensive roof with weighted sheets of metal tiles.
Additional beams are nailed on top of the sheathing, which allows you to simultaneously form an air gap 50 mm thick. Under normal conditions, the ventilation gap is thinner and is formed by raising the structure onto small bars that are not combined into a solid structure.
To install the counter-lattice, beams of the same thickness as were used before are used. To ensure that all fastening points are reliably protected from leakage, they are covered with sealing tape. Such protection is placed between the waterproofing and the counter-lattice beams. At the same time, this measure will reduce the roof’s sensitivity to vibration and provide additional noise protection.
An example of a continuous counter-lattice with insulation Source ksk24.ru
See also: Catalog of companies that specialize in attic repair and reconstruction and installation of roof windows
Installation of sheathing
The supporting structure is installed on top of the base in a horizontal position with a pre-calculated step. Calculations should be carried out so that the outer boards are located on the ridge and at the very edge of the cornice. If it is not possible to select the position of the beams by fulfilling this requirement and securing the sheets of tiles in the lower part of the wave, then an additional board in the lower part is laid so that the outermost element of the roof can be attached to it.
The first board is aligned with the rafters. If it becomes necessary to join boards attached to adjacent slopes that are adjacent to each other, this is done in a staggered manner in order to maintain the strength of the structure. Additional boards are installed in the valleys and around the chimney, which is necessary to strengthen the roof and increase resistance to mechanical loads (precipitation, wind, etc.).
Laying the first lathing
Step-by-step laying of the lathing
The first element is placed horizontally along the edge of the rafter legs and secured to the counter-lattice beam. The starting board is fixed with two screws to each rafter. A block of similar thickness is placed on top of it to prevent the roof covering from sagging.
Operating procedure:
- measure the gap to the center of the next element from the bottom of the first;
- pull the cord between the sheathing element at the ridge and the starting part;
- the remaining boards of the frame are installed in this gap so that their upper plane touches the lacing;
- An equal distance is made between the centers of the remaining laths.
As a rule, manufacturers offer installation instructions for their particular type of tile, and indicate the step.
How to install sheathing
The type of supporting structure may vary depending on the design features and the complexity of the task. In total, there are two main types of sheathing - solid and lattice. If tiles without waves are used during installation, they are fixed to a structure made of boards laid with a gap of 10 mm. They should not be stacked tightly, as aging or thermal expansion will cause the wooden components to deteriorate.
The standard lattice design is designed for use under reduced load conditions. The reduced amount of building materials used reduces the total weight of the building and the roofing pie.
Work in full swing Source orchardo.ru
The installation process after laying waterproofing includes the following steps:
- Marking. To eliminate the possibility of errors during roof assembly, all places where the boards will be attached to the rafters. Having decided at what step to make the sheathing for the metal tiles;
- Fixing sheathing boards to rafters. For this, galvanized steel nails with a length of 3-3.5 mm are used. They should be twice as long as the thickness of the boards on the sheathing. Each of them is fixed with a pair of nails along the edges so that they are as close as possible to the axis of the rafter;
- Installation begins with the boards on the eaves, since all elements are aligned along them. Using a level, you need to make sure that each component is positioned correctly and level. If one of the boards is not nailed tightly enough on one side, a distortion will occur, making further installation difficult.
During installation work, the sheathing board is attached with two nails to each rafter that it crosses. Before fixing the element with nails, the master checks that it is positioned strictly horizontally in relation to the outer elements. To do this, you can use a tape measure, any other measuring device, or make a template.
Calculation of lumber for sheathing under metal tiles
To avoid unnecessary expenses, the required lumber is calculated in advance. To do this, using a tape measure, measure the length and height of the slopes, the total length of all eaves overhangs, the total length of the valleys (if any) and ridge lines.
Calculation of continuous sheathing
The initial data for the example is a roof area of 50 m², 25x100 mm boards used, 6 m long.
- We determine the area of 1 board - 0.1 (board width, m) x 6 (board length, m) = 0.6 m².
- We calculate the number of boards - 50 (total area, m²): 0.6 = 83.33 ≈ 84 pcs.
- We calculate the required volume - 0.1 x 0.025 x 6 x 84 = 1.26 m³.
- We add a margin of 10% for trimming, trimming and random errors. As a result, we get 1.26 x 1.1 = 1.386 m³ ≈ 1.4 m³.
Calculation of sparse sheathing
The initial data is the same, the sheathing pitch is 350 mm, the length of the eaves overhangs is 30 m, the length of the ridge line is 8 m, there are no valleys, a simple gable roof.
- We count the number of boards for sheathing the main roof area - 50 (total area, m²): 0.35 (pitch, m) = 142.8 linear. m: 6 (board length, m) = 23.8 pcs. ≈ 24 pcs.
- We determine the required volume 24 x 0.025 (board thickness, m) = 0.6 m³.
- We calculate the number of cubes for the arrangement of the ridge and cornices - 30 + 8 = 38 linear meters. m: 6 = 6.3 pcs. x 0.025 (board thickness) = 0.16 m³.
- We calculate the total number of cubes of lumber - 0.6 + 0.16 = 0.77 m³.
- We add a margin of 10% - 0.77 x 1.1 ≈ 0.85 m³.
A more accurate calculation of the sheathing can be made using an online calculator on online construction resources or on the website of the manufacturer of the selected metal tile.
Attaching the roof to the sheathing
Having created a solid foundation, you should begin laying the roof, which performs a protective and decorative function. Features of laying and connecting sheets to each other may vary depending on the manufacturer and type of product. If the design does not provide holes for fasteners, you will need to make them yourself.
Fixation is carried out from the end using special roofing screws with a sealing washer. Their cap has a special shape - after the fastener is completely screwed in, its top will tightly press the metal part. This will prevent the penetration of moisture in the place where the metal tiles will be most susceptible to corrosion. To make the job easier, use a screwdriver.
How deep should the self-tapping screw go into the beam for reliable fixation Source www.insi.ru
Ideally, there should be 8 roofing screws for every square meter. If work is carried out on a gable roof, then the roof components are fixed from the end. When working with a tent structure, the set is carried out from the top point of the slope, in both directions. The metal profile is equipped with special locks that allow you to combine several elements into a single structure without violating its integrity.
Note! Under no circumstances should you make holes in the metal tiles or attach them to the sheathing with regular nails. This will lead to the appearance of pockets of corrosion. Also, the smooth surface of the nails does not contribute to reliable fixation, unlike wood screws.
The length of the overlap at places of overlap must exceed 250 mm. Here the sheets are fixed in a transverse pattern. Also, fastening is performed on every second wave. Please note that at this stage the metal structure does not have sufficient strength, therefore, in order to avoid accidents and injuries, the master moves exclusively along the sheathing or wave deflections.
Ladder for roofing work Source i.ytimg.com
For waterproofing, sealing tapes are installed under the ridge and at the joints after laying the tiles. If the lower part of the roof is additionally protected from moisture by a membrane or film, it will be enough to apply insulation at the internal joints.
Please note! Some elements may include holes for fixing waste pipes or other hanging elements.
Additional elements
In addition to the above eaves and ridge strips, when installing a metal roof, you may need the following products (full list here):
- Snow guards. They loosen the snow masses falling from the roof, making their fall relatively safe for building structures and for humans.
- Junction strips . These products frame the joints between tiles and all important structures, such as chimneys and ventilation pipes.
- Corners and valleys . They protect all corner roof structures.
- Low tides . Used to redirect flows of rain and melt water.
- Horse.
Additional elements
Video description
How to calculate roof sheathing for metal tiles on paper - careful planning for the best result:
Also, we must not forget about several seemingly insignificant, but very important nuances:
- Wood needs to be treated with an antiseptic and fire retardants. These substances will completely eliminate the possibility of damage to wooden components by fungus, insects or mold;
- Take the time to check that the boards and beams you use are up to standard. Don’t spare money – buy uncut, high-grade wood with the same dimensions and minimal knot content. This will significantly increase the durability and reliability of the structure;
- Please note that metal tiles cannot be turned on either side like slate. Each element has a top and a bottom. In case of an error, you will have to remove the installed part and install it again. If the holes made do not fit, the tile fragment will have to be thrown away.
Do not neglect any of the recommendations mentioned above. In particular, only galvanized nails and roofing screws should be used. A thin protective coating guarantees protection against corrosion, which will have a positive effect on the appearance of the roof and its durability.
Only by painting by hand can you reliably protect wood from moisture Source avatars.mds.yandex.net
Nails or screws: which fastener is preferable?
Many people assume that self-tapping screws hold wooden structures together much more firmly than nails. And this is partly true. But the impacts on the roof have different directions, and with lateral loads, the self-tapping screws have no way to withstand them. They break, the connection is destroyed.
Nails are less resistant to pullout, but resist shear forces without breaking. They are more flexible than self-tapping screws and better withstand dynamic loads. Therefore, for the reliability and durability of fastenings of wooden structures, it is preferable to use nails.
Features of the outermost row of sheathing
As already mentioned, the row of sheathing closest to the overhang should be installed especially carefully, since it is subject to increased load. That is why the row of edges of the ramp sheets is aligned, so it must be measured repeatedly so that any possibility of error is eliminated.
If the rafter extension does not allow you to create a reliable roof overhang, then you will need to install a filly, with the help of which the entire line will be leveled. Please note that the first row is installed higher at the height of the wave - this compensates for the difference in the extreme height of the metal sheets. For this, an additional block or lining is used along the entire perimeter of the roof.
What is the lathing used for?
To lay roofing materials, a deck is installed, which is attached to the rafters and gives the roof frame additional rigidity. It can be made from boards, bars or sheet materials - OSB, moisture-resistant plywood. If the roof is made of metal structures, then the sheathing is often also metal.
The design of the deck is selected according to the loads, the characteristics of the roofing material and the technological requirements for installation. The necessary load-bearing capacity, stability, fire safety and service life must be ensured.
Common mistakes
Inexperienced or unscrupulous craftsmen sometimes use a conventional design to install a metal profile on the roof. This is a very serious mistake that will lead to the rapid destruction of the entire structure. Also, the boards should not be allowed to be positioned crookedly - this will lead to a mismatch between the lower part of the profile wave and the place where it is attached.
To ensure that the load is distributed evenly, the even-numbered sheathing beams can be 30 mm thicker than the odd-numbered ones. Don't forget about protective impregnations. They are applied in two layers using a paint brush, with the second one a day after applying the first. To check the quality of processing, chop off a small piece of wood and set it on fire. If everything is done correctly, the tree will not catch fire.
After installation, gaps remained, and the bolts were attached not to the sheathing, but to the adjacent profile - an obvious mistake! Source i.ytimg.com
The following defects in the finished coating are often encountered:
- inconsistency of metal sheets is a consequence of improper placement of load-bearing boards;
- wrinkling of the entire slope covering;
- improper fastening of protective elements.
If the work is carried out by a team of responsible finishers, then such shortcomings are rare. A metal tile roof always looks appropriate on a house built from any materials. Depending on the texture and color, it can be smooth, antique, dark or bright.