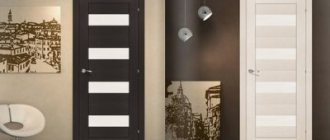
Metal door covered with vertical wooden paneling A high-quality metal door is an unaffordable luxury for many. We are now not talking about Chinese foil for 10,000 rubles, but about real steel doors, the price of which can exceed well over 50 thousand.
Can't afford such expenses? There is a way out, and in this article we will talk about metal doors with lining, and how you can make a decent finish yourself and save a fair amount of money on it.
What is the beauty of using lining
- Looks impressive. At the same time, wood processing is relevant at all times. This type of finishing does not go out of fashion and has been popular for a hundred years, if not more, and is not going to lose its position.
- Reasonable price. Moreover, this applies to any type of lining, including wood, plastic or metal. Covering with this material is a much more budget-friendly option compared to expensive natural materials.
- Heat retention and noise reduction, which is explained by the structural features of wood slats (their porosity and thermal insulation).
- Easy to install. The groove/tenon rule applies to all types of materials, and assembling panels into a single, impenetrable surface will be as easy as playing with a children's construction set or puzzles.
- Reliability, durability and wear resistance of raw materials. With proper care, the panels will remain in perfect condition for decades, but even in the event of force majeure, replacing a couple of damaged lamellas is a matter of five minutes.
Additional decor
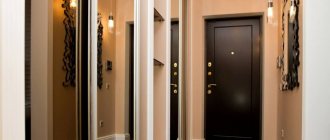
For additional decoration, you can attach a mirror sheet to the door on the inside. It's not just decor. A mirror at the entrance is very convenient, because you can look at yourself before going outside. A mirror in the hallway will help to visually enlarge the space.
For self-assembly, choose lightweight panels, because factory-made doors with a built-in mirror often use a mirror film instead of real glass. The canvas is attached only to a solid base using special fasteners or “liquid nails”. You need to choose a specialized glue, which is marked “for glass and mirrors.” The canvas can be full height or only in the upper part. Make sure that when opening the door, the mirror does not hit anything.
The door is like a business card of your home; people who come by it begin to form an impression of you. If it is in poor condition, this is not an argument in favor of the owner of the house. A door doesn’t have to be beautiful or creative, but many people want to make it neat and well-groomed.
Prices for modern doors are affordable, although they cannot be called low, so upholstering or reupholstering them with a new coating is much easier than purchasing a whole door. The advice and instructions received will allow you to step-by-step replace the door trim without resorting to hiring craftsmen.
Required tools and accessories
In order to sheathe an iron door with clapboard correctly and beautifully, you need to select some equipment, including:
- a drill (ideally electric) and a screwdriver, you can try to get by with a screwdriver, but the process will become much more complicated;
- a hacksaw for metal or wood, depending on the original type of lining (here it is better to use hand-held equipment and not use a grinder);
- measuring instruments: ruler, square, tape measure;
- hammer.
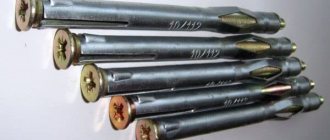
In addition to the basic materials, the following will be useful: wooden blocks to create the frame of the sheathing; self-tapping screws; finishing nails with very small heads or no heads at all or clamps.
Final stage
Lining can be used to cover not only entrance doors, but also garage doors, which after such finishing become not only beautiful, but also warm
Well, we have come to the final stage, which includes gluing the sealing tape and installing all the components.
Advice! Apply the sealing tape gradually; there is no need to remove the entire protective layer at once, as there is a high probability that the tape will tangle and stick together. Tear off the protection in small sections, gradually gluing the tape to the door leaf, previously cleaned of dust and dirt.
Now all that remains is to install the locks and the peephole. There is nothing complicated here, especially if you remember how they were filmed.
Entrance doors with clapboard
That's all, we hang the door back on its hinges and check the work. If everything was done correctly, then no difficulties should arise, since we did not interfere with the design of the door itself, and therefore could not disrupt the functionality.
As you can see, finishing a door with your own hands is not a complicated process at all, which will require a minimum of time and effort, and if you have not yet decided on the material, we recommend that you watch the video in this article, which does not show finishing instructions, but does present metal doors with clapboard. It’s much easier to visually understand what your door will look like, and if you use a little imagination, you can create a real masterpiece yourself, as shown in one of the photos above.
Selection of materials
For cladding an iron door with clapboard, materials of “Extra” and “A” (the so-called “first”) classes are best suited. It is these categories that have the necessary qualities for interior and exterior work, because the surface is the smoothest and most even, and the number of knots and other defects, which, by the way, only worsen the appearance of the product over time, is minimal or not allowed at all.
Considering the fact that the metal door itself is quite heavy, voluminous and massive, then for cladding it is better to choose the thinnest, most elegant dies in the 12.5 mm category: “Calm”, “Standard”, “Softline”, “Eurolining” or “Landhais”, but textured “Blockhouse” or the same “American” will only add unnecessary extra volume, which is undesirable.
The type of wood for covering the door leaf does not play a special role; you can choose the most optimal option in terms of price and appearance from coniferous or deciduous varieties. The only thing is to immediately clarify whether these products have additional deep impregnation with special antiseptic agents or whether further finishing with varnish, stain or other means will be required.
If cladding with plastic lamellas is planned, then it is necessary to choose impact-resistant, heavy acrylic products intended for outdoor use. Such panels are simply attached with glue, but partial repair of single damaged dies will become much more complicated. In addition, the cost of such lining is very high, which is not always comfortable.
Metal lining for door trim is poorly suited because it does not have the necessary noise and heat insulation properties, and practically “does not withstand impact” in the event of mechanical damage.
How to cover a door with panels or laminate
Covering a metal door at the entrance to an apartment with laminate is similar to installing MDF panels. The door can be removed, the fittings can be unfastened, building insulation can be laid into the base, a starter profile can be installed and the sheathed side can be covered with laminate. Here you will need a complete set of tools. Insulation or soundproofing material can be attached to liquid nails.
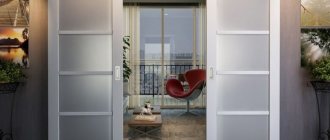
Laminate allows you to achieve the perfect color combination with the floor or with other doors. You can choose panels with a pattern. Designers love this kind of cladding. Working with laminate is easy. It does not require additional maintenance, is moisture resistant, resistant to scratches and fading, which allows you to increase the service life of the door for many decades.
Work method (one-sided cladding)
It is worth considering that with this method of covering the door will become thicker by approximately 3 cm, or by the thickness of the panels themselves, if an option without insulation is provided. The treatment looks good on door modifications that are externally slightly pressed into the wall, then the increase in thickness is almost imperceptible due to the width of the slopes. This finishing method is also well suited for non-removable door leaf models, when it is not possible to remove the outer sheet and replace the inner lining.
The main stages of work with additional insulation:
- Fastening the sheathing to the outer door leaf horizontally (if the lining will be laid vertically) and along the perimeter of the opening if horizontal laying is planned. Fixation occurs with long self-tapping screws directly to the metal base of the door.
- Insulation of frame voids with foam plastic slabs, which are cut with a knife and simply sit on glue.
- Cutting off the tenon at the initial strip, sanding the part and fixing the panel to the sheathing from the lock side with finishing nails or clamps.
- Cladding with clapboard using the groove/tenon principle and reliable fixation.
If additional insulation is not planned, then the panels can be attached directly to the door leaf using metal screws. In the future, the caps can be carefully masked with a decorative strip, which is placed on regular glue, or left as is.
Fabric preparation
Preparing the door for finishing:
- All removable parts from the canvas must be removed , i.e. locks along with locking plates, peepholes, handles, etc.
- In steel doors, the inner panel is often removable ; it also needs to be dismantled.
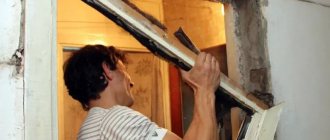
- Then the canvas can be removed from the awnings and placed on trestles or something similar, but personally I find it more convenient to work without removing the doors.
It is easier to trim doors in a horizontal position
If your doors are already painted with some kind of paint, there is no point in stripping it off. At this stage, the main task is to protect the metal from corrosion.
- Bare metal must be cleaned with a metal cord brush and degreased with an alcohol-containing solution.
- Paint with any paint (except water-based) in one layer - the color does not matter.
Lining an iron door with clapboard from the inside
The technology is not much different from outdoor work. Here it is also necessary to provide a transverse strip if vertical orientation of the lining or only perimeter sheathing for horizontal laying is provided. The additional cross beam is attached to self-tapping screws using standard furniture corners, or screwed to the original stiffeners of the door leaf.
The easiest way to attach the lining to the sheathing is with the help of clamps (they provide reliable fixation and are practically invisible from the outside, which means they are not subject to corrosion, oxidation and deformation over time). In this case, the clamp is installed on the back side of the edge of the groove, screwed with self-tapping screws (staples, nails) and hidden with the tenon of the second strip, and so the assembly of the structure continues according to the principle of the designer. The first and outer strips are adjusted to size, cutting off the excess width along the entire length of the die.
How to upholster a steel door with leather substitute
Covering the entrance door with leatherette is not too different from upholstery with leatherette. This work is even easier to do, since artificial leather on a knitted base is much more practical and flexible. Modern materials have a greater selection of colors. It can be mounted from the outside without fear, because it can easily withstand temperature changes and direct rays of light, maintaining the brightness of the color.
The sheathing process is completely similar to working with leatherette if you lay insulation or foam rubber. If the skin needs to be fixed directly to the door, then coat the surface with glue and pull the material on both sides. You can choose one color for the outside and another for the inside.
Further processing
Having covered an iron door with clapboard, you need to take care of the finishing of the surface for an aesthetic appearance and improving the wear resistance of the product. There are several ways you can go here:
- Paint the surface (the most affordable and easiest way). Cheaper alkyd enamels or more expensive acrylic paints are suitable here. In any case, it is better to apply the paint in two layers.
- Varnish the panel with translucent, matte or glossy materials. You will need at least a three-layer coating, but the appearance of the product will be impeccable. At the same time, the natural texture and color of the wood is completely preserved.
- Coat with wax or oil (ideal environmentally friendly option for interior work), but will require frequent updating (every 1.5-2 years).
- Apply a layer of stain (color the surface) - this treatment will only be an intermediate step and will require further work with varnish/wax/oil, but it will allow you to give the desired shade to overly light wood and make the natural pattern more expressive. In addition, it will provide an additional antiseptic effect.
After all the finishing work has been completed and when all the layers have dried thoroughly, you can put the door hardware in place.
Treating an iron door with clapboard will give the product additional strength and significantly improve its appearance. Even a construction novice can cope with the work, and the advantages of the material are difficult to overestimate. It is thanks to this that lining has been one of the most popular finishing materials for many decades.
5/5 — (1 vote)
Finishing process
In order to get to work, you need to remove the canvas from its hinges and thoroughly clean its surface from dust. The fittings are removed and not used for work. Next, the door is measured and the required dimensions of the finishing material are prepared.
How exactly the lining will be located is decided by each individual individually. This can be horizontal or vertical. You can show your creative imagination and decorate the door with an ornamental pattern created from lining. In the latter case, the finishing process will be especially interesting, since the result may be so unexpected that it will amaze the master himself. In order to be able to attach the cladding to the iron base, you must first build a wooden skeleton, which is fixed to the door using self-tapping screws. The finishing process should start from the edge of the iron sheet. To accurately lay the sheathing, use a plumb line. You can go the other way and secure the lining without a wooden base. In this case, the panels are attached to the iron door using self-tapping screws or liquid nails.
After all, do not forget, we are talking about entrance doors, where the outside cladding is regularly watered by rain, freezes and roasts in the sun, and from the inside the finishing of metal doors is in the comfortable conditions of a residential building. By the way, at this address you can learn about insulating iron doors with your own hands. The story is about the same with multi-veneer, but it is visible to the naked eye. The design there is quite abstract, cubes, waves, circles and a lot of other options, but this is natural wood, only pressed, glued and cut, this is not for everybody.
After all, the flooring was initially designed to withstand quite serious loads.
Suppose you decide to make a steel door with your own hands or want to buy one, but the upholstery of metal doors in the store leaves much to be desired. Don’t be upset, sheathing a metal door yourself is not so difficult, and then we will tell you in detail how to sheathe the front door and slopes to it on both sides, with all the pros and cons of the options that exist today.
For those DIYers who want to surprise their loved ones with a high-quality steel door made at home with their own hands, there is a good step-by-step instruction with a detailed video, detailed photos and explanations, you can find it “here”.
Leatherette upholstery
In the past, leatherette trim was considered a luxury. Now this is a more affordable decor option, and it is very popular. Its neat appearance, good heat and sound insulation properties make leatherette an excellent solution for covering a door.
Wooden
Wooden doors can be finished on both the inside and outside. There are some differences in technology.
In the case of working with wooden products from the inside, they begin by determining how the door will open - inward or outward. This determines the choice of size and location of the sealing rollers.
-yourself upholstery on the inside of
- Prepare: remove the old finish, clean the canvas, place it on the table.
- Remove the entire paint layer and re-varnish or paint to preserve the surface.
- Prepare the upholstery.
- Cut strips 8 cm wide and length according to the parameters of the door leaf from the selected insulation material.
- Wrap the insulation in them and align the edges.
- Secure the resulting roller around the perimeter of the sash with a construction stapler.
- Cut the leatherette layer to the size of the canvas, leaving an allowance of 1–2 cm.
- The leatherette is folded over and one of the folds at the junction of the rollers is secured with a nail. Fasten the upholstery from any of the upper corners.
- The size of the insulation is determined by the parameters of the sash. It is cut off, spread out and secured first with a stapler or glue, then with staples.
- The folded upper edge of the leatherette is stretched and secured with a nail in the opposite fixed corner.
- Fasteners are driven in along the stretched edge. Usually the distance between them is approximately 10 cm, but it all depends on the size of the particular canvas.
- Leatherette is laid sequentially, secured with nails, along the product.
- Fold the bottom edge, adjusting the remaining material to size, and secure with nails.
- The insulation and sheathing can be additionally pressed with decorative fasteners diagonally or in the desired pattern.
- When the main work is done, holes are cut out in the panel for the fittings.
From the outside, the upholstery process looks like this:
- The door is closed and 1 cm is retreated from the edge of the panel.
- At the bottom, just above the edge of the sash, a sealing roller is fixed.
- Cover the canvas with insulation, starting at the top and going down evenly on both sides. It is important to prevent the material from sagging.
- The last stage is to cover the door with leatherette, securing the folded edges with nails. If desired, form a pattern using decorative fasteners.