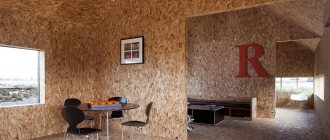
The bathhouse premises have a special microclimate, which differs from the conditions in residential premises. Therefore, materials for wall decoration require the right approach to their selection. When deciding how to line the inside of a bathhouse, take into account that the finishing will be used in conditions of high temperature, hot steam and high humidity.
The decoration of each room should be functional
How and what is the best way to decorate a bathhouse inside
Arranging a bathhouse is not an easy task. In this building there are always several rooms, each of which performs its own function. Those materials that are optimal for a dressing room and rest room are not always suitable for finishing a steam room or washing room. Therefore, the owner of a bathhouse needs to know what the criteria for choosing the design and cladding of each room are.
The interior decoration of the bath can be made of the following materials:
- lining;
- planed boards;
- salt panels;
- brick;
- porcelain stoneware;
- natural and artificial stone;
- plastic panels;
- moisture-resistant gypsum plasterboard and gypsum fiber board;
- ceramic tile.
Listed are materials that can be safely used for cladding walls and ceilings of any room. The environmental friendliness and durability of these products have been tested by many years of practice. With the right choice of materials, finishing a bathhouse can be complicated by only one thing: not knowing how to lay, stick or mount them correctly.
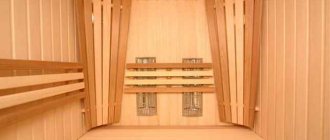
Efficient ventilation
There is enough natural ventilation in a Russian bath. That is, periodically just open the door and the window on the opposite side - that’s enough.
In the sauna the situation is different. This requires full ventilation, which will work without your intervention.
There is nothing complicated about it: look at this picture. A tube is installed at the bottom for air inlet near the stove. On the opposite side, 2 more pipes for blowing are mounted near the ceiling. The size of the sauna does not matter; even in a small room there will be good circulation.
Which lining to choose for a bathhouse
There are 4 types of lining, differing in the profile of the boards:
- Eurolining.
- Standard (otherwise called “peasant”).
- Block house (imitation logs).
- American (imitation timber).
Popular brands that have proven themselves to be of high quality:
- "Calm";
- "Soft Line";
- "Classical".
All of them belong to the eurolining category and differ in size and profile. Boards, regardless of their type and brand, are often called lamellas.
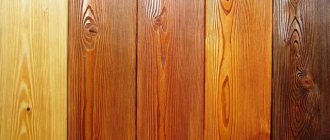
Finishing a bathhouse with clapboard is a traditional, frequently used solution. It has gained so much popularity for many reasons. Lining is a natural and therefore environmentally friendly material that is beneficial to human and animal health. When choosing, it is extremely important to consider several points:
- type of wood;
- grade of material;
- resistance to moisture;
- coefficient of thermal conductivity.
Lighting
Most often, bathhouse owners prefer to abandon natural light. For this reason, the organization of artificial lighting is of particular importance. When arranging a steam room, the required number of light sources must be provided. The lamps themselves should not distract from the procedures or irritate the eyes. The optimal points for their location are above the door and above the shelves.
The lighting fixtures used can be recessed or overhead. During their installation, it is important to properly insulate the light bulbs and wires. For this purpose, to protect against overheating, the former are placed in sealed cases, and the latter in plastic boxes. The switch must be made outside.
Rules for choosing lining grades
Manufacturers offer several options for grading boards:
- "A" - first;
- “B” – second;
- “C” – third;
- "Extra" is the highest.
What “highest” is is not specified in the state standards. This indicator is not used anywhere in the world except Russia. Domestic manufacturers often pass off “A” grade wood as “Extra”, and “B” grade boards as “A”. This is what caused the appearance of premium lining on the market. Recommendations for choosing grades are as follows:
- the interior decoration of the bathhouse can be made of second-grade boards;
- For rooms with high humidity, the presence of rot and wane in the wood is unacceptable.
Required Tools
Finishing a shower in a bathhouse assumes that the master has prepared the following tools:
- Bulgarian;
— nail puller;
- drill;
— hammer drill;
- meter.
Insulation on the walls in the bathhouse can be installed using power tools. It's good if you can make cuts quickly. Finishing the walls in the bathhouse is possible using hand tools. You will need a plane, a crowbar, and a scraper. When evaluating the finishing of a bathhouse, photo, it is better to take into account that a high-quality power tool works well.
Important! Even beginners can make precise cuts if they measure everything correctly.
Rules for visual inspection of boards and assessment of their condition
The following must be taken into account:
- Pay attention to the quality of the chips. The boards must have a flat and smooth surface. This directly affects the economic benefits of finishing work. If the front side of the lining is rough, finishing will be complicated by the increased consumption of antiseptic and paint materials.
- The moisture content of the boards should not exceed 12-16% (GOST requirement). It is visually impossible to determine whether the material offered by the manufacturer meets this criterion. Therefore, it is necessary to request documents confirming compliance with GOST. If the wood is not dry enough, there is a high risk that it will suffer during the first years of operation of the finished premises.
- Pay attention to the depth and evenness of the groove. These indicators determine the quality of installation. And it doesn’t matter how it will be done: using clamps, nails or staples. If the groove is shallow, there will be nothing for the fasteners to grab onto.
An important characteristic of boards is width. Often there are lamellas on sale that are wider than standard ones (more than 88 mm) and managers assure that it is more profitable to buy such lining. This is not true, since such a finish will be less durable and there is a high risk of wide boards bending when exposed to moisture.
Furnace installation
A brick and stone oven is laid immediately after the foundation has solidified.
If it is iron, then the step-by-step installation instructions look like this:
- A steel sheet is laid on the floor, wider than the stove itself by 20 centimeters on each edge.
- It is covered with bricks on top.
- A hole is made in the ceiling for the chimney pipe.
- The chimney pipe is laid. Thermal insulation is required on top of it.
Criteria for selecting wood species
The finishing of the walls and ceilings of the bathhouse can be made of the best types of wood.
| Material | Advantages | Flaws |
| Spruce | Low price, wood does not darken over time, small number of knots, low degree of resin, dries quickly. Finishing with second grade boards is acceptable | Often leads |
| Pine | It is a source of phytoncides that heal the body, is resistant to moisture, and has low thermal conductivity. It is recommended to finish with first grade boards | Gnarly, resinous |
| Aspen | An excellent antiseptic, highly resistant to moisture, has a pleasant color tint, and is not tarry. Finishing steam rooms with aspen is a recognized option for arranging these rooms | Possible hidden rot |
| Linden | Low price, structural integrity, small number of knots | The softness of wood, which complicates the installation process and operation |
| Alder | Beautiful texture and color, high moisture resistance, low thermal conductivity, strength. Alder finishes are suitable for recreational areas | High price |
| Larch | The best moisture resistance among other types of wood, low thermal conductivity, impressive texture, small number of knots. Larch finishing is suitable for any bath room | High price |
| Cedar | The best indicators of therapeutic and health characteristics, high strength, hardness, high-quality noise absorption, not susceptible to rot and insects. Cedar finishing is the best solution for steam rooms and relaxation rooms | High price |
Treating wood with antiseptics
Before laying, all (!) wooden surfaces must be treated with an antiseptic and fire retardant.
Rot and parasites can be found both in the casing and in the benches.
Any antiseptic will do, the main thing is that it is well absorbed by the wood. For example, Ecosept 200, specially designed for baths and saunas. It can even stop the processes of rotting and decomposition that have begun.
As fire retardants, also take any composition you like.
Please note that liquid glass will not work! After drying, it becomes a hard, airtight crust, destroying all the properties of the tree.
Stages of covering a bathhouse with clapboard
Covering a bathhouse with clapboard is no different from a similar process for finishing facades and premises for any other purpose. To complete the task without errors, simply follow our installation instructions.
How to attach lining in a bathhouse
Installation of lining in a bathhouse begins with choosing a method for attaching the boards and preparing the tools necessary to perform this work.
The following options are used:
- Finishing using the method of hidden fastening of the lining. Claimers are used. These are metal products that are inserted with one side into the groove of the board, and the second part, protruding from the groove, is attached to the sheathing posts. For this purpose use: – nails (included in the package of clamps) and a hammer or nailing gun; – flat head screws and a screwdriver; – galvanized metal staples and an electric construction stapler.
- Finishing using the open method of fastening the lining. With this installation method, galvanized finishing nails are used, which are driven directly into the lining boards from its front side. Against the background of wood texture and knots, fasteners are invisible. After the paintwork is completed, they are barely visible.
- Stages of attaching lining to clamps. Using a tape measure, a pencil and a building level, mark the location of the first lamella on the sheathing posts. Turn the board with the groove down and apply it to the sheathing, focusing on the previously made marks. Place the clamp into the groove of the lining and attach it to the sheathing post using the chosen method: with a bracket, screws or nails. Repeat the process at all points where the boards intersect with the sheathing.
Lathing for lining in a bathhouse
Fastening the lining is possible either directly to the wall or to the sheathing. In the first case, impeccable flatness of the base surface is required, which is rare. Therefore, clapboard finishing is traditionally done on the sheathing.
For its installation, well-dried wooden blocks with a cross section of 30x40 mm, 40x40 mm, 40x50 mm, 50x50 mm are used. The parameters of the racks are selected depending on the area of the wall. If it is small, then bars of a smaller cross-section are suitable. Finishing large areas requires thick and durable lumber.
If necessary, thermal insulation materials can be laid between the sheathing posts: mineral wool slabs, penofol, sheets of expanded polystyrene. Most often, the first option is chosen, because polystyrene foam, when exposed to high temperatures, begins to release styrene that is harmful to health.
High-quality interior finishing is important in a bathhouse. It is unacceptable to use materials that may reduce the usefulness of hygiene procedures.
The stages of installing the sheathing for the lining are as follows:
- Calculation of the amount of lumber. In order to properly make the sheathing, you need to draw up a drawing of it. It is important to maintain the recommended pitch between the posts: 45-60 cm. The thinner the selected lumber, the smaller the distance between the bars should be. The lathing consists of horizontally laid upper and lower guides and vertical posts located between them. Draw up a drawing for each wall, indicate on it the dimensions of the room and calculate the required amount of lumber.
- Wood preparation. The purchased lumber is brought into the room and left there for 1-2 days. During this time, the wood will have time to “acclimatize” and acquire the desired temperature and humidity. After which, each block is covered with a layer of antiseptic on all sides and ends. This task can be accomplished in two ways: – cover all surfaces with a paint brush; – prepare a container of such length that you can pour an antiseptic into it and immerse the bar in it.
- Leave the lumber to dry for the period recommended by the manufacturer of the antiseptic solution.
- Marking the walls. To carry out marking work you will need: – a plumb line; – construction bubble or hydraulic level; – roulette; - pencil; - construction square.
- Using the listed tools, marks are made on the walls in accordance with the previously drawn up drawing. In this way, the location of all the sheathing bars is found.
- Installation of sheathing. Wooden blocks are attached to the walls in any convenient way: using nails or self-tapping screws. The distance between fixation points should not exceed 40 cm.
Fastening the slats
There are several ways to decorate a bathhouse with clapboard. The slats can only be laid horizontally or diagonally. It is also possible to combine these techniques. In this way, they create the design of the room that is most pleasant and beneficial for the owner.
It should be noted that when installing boards diagonally, it is necessary to reduce the distance between the sheathing posts. This method of attaching lamellas entails a greater consumption of materials than with traditional horizontal laying of lining. Finishing walls with diagonal direction of the boards is complicated by the greater labor intensity of the work.
Lathing - to do or not to do
Craftsmen prefer to install the sheathing and attach the interior trim to it. The popular base size is 50x50, less often they make 70x70. The pitch is not standard and varies depending on the size of the blocks being strengthened.
The sheathing is made of wood, less often of metal. Considering the operating conditions, the metal must be treated with moisture-resistant compounds. The lining or logs are secured with self-tapping screws and nails. They must be copper or brass. The installation of the base is done perpendicular to the sheathing.
Lathing walls in a steam room under clapboard Source seattlehelpers.org
How to cover the walls in a bathhouse
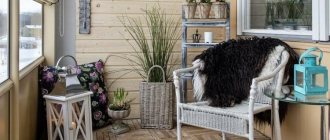
The interior decoration of a bathhouse can be done not only with clapboard. The list of materials suitable for this purpose is wide. An effective technique is finishing with salt panels and blocks. This is an expensive material, so it can be used for installing partitions or panels.
Salt slabs have high heat resistance, but are not recommended for installation in rooms with high levels of air humidity. As a result, this finish is suitable for relaxation rooms and Finnish saunas with dry air. A cozy and comfortable atmosphere can be created by facing with salt slabs in combination with their lighting, internal or external.
The panels are attached to the walls using a two-component adhesive based on caustic magnesite. If small blocks are purchased, they can be glued to inexpensive liquid glass. This finish will be more economical, but no less durable and aesthetically pleasing. Salt panels can be attached to any surface. These facing blocks are used if the bathhouse is built of brick, wood, concrete, plastered, lined with gypsum fiber board or gypsum board.
You can't help but pay attention to the ceiling. It is sheathed with materials that harmoniously combine with the walls. The bathhouse cannot boast of high ceilings, because they are not needed. For this building, rapid heating of the premises is important, which is possible with low walls.
If the bathhouse is built of timber or logs, the ceilings in the rooms do not need to be tiled, but rather covered with varnish or a tinting compound. In this case, it is necessary to perform high-quality insulation from the attic.
If the bathhouse is built of brick, foam or aerated concrete, the ceiling can be finished with the same facing materials as the walls. The methods for cladding horizontal and vertical surfaces are the same. But, before attaching wooden slats or other material to the ceiling, you need to make sure the strength of the load-bearing surface.
Thermal insulation of the steam room
Covering a steam room in a bathhouse involves the use of thermal insulation. In this regard, the following applies:
- rolled paper;
- mineral wool;
- Styrofoam.
If you are curious about how to cover a steam room in a bathhouse at the lowest cost, it is better to consider penoizol. Just like polyurethane foam, it is affordable and does its job well.
The most common components enclose structures and perform important functions. Different types of materials can help building owners achieve the required efficiency. For example, extruded polystyrene foam insulation offers many benefits due to the way the product is manufactured.
Energy efficient, easy to install, lightweight and identifiable by its blue, pink or green color, extruded polystyrene foam cladding can allow a single product to be used to create a continuous layer of thermal and moisture protection on a building.
Extruded polystyrene foam contains solid granules of polystyrene resin. Plastic pellets are used with an extruder, they are melted and mixed with important additives to form a viscous liquid. During installation, liquid is injected to cause the plastic product to expand. Under carefully controlled conditions of heat and pressure, the plastic mixture is forced through the cells. The rigid foam can then be cut to the dimensions of the final product.
This continuous process produces a closed cell structure. It looks like a mass of homogeneous bubbles with common walls between them. As a result, a continuous smooth film is formed on top and bottom.
The closed cell extruded polystyrene foam structure provides superior durability. Products are available in a variety of compressive strengths to suit the varying needs of builders. Due to its physical properties, strength is not dependent on the use of facing materials or laminates. sometimes they can be broken during installation. However, extruded polystyrene cladding products are available to add additional strength.
Extruded polystyrene plastic also comes in a wide variety of sizes. It has a thickness of up to 102mm, allowing it to be used in many areas. Sheathing made from extruded polystyrene foam can have a positive effect on moisture resistance. With proper use of polystyrene foam, the service life of the bath increases. It is also interesting that no toxic substances are used in the production of the insulating shell from extruded polystyrene foam.
View this post on Instagram
Posted by