Owning a wooden house is the cherished dream of every city dweller.
To organize a comfortable living environment, in addition to the box - foundations, walls, floors and roofs, it is necessary to install energy-efficient window structures.
After purchasing and installing translucent blocks, the question arises of forming slopes and installing platbands. Finishing windows in a wooden house differs from a similar type of work when glazing brick or panel houses.
What is included in the concept?
Window finishing in a wooden house is a set of measures for sealing and masking the installation gaps between the frames of translucent structures and the end parts of the openings. The finishing work includes the following production processes:
Sealing seams after filling them with polyurethane foam and vapor barrier tapes.- Sealing gaps between slopes and frames, as well as in wooden wall structures.
- Leveling slopes.
- Low tide device.
- Installation of window sill boards.
- Finishing slopes with decorative materials.
- Installation of platbands around the perimeter of windows on the front and interior sides.
- Painting with interior and exterior paints and varnishes, varnishing, painting and other finishing elements.
Depending on the design features of the wall or opening, the order of these operations may be changed, or new types of work will appear in the flow chart.
Why do you need to do it?
Finishing window openings after installing the translucent element is necessary to achieve the following result:
- Improving the aesthetic characteristics of window construction.
- Meeting the requirements of the architectural project.
- Protection of assembly seams with decorative overlays, which reduces the risk of destruction of the sealing layer and foam.
- Strengthening the thermal properties of the building envelope to improve the energy efficiency of premises.
- Increased sound insulation of window structures.
- The risk of excess oxygen entering during a fire is reduced, which will help prevent a fire.
In addition, if we are talking about complex development, which is carried out according to the detailed design, the requirements of the energy passport must be satisfied for the successful commissioning of the facility by the acceptance committee.
Where exactly is it needed?
Finishing of window blocks in a wooden house is required in the following areas of the opening in the outer wall:
- From the facade of the building:
Protection of polyurethane foam from ultraviolet rays. - Installing a flashing to prevent moisture from entering the gap, which causes mold and bacterial growth.
- Making slopes around the perimeter of the assembly seam in the form of sealing tape, wooden, steel or plastic finished parts, silicone sealants.
- Cashing device with painting in the color of the facade, or according to the project.
- From the interior:
- Installation of window sill boards.
- Design of a slope with protection of internal installation gaps.
- If necessary, frame the opening with corners or decorative trims.
One of the main types of work that needs to be given special attention before installing decorative finishing elements is a thorough check of the quality of the seam filling. The structural element must not cause drafts or moisture. It should be taken into account that after masking the gap, it will be much more difficult to correct the defects of the window installers.
Advantages of wooden slopes for a wooden house
Despite the positive characteristics of plastic, for many, the choice in favor of wood remains a priority. In addition to external aesthetics, installing wooden slopes has many positive aspects.
Reliable fixation and proper care provide wooden casing with strength and durability
Compared to plastic and other synthetic materials, such products are environmentally friendly and do not cause allergies. Wood has good soundproofing properties. Wooden slopes can be securely fixed, and if cared for correctly, they can last much longer than plastic . Wooden slopes and window sills are suitable for finishing windows of any size, made of PVC or wood. Wooden products can harmoniously hide the shortcomings and errors in creating a window opening that may appear during the installation of windows.
What materials can it be made with?
When installing decorative finishing for window structures, careful adherence to the technological map and the use of suitable materials will be required . Considering that increased demands are placed on a wooden building to ensure absolute environmental friendliness, a limited number of materials that are suitable for sealing cracks or framing the slopes of a wooden building are described below.
Slopes
When sealing slopes and creating a flat plane at the end of the window opening, the following structural elements are installed:
Lining laid along each side of the opening.- Trimmings from the lining, fixed in a perpendicular direction relative to the plane of the opening.
- Plastic elements for framing the end of the opening, mounted on liquid nails or sealant.
- Metal sheet materials painted to match the interior color.
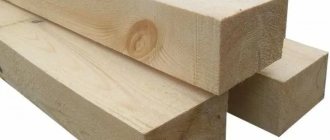
- Edged boards that are suitable for masking the end of an opening in a three-layer wall.
- Imitation of timber or logs - if there is an appropriate design solution from an architect or designer.
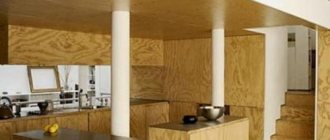
- Plywood cut to the required size.
- Sheets of OSB or DSP, or plasterboard, if necessary, putty and paint the interior in an industrial style.
To achieve a high level of efficiency in the operation of window openings, for each finishing material for the slope, it is recommended to calculate the actual heat transfer resistance in order to ensure the required energy efficiency indicators.
Sealing cracks
One of the most important stages of work is the correct sealing of the gaps between the wooden beam framing the opening and the profile of the translucent structure. As a rule, the seam is formed with foam around the entire perimeter , after which it is necessary to protect it with the following materials:
- Pre-compressed sealing tape PSUL (from the front side).
- Silicone or acrylic sealant to protect the mounting foam - both from the outside and from the inside of the opening.
- Vapor barrier and waterproofing tapes on synthetic non-woven material with a self-adhesive surface.
- Wood putty, when it is necessary to seal gaps or defects in frames made of natural materials.
All materials for sealing cracks must meet the requirements for thermal insulation , not be destroyed by direct sunlight, and withstand temperature changes and other influences of an aggressive environment.
Cashing device
Cashing, as a rule, complements the window opening and plays a purely decorative role. For a device of this design, the following categories of materials are used:
Ready-made platbands made at a woodworking plant from larch, oak, birch or pine boards.- MDF strips with lamination, which can be used on the inside.
- Mutually perpendicular lining elements.
- Steel strips bent at the edges using special equipment - for installation on the facade.
- Elements of plastic siding.
- PVC lining for interior or exterior work.
- Paint that can be selected both in combination with the main plane of the facade or interior, and in contrast with them.
Before manufacturing and installing cash, you should develop a sketch or design project with a 3D model, on the basis of which the owner of the property can independently select the dimensions of the future framing structure before purchasing it.
The need to finish slopes from the outside
So, for everyone it seems that finishing window slopes is, first of all, decorating the facade of the house. Of course, not without this, but there are other overriding goals. One of them is the gap between the walls of the house and the outer planes of the window frames. This gap is a mandatory attribute that compensates for shrinkage of the house or its other movements.
If you don't leave it, the window will warp over time, the glass will squeeze out, which means it will have to be replaced. Nobody needs unexpected expenses. Moreover, windows are not cheap.
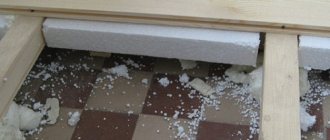
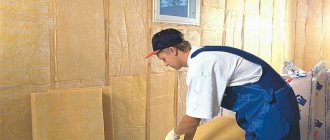
But what is a gap? This is a cold bridge through which cold air will penetrate into the rooms of a private house in winter. To avoid this, the opening between the window frame and the walls of the house is filled with thermal insulation material. And although today the market is filled with modern insulation materials, it is still necessary to create protection from natural precipitation, which reduces the service life of any building material.
The gap between the window frame and the wall of the house is filled with polyurethane foam
And this primarily concerns insulation materials with their porous structure. Moisture quickly penetrates inside, reducing their thermal insulation characteristics. That is, over time, the thermal insulation layer becomes unusable and has to be replaced with a new one. Even foamed polyurethane in the form of polyurethane foam, which today is used more often than other insulation materials in the process of thermal insulation of installed windows, does not withstand sunlight. Under their influence, it darkens, crumbles and peels off.
All this requires the creation of a special barrier that would become a barrier to these natural loads. That is, a building material that is more resistant to these loads should be used. In this case, the material used will in any case have thermal insulation properties. That is, the resistance of the joint between the frame and the walls to low temperatures increases.
But man is always drawn to beauty. Therefore, the finishing of window slopes gives an attractive appearance. It turns out that with one finishing operation two of the most important problems are solved at once: increasing the decorativeness of the facade of a wooden house and protecting the insulation from the negative effects of natural loads.
The window must be aesthetic
What tools and equipment are needed?
To finish the ends and edges of window openings after installing translucent structures, you will need the following set of tools:
- A steel ruler, a carpenter's corner and a tape measure for measuring the dimensions of the opening, the thickness of the gaps, and the finishing material.
- A pencil with a soft lead or a marker for cutting blanks.
- A screwdriver or hammer for fixing wooden boards to the casing.
- A jigsaw, circular saw or hand saw for cutting wooden materials.
- To cut platbands at 45 degrees, you may need a miter saw or a special saw with a fine tooth and a miter box - a template with the ability to make error-free corner cuts.
- Construction knife with a retractable blade for cutting drywall (if necessary).
- Liquid nails with a mounting gun, if fastening is carried out without the use of mechanical hardware.
- Paint and varnish composition, roller, brushes for finishing.
- Rags for cleaning and degreasing the surface that is being treated with an adhesive synthetic composition before fixing the finishing elements of the slopes and the cashing device.
The tools listed below must be in good working order, free of dirt and ready for use.
Insulation of slopes from the outside. Insulation of the external slope with polystyrene in the apartment. Part 1
Let me note right away, friends, that if you want to know the details about the whole process, you will have to be patient and read two articles. In the first I’ll tell you about the step-by-step preparation of the surface and cutting materials, and in the second I’ll tell you about the finishing procedure.
Window on the sunny side. The slope is foamed and in good condition, but was not initially sealed from the outside. I don’t know when this happened, but during this time the foam managed to fade a little in the sun, so to prevent it from getting worse, it was decided to insulate it with extruded polystyrene.
Necessary materials
- Extruded polystyrene - 0.5 sq.m
- Reinforcing mesh (density from 160) - 0.5 sq.m
- Universal mixture for gluing and reinforcing polystyrene - up to 5 kg.
- Primer - 0.2 liters.
- Facade paint - 0.2-0.3 liters.
Step-by-step instruction
Finishing a window structure after installing a translucent element in the opening is a responsible procedure that requires compliance with a number of nuances.
For such work, the best solution would be to turn to professionals who will complete all the work quickly, efficiently and provide a long-term guarantee for the result.
If this is not possible, every home craftsman can do it with his own hands, but he will need to carefully follow a certain algorithm described below.
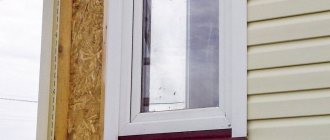
Outside
To finish the outer opening, you need to stock up on the material and tools indicated above, and then follow these steps:
- The opening is measured and marked in the installation area.
- A decision is made on the choice of technology for protecting and framing the opening.
- A PSUL tape is installed around the perimeter of the installation gap.
- The seam is sealed with silicone sealant with an increased level of frost resistance.
- The framing material is cut out and tried on in the vertical and horizontal parts of the opening.
- Platbands are mounted ready-made or assembled directly around the perimeter of the opening.
- At the bottom of the window, directly to the profile, a galvanized ebb is fixed.
- After fixing the steel part, the seam between the profile and the ebb is filled with silicone.
- After installing the casing structure, you should check that its geometry is set correctly with the level.
- In case of fixing parts with self-tapping screws, it is recommended to pre-drill holes at the installation site to avoid cracking of the material.
After installing a wooden casing, it must be painted as soon as possible, since rain and sunlight contribute to the rapid destruction of the natural material.
Inside
The inside of a window opening in a wooden wall is also finished according to separate step-by-step instructions:
The inner part of the seam with foam is closed with sealing tapes after degreasing and cleaning the contact plane.- The ends of the opening are marked and measured.
- The material for framing the slopes is prepared and cut.
- Boards or plastic elements are carefully mounted in the opening.
- A window sill board is installed at the bottom of the window block, which, depending on the material, can be attached either to self-tapping screws or bolts, or to mounting foam or liquid nails.
- After framing the slopes, as a rule, along the perimeter of the opening, a U-shaped frame is installed, made of wooden or polymer corners, which close the gap between the end of the opening and the interior finishing element.
- If necessary, according to the project, the interior is also equipped with wooden or plastic slats, or a certain part of the perimeter of the window opening is highlighted in color.
After installing casing or slope framing elements with liquid nails, you should wait 12 to 24 hours until the adhesive compositions completely polymerize. Only after this is the building structure allowed to operate normally.
Types of pigtails
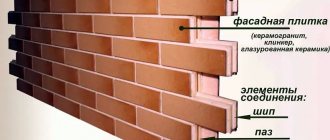
The casing in the opening is always fastened according to the same principle: it is a “tenon-to-groove” connection, but the very methods by which the sliding fastening is created can be different.
Zack75FORUMHOUSE user
The existing frames seem to be inserted into another frame between them and the timber. Is this a pigtail? With an internal “tooth” in the timber?
A handbook for all self-builders, “How to Build a Rural House” by A.M. Shepelev, tells in detail about the main methods of constructing sedge frames.
The pigtail is made from durable, dry material. This can be an edged board with a thickness of 50-60 mm (but not 15-20 mm). The width should correspond to the width of the opening.
The most common type of okosyachka, the classic okosyachka has a U-shaped appearance from the end (side posts and a crossbar on top), carpenters have been making it in huts and towers for centuries, and called it “deck” or “frame”. On the side of the window in the casing, choose a quarter for the window profile (not always).
As FORUMHOUSE experts say, a casing frame is not a standard product, what is needed, this can be done - with a quarter, with a reverse quarter, without a quarter.
On the casing with a reverse quarter, the plastic frame is simply fixed in the resulting wooden opening; the frame is pressed against this back quarter, and everything is closed from the outside with platbands. This is the easiest way to install plastic windows in a wooden house with your own hands. The design does not prevent the walls from shrinking, but ensures the stability of the wall at the opening.
In houses made of timber with walls 100-150 mm thick, casing is made in the shape of the letter T. This type of casing became popular due to house kits made of profiled timber: the supplied structures already had selected grooves in the window openings. In a high-quality T-pipe, the tenon is glued into the body, or it is integral with the base, and therefore the rigidity of the product increases several times. The window is attached to such a casing with screws. The groove in the opening is selected in the center of the cross-section of the log, but it can be shifted slightly to the outer edge, but so as not to affect the strength, no closer than 50 mm from the edge.
According to the second classification, there are rough and finishing sockets.
IPaltusUser FORUMHOUSE
Finish – when all elements are planed/sanded and remain visible, that is, not covered by finishing. This type of window frame is installed in houses made of polished timber/round timber.
Roughing - when the entire opening is then covered with finishing. There is no need to plan/sand the casing material.
The finishing casing is made from very high quality wood and forced drying. For it they take solid cedar, larch, Karelian pine. It itself is a decorative element. Euro casing is a variant of finishing casing, but is made not from solid wood, but using the glue-type method from dry bars.
Errors, difficulties and their consequences
When refining an opening on their own, beginners can make a number of serious mistakes that will lead to negative consequences. To prevent this from happening, experts recommend taking into account several important nuances :
- The geometry of the finished opening after finishing is disrupted - before installing the frame, you need to measure the diagonals of the rectangular or square structure in both directions in advance.
- The window is ventilated - the cracks must be sealed in full, with mandatory quality control of the finished result.
- Condensation forms at the end of the inner part of the window - the sealing tape must be vapor-permeable.
- The window sill board is installed with a slope towards the frame - this element must either have a reverse slope or be mounted strictly horizontally.
- When operating a window unit, water enters the room - the first thing to check is the quality of the installation and the sealing of the ebbs, after which you need to disassemble the decorative frame from the inside and check the connection of the sealing tape around the entire perimeter.
The main mistake of any home craftsman is performing work without a technological map. Before you start installing any structure or finishing element, you should draw up a plan in advance so that you don’t have to correct accidental defects later .
Video description
The video shows the easiest way to form slopes and platbands for a window opening in a wooden house:
There is another type of wood finishing in which lining is used. To do this, be sure to use a starting bar made of plastic. It is mounted in exactly the same way as in the case of plastic slopes. As for the lining, it is cut into long pieces equal to the width of the window slope, and laid across the plane of the wall, that is, horizontally.
In this case, the planks are assembled from the place where the window sill is installed upward, connecting them to each other using a tongue-and-groove lock. The result is a sealed connection, and if it is additionally treated with sealant, then this is a one hundred percent sealed structure. In this case, one edge of the lining is inserted into the starting strip, and the second is simply attached to the wall of the house with a self-tapping screw.
The fastener can subsequently be covered with a decorative corner, thereby forming a window casing, or with an ordinary casing. The last option is clearly visible in the photo below.
Decorating a window opening of a wooden house with clapboard
Average prices for work
Many companies on the market offer services for both the installation of window blocks in wooden external walls and the modification of the inner edges of openings. Considering the high level of competition between these enterprises, with unchanged quality, the price level also differs slightly. Rates depend on the following criteria:
Type of material used.- The number of production operations for finishing the opening from the inside and outside.
- Number of windows to be finished within a single order.
- The complexity of the arrangement of selected decorative elements.
- The total area of surfaces to be finished.
- The distance of the object from the city.
- Availability of a formal contract.
- Order payment form.
- The need to comply with GOST requirements.
- The need to use your own tools and consumables.
- Other external and internal factors that may affect the final price adjustment.
Thus, each owner of a property can order an opening finishing service at the following cost:
- Sealing cracks – from 50 to 150 rubles/p. m.
- Installation of framing slopes along the internal perimeter of the premises - from 150 - 200 rubles/p. m.
- Installation of cash registers - from 500 rub./piece. for a standard window with dimensions no more than 2100 x 2100 mm.
- Painting of frames – from 50 rub./p. m.
- Sealing of joints – from 50 rub./p. m.
- Complex finishing of a wooden window on both sides - with dimensions from 900 x 900 to 1500 x 1500 mm - from 1500 rub./piece.
- Comprehensive finishing of a wooden window on both sides - with dimensions from 1800 x 1800 mm - from 2000 rubles / piece.
When finishing more than 10 windows at one address, the company provides significant discounts to potential clients. The average bonus size is 5% – 15%.
The above prices may be adjusted depending on the complexity of the order , the distance of the object from the city and the specifics of drawing up estimates by a particular company.
How to choose the right finishing element
To choose the right finish, it is important that it meets the following criteria:
- matched the style of the window and the interior of the house;
- was durable and moisture resistant;
- served for a long time, at least the window service life: 15-20 years;
- It was installed easily and simply so that any beginner could cope with its installation.
Slopes made of painted metal - in the case of finishing the facade of a house with metal cladding
Step-by-step installation of windows
This procedure should be divided into several stages. Each of them must be performed correctly. Then we can say that everything will work out as it should.
Preparatory work
Any work requires preparation. Thus, it is possible to reduce operating time and ensure the highest quality installation. In general, if you plan to install a double-glazed window, then measuring the required size can be freely carried out without removing the old opening.
- The old window is being dismantled.
- All unnecessary fragments, debris and dirt are removed from the opening.
- Additional measurements are being taken.
- If required, the contours of the sides are corrected or the window opening is expanded.
- Once again everything is cleaned, if necessary, finishing is done with putty, and the casing is installed.
Naturally, if work is being done in a new house, which is one large box, then the preparation process is much simpler.
Attention! Many manufacturers advise taking measurements after strictly dismantling the opening. This is not entirely justified, because it will take more time to prepare the glass unit and deliver it. Such features must be taken into account.
When the preparatory work is completed, installation can begin. To do this you will need the following tools:
- drill and screwdriver with attachments;
- tape measure and building level;
- mallet and chisel;
- anchor bolts and spacer wedges;
- polyurethane foam.
All installation work is easy to do yourself. Modern designs provide for separate installation of the frame and double-glazed windows.
On a note! Work can only be carried out at temperatures above 5 degrees C. There should be no strong wind.
The glass unit is installed according to the following principle:
- The window block is inserted into the prepared opening.
- Gaps are made between the casing and the frame: 40 mm at the top and bottom; on the sides 30 mm.
- To secure these indicators, wedges are installed.
- Using a level, the frame is leveled.
- The structure foams a little around the perimeter.
- Now you can secure the frame thoroughly; for this, special fasteners are used or this is done directly through the profile. First, the accuracy of the level is checked again.
- You can foam the remaining areas and begin finishing the exterior and interior (installation of platbands, slopes).
If you are not confident in your abilities, then it is better to turn to specialists who do this professionally. In addition, if problems arise, you can always ask for corrections.