It used to be that wood was not the best base for wallpapering. But with the advent of drywall, modern adhesives and plasters, the possibilities for interior finishing of a wooden house have expanded significantly.
Often in wooden houses one begins to get bored with the monotony of a large number of wooden surfaces. When building a new house, this is usually not thought about or noticed, but after five to ten years the owners usually want something new. Often a wooden house has frame walls, which are often, in common practice, finished with clapboard, imitation logs or timber. But if you stick wallpaper on them, it will help “dilute” the monotony of the wood.
It happens that all the walls in the house are load-bearing and there are no frame partitions, but you want variety. Then we suggest using sliding guides to frame the wooden wall over the frame. This technique is good to use in the bedroom, where it is easier, for example, to cover the wall behind the head of the bed.
How to properly hang wallpaper on plywood
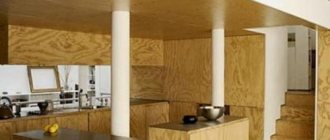
Since its inception, plywood has been used in construction to line walls.
New materials and technologies have undeservedly pushed plywood out of this niche - it is cheaper and faster to level the walls with plasterboard boards or inexpensive gypsum putty. In the decorative decoration of the premises, mainly sheets of elite and first grade plywood were used. With the development of wooden frame construction and people’s desire for environmentally friendly housing, plywood has received the opportunity to be rehabilitated as a material for interior decoration - high-quality grades of plywood sheets (E and 1st) are used for decoration, secondary grades (2nd, 3rd, 4 th) - brought to the required condition by painting or wallpapering.
Russian style
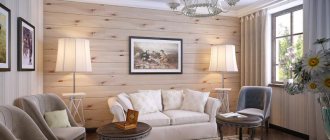
The “village hut” in the Russian style is characterized by the massiveness and simplicity of its components.
Here the main elements will be ordinary benches and antique chests, display cases and chests of drawers, carved beds with embroidered pillows. The Russian stove will add special attractiveness to the style.
Note!
Balusters for stairs: TOP-140 photos and videos. Types of balusters for stairs. Manufacturing materials. DIY installation instructionsWindow shutters: purpose and types of window shutters. Features of the material of manufacture. Shutter sizes for different windows (photo + video)
Veranda Design - Uses and Benefits of Veranda. Interior veranda design styles. Materials for finishing the terrace (photo and video reviews)
Wallpaper in a wooden house: types of products and installation features
Wallpaper in a wooden house is selected based on the personal preferences of the owners of buildings and the creation of protective properties for vertical and ceiling coverings. Different types of products are characterized by their inherent advantages and disadvantages. They differ in application and operation technology.
Wallpaper for decorating a wooden surface
Selection of materials
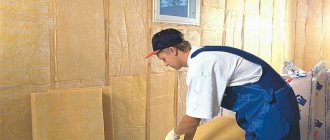
- Wallpapering in a wooden house is done with paper and more expensive products, but paper has breathable properties. Performance characteristics are characterized by rapid wear of low-quality natural material.
- Vinyl wallpaper for a wooden home desktop comes in the form of synthetic materials that are easy to clean, do not fade or deteriorate. When applied, the rolls are not stretched in width, which threatens to create a crumpled surface.
- Liquid wallpaper in a wooden house is used to decorate surfaces with the ability to fill small cracks and seams.
- The cellulose version is used to eliminate wrinkles and bubbles on the walls. They are reusable and practical.
Wallpaper for finishing wooden floors
Preparing the walls
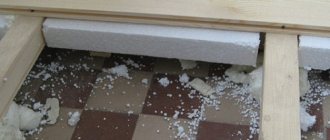
So, we glue wallpaper in a wooden house. At the first stage, plastering of the surface is carried out. This is facilitated by the creation of wooden shingles from thin slats placed at an angle in opposite directions. When finishing a plank surface, it is enough to rinse and clean the products. If the precoat is oil paint, it is sanded and primed.
When understanding the issue of how to hang wallpaper in a wooden house, it is important to remember that when drying walls, natural technologies are used without heat guns and heaters. Preparing the walls involves temporarily removing the baseboard. It will need to be mounted in place after gluing the products.
It is important to exclude sockets and ventilation grilles. Putty is used to smooth panel seams. At the end of the work, the structures are treated with a primer.
Wallpaper for covering wooden walls
The process of wallpapering wooden walls
The process of applying panels begins with gluing decorative sheets from the outer corner. It should form an angle of 90 degrees. To take measurements you will need a level.
The first canvas will have longer parameters. This facilitates the fit of products. If you need to create a vinyl covering, it is recommended to lubricate it with glue and leave time to saturate the surface.
Applying wallpaper to wooden walls
You can avoid excess glue consumption by preparing a special bath. There are wallpapers that can be applied with a damp sponge or spray gun. The sheets are placed from ceiling to floor. The decoration begins from the window. Use a rag or soft spatula to smooth out bubbles.
The application of the following canvases is carried out by alignment along the first strip. At corners and joints, laying is done with an overlap. Strips from rolls are pre-cut. Paper wallpaper is equipped with an edge located on the right side. The edge should be cut carefully.
Wallpaper for solid wood walls
Wallpaper with a pattern should match at the joints. The rolls are cut into pieces with preliminary laying out on the floor to take measurements.
The panels are prepared by laying them in a stack on a clean floor. In this case, each underlying product should protrude by 1-2 cm. This facilitates their convenient separation before gluing on the wall.
While the wallpaper is still wet, you can create gaps for sockets and ventilation. Within 2 days the strips should not come off at the joints.
Solution 2: Texture wallpaper
WALLPAPER BRAVO STEIN 80583BR23
Regular smooth wallpaper does not cope well with surface imperfections, but textured ones can hide them more effectively. Such wallpapers include varieties of vinyl and non-woven coverings and photo wallpapers. The most important thing is the convex pattern.
Foamed Vinyl
performs the task perfectly.
The dense base and voluminous relief of such wallpaper will mask flaws and decorate the room. Hot stamping
is also suitable for such cases. These coatings are durable and have a textured surface, which means imperfections will be completely invisible.
Non-woven wallpaper for painting
- an indispensable assistant in repairs. You can choose different relief patterns and paint them in a suitable color. In this case, the unevenness will visually disappear, and the walls will appear smooth.
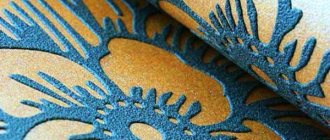
Wallpapers and photo wallpapers that imitate natural textures
, will cope well with problematic surfaces. Coverings imitating stone, brick or plaster create a special stylistic mood in the room and turn the disadvantages of the walls into advantages. It is important that such wallpaper be matte. The play of light and shadow on glossy wallpaper will make unevenness visible.
Lighting
Properly selected lighting will add airiness to the interior design and help hide minor imperfections.
Ideal lighting fixtures include ceiling chandeliers and spotlights that provide complete lighting, wall sconces and spotlights that highlight certain areas, and floor lamps that create soft comfort.
Preparing the walls
In order for the wallpaper to lie flat, you need to prepare the walls before gluing. The complexity of the process depends on the type of surface:
1. Plasterboard walls. Apply primer at least 24 hours before wallpapering. This is necessary to protect the surface and, if desired, remove the wallpaper without any problems.
2. Painted walls. Wash the walls with a special solution, rinse with water, and sand for better adhesion of the glue.
3. Walls with wallpaper. There are several ways to remove old finishing material from the surface (with a scraper or a special solution). The solution is diluted in warm water, applied to the walls for at least 10 minutes, then the wallpaper is removed from top to bottom with a spatula. A steam cleaner will also make the process of removing old wallpaper easier.
Wood fiber board primer
The first step in surface preparation is to prime the wood fiber board. This stage is also called pre-priming. The primer is applied using a long-handled roller or brush. It is preferable to use drying oil (that is, the simple method that we mentioned above). So, drying oil is applied to the wall hot. If this does not happen, then it is heated with a hair dryer or other devices. But unfortunately, due to the fact that this special solution creates a film, its adhesion is minimal. Therefore, contact concrete is used. Adhesion is created due to the fact that the composition contains quartz sand. After this, you can successfully move on to the next stage.
What kind of wallpaper can't be applied to?
It is absolutely contraindicated to apply new wallpaper to vinyl, non-woven, “heavy” wallpaper, especially those with metallized decor and embossed (foam) wallpaper.
Wallpaper glue is not capable of adhesion (gluing) to vinyl or metallized coatings. You cannot paste wallpaper of lighter colors onto old dark wallpaper. It is possible that the pattern may show through or stains of paint from old wallpaper may appear. You cannot paste new wallpaper onto old wallpaper, which in turn was pasted onto oil-painted walls.
The main condition is to match the type of wallpaper being pasted: if the old wallpaper is thin paper, then thin paper should be glued over it.
Style selection
Not all designs are suitable for creating the interior of a wooden house. And each house has its own unique features that will contribute to the future style.
However, the best interior styles for wooden houses somehow resonate with national design elements.
Wallpaper selection
In principle, you can cover the ceiling with any wallpaper. Some of them are better, others will not be the best choice. To understand which options will be preferable, it is worth understanding what types of such finishes exist.
- Paper varieties are much cheaper than all other types. However, this option is only suitable for very budget repairs, since paper is a fragile material and will not last as long as we would like.
- Vinyl types of this material would be a better option. They are distinguished by durability, high quality of the applied pattern and moisture resistance. In addition, the choice of drawings is very large. Great for ceilings.
- Non-woven wallpaper is very durable, elastic and highly resistant to mechanical damage. The price will be high, but they look very nice.
- Liquid wallpaper options can be used in the same way as regular paint. They are applied, depending on the consistency, either using a roller or a spatula. The choice of textures and patterns is not very rich, but such finishing will help hide minor irregularities in the ceiling.
- Fiberglass. This universal type of design for floors is just perfect. Due to the fact that this material has different textures, you can choose the appearance of the future plane, and you can choose any color - after gluing, the ceiling will be easy to paint.
You can select any of the types shown in the list. However, washable options are preferable, as they allow for wet cleaning. If the amount for repairs is limited, then the paper version is also suitable.
Country and shabby chic - all the nuances of use in the country
Considering how the rustic style is interpreted in the photo, you will see that there are actually many country stylizations, and each of them can be implemented in the country house according to your capabilities:
- imitation log walls is suitable for a Russian hut;
- delicate roses - belonging to French Provence;
- the American ranch can be recreated with the help of spectacular patchwork inserts;
- a typical English cottage is stripes and imitation stone.
Delicate roses will highlight the grace of French Provence
For each of these styles, light and floral tones are preferred - cornflower blue, apple, pink, lavender, beige. And the basic pattern will be checkered, striped, and floral patterns. But wallpaper does not have to be patterned - textured monochrome surfaces are also suitable, against which ethnic decor items will look very appropriate. It is this rustic style that can be seen most often in the photo.
Stages of wallpapering
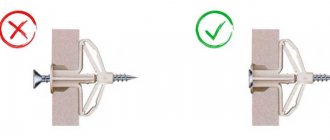
So, processing the seams and sanding the surface of the plywood will help prepare the base for wallpapering. Such operations must be carried out, but first it is useful to pull out all the protruding rusty nails from the wooden base. If the heads of nails and screws are torn off, if there is no need to remove them using a nail puller or a screwdriver, then the protruding pieces of iron should be driven deeper into the plywood sheet with a hammer, and the hole formed should be filled with putty.
The stage of gluing wallpaper onto plywood is not much different from gluing rolls to a regular wall. The main thing in solving the problem is to choose the right glue. It must match the wallpaper chosen for gluing the plywood. More detailed information is covered in the following video:
Features of wallpapering over paint
Professionals are inclined to carry out work with a cleaned surface, which will be leveled and primed so that the adhesion of materials occurs at the most reliable level. But carrying out these stages is not an easy process, so property owners try to carry out independent repairs while minimizing the work. It is possible to glue wallpaper to walls that have been painted previously, and you can get a reliable result. But the important thing here is how to put wallpaper on painted walls, so as not to have to redo the entire finish in the future.
Is it possible to glue wallpaper onto a painted surface without preparing it?
This can be done, but such a decision looks risky and sometimes pointless. If the paint on the wall holds up well, is of high quality and still has some roughness, then there is a certain probability that the wallpaper will last for several years without any problems.
If the paint comes off in places, then it is strictly not recommended to glue wallpaper onto such a coating, because... the canvases themselves will begin to peel off after a few months or even weeks.
Therefore, it is recommended to carry out the preparation: clean the wall, apply a primer in two layers, dry and glue the canvases.
If possible, it is recommended to completely refrain from gluing wallpaper on a painted wall. The best option is to completely remove the old coating and prepare the wall from scratch. In this case, it will be possible to glue any type of canvas - even the heaviest models.
When to start
On a “fresh” log house, you can begin finishing work no earlier than the main shrinkage has passed. If the log house is made of laminated timber, it should take 3-4 weeks. For all other types of wooden houses, the period is calculated in months, and sometimes years. The exact shrinkage time depends on the initial moisture content of the raw materials, climate zone and construction time. That's how difficult it is. In any case, it’s not worth starting finishing sooner than a year later, or at least 10 months later. During this period of time, active shrinkage of the wood occurs, logs and beams decrease in size, and the insulation laid between the crowns is crushed. If you attach the trim before the main processes have completed, it will fall off or become warped. Everything will have to be removed and redone. So there's no need to rush. Moreover, there will be enough work: you need to achieve tightness of the joints, and this is not easy. Careful competent caulking is needed.
Before starting finishing work, it is tedious to caulk a log or timber frame
Typically, the main caulking of a log house takes place in two stages. Primary - a few weeks after installing the log house, and secondary - after about six to eight months. Each time the cracks are clogged with insulation - jute, tow, sometimes moss. It is done immediately both outside and inside, otherwise the house will warp. Therefore, they walk around the perimeter of the building, caulking alternately, each crown, now from the outside, now from the inside. Work begins from below, from the lowest row of logs or beams.
With each caulking, the frame rises by 5-7 cm. Then, under the force of gravity, it gradually settles. The compacted inter-crown insulation reliably covers the cracks. The quality of this work is very important: it not least determines how warm the house will be.
Finishing work begins inside the wooden house after the frame has settled after the second caulking. To determine whether the process is completed or not, the height of the walls is periodically measured. If there are no significant changes within two to three months, we can assume that the main processes have passed. It's time to start decorating the inside and outside of the house.