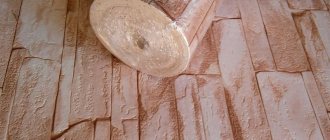
Since not everyone can afford to use natural stone, which is highly valued in decoration, products that imitate this material are becoming quite popular. Stone-look gypsum tiles are one such material. It has many advantages and looks great in the interior of the room. In some aspects it falls short of natural stone, and in others it even surpasses it. This is what finishing a room with gypsum decorative stone looks like.
If you are interested in this topic, then this article is for you. We will take a closer look at not only the advantages of this material, but also learn the installation principle. And for those who are not ready to overpay, we will post detailed instructions for creating stone-look tiles from gypsum with your own hands.
Advantages and disadvantages of gypsum products
First of all, I would like to consider the advantages of the material with which you will have to work. Everyone knows that stone itself is a fairly strong and durable material. It is natural and brings a touch of nobility and quality to the room. What can you say about gypsum decorative stone? Below is a list of the distinctive characteristics of the products:
- Unlike natural stone, gypsum tiles have significantly less weight. This is convenient not only during work and transportation, but also allows you to save on strengthening the structure. Gypsum tiles do not load the building and no reinforcement is required for installation.
- The cost of the products is also disappointing. Not only is it several times cheaper than stone, but also you don’t need to spend a lot of money on auxiliary materials for installation. And if you take into account the fact that it is very easy to work with the material, then you can save on hiring workers.
- Easy to install. Even an inexperienced user who has not dealt with it before can work with the material.
- Products made from gypsum are hypoallergenic, which allows the use of decorative stone even for allergy sufferers. It does not provoke a reaction, as it consists of natural materials: sand, gypsum, water, marble chips and dyes. There are no odors coming from it.
- Considering the composition of the decorative finish, we can say with confidence that gypsum decorative stone is 100% environmentally friendly. You don't have to worry about the health of yourself and your loved ones.
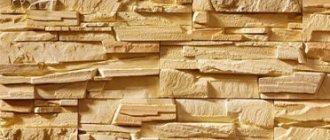
- Attractive appearance. The tiles can be painted in any color, have different textures and sizes. The variety is simply amazing. The result is a wonderful material, the decoration of which does not become outdated.
- The material itself can be created at home with your own hands, which makes the use and cost even cheaper.
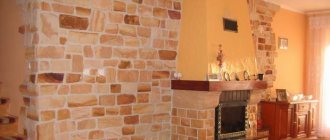
- Decorative stone, like its parent, does not burn at all. Its fire safety is at the highest level. Some even decorate fireplaces and stoves with it.
- By adding special components to the composition, the coating will be protected from ultraviolet radiation.
- One cannot but rejoice at the durability of the finish. Gypsum decorative stone will last for many years. It’s not for nothing that it is used in offices, hotels, cafes, etc.
That is why many choose this particular material for interior decoration. At a low cost, decorative gypsum stone is difficult to distinguish from natural stone. It looks great and makes the room beautiful and reliable. However, there are some drawbacks to gypsum products. There are only two of them, so many people don’t even pay attention to them. And with proper installation and use they are insignificant. So, these are the disadvantages of gypsum decorative stone:
- low level of strength. Since it is mostly plaster, it is quite fragile. Even with a slight mechanical load it can collapse. But with careful use this can be avoided;
- the material, unlike natural stone, is afraid of moisture. If the room in which the gypsum decorative stone will be laid is damp or damp, then there is no need to use it there. This is, for example, a kitchen, bath or toilet. And to protect against moisture, the coating is treated with varnish.
But now you can decide whether it is worth installing gypsum tiles or not. But many people make a choice in the direction of the material. After all, at a low cost, they get a wonderful decorative effect that decorates the room. In addition, the fact that you can create a decorative stone from gypsum with your own hands makes the material even more popular. How exactly can you create it yourself? Let's find out.
Tips for stone makers
- Make or buy larger molds so you can produce more stone in less time. The coolest forms with an area of 0.25 square meters. By filling 4 forms you will receive 1 sq. meter of finished product. Don't buy molds that are too thick; it's not profitable. For bricks, the maximum thickness should be in the range of 0.5 - 1 cm, for slates from 1 to 2.5 cm, depending on the type.
- Buy a scale. With scales you will have almost no waste, because... all proportions will be the same. I initially used a 700 gram scoop as a measuring stick. But it turned out that there were a lot of residues or, on the contrary, there was not enough solution.
- Use respirators when preparing the solution. You get a very unpleasant sensation when you inhale dust from plaster while mixing. And the lungs become clogged.
- Do not use high speed drills. Knead at low speed to avoid bubbles appearing on the surface of the tiles.
- Using a vibrating table is not necessary for making gypsum tiles, so don't worry about it.
Technology for creating gypsum stone
Even though the production of installation materials will be cheaper, you will still have to spend money on materials and tools. You need to understand the principle of creation, which is somewhat reminiscent of baking bread. Then you will understand why. So, here's what you need to get started:
- the main component is gypsum. Replenishment includes other elements, such as coloring pigment, water and other additives;
- There is no way to do without special forms or templates. They are made of silicone or polyurethane. It is these soft products that are preferred. There are plastic molds for gypsum tiles, but they are rigid and difficult to work with. Moreover, you need to choose the size of the forms, their relief and shape. This is chosen individually;
- thickener, which is needed to speed up the thickening process;
- container for preparing the mixture;
- drill with a mixer-type attachment;
- brush;
- composition for processing molds. It will make the finished product easier to remove from the mold. It’s like with baked goods - so that they move away from the pan, they are greased with butter;
- notched spatula.
It is from this set that the gypsum tiles will be created. The process itself has no difficulties. There are only some points. For example, the pigment can be added directly to the plaster mixture. Then the color of the stone will be throughout the structure. Due to this, even if one finishing element is damaged, it will be difficult to notice. Another coloring option is to apply the color with a brush to the form itself. What to choose, everyone decides for themselves. The number of molds can also be different. It is clear that it is more convenient to use several at once. This way you can quickly create the required amount of decorative stone.
To begin with, dry gypsum mixture and water are mixed in a tank. It must be remembered that the amount of the finished mixture must be identical to the number of filled forms that are available. In other words, it is unacceptable for the prepared plaster to remain for a long time without a mold in the tank. Cook as much as will go in at a time. It is important to make the mixture similar to sour cream and maintain a similar proportion so that the batches of gypsum stone are the same.
The following is the process step by step:
- The mold is lubricated with a composition for better removal of the element and painted (if this option is selected).
- The mixture in the tank is mixed again and the molds are filled with plaster.
- In order to remove air and compact the material, the template is moved slightly, creating vibration.
- Excess plaster is removed.
- As soon as the mixture begins to harden, grooves are formed on its surface using a notched trowel. Their task is to improve grip on the surface.
Note!
Laying gypsum decorative stone can be done on a concrete base, on brickwork, on a plastered or wooden wall, and even on plasterboard. That's all, all you have to do is wait for it to dry and make a new batch. When you have collected a sufficient number of decorative elements, you can begin to lay them out. How to do this? Let's find out.
Preparatory work
All preparatory work is divided into several stages:
- preparation of the working surface;
- calculation of the amount of material;
- choice of glue;
- preparation of material (adjusting the required shapes and sizes).
Let's look at each of them in more detail.
Preparing the work surface
To ensure that the gypsum material holds securely, any type of surface will do. The main condition is that the working surface must be clean and dry. To fulfill this condition, it is necessary to carry out the following work:
- Remove the remains of the previous finishing material.
- Remove remaining glue and plaster from the surface.
- Use a wire brush to sand the surface of the wall.
- If necessary, install reinforcing fiberglass mesh for the wooden base.
- Prime the walls with acrylic solution for deep penetration.
Important! For further work, you need to wait until the solution has completely dried. Check the exact time in the instructions for the material.
Quantity calculation and material preparation
In order to correctly calculate the amount of material required, you need:
- Determine the surface area of the finish.
- Subtract the area of window and door openings.
- Calculate the amount of material in accordance with the resulting cladding area.
- Add 10% of the standard overrun to the resulting figure.
Laying gypsum tiles with your own hands
You already have the main element, gypsum decorative stone. It remains to stock up on the remaining materials and tools that will be required for the work. Here's an arsenal of what you'll need:
- gypsum or other adhesive for this purpose;
- deep penetration primer;
- regular spatula and notched one;
- miter box, for giving the stone the desired shape in the corners;
- tape measure, level, plumb line;
- pencil;
- mounting gun;
- hacksaw for metal;
- acrylic lacquer;
- roller with bath;
- sponge to remove excess glue.
When you have everything you need, you can start working. The process itself is simple, you just need to follow the instructions. First, it is important to prepare your work surface. Ideally, it will be plastered. After which a primer is applied to the surface. The best method of application is to use a roller and a tray.
Now you can start preparing the adhesive composition. Many people prefer to use ceramic tile adhesive. Only here it can be improved a little by adding a little PVA glue to the composition. The ratio is from 6 to 9% of the total volume. Thanks to this, it will receive water-repellent properties. Mix everything thoroughly with a mixer to obtain a homogeneous mass.
Everything is ready for installation. The first row of decorative gypsum stone plays an important role. Further masonry depends on it. Therefore, it is important to make it perfectly even. To do this, markings are made on the wall using a level, plumb line, tape measure and pencil. The markings must be perfectly level. After which the installation process begins. The adhesive composition is applied to the surface of the wall or to a decorative gypsum stone. For reliable fixation, the mixture can be applied to both surfaces. Using a notched trowel, furrows are made. All that remains is to place the first stone in its place according to the markings and press it to the surface. After this, you have from 6 to 12 seconds to adjust the location of the decorative plaster element. Watch for unevenness and quality of gluing. Other plaster parts are glued in a similar way.
Advice! Using a straight spatula and sponge, remove excess glue. Otherwise, it will dry out and petrify, adhering to the surface.
A hacksaw is used to fit the elements. It happens that the decor is made figuratively, an arch, a column or a corner of a wall is processed. In this case, use a miter box, cutting the products at an angle. To give the product a neat appearance, it is sanded with sandpaper. After the laying of the gypsum decorative stone is completed, the joining grooves between the slabs are filled using a mounting gun. A soft sponge is needed to remove excess. But many people lay the stone close to each other without creating seams.
The final step is to treat the coating with varnish to protect it from moisture. This is done at will. And in the case when the gypsum stone has no color, the surface is painted in the desired color before varnishing.
Advice! Remember, you need to work with stone-like decorative gypsum tiles carefully so as not to damage them.
That's all the work. As you can see, this is not difficult, especially if there is an excellent video in addition. In this video there is another interesting way of laying decorative plaster, which is slightly different from that described above. You can use it as a base.
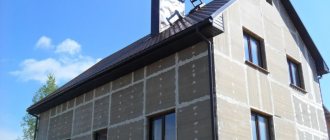
Laying artificial stone on a plasterboard wall
In residential premises, artificial stone is often used for decoration. For many facing materials, plasterboard structures are an ideal base. Decorative stone is no exception. Artificial stone is a general name for a finishing material of various shapes that resembles natural stone.
For its manufacture the following is used:
As you can see, the set of tools is minimal and almost every owner has it. If a tool is not available, you can ask friends or rent it. The material is only glue and stone.
As soon as everything is ready: dry, clean surface, tools and material, you can begin installation work.
- chips of natural stone;
- synthetic stone;
- aluminum hydroxide;
- polyester resins;
- gypsum;
- pigments similar in color to natural stone.
- hacksaw or tile cutter;
- building level;
- notched spatula; Types of tools for laying artificial stone
- roulette;
- pencil;
- construction bucket for mortar;
- rags;
- crosses;
- wand.
Before you begin to install the surface cladding, it is carefully prepared, bringing it to perfect condition. Do not forget that all work on preparing the plasterboard surface must be carried out at above-zero temperatures in a dry room. Preparatory work algorithm:
Let's sum it up
With the development of building materials, the use of natural stone in decoration is moving away. Although this is a practical, but unprofitable way to transform a room. After all, there are materials that are much more accessible and practical. Those who have made a choice in favor of gypsum decorative stone do not regret their choice. The ranks of satisfied users are growing, as evidenced by reviews. Therefore, if you do not have enough funds to get a stone finish, do not be upset. Gypsum stone is a worthy alternative. And the installation process can be done with your own hands.
Recommended Posts
Japanese houses made of polystyrene foam
Cement mortar for bricklaying
Gypsum stone for interior decoration + photo
House made of expanded clay concrete blocks + reviews
We build a wooden house with our own hands
How to nail the lining correctly + video
Summary
As you can see, installing gypsum stone is quite simple. Due to the fact that you can make gypsum stone with your own hands, it is easy to adjust its parameters to the required area, which will be faced later. Gypsum stone can be painted in such a way that it will be difficult to distinguish it from natural stone. Gypsum stone looks good when combined with other types of finishes, for example, textured plaster.
- Installation of ebb tide on the balcony
- Options for finishing a house from sip panels
- Balcony cladding with sandwich panels
- Facade insulation for exterior finishing of a house
Preparation for installation
The wall on which the stone will be glued must be dry and even. Ideal option: plastered, primed wall or drywall. The tiles need to be laid out on the floor and compared, because... The sizes of individual tiles may vary. It often happens that the length of the stones is different; if for slates this does not play any role, since it is laid closely, then for bricks this is a problem. Even if the length of some tiles is 1-2 mm longer, then “in volume” your seams will shift and it will not be beautiful. There are 2 options to work around this problem:
Grouting decorative brick joints
Grouting, or as it is also called “grouting,” involves filling the seam between the tiles and gives the natural appearance of brickwork. You can grout the seams using different methods and mixtures. You can use special grout and a narrow spatula, as in the photo.
Or you can take regular finishing putty (it's usually white), dilute it with water and place it in a milk bag. On the other side of the bag, cut off the corner and squeeze the whole mixture into the seams. You can see how this is done in the video.
the best way to make a garage floor
Adhesive compositions
The quality of adhesion of surfaces and the service life of the cladding will depend on how correctly the glue is selected.
Installation of artificial stone can be done using the following types of compounds:
- PVA;
- dry cement mixture;
- acrylic;
- "liquid Nails";
- "Bustilat";
- thick rubbed paint;
- tile adhesive;
- putty;
- mastic
- polymer assembly sealant;
- CMC (CarboxyMethyl Cellulose).
Advice! When choosing, be sure to consider the type of base, how convenient it will be to apply a particular adhesion material and the reputation of the manufacturer.
The most popular brands of adhesive compositions used for cladding surfaces with artificial decorative boards:
- Ceresit;
- "Unice Plus";
- "Creps";
- "Acrylic";
- Confiad;
- Litokol;
- Corian.