Types of artificial stone for wall decoration
Before purchasing a decorative stone for the wall, you need to decide on its type. There are two types of decorative stone for interior wall decoration:
- stone made from gypsum;
- material, the production of which is made from colored concrete.
Artificial gypsum stone is quite simple to process, that is, it is easy to cut. Gypsum is also a fairly lightweight material, and accordingly, laying decorative stone from this material will not require much physical effort. The disadvantage is its fragility and instability to moisture. Often, gypsum-based stones are treated with special solutions that increase their moisture resistance.
In order to cut a stone made of colored concrete, you will need a grinder with a diamond-coated disk. The disadvantage of this material is that it is heavy, and this significantly complicates the finishing work.
In appearance, stones made from these materials are not at all different. If necessary, they can be painted.
Look at the photo gallery of decorative stone for interior decoration:
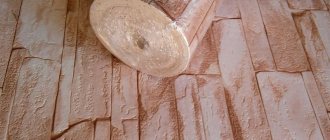
You can make decorative stone with your own hands at home:
- First you need to purchase gypsum dough, to which a certain amount of dye is added. Its volume depends on the color saturation.
- The resulting solution is poured into special molds, which are pre-lubricated with a substance intended for this work.
- After the solution has completely hardened, you must carefully shake out the finished material.
- Carefully fold the resulting decorative stones and leave for a period of at least 24 hours.
Functionality of finishing elements
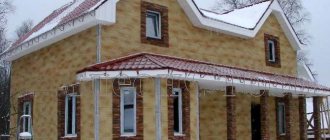
Siding and facade panels are the most popular finishing materials in the private construction sector. They are characterized by practicality, presentability, durability and ease of use. But for a long time, their shortcomings included the limited amount of extras. There simply wasn’t a large selection of decorative elements in the collections; ordinary “boards” were used to decorate corners and openings. Today the situation has changed for the better and manufacturers offer a large selection of finishes. All elements are produced by casting from high-quality polymer, to which stabilizers are added to improve technical and operational characteristics. The decor is distinguished by its durability, presentable textured surface, resistance to moisture, fading, wear, mechanical stress and weather factors, and wide functionality.
The Alta Decor collection of finishing elements for decorating corners, niches, openings and columns is presented in several varieties.
Exclusive innovative corner finishing system “Rustic Corner” (includes fastening base and cladding).
The decor gives the facade a complete look, hides seams and installation joints, and prevents sediment from flowing under the finishing in difficult places. The color scheme of the collection includes the four most popular shades: white, ivory, beige, brown (chocolate). The finish is harmoniously combined with siding (vinyl, foam, smooth or textured) and facade panels imitating brick or stonework.
DIY artificial stone finishing guide
In order not to be distracted during the work process by searching for various tools and materials, it is worth preparing everything in advance:
- For fastening, you can use a cement-based solution, but it is better to purchase a special adhesive that gives a more reliable result;
- building level;
- various spatulas.
In order to simplify the finishing process, it is worth preparing the surface and marking it using a construction pencil.
- A solution or glue is applied to the prepared surface, which then needs to be given a little time to absorb and dry. Next, decorative stone is applied.
- Decorating walls with decorative stone follows the same scenario as ceramic tiles. In order for the seams to be the same, it is worth using special crosses or ordinary wooden pegs.
- During the process of gluing the stone to the wall, you need to watch for the glue to bleed through. If it appears, you must carefully remove the excess using a spatula.
- It is very important to start work from the corner part of the room.
- Experts recommend starting work from the bottom up.
- After completely laying the stone, you need to leave it for 12 hours. This time is enough for the solution to harden well. After the allotted time has passed, you can coat the finish with special protective solutions.
Some tips from experienced specialists:
- If glue gets on the outside of the stone, you can deal with it using a damp sponge, which will easily remove the marks. This must be done immediately, while the solution is still wet. If you postpone this work, it will be impossible to get rid of the marks on the stone.
- It is very important to monitor the glue, as it should not be too thin or thick. Rare glue has insufficient adhesion, and thick glue will pollute the tiles too much.
- You can’t mix too much glue at once because it hardens too quickly.
How to glue a plastic corner yourself
In addition to decorative corners, you will also need a fastening compound. For narrow elements it is not recommended to use glue, the excess of which cannot be removed from the surface without leaving a trace. Before carrying out the procedure, the joint must first be cleaned of dirt and remnants of wallpaper or protruding pieces of finishing material. No corners will save an excessively uneven and bumpy surface. Then the wall is measured. The measurements are exactly transferred to a piece of corner. It is better to cut the material with a hacksaw with fine teeth. Do not forget about the joints between the corners themselves (in doorways, windows): two straight lines should end with cuts at an angle of 45 degrees. The “wrong” side of the prepared material is coated with glue and applied to the wall. Using your hands, firmly press the corner to the surface and hold it until the fastening composition “seizes”
Cost of finishing with artificial stone
When decorative artificial stone tiles first appeared, the price was quite high, since the material was not produced in our country. Delivery was made from European countries. But now, when the material can be made even with one’s own hands, it has become available to every consumer.
The average cost of gypsum-based stone varies between 800–850 rubles per square . The cost of decorative stone made of colored concrete is slightly higher - 900–1100 per square .
Production
The production process for making artificial stone depends on the type of material. So, for some types, pressing with firing (ceramic granite) is used, others are made by casting the mixture into molds, followed by drying and processing .
Most types of material are created in this way, which is more economical and allows you to create different textures and colors. Moreover, it is quite possible to create artificial stone yourself, you just need to purchase molds from silicone (or make them yourself from plaster), mix the solution and get facade panels.
Sometimes this method becomes the best option, reducing costs, time spent searching for the right material and allowing, if necessary, to make the required number of panels, for example, for repairs.
Application of facing decorative stone
Decorative stone is used as a finishing material for various rooms. The type of material is selected depending on the purpose and style of a particular room.
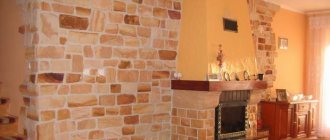
- You can allow a large amount of stone in the living room. You can completely cover one wall with it. The only condition is that the color scheme of the remaining walls must match the color of the stone. You can also highlight any of the corners or make a kind of frame around the entire perimeter.
- In the kitchen, the kitchen apron is most often finished with decorative stone. It turns out to be quite an original appearance.
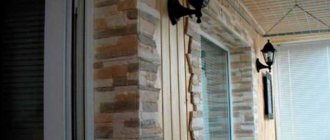
- Cladding the hallway with this material is the most practical option, because the stone does not require special care. Read also our article about wooden hallways.
- When decorating a balcony, you can expect to end up with a more comfortable room.
You can decorate with artificial stone in any room. The main thing in this matter is not to overdo it, because an excess amount of material on the walls will create a heavy and depressing appearance.
Is it worth making a suspended ceiling in the bathroom: pros and cons.
How to combine a living room and a work studio-atelier, see our review.
Let's summarize:
The service life of decorative stone is much longer than that of wallpaper or various panels. It is resistant to temperature changes and therefore does not fade. Even a novice, inexperienced builder can cope with wall cladding. But the end result will be an exquisite room that will not fail to please.
We also invite you to watch a video on how to make artificial stone with your own hands:
When is this required?
Previously, in order for the corner to have a completed beautiful shape, it was trimmed with plastic or other special corners. Today this method is considered outdated and is viewed with doubt. A more sophisticated, organic solution is required. Similarly, tiles of adjacent walls placed end to end on the outer corners do not give the desired picture.
It is best to use special corner elements . Even if their price is slightly higher than standard material, the visual effect will be much richer and more refined: it will suit any interior style. In addition to the beautiful appearance, the absence of seams in such problem areas will ensure a long service life of the cladding and will protect the ends of the tiles from destruction.
Purchase of materials and preparation of tools
Decorative stone is not a cheap material; before purchasing the material, you must carefully calculate the amount that will be needed to renovate the room. Make the calculation based on the area of the room, subtract door and window openings. If you plan to cover part of the wall with stone, calculate the area, add 10-15% to the result for trimming and unevenness. Remember that the amount of decorative stone is measured in linear meters, since the stone has uneven edges. Do not neglect drawing up a detailed stone layout diagram. Professional builders advise using the work drawing for rehearsal laying of stone on the floor. This method helps to visually evaluate the resulting pattern and arrange the stones in the desired order. In addition to purchasing the material, purchase a special glue for decorative stone; the choice of glue depends on the type of stones and their weight. Prepare the tools you will need during work:
- A grinder with a new disc selected for working with a specific type of stone.
- Spatulas.
- Tools for priming.
- Building level.
- Rubber hammer.
11.Sealing joints
The joints that have formed between decorative stones are sealed either with putty or a special compound. To seal joints, it is best to use a construction gun, but, in extreme cases, a thick bag will do. It is necessary to fill with gypsum putty all the existing gaps that have formed between the fragments of the finished masonry. Excess should be removed quickly before this mixture dries.
Since hardened putty usually has a different color from decorative stone, you need to finish sealing the joints by carefully painting them over with paint. The shades of pigments need to be selected as carefully as possible.
Step-by-step instruction
The stages of finishing with decorative stone are as follows:
- Dismantling the covering
. Carefully remove the old finishing material and tap the plaster with the handle of a hammer. If you hear an empty sound, remove this covering too. - Leveling the base
. The quality of preparation of the base is similar to preparing it for wallpapering or laying ceramic tiles. Changes in the relief of the base will lead to early damage to the cladding, chips, and the need for reconstruction. - Base primer
. Apply primer in 2 layers. Do not neglect this stage, the primer improves the adhesion of the materials.
- Preparation of glue
. According to the instructions, dilute the dry mixture with water in the correct proportion. For high-quality mixing without lumps and dry residue, use a drill with a special attachment. Do not dilute a lot of glue at a time, it dries very quickly. - Laying the first row
. After marking the wall, begin laying stones. Apply a layer of glue to the back of the stone and to the base, press the stone against the wall and move it slightly. The glue will set and the stone will take its place. If excess glue appears on the surface of the stone, remove it immediately after drying - this is impossible to do. For gypsum stone, use a dry cloth; for the rest, a damp cloth will do.
- Formation of seams
. Insert special fasteners if there are going to be seams between the stones. If the material is placed closely, make sure that the joints do not coincide. - Working with corners
. Purchase ready-made stones to decorate the corner. If store-bought ones do not fit, overlap the corner, alternating sides with each row. - Final finishing
. Fill the seams with grout and paint after drying. If necessary, coat the finished wall with varnish or a protective mixture.
7.Laying the first row
You need to start laying the stone from the corner. You can choose any angle and move in any direction. In order for the masonry to have support, work is carried out from the bottom up. In the event that it is intended to cover only part of the wall, the area around the arch or door, and not its entire surface, work must begin from any corner of the arch or door. If, based on the sketch, markings are first made on the wall surface, then the work will be much easier. So, installation should begin in the following sequence:
- take a notched trowel and apply a 5 mm layer of adhesive to the first tile;
- place the stone on the wall according to preliminary markings;
- press very tightly and carefully remove excess glue (later it will be extremely difficult to do this);
- fix the second tile nearby;
- If the stone is not laid tightly, but with joints, then you need to carefully observe the required distance.
The entire above process should be repeated until the logical completion of the work. In the case when the entire cladding will consist of stones of different sizes, you need to monitor the sequence of alternation. But if you have previously laid out the rows on the floor, as recommended earlier, then there should be no problems.
Features of finishing with decorative stone
Each type of repair work has its own subtleties and nuances. Working with decorative stone is no exception; knowing the secrets of the craft will provide improved results.
- Even a light stone, due to its massiveness, gives the room an oppressive appearance. It’s easy to play with this feature: combine stone with light, plain walls.
- When laying stone on the floor for clarity, make sure that there are no sharp changes in relief or color in the picture. When using stones of different sizes, alternate placing large and small specimens next to each other.
- Applying acrylic paint will help protect the coating from mechanical stress, abrasion and moisture.
- Properly selected lighting will highlight the stonework. Mount lamps in the ceiling or floor lighting, install wall sconces, the play of light will add volume.
Cladding with decorative stone is a difficult task, but doable. Use the step-by-step instructions presented in the article, don’t be afraid to experiment, the results will surprise and delight your family members.
Decorating an apartment with decorative stone
Decorative stone is a facing material for exterior and interior decoration, which is rapidly gaining popularity. Stone finishing gives the room an original and presentable look and complements the interior of different styles well. Decorative stone is wear-resistant, practical and easy to care for. The only thing that may confuse you is the high cost of the material. But if you consider that it is not necessary to cover all the walls in the room with stone, then the costs will not be so high. In addition, today artificial types of decorative stone are actively used, which are much cheaper than natural rocks.
Plastic corner size
The standard range of sizes for PVC corners starts with 10x10 mm and ends with 50x50 mm. Between them, gradations with a difference of 5 mm are used. Parts of non-traditional sizes are made to order. An angle of 90 degrees is maintained between the two guides of the decorative element, at which all planes of the apartment must intersect. If you have a home with “crooked” walls, then you need to take appropriate measurements and contact a specialist with a request to make individual parts.
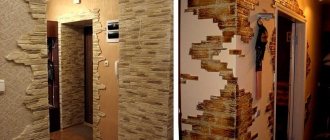
Decorative stone in the interior
Most often this decorative facing material can be found in living rooms, spacious kitchens, dining rooms and hallways. Decorating doorways, niches and entire walls with stone allows you to achieve a monumental effect, and in combination with living plants brings naturalness to the room.
Decorating the hallway with decorative stone is practical and convenient. A large amount of dirt accumulates in the hallway and corridor, which is brought into the apartment from the street. An artificial material that imitates masonry perfectly tolerates wet cleaning with detergents and has dirt-repellent properties. In addition, this design will be very durable and will not lose its attractive appearance from frequent touches.
Full decoration of the hallway with decorative stone can have a “pressing” effect, so the best solution would be fragmentary finishing highlighting certain areas:
- doorways and arches;
- viewed angles;
- areas around furniture and separately located decorative elements (lamps, paintings, mirrors);
- contact areas (hangers, racks, shelves, sections of walls above the baseboard);
- ledges and niches.
Tip: Decorative stonework can only show its full potential in good local lighting. If there is insufficient lighting, decorating walls with dark-colored decorative stone will look gloomy. If it is impossible to provide suitable lighting in the corridor, you should give preference to light-colored materials and reduce the size of the cladding area, limiting it to, for example, the door opening.
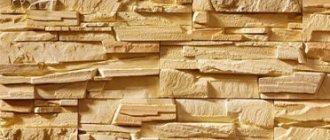
Types of decorative stone
The following types of this natural material are used in decorative finishing:
When decorating interiors yourself, only the first two types are usually used. Sandstone lends itself well to processing and has a pleasant color palette. Limestone is very hard, so it must be purchased in cut form.
Currently, artificial decorative materials with different compositions are used much more often.
- Concrete based material. It is made from cement, sand and various additives: pigments, plasticizers, reinforcing components and natural fillers. The most common type, applicable to any surface.
- Porcelain tiles. It consists of clay, minerals, pigments, and has high strength. It looks little like natural rock, more like multi-colored glass tiles.
- Conglomerate. Made from marble and granite chips with the addition of quartz sand, limestone and dyes. It has increased strength and reliability, and is closest in appearance to natural stone.
- Acrylic. It is light in weight and comes in a variety of colors, is easy to process and does not require the use of detergents when cleaning.
- Quartz. Strong and durable material, easy to use, cut using diamond blades.
- Plaster. It is very light in weight and easy to glue. This material resembles sandstone in appearance. The main advantage of gypsum facing material is the possibility of its independent production using special molds.
Working with decorative stone
When choosing decorative stone as a facing material, first of all you will have the following questions:
- Is it possible to carry out finishing without the participation of a specialist?
- What tools will you need during work?
- How to lay decorative stone?
- What composition can be used to glue the facing material to the wall?
- How to decorate an arch with decorative stone?
Let's find out the answers to these questions and consider each in detail.
Do-it-yourself decorative stone finishing
Finishing with decorative stone on your own is a very real task. Working with different types of this facing material has different levels of complexity, but in general, any novice master can cope with laying stone.
Required Tools
To work with decorative finishing material you will need the following set of tools:
- trowel or spatula for applying glue;
- rubber hammer;
- grinder with disc for concrete;
- container for mixing the solution;
- triangle ruler;
- cords for horizontal beacons;
- plumb lines;
- metal brush;
- roulette;
- level.
Bonding composition
The facing material can be glued to the wall using tile or silicone glue, liquid nails, or stone glue. In some cases, it is permissible to use cement-sand mortar with plasticizers or polyvinyl chloride construction adhesive.
The best choice is tile adhesive or a specialized composition for decorative stone.
Important points
When working with stone, you need to take into account several nuances, the observance of which will ensure a high-quality result.
- Decorative cladding material can only be glued onto a leveled and carefully primed wall. It is acceptable to use plaster or drywall for leveling.
- When choosing a natural facing material that has a lot of weight, you need to attach a reinforcing mesh to the wall.
- When covering walls with plasterboard, the sheets must have a thickness of at least 12.5 mm and be fixed along the length along at least three transverse lines.
- Maintaining relatively even rows improves the appearance of the finished surface.
Sketch development and marking
Before you start gluing masonry elements, you must determine the size of the area to be covered, select the type of seams, make a sketch and markings on the walls. The sketch is necessary for the reason that it is desirable to lay a solid stone on the wall, and you should try to place it so that you do not have to cut and chop it, since these actions can lead to damage.
After creating a sketch, you need to transfer the installation diagram to the wall and mark it using beacons. In places where there will be a smooth edge, it is necessary to secure limiters in the form of profiles or corners.
Work order
During operation, follow the following instructions.
- Before you start gluing the stone to the wall, go over the back of it with a wire brush to improve surface adhesion.
- Remove any burrs on the front side with a file.
- Apply the solution or glue to the wall with a trowel or spatula along the width of the first row, cover the back side of the stone with the composition. The glue layer should be 5-10 mm.
- You can lay the elements end-to-end by placing them against the wall, pushing them tightly against the profile and elements of the bottom row, and then adjusting them with a rubber hammer.
- To form seams, you can use wedges, lay pieces of drywall between the rows for wide seams or scraps of cardboard for narrow ones. After the glue has dried, the auxiliary materials must be removed.
- Elements in a row must be placed offset, as when creating brickwork. This is necessary for a more natural look and increased strength.
- After laying several rows, it is advisable to take a break to prevent the array from slipping.
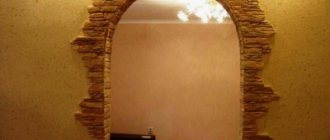
- Finishing an arch with decorative stone involves gluing elements not only to the vertical wall, but also to the vault. For better masonry quality, tap the laid elements for possible voids. If they are found, the stone must be removed, the glue cleaned off and laid again.
- Cladding arches, doorways and finishing corners in an apartment often requires trimming the stone. Even cuts look unnatural, so using pliers, a knife and a file you need to make various chips that will give the stone that forms the opening a more natural look.
- A few days after finishing the work, you can start grouting the joints, take out the wedges and fill the joints with a special grouting solution.
(votes: 4 , average rating: 5.00 out of 5)
Rules for laying brick corners
Brick is one of the popular building materials. They build houses and outbuildings from it, lay out internal partitions and make stoves, build strong and beautiful fences, and make foundations. One of the most important aspects of such work is the brickwork of the corners. Brick can be used for cladding and insulation, for decorative finishing. In order for the masonry to be not only attractive, but also durable and resistant to various types of influences, it is necessary to pay attention to the installation rules.
Figure 1. Scheme of laying corners.
Unlike walls, where attention needs to be paid only to bandaging and strengthening, for corners you also need to choose the right masonry option . Here not only whole bricks can be used, but also halves, but their masonry is more complex and demanding. Laying out corners is required not only for buildings, but also for fence posts, supports and columns, and furnaces. If you have no experience in such work, then it is best to use the services of an experienced craftsman, otherwise the structure may turn out to be extremely unreliable.
Step-by-step work process
To correctly lay out the corner of the walls, you need to prepare the material for work. Often, incomplete bricks are used for corners, and for dressing they should first be cut so that there are no chips, cracks or other defects. If there are such defects (this only applies to chipped corners), then it is necessary to lay each element inside the masonry with the damaged side. In addition, we must not forget about dressing and how exactly to design the angle if it is necessary to remove the partitions. Violation of the masonry will only lead to the wall beginning to crack and gradually collapse.
It is necessary to chop the brick into separate parts in this way:
Figure 2. Scheme of continuous masonry.
- The cutting begins with markings. You should measure the required length; it is best to use a ready-made template for this. This will make it possible to chop the required number of half-sized ones with the same characteristics.
- The future cutting line is made with an ax blade. After this, with one strong and sharp blow, a notch is made on both sides. Next, a cut is made along the intended line.
- When cutting the material, it is necessary to direct the ax blade strictly perpendicularly, otherwise the chip will turn out oblique, such a product will not be suitable for mounting corners and walls.
- It is necessary to start any masonry from the corners. The first bricks are first laid “dry”, that is, without using mortar. This is done for fitting; if all the elements fit correctly and fully correspond to the drawing drawn up in advance, then the work can be done.
Special fines are installed at the corners, which show the boundaries of the entire masonry.
It is on them that all further work will be carried out. To check the evenness, use a wooden square and a building level. In addition, beacons are used, that is, lighthouse bricks fastened to brackets. This beacon is used to check the row thickness. A strong cord is stretched between the individual beacons.
Schemes for laying corners
Laying brick corners is difficult and responsible at the same time. At right angles, the first row is formed by a butting arrangement, starting from the outer side of the corner. For the second row, reverse masonry is used, i.e., the so-called tying is performed, the brick is not solid, but ¾. It turns out that one row is bonded, and the second is spooned, while the masonry pattern is constantly alternating. An example is shown in Fig. 1.
Walls
Tired of advanced technologies, society increasingly values nature and uses natural materials. This is wood and stone. And although decorative stone can be either natural or artificial, it allows you not only to decorate the basement and facades of buildings from the outside, but also to create the most unusual combinations inside the house.
If you combine it with other materials (glass, metal), place green plants nearby and provide good lighting, then the interior can be made both stylish and cozy. Most often, decorative stone wall decoration is used in the hallway, living room, kitchen, and bathhouse. This is an excellent way to create a presentable interior in a restaurant, hotel or business center hall.
Stone in the interior of modern premises
Decorative finishing of walls to look like stone (especially if it is an interior room) should be carried out taking into account these rules.
Finishing elements for framing windows, doors and corners: types and characteristics of accessories, installation
Facade cladding is not only the final stage of construction using frame technology or rough wall materials, but also an opportunity to radically change the appearance of a residential building. To increase the expressiveness of the facade and make the image integral, decorative and functional elements are used along with the cladding to design corners and openings. In this lesson from the FORUMHOUSE Academy, together with a specialist from the Alta-Profil company, we will understand the characteristics, scope of application and installation of finishing elements for the facade.