Stone decoration of hallway walls is extremely popular and in demand today. This is due to the excellent quality characteristics of decorative stone. Requiring no special preliminary preparation or leveling of the walls before facing, resistant to various types of damage and high levels of humidity, the incredibly impressive stone design will appeal to many people and be affordable.
Advantages and disadvantages
Finishing with artificial stone in the hallway has a number of advantages.
Respectability. The visual effect when using the texture of stones is brutal and natural at the same time. This finish is preferred largely for this reason. A romantic mood with dreams of youth in medieval Gothic castles can easily be embodied in the hallway of your home. At the same time, the interior will immediately sparkle with new colors, and the owner of the house will show his delicate taste.
Lightness of the material. Natural components themselves have a large mass. Before decorating the walls with them, it is necessary to further strengthen the surfaces. The cost of this will not cause problems for wealthier families, but some still have a limited budget.
It is for them that artificial stone is an alternative. Only a thin layer of coating is needed under it, because the material is very light. In addition, it is very difficult to visually distinguish between real and artificial stone. On the market you can find imitation of even the rarest species.
Easy installation process. Even at the stage of production of artificial stone, manufacturers adapt its design for future fastening to vertical surfaces. Because of this, a completely leveled plane is not required for installation, and a cement solution or glue is suitable for attachment. The same materials are suitable for eliminating cracks in the wall and similar defects. If there is any large pothole, it can be hidden with a small fragment of stone during installation.
Fire safety of the material. Decorating the hallway of an apartment with stone is safe, since the material does not act as a flammable material. This is another plus in contrast to other materials.
Durability. A single finish will allow you to forget about additional work on the walls for a long period. With careful handling and initial correct fastening, the decor can last about 12-15 years.
Reasonable price. Artificial stone is much cheaper than natural stone, which makes it much easier to choose it if you have a large room area.
Compatibility. There are a huge number of combinations of decorative stone and other stylistic elements and materials (glass, brick, metals), a variety of colors also makes this task easier.
Easy to care for. When cleaning, such finishing does not require a special approach; wet cleaning and the use of soft materials as a napkin and gentle cleaning products are sufficient.
Of the few disadvantages, one can note only the susceptibility of the artificial material to sunlight and humidity. To combat this, there are specialized hydrophobic compounds that need to be coated with the finish to protect it.
Wood paneling
Often, a material such as wood panels or lumber is chosen to decorate the hallway walls. Both options look simply excellent and are almost identical.
The main difference is that wood will last longer and looks more impressive. But its disadvantage is its high cost.
In order to decorate the hallway walls with such materials, you do not need any special knowledge. The material is provided in slabs - panels that are very easily attached to each other and the surface.
The material will be completely environmentally friendly, and when using solid wood it will give an amazing aroma.
It is very easy to choose the design of wood panels for cladding to suit any design style. When using such material, you can change the design of the walls at any time by repainting the panels with a different paint.
And, of course, it should be noted that the tree has a very original design, which truly cannot be repeated. With this type of material, the interior of the hallway walls will be excellent.
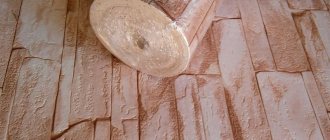
Flexible stone
This type of material is relatively new; its creation occurred due to the development of innovative technologies. The composition includes a section of sandstone, which is connected to a polymer textile base. Because of this, a high level of imitation of naturalness can be noted.
In the field of design and architecture, the material is especially valued due to its uniqueness. It is both easy to install and flexible. At the same time it looks natural and is easy to care for.
Finishing with flexible stone has one disadvantage - cost, but it is justified by the naturalness of the cuts used.
The natural relief of the stone can cause some problems; also, do not forget about dust particles, which tend to collect in the folds of the coating and cause allergic reactions.
Wild stone. This finishing look fits harmoniously into any room due to its natural appearance. People used natural materials back in ancient times, when it was necessary to decorate the walls of palaces and castles. Nowadays, the design of a hallway with stone trim immediately declares the status of the owner and his good taste.
The coating can be of different colors, and all due to the fact that its formation in nature took a long time. All this serves to the advantage of designers, allowing them to bring any ideas to life.
Recycling companies separate the stone slabs into many individual pieces. This makes the finishing material unique, because among the received parts it is difficult to find completely similar fragments. This means that the finished finish will be completely original.
Ceramic tile
Ceramic tiles are suitable for both exterior and interior wall cladding. There are many types of textures and colors available in the market.
The design of the hallway, decorated with stone in the form of ceramic tiles, will look advantageous even with uneven walls.
Fake diamond
This material is created industrially to order, less often - manually. The process is as follows: the prepared solution is placed in molds, after it is completely dried, heat treatment is performed. Glaze or impregnation is applied to the resulting product.
The sources of raw materials are the following materials: quartz, gypsum, acrylic, concrete, porcelain stoneware. In addition to them, various dyes are added. Elements for reinforcement, plasticizers. All of the above is safe for the body.
It is very easy to update the laying of artificial stones; if necessary, a separate element can be replaced with a new one.
Gypsum stone
Due to its high level of durability, it is often used for indoor wall decoration. Such material can be created independently using a gypsum base and specialized molds.
The finished product will be particularly light, which will allow it to be applied to thin partitions between rooms or used to create art structures that cannot withstand excessive pressure.
World designers very often choose gypsum, because its properties contribute to the creation of various forms necessary for architectural purposes. A photo of the hallway finishing with stone will allow you to verify this.
The undoubted advantages of such material are the affordable price and environmental friendliness of the creation. Choosing such a finish will save your budget, because marble or granite are much more expensive.
In addition, the material does not retain air, which means it will circulate in the room, which will create a healthy microclimate. The disadvantages include fragility; gypsum products need to be carefully transported and installed.
It's not the gods who burn the pots!
Decorating the hallway with decorative stone is also completely within the power of mere mortals, because... The technology is not much different from laying tiles. The facing elements are attached to a cement mortar or adhesive composition either seamlessly (creating an imitation of a solid surface) or with jointing (at a distance of about 1.5-2 cm from each other).
Laying decorative stone in the hallway
The second option will save time and material, but is not suitable for all design solutions. At the same time, regardless of the chosen method, if desired and following the necessary recommendations, everything can be done with your own hands. Let's look at the whole process step by step. Finishing a hallway with stone of any configuration and relief consists of the following steps:
-Preparing the surface
The scheme is familiar: carefully remove the previous coating (if any), thoroughly seal the cracks and cracks, level and prime the surfaces with water-based acrylic impregnation.
-Create a layout
We lay out the elements on the floor as they will be located on the wall. Try to make the texture and color of the stone look most advantageous. Avoid color spots, distribute the relief evenly and alternate long, short, small and large parts.
-Customize the shape and size
Some fragments will definitely need to be corrected. Carry out decorative chips, the necessary contour or reduction in size using simple available tools.
-Wall marking
The floor and ceiling in our houses, alas, are not always horizontal. If finishing the hallway with stone will be carried out with gaps, a fixed thickness of all seams and precise laying of the slabs along the horizon is necessary
It is important to strictly observe the right angle when crossing seams. To do this, use a regular building level to create control marks
Lay out the first row of cladding along them, which will serve as a guide for further work.
- Installation
For fastening we use liquid nails, adhesive-sealant or cement mortar. Starting work from below or from above is not a matter of principle. The main thing is from the corner.
Finishing a hallway with stone is a process that requires care and patience (especially when making corner joints). With the right amount of diligence, you can lay out the outer corners without using decorative elements, working “overlapping” or hemming the edge at 45°.
- The final stage
For seamless installation, this is the elimination of minor defects (scuffs, color inconsistencies or trims). Water, acrylic varnish, tint paste and an airbrush will solve all problems in seconds. It’s great if you have enough strength for finishing spraying. It may contain bronze or gold pigments, which give the stone (in direct light) a slight shine. This will revitalize the surface and bring it closer to natural.
The final touch is a water-based protective varnish applied to the most vulnerable areas, and finishing the hallway with decorative stone is completed! If the work was carried out by grouting, the final stage is the grouting process. This can be done no earlier than a day after installation, so that the adhesive has time to set.
Decorating the hallway with stone photo
Decorative stone from egg trays
This material is quite original as a decorative element in the hallway. It is the most affordable and easiest to use. Decorative stone is extremely easy to attach to surfaces and achieve a spectacular final appearance. The material is practically no different from industrial varieties of stones.
In order to create decorative masonry details, you need cardboard, egg cells and polyvinyl acetate glue. The material of the cells must be divided at the bend points, maintaining relief, and then attached with glue to prepared cardboard sheets.
To obtain the desired effect, you can use paper napkins placed on top of the resulting structure. Then everything needs to be dried and fixed with varnish. If desired, use paint that matches the color scheme of the hallway.
Such an original solution for a room will not leave anyone indifferent.
How to do it yourself
For interior decoration, it is recommended to take extra cladding. That is, you should purchase 10-15% more material than required. To calculate the amount of cladding required, you need to measure the area of those sections of the walls on which the stone will be fixed.
Preparing the walls
Before laying the cladding, the walls must be cleaned of old finishing and leveled. If the surface is treated with plaster, then this step can be skipped. If the walls are made of wood, the material is pre-impregnated with a waterproofing compound. Next, primer and painting mesh are applied, which is finally covered with plaster.
Pre-layout
Before applying it to the walls, decorative stone is laid out on the floor. Next, the resulting drawing must be transferred to the area where cladding is planned. To do this, appropriate markings are applied to the walls. If the stone needs to be cut, the resulting corners must be sanded with coarse sandpaper.
How to prepare glue
It is recommended to select the adhesive taking into account the type of material from which the walls are built and the stone tiles are made. This composition is mixed according to the instructions. Many glues dry quickly. Therefore, after mixing the composition, you need to immediately begin finishing the room.
Laying the first row
Before laying, a layer of dust must be removed from the back of the stones. Work begins from one of the corners. It is recommended to attach a metal strip to the wall along which the masonry will be laid.
The first layer is mounted according to the following algorithm:
- Using a spatula, apply glue to the back side of the facing tile. If the humidity level in the room is low or high, the material is additionally wetted with water.
- The glue is leveled on the surface of the tile.
- The tile is pressed against the wall and moves slightly to the side. This action increases the degree of adhesion. Additionally, it is recommended to hit the tile several times with a rubber hammer.
The rest of the tiles are laid in the same way.
It is important to measure the level during the process. A metal strip laid at the bottom of the wall helps with this.
Subsequent installation
The following layers of decorative cladding are laid according to the given algorithm. To avoid discrepancies between rows of tiles, it is recommended to apply a dimensional grid to the wall. There are two ways to lay artificial stone. Beginning craftsmen are recommended to use the jointing method. In this case, a plastic cross is attached between each tile, which creates a seam. The size of the latter is determined depending on the chosen room design.
Corner cladding
To cover the corners, you need to cut two tiles at an angle of 45 degrees. The fragments obtained in this way are connected in the indicated zones.
Decorating the edges of the masonry
If decorative gypsum stone is used, the edges of the tile can be processed with a file or knife. Thanks to this, the masonry will turn out more broken and take on a natural look.
Sealing joints
After a day (12-48 hours, depending on the type of glue), you need to grout the joints. For this, a specialized composition is used, selected in accordance with the color scheme used in the room. A construction syringe is filled with this mixture. Next, the joints between the tiles are filled with the composition. This procedure must be carried out immediately, without stopping.
Completion
To eliminate minor defects, it is recommended to treat the tiles with a mixture of water, color (take a darker shade) and acrylic varnish. This composition is applied to the cladding surface using a sprayer.
Dimensions and texture
- Rubble stones are oval stones that resemble boulders or pebbles.
- Chipped - with characteristic chips, reminiscent of untreated rock.
- Sawn - particles obtained after cutting slabs, three sides are polished.
- Mosaic - elements are arranged in a certain pattern.
- Brick - imitation of brickwork.
- Tile - the front side of such stones is polished, and the surface imitates tiled masonry.
- Fantasy - an appearance that cannot be found in nature, specially created for projects.
If the hallway is large, you can combine decorative items of different textures; if the area is small, it is better to stick to one option.
You can focus on a separate area using a combination of stones of different sizes, but similar in color. Larger stones can be placed in doorways, and smaller stones can be placed in active areas.
After creating a design project, you need to decide on the required volume of material. When using decorative elements, this is easy to do, because they all have an almost correct shape.
Shades of white
White color contributes to the visual expansion of space; its use in design is considered a classic. The choice of shades of a given color is the key to success, as connoisseurs of sophisticated style know. Some people think that white is a very easily soiled color, which is bad for the hallway, but this is not true, because the stone is very easy to keep clean.
There is no need to make all the interior details of the hallway white; it is best to dilute the space with bright accessories such as a carpet or lamps.
Plain white walls are a must for the Greek style. If you want to recreate it at home, white can be alternated with shades of blue and blue.
Style selection
Modern
Modern style is characterized by restraint and straight lines and maximum utilization of usable space.
Classic
Soft shades of the walls, elegant furniture and decorative items that match in color will create a delicate, classic hallway interior.
Provence
Provence style is romantic and light; the interior, as a rule, is made in light colors and is complemented by wooden pieces of furniture. A brick wall will be an unusual addition.
Loft
Loft style and stone are almost inseparable concepts; it is used in almost every design.
The photo shows a hallway decorated with brick-like wallpaper. The interior is designed in loft style.
Shades of Gray
The gray color imparts rigor, and the hallway, made in shades of this color, speaks of the practicality and efficiency of the owner of the house. The shades can be combined with other components to achieve a fresh, modern look.
In the Gothic trends of the Middle Ages, you can diversify the style of the hallway with the help of laying gray, red and black bricks and additional accessories.
Design ideas
Designers recommend not creating only stone walls in the hallway; this will make the space closed and dark. It is much better to select and cover wall fragments, placing accents in the right places.
- Corners of the walls in the hallway. It is better to fill them with masonry (either along the internal or external corners).
- Stone floor. This option is not particularly budget-friendly, but is quite fragile to use, because it is under constant pressure. Natural preparations are suitable as materials.
- Niches. To achieve the desired effect, it is worth filling the niches with stone elements and directing light sources there.
- Doorway. The arch can be enhanced with the help of decorative stone, referring to the medieval era and the mystery of caves.
Getting ready for installation
Before finishing the hallway itself, it is important to carefully prepare both the working surface and the decorative stone itself. First, it is necessary to clean the surface that will be covered: remove all stains, peeling primer, dust, building mixture residues
If the surface coating has poor adhesion properties, for example, like plaster, it must also be removed
First, it is necessary to clean the surface that will be covered: remove all stains, peeling primer, dust, and remnants of building mixtures. If the surface coating has poor adhesion properties, for example, like plaster, it must also be removed.
Advice. To check the level of adhesion of the working surface, carry out a simple experiment: sprinkle a small area with water - if drops form and the moisture is not absorbed, it means the adhesion is low. Surface treatment with special water-acrylic compounds will help correct the situation.
If there are cracks and cracks, they must be primed.
Secondly, clean the decorative stones from cement laitance - you can use a regular metal brush for this. Then carry out the already familiar experiment: moisten the back side of the material, that is, the one with which it will be laid against the wall, and wait 2 minutes - the surface should absorb the moisture. Otherwise, also treat it with special compounds.
Thirdly, you need to create a unique layout layout - lay out the elements on the floor in the same way as they will look on the wall. This will help you choose the most optimal finishing option and evenly distribute the stones on the work surface.
Combination examples
Decorative stone can be used together with wallpaper, various paints, plaster or putty.
- Plaster. The combination of artificial stone with it is successful for interior decoration. This decor will last a long time and will delight the owner with the quality of its workmanship. For a more harmonious look, stone corners can be combined with plastered walls.
- Wallpaper. The combination with them is one of the most popular in the world of design. It is recommended to choose light shades of materials, and since the emphasis is still on stone, wallpaper should be chosen with floral motifs.
If the corridor has stairs
When decorating such a room, you need to remember that the colors of the walls, floor and stairs must be combined with each other.
Lighting
Lighting fixtures are selected to match the style of the room. For classics, a sconce on the wall is suitable. The Art Nouveau room is decorated with spotlights.
Stylistics of the ladder
This interior element performs not only a functional, but also a decorative task. The style of the staircase should match the design of the house.
Strength of glass materials
The glass staircase does not weigh down the interior, but, on the contrary, gives it lightness and airiness. Transparent steps make the room brighter, and they are made of thick laminated glass.
Replacement options
In cases where there is no finance for stone finishing, analogues are suitable.
- Panels. Their location inside the hallway is the optimal solution for a small budget. The panels consist of both natural and artificial raw materials; they combine well with other materials.
- Tile. Practical and affordable, with the right choice it will be difficult to distinguish tiles from tiles.