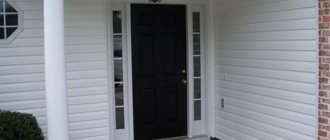
Owners of country houses one day think about how and with what to cover their building so that it is protected from external influences and at the same time looks quite attractive.
The construction market offers a large selection of building materials for finishing, but not everyone is suitable for an old house or one built from light building materials. Country siding is well suited for covering a small house and getting an excellent result.
Variety of this material
It is important to understand that different types of the same finish may differ in certain characteristics. This means that one option is suitable for a house with a long service life, while the other is better to choose for a recently erected and reliable structure. Let's look at different types of siding:
- Metal. Made from galvanized steel or aluminum. The cladding has excellent strength properties and perfectly protects against mechanical, biological and atmospheric influences. But not every house can withstand the weight of such cladding. It is better to choose it for houses made of bricks or blocks.
- Fiber cement panels. High quality cement and cellulose fibers are used as raw materials. The result is siding that is durable and reliable. But in terms of price, this option is more expensive, and also has a lot of weight and is unlikely to be suitable for frame summer houses.
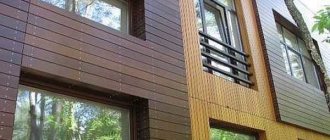
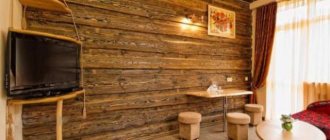
- Wood siding. This type of finish is made from natural wood with the addition of synthetic resins, which makes it more resistant to the external environment. But we must also take into account the fact that wood, even protected by certain compounds, is an extremely impractical material. After some time, it loses its attractiveness, and then you have to spend time and a day updating the facade.
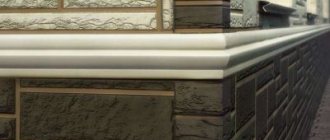
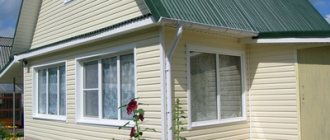
- Vinyl panels. This option is ideal for covering a country house with siding. The finishing is light and reliable and at the same time the price is quite affordable. True, you will have to be careful not to damage it with garden tools. But the lower areas of the house can be finished with basement vinyl siding. Manufacturers made it specially much stronger.
Advantages and disadvantages
There are a lot of positive characteristics of siding material, the main ones are:
- the period during which siding can be used without problems reaches 50 years;
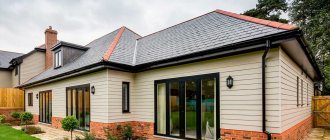
- Thanks to the finishing with siding panels, the house acquires an attractive appearance . Using this material it is possible to create a variety of styles and realize the most daring design ideas;
- the material does not require special care, there is no need to paint it. It is very easy to handle;
- siding is characterized by lightness and elasticity;
- the process of installing panels is very simple, it requires the efforts of only one person, which allows you to significantly save on a team of workers;
- has high resistance to sudden changes in temperature;
- creates a reliable protective barrier for the surface of the facade of a house finished with siding from the effects of negative destructive environmental phenomena;
- condensation does not form under the surface of the panels, since there are ventilation holes in it that remove accumulated moisture;
- the material is resistant to rotting and corrosion processes, and is also not destroyed due to the activity of insects and microorganisms.
As for the disadvantages of this material, it is worth considering the following points:
- The material from which siding is made is completely synthetic. Accordingly, it does not have a sufficient level of environmental friendliness . This does not apply to the wooden variety of panels, although it is not as reliable as the others.
- Flammability of siding . This point is important in the event of a fire. If the panel begins to melt from the fire, then it releases caustic and toxic substances that are dangerous to the health of people and animals. Stewing products is very difficult.
- If low temperatures persist for a long time, the siding panels become very fragile and may begin to crack . It is even possible for parts of the panel to break off.
- The material is not very resistant to mechanical damage . This is especially important for the metal variety, since for it even a scratch on the surface is a significant threat to quality. The panels cannot be restored, which requires the cost of replacing a damaged panel.
NOTE!
For homes that are exposed to sunlight more often, it's best to choose light-colored siding because it's less prone to fading.
Advantages of vinyl siding
This material has a number of advantages that set it apart from other types of this finish.
- Ease. Allows you to transport and move elements without much difficulty. In addition, it can be installed both on new buildings and on old ones.
- Protective functions. Vinyl siding perfectly resists temperature fluctuations, humid environments, and the effects of microorganisms.
- Wide selection of colors and textures.
- Affordable price.
- Unpretentious care. For cleaning use ordinary water. More serious stains can be removed with a sponge and detergent. But ordinary melt or rain water can easily remove dust.
- Long service life. Some manufacturers indicate a figure of about 50 years. But be careful when choosing colors. Often, to reduce the cost, low-quality dyes are chosen, and bright colors lose their attractiveness after the first sunny season. Therefore, it is better to choose pastel shades.
What tool will you need?
When the facing material is prepared for work, you need to collect all the necessary tools in one place.
All the tools that a master needs should always be at hand. A special belt is often used for this purpose.
We will need:
- ruler, square, tape measure;
- a hacksaw for metal with fine teeth or a grinder equipped with a metal circle;
- furniture stapler and hammer for working with wooden sheathing;
- screwdriver and screws;
- metal scissors, awl, knife;
- level at 1.5 meters, water level, plumb;
- construction pencil or chalk.
Don't forget that to work on the upper level you will need either scaffolding or ladders.
Finish options
Finishing a country house with siding can be done in several ways:
- Horizontal cladding. Use horizontal panels.
- Vertical cladding. This is done using vertical siding.
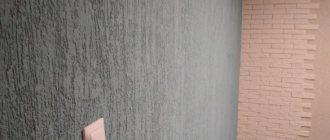
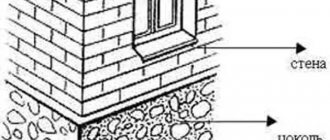
- Decoration of the entire façade area with a basement view.
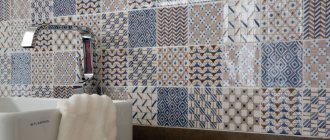
- Various combinations. It all depends on the imagination and tastes of the owner. You can combine horizontal and vertical, basement with horizontal or vertical siding. You can also add other types of finishing materials (natural or artificial stone, facade tiles, plaster).
Are you planning to insulate your facade?
In order for the house to maintain its ability to breathe, it is recommended to choose mineral wool. This is especially true for wooden buildings. The thickness of the heat insulator is selected depending on the climatic region.
Insulating a house with mineral wool implies the presence of a ventilation layer between the wool and the siding. If the height of the sheathing is not enough to provide a gap of 1-3 cm, then a counter-lattice is provided.
Installation of insulation with a counter-lattice to create a ventilation gap
A hydro-windproof film is attached on top of the insulation using a construction stapler. Wall cladding will breathe well if you use modern vapor diffusion windproof membranes. You should be careful with insulation, since the wrong choice of materials at this stage can lead to problems with room temperature and ventilation.
If you plan to combine the cladding of a house with its insulation, we recommend going to the article about installing siding with insulation.
Preparatory stage
Let's start by calculating the necessary materials and purchasing them. Typically, manufacturers produce panels with a length of 2.5 to 6 m and a width of 22–27 cm. Knowing the length and height of the walls of the building, you can calculate how many parts are needed. You must not forget about the additional elements (starting and finishing strips, corner elements, connecting strip, if necessary).
You need to buy with a margin of 10–15%. This amount will be enough to cover damaged elements during installation or transportation. It is also advisable to buy everything from one batch from one manufacturer. The dimensions of the parts and even the shade may differ in different batches, and even more so among manufacturers.
After everything has been purchased, you need to start preparing the foundation:
- Remove all incoming parts - waste pipes, antennas, fasteners.
- Clean the surface from old decorative coating.
- Remove stains and traces of fungi or insects.
- Treat the walls with deep penetration soil. This stage should not be skipped, since the composition will help protect the base from moisture and fungus, and therefore help maintain a pleasant indoor microclimate.
Corner profile repair
A common problem is damage to the front side of the corner profile.
To correct the situation, it is not necessary to dismantle the casing. It is enough to cut off the face strips of the damaged corner profile, leaving the nail strip, bottom and wall of the receiving gutter. From another, whole, corner profile, you need to cut off the nail strip, leaving the front profile and the bottom of the receiving gutter. Next, the cut fragment of the new corner profile is applied to the part of the damaged profile remaining on the wall and glued together or attached with vinyl or nylon rivets to the old nail strips. J- and H-profiles are repaired in a similar way.
Frame construction
Before installing the frame on which the siding panels will be attached, you can attach insulation. Additional thermal insulation will make the country house warmer in the cold season, and in the hot season it will keep it cool.
To secure the insulating material you need:
- Cover with vapor barrier film. The joints must be taped with tape.
- Attach insulation. You can use the one you like best based on its technical characteristics.
- Cover with another layer of vapor barrier film. Protects the insulating material from evaporation from the interior, moisture and cold gusts of wind from the external environment.
Now let's move on to the frame. For horizontal siding, a vertical sheathing is installed; for vertical siding, a horizontal version is installed. The distance between elements should not exceed 50 cm.
Description
The material consists of panels, which subsequently acquire an integral system on the facade of the house. The material used to produce products is varied . Accordingly, each type of siding has its own characteristics and performance characteristics.
There are quite a lot of options for implementing the desired design solution; each type of product has its own color scheme and variety of textures. Basically, the products are characterized by a fairly high level of strength and reliability; they are also profitable to use because their price level is not too high.
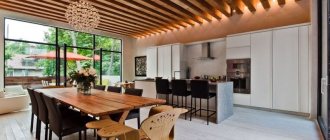
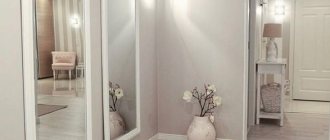
Beautiful siding for cladding a house - photo:
Siding installation
There is a specific plan according to which this cladding is installed. Even a beginner can cope with this task.
- Securing the starting bar.
- Installation of corner elements.
- Fastening the first panel. The bottom edge is placed in the starting strip, the sides are installed in the corner pieces. On the top side there are holes for fasteners; you need to place and fix a screw or nail in them. Do not tighten the fasteners all the way. After installation, the part should be movable by 2–3 mm in both directions.
- Installation of all subsequent panels.
- Fastening the finishing strip.
How to install panels correctly
During all preparatory work, it is better to store siding panels in a covered, dry room, protected from direct sunlight, in a horizontal position on a flat surface, at a temperature of –30 to +50 °C.
Fastening sequence.
Siding panels are mounted on previously installed connecting structures: starting, connecting and corner strips. Facing starts from bottom to top from left to right. First, the starting bar is attached. It must be mounted absolutely horizontally: the evenness of laying all subsequent layers depends on this.
The first front panel is inserted into the starting bar and slightly pulled up until it snaps into place. Then the panel is screwed to the sheathing through special mounting holes: the first screw is screwed into the middle of the siding panel to avoid its deformation in the future. When screwing in the screws, the panel should not be pulled up - it should hang freely under its own weight.
After fixing the first siding panel, the next one is installed on it using exactly the same technology. In order to cladding the facade evenly and accurately, it is recommended to assemble the panels simultaneously along the entire perimeter of the house - in a circle, visually monitoring the evenness of the installation and checking the horizontality of every third layer of panels with a building level. This way there will be less waste during installation - you can immediately see where the cut pieces can be used.
The finishing strip is attached after the last layer of siding panels is installed. In the very top panel you need to make hooks - for this you will need a punch. These hooks are then snapped into the finishing strip clamp.
Thermal expansion gap.
The main installation rule is that siding and accessories must move freely and not rest against anything. Due to natural temperature changes throughout the year, siding is subject to expansion and contraction. Therefore, when rigidly fixed to the sheathing, it becomes deformed and moves in waves.
This is what errors look like when calculating gaps for thermal expansion. Photo No. 7.
Be sure to leave 5–8 mm free between the siding panel and the side fastener. After installing the panel, it should move freely left and right, but not dangle.
Fastening elements.
The most convenient way to fasten the siding to the sheathing is with galvanized self-tapping screws with a sharp tip and a wide head. They are not subject to corrosion and over time will not leave unpleasant rusty stains on the facade.
There should be a distance of 1.5 mm between the screw head and the panel. The easiest way is to tighten the screw completely and then loosen it one turn. Photo No. 8.
The screws are screwed exactly in the middle of the mounting holes so that the panels can move. Photo No. 9.
Extension of panels.
Often the building is longer than the siding panel. In such cases, a connecting strip is used. In this case, panels of standard length have to be cut. When calculating their length, it is important to remember the temperature gaps.
Installation of siding panels with a connecting strip (left) and extension of panels with an overlap (right). Photo No. 10.
The second way to lengthen panels is overlapping installation. So that the junction points are not noticeable, the joints of the next layers are made offset. But still, after a few years, due to thermal expansion between panels mounted overlapping, gaps will appear and the joints will become noticeable.