We pour the screed onto the heated floor
“The doctor hides his mistakes in the cemetery, the cook in the sauce, and the builder in the foundation.” (French proverb)
Good day, dear reader!
Many residents of private houses use a warm water floor as their main or additional heating. Even the bathhouse is no exception, for example, here. It has a lot of advantages, the main ones:
— balanced, that is, optimal temperature distribution across the height of the room;
— tactile comfort (this is when it’s pleasant to walk barefoot, but you can also sit and even lie down);
And here is one of the important questions for you - what is the thickness of the screed for a warm water floor. Let's talk exactly about this. Go…
Screed thickness
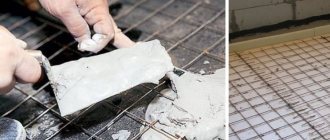
The concrete layer is the floor screed itself. It is strongly recommended to use a concrete screed rather than a cement-sand screed. To achieve the required strength of a slab using a cement-sand mixture, the amount of cement that will have to be used will lead to the fact that the cost of the floor will significantly exceed the price of a structure of similar strength made of concrete. The thickness of the screed should be 30-45 mm above the level of the pipes.
To make a concrete layer, concrete of a grade not lower than M300 should be used, and crushed stone should have a fraction of at least 5 mm and no more than 20 mm. With a screed thickness of 50 mm, the weight of 1 m² of such a floor will be about 120 kg, so you should always ensure that the floor beams in the room where the warm water floor is installed are sufficiently strong.
The installation process takes place using metal beacons of the PN-28 type, located around the perimeter. Leveling the mixture is done using a rule.
It is recommended to strictly adhere to the ratio of the required ingredients in order to avoid additional difficulties during the installation process. The optimal composition of the mixture prepared using 12-liter buckets is as follows:
- 1 bucket of cement
- 2 buckets of crushed stone with a fraction from 5 mm to 20 mm
- Water 7-8 liters
Superplasticizer for concrete SP1 - 0.4 liters of solution prepared in advance. Recipe: add 2 liters of powder to 5 liters of water and mix well.
If available and upon request, add 3-4 buckets of granite screenings with a fraction of up to 5 mm.
If special plasticizers and granite screenings are not available, then a screed of similar strength can be prepared by increasing the amount of cement from 1 to 1.5 buckets.
After the surface of the concrete layer has dried, the heating system starts in test mode with a coolant temperature not exceeding 25 °C. You can use water heated floors to their full potential only after 30 days.
Features of a heated floor, its layers and their thickness
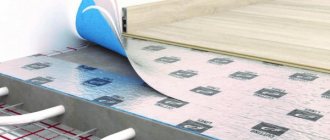
Warm floors include special materials that are laid in a certain sequence. This structure is also called a “layer cake” with heating elements inside (water pipes or cable).
The main task of the pie:
Installation of the pie on a concrete screed
The underfloor heating pie on concrete slabs, regardless of whether it is water or electric, looks like this:
On the ground
Installation of the pie on the ground of a water or other type of floor is allowed if the soil is not loose and the groundwater is at least 5 meters from the surface. The difference between this design and the installation of a floor pie on concrete lies in the additional stage of work.
The bottom line is this:
In the future, the process of installing a heated floor on the ground is no different from laying a cake on concrete slabs: reinforced mesh, heating elements, pouring screed or underlay, and floor covering.
On a wooden base
If the basis for a heated system is a wooden covering, then the principle of installing the pie is the same as on concrete slabs.
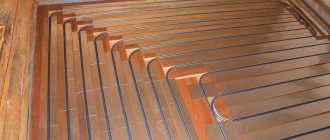
There is a second method, which differs in technology - using wooden logs. In this case, plywood is laid down like the base of a pie. There are logs on it, on top of which a waterproofing film is spread.
Insulation boards 10 cm thick are laid between the logs. For heating elements (pipes or cables), grooves are made in which they are installed. When arranging a water pie, first a reflective plate or foil is placed in the grooves, and only then the pipes are laid.
There is another option - flooring, when chipboard sheets equipped with channels for pipes are placed on the insulation laid in the logs.
Another method is rack-and-pinion, they are stuffed onto the base. The distance between them must correspond to the size of the heating elements.
For your information! The concrete screed in a pie with logs, when installing a heated structure with slats or floors, is not poured.
Thick plywood is laid as a base for the finishing coating. A decorative coating is mounted on it. If you plan to install a laminate, then you can abandon the plywood and lay it directly on the pipes of the water system, since any of the profiles listed above can withstand such a load.
On a dry screed
Dry screed is a loose material on top of which plasterboard or plywood is spread. The instructions for laying the cake on a dry screed under a heated floor are as follows:
For your information! Professionals advise using expanded clay; it is the best heat insulator.
Difference in heating depending on the thickness of the screed
A competent calculation of the thickness of the layer poured when installing a screed is also necessary because of its influence on the process of uniform heating of the room.
If the layer is thin, then it objectively warms up faster, ensuring that after the water circuit starts functioning, heat spreads into the room without a long wait. At the same time, in such conditions, it is more likely that cracks may appear in the screed, negatively affecting the uniform heating of the floor.
Scheme for laying layers for water heated floors
An excessively thick layer has good heat capacity, so it retains heat longer, allowing it to be distributed across the floor plane, but it takes longer to warm up. There is also a large load that has a negative effect and can cause the screed to break. To avoid this phenomenon, it is recommended to install expansion joints.
When deciding to level the floor using a screed, you need to understand that the thickness of the layer installed using a wet, semi-dry or dry method will be different, therefore, uniform heating will not be achieved.
Separating layer
To prevent anything from moving apart, the base of the pit must be lined with geotextile or dornite. It is better to choose the first one, because it also protects against weed germination.
The correct underfloor heating pie must be separated from parts of the foundation and plinth (the lower part of the building wall lying on the foundation) with a special layer. It is strictly forbidden to rest the slab on protruding parts of the structure.
The correct floor should be made in the form of a floating screed.
Total thickness of finished subfloor
Recommended thickness of each of the layers that make up the warm water floor cake. The order of arrangement of each of the layers is shown in the diagram below:
The subfloor must be smooth and durable. The thickness of each layer placed on top of the subfloor, in order from bottom to top, will be as follows.
A layer of insulation 30-90 mm thick made of fibrous polystyrene rigid boards. They must be strong enough to withstand the high load of subsequent layers, and therefore the material density is chosen to be at least 35 kg/m³. The thickness varies depending on how cold the crawl space is. If there is a heated room below the floor, then a layer of 30 mm will be sufficient, and if the floor is laid on the basement floor of a private house, then it is better to place a layer of insulation with a thickness of at least 90 mm.
Multifoil 3 mm thick is laid on top of the thermal insulation. Its main function is to waterproof the next layers of the floor. If the waterproofing layer has already been laid on the rough concrete floor, laying multifoil is not required.
Reinforcing mesh 100x100x4 mm or 150x150x4 mm serves to increase the strength of the screed, which, when reinforced, becomes more resistant to tensile loads. For the convenience of laying pipes according to the diagram, they can be fixed at the desired points on this grid.
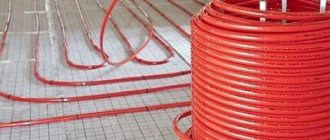
The pipe is laid according to one of the diagrams shown below. These circuits are called "coil" and "helix". The first is classic and suitable for any room, while the second is not recommended for use on wooden floors and is most effective for rooms that require particularly intense heating. The permissible distance between pipes is from 10 to 30 cm. The presence of joints inside the floor is unacceptable; the pipe is laid in one piece, the ends of which go into the collector. The average layer thickness is 20 mm.
Before moving on to the screed, we need to talk about the damper tape. It is pre-laid around the perimeter of the walls in order to avoid creating unnecessary stress on the walls. The fact is that the concrete screed, when heated from the heat of the pipe, will expand and create pressure on the walls, and to prevent this, it must be fenced around the perimeter with a special “spring” material. The minimum thickness of such a tape is 5 mm, the optimal is 10 mm.
As a result, taking into account all the described requirements for the arrangement of a water-heated floor screed, the thickness of all layers and a separate concrete screed will be as follows:
- The entire floor is 80-135 mm, taking into account the thermal insulation layer and the thickness of the concrete layer
- The thickness of the screed is 50-65 mm, depending on the selected layer height above the surface of the pipes.
Looking for energy efficient solutions?
Pay attention to FORUMHOUSE geothermal heat pumps
Ground source heat pump EU (start/stop)
Geothermal heat pump IQ (pseudo-inverter)
IQ ground source heat pump (inverter)
In the first part of the material, we talked about why the FORUMHOUSE user with the nickname Rebbytw decided to make a water-heated floor on the ground with his own hands when reconstructing an old house. In the article we described the entire preparatory stage, as well as the nuances of preparing the base for a concrete screed. Let's continue the topic we started. We tell you how to properly install a heated water floor from scratch on the ground, and move on to the following technological processes - laying sewer pipes, laying a hydro- and vapor barrier layer, installing insulation, the process of reinforcement and pouring screed.
Water floor on the ground: laying sewer pipes
According to a user of our portal, he decided to lay the sewer pipes after compacting the sand for two reasons:
The laying of sewer pipes itself was carried out like this: using a laser level, marks were placed on the wall, from which the depth of the pipes was noted. Marks were placed every 1 meter, taking into account the angle of inclination of the pipes. The slope was 3 cm per 1 m. After digging the ditch, before laying the pipes, the sand was additionally spilled with water and compacted.
The pipes used for sewer installation were ordinary gray ones.
Pipe diameter – 110 mm. I took the gray ones because... brown ones are 1.5 times more expensive. The gray pipe has a thinner wall - 2.7 mm, and the brown pipe has a thinner wall - 3.5 mm, but the load on the pipes will be minimal. And judging by the reviews of local builders, the gray pipes laid in the ground stand and nothing happens to them.
The nuances of pipe installation are interesting. First, the entire sewer circuit is assembled without rubber seals - in rough form, to check that everything is calculated correctly. Then the pipes were assembled with rubber rings inserted. For ease of installation, liquid soap was used, so it is easier to insert the pipes into each other.
After the pipes are inserted, mark the joint with a marker (put a mark in a circle) and slightly pull out the pipe by 0.5-1 cm. This gap is necessary to compensate for the linear expansion of the pipes. Also, after installation, the pipes rotate slightly. If the sealing ring gets stuck during installation, it will be very difficult to rotate the pipes. This means that it is necessary to disassemble the connection and eliminate the distortion of the rubber band.
If you leave the sealing ring tucked in, the runoff will begin to seep into the sand and erode it.
All pipe joints were also wrapped with mounting tape.
At the finish line, a plastic pipe was inserted into an asbestos pipe that had already been laid earlier and ran from the house to the septic tank. Because The diameter of the asbestos pipe is 20 cm, the user used this trick. I took the transition of a brown pipe from a diameter of 11 cm to 16 cm, put it on the last tee and stuck it into the asbestos. The gap between the two pipes (approximately) 20 mm was filled with a cable - a linen braided rope, which is impregnated with resin-bitumen mastic.
After laying the sewer pipes, they were covered with sand, spilled with water, compacted and everything was brought into the same plane with the prepared base.
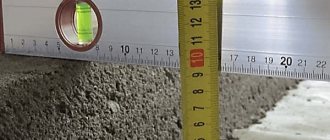
The user also advises, before finally filling the pipe, to take a photo of it, attaching a tape measure, in order to know the exact distance from the wall to the sewer, in case you need to drill the floor in the room in the future.
Installation of steam, heat and waterproofing
The base is ready, we continue installing the heated floor on the ground, and the next question arises - what to do next, because... There are several “pies” of this gender. In this regard, Rebbytw's train of thought is interesting.
I wondered what to do: fill in crushed stone, make a screed (rough) or immediately lay insulation, and decided to consult with those who had already laid the floor on the ground.
Local builders advised the user to make such a cake: roll out a plastic film over a layer of compacted sand, then pour a reinforced concrete screed approximately 50 mm thick over this flooring. Next, lay extruded polystyrene foam on this base, which is then fixed to the screed with self-tapping screws. Then pour the finishing screed for the heated floor.
The user thought about it and abandoned this solution as an incorrect and unbudgetary method. After all, in fact, the rough screed proposed by the “locals” should be made only for the convenience of fixing the EPS. Rebbytw decided that because. the floor is not expected to bear a large load; it would be correct to place the insulation (in 2 layers of 5 cm each) on a base of compacted sand, laying a plastic film under the thermal insulation.
Source
Installation recommendations
If you decide to use a film structure, then using a screed compound is not advisable. Here you should use a special tile adhesive. The elements are fixed on it. Naturally, the thickness of the layer should be minimal, and the upper part of the film floor should be visible. Next, you can lay the tiles. First you need to wait for the previous layer of glue to dry. This method of installing tiles will avoid peeling of the floor covering.
Technology for laying heating mats for electric heated floors
https://youtube.com/watch?v=fY3jneItmIs
What is a heated floor pie on the ground?
Such floors have nothing to do with baking. They are called "pies" due to the fact that their thermal insulation has many layers and they look slightly like a layer cake. If you still decide to build, then keep in mind that heated floors on the ground require some measurements.
For example, groundwater should not be too high, because this will cause your “pie” to “float”. You should also make sure that the soil is strong enough, because the entire structure can simply settle. You should also remember that the “pie” reduces the height of the room, and dismantling such a structure is a difficult task, so everything must be done correctly the first time.
Semi-dry coating
Today, many people prefer dry mixture for laying screed. It is less problematic to pour than a cement-sand mixture. This installation method has its own characteristics. The semi-dry mixture is considered stronger than ordinary cement. After pouring, the drying period is much shorter, which makes it possible to finish laying heated floors faster.
Experts say that the material does not crumble or collapse under the influence of heat emanating from the pipes. It is easier and more convenient to work with this type of mixture.
Before laying the semi-dry mixture, you should carefully prepare the base. All debris is removed, the base is laid with a vapor barrier material. If there are deep cracks or depressions, it is recommended to fill them with a viscous cement solution. Rolled materials are laid with an overlap, and it must also overlap the walls. The seams are treated with special tape. The semi-dry mixture is poured onto the finished base.
The mixing proportions that should be used are indicated on the packages of the semi-dry mixture. The consistency of the material should not contain a lot of water. If you squeeze it in your hand, you get a dense lump. Moisture should not flow down your hand. In this way, they check that the ingredients of the mixture are mixed correctly. Very often, fiber fiber is added to the dry mixture to make the coating even more stable. The fiber is well distributed throughout the structure in all directions.
The minimum thickness of the screed will be 4 cm. Its height also depends on the method of laying the pipes themselves and what material they are laid on. The floor and its maximum height can reach 20 cm. If the base for pouring has significant unevenness, the height must be raised significantly. In general, the thickness will be at least 4 cm and no more than 20 cm.
The coating may be destroyed by improper drying methods. Just because you can walk on the floor does not mean the grout is truly dry. A liquid cement-sand mixture 4 cm high takes at least a month to dry. The mixture prepared from dry materials dries within several days, depending on the height of the coating. In order for the material to harden correctly and without cracking, the surface should be moistened with water and covered with film. As a result, the base will not sag, will dry well and will not crack.
The size of the water coating depends on the type of fill and the characteristics of the base. The more significant irregularities on the surface, the higher the structure will be. This happens due to the application of several layers - this is a necessity to achieve the zero level.
Based on experience, experts say that the relative total height of the warm water coating is 10-15 cm, taking into account absolutely all materials used, including the floor covering.
Thermal insulation of the base
Before installing the heating system, it is necessary to insulate the base. The thermal insulation layer will protect the water circuit from heat loss going into the basement or foundation of the house. The following is used as insulation:
- Styrofoam;
- extruded polystyrene foam;
- foil-coated backing.
The listed materials are characterized by high strength to mechanical load, resistance to moisture and temperature changes. The thickness of the insulation is 30-50 mm, it is laid on a layer of waterproofing polyethylene film. The canvas is laid overlapping on a clean, dry base; it will protect the insulation from getting wet. Thermal insulation boards are laid end to end, the joints are coated with glue or blown in with foam, the excess of which is cut off.
Penofol or a similar sheet of reflective insulation is placed on top. A layer of aluminum foil is directed upward, this will reflect the bulk of the heat back towards the room. The joints of the foil insulation are taped with special tape. Penofol will protect the insulation from the aggressive effects of concrete. A metal reinforcing mesh is laid over the thermal insulation. This element evenly distributes the high load from the water circuit system and the concrete structure.
Types of plasticizers, features of their use
Plasticizers (surfactants) are surfactants. Surfactants are produced in liquid or powder form, with antifreeze additives and reinforcing polyamide fibers.
During the development process, the composition is endowed with properties that modify and improve the quality of floor screeds:
- Ensuring the plasticity of the solution;
- Increasing the degree of mechanical strength and moisture resistance;
- Improving surface smoothness;
- Elimination of possible damage to electrical devices by corrosion.
Laying a heated floor with your own hands, using strengthening active substances in the screed, makes its use comfortable and safe.
Sometimes modern plasticizers for screed are classified as environmentally friendly products.
But still, do not forget that they contain chemicals that have the property of changing the structure of the concrete mixture.
Therefore, in the process of preparing screeds for electric or water floors with your own hands, it is recommended to include in their composition the amount of additives corresponding to the information indicated on the packaging.
Some manufacturers of surfactant additives for cement-sand screeds, in order to get ahead of competitors, keep their composition and recipe for their preparation secret.
In addition to unknown individual components, plasticizers include the following ingredients:
- Concentrated sulfuric acid (strong oxidizing element);
- Phenolic production waste (phenolic resin, water);
- Concentrated sodium hydroxide solution;
- Defoamer, formaldehyde and water;
- Plastic reinforcing fibers (present in some surfactants).
Liquid plasticizers are added to the dry mixture: at the rate of 1-1.5 liters per 100 kg; Before use, shake the substance thoroughly and pour in simultaneously with water as mixing progresses.
Powdered - take at a ratio of 1:2 (surfactant/water); mix thoroughly, let stand for a couple of hours (the further mixing procedure is the same as with liquid).
Features of floor screeds of various thicknesses
The thickness of the screed for a water heated floor is the most important component in organizing room heating. There are 2 types of covers used, characterized by thickness: thick and thin screed. Each of the listed types has its own specific advantages and recommendations for use (depending on specific conditions). To learn how to make a screed over a heated floor, watch this video:
https://youtube.com/watch?v=fY3jneItmIs
Thin screed for warm water floor
There must be a layer of concrete above the pipe of at least 4 cm
To determine the minimum thickness of a heated floor, there are certain requirements that are enshrined in special documents (SNiP).
It is worth saying that many of the prescribed sizes in official documents are ambiguous.
For example, SNiP states that the minimum thickness of the screed for a warm cover can be at least 20 mm, but this applies to a cover made on a cement-metal base.
When calculating the height of the floor, do not forget to add the thickness of the laid covering
What thickness the screed should be when using other mixtures is not stated. But it is indicated that the minimum layer of pipe cover should not fall below 4 cm.
This means that together with the pipe (average section 20-25 mm), the thickness of the solution can reach 60-65 mm. Most often, this is exactly what the screed turns out to be (SNiP recommends 6-7 cm).
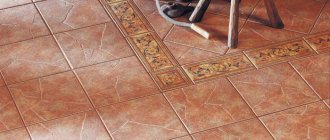
Many people wonder how to determine the thickness of the screed if a leveling mixture is poured on top or a tile covering is laid. When organizing a cement mixture under the tiles, one established postulate should be followed: the solution should exceed the level of the pipes by 1-1.5 cm. For details, see this video:
Since the tiles are laid on an adhesive base 8-20 mm thick, the total height of the flooring above the pipe will reach 6 cm (taking into account the thickness of the tiles). Using the same principle, a cover is created with a leveling mixture, on which a laminate or wooden floor is subsequently laid.
Thick floor screed
Increasing the amount of mortar will not only increase the cost of work, but also increase the load on the base
The maximum permissible values for the thickness of a heated floor screed are not mentioned in SNiP, but an unreasonable increase in it can lead to certain consequences:
- an increase in material consumption leads to an increase in the cost of the structure;
- to heat a thick layer of coating, a longer period of time and increased energy consumption are required;
- reduction of space in a heated room;
- may lead to the dismantling of the doorway (the door does not open).
But, nevertheless, quite often they resort to measures, organizing a thick flooring associated with leveling the floor and comparing it with the zero point.
The process of leveling the surface is organized on the rough floor, but if for some reason this has not been done, it can be done using a pipe layer of mortar.
The total thickness of the flooring can reach 15 cm.
Based on what has been written, it is worth saying that each owner, when choosing the thickness of the screed for a warm water floor, will rely on his own considerations.
But you should not abandon the above recommendations; they can be useful for any builder who is planning to install a warm water floor in a room.
Common features
Typical violations.
It is wrong to make a thick screed over pipes and without a backing. The thickness of the screed for a water heated floor will affect the efficiency of the system, its efficiency, as well as the operating period. A thin layer will not allow the base of the floor to warm up evenly, and besides, such a screed will crack very quickly due to constant changes in temperature conditions. The selected floor covering on a very thin screed will also deteriorate very quickly.
But thick layers of fill will not bring a positive result. With this basis, heating costs will increase significantly, since you will have to spend a lot of energy to warm up the entire resulting “pie”. Therefore, it is necessary to choose the optimal level of concrete screed pouring for a water heated floor system. But even experts will not be able to give an answer about the universality of the thickness of the mortar. Many conditions can affect this parameter:
- Type of floor base, type of soil. To a greater extent, this applies specifically to private construction when arranging a room with a concrete floor from the very foundation.
- Parameters of the entire room where the screed is installed on top of the warm water floor, its configuration.
- The purpose of the future premises.
These points are among the main ones. Additionally, there may be a few more nuances that are worth paying special attention to. They can be called the marking of the cement used, the choice of a specific mixture for the job, the reinforcement and its characteristics, etc.
Features of installing a rod infrared floor
This type of heated floor consists of rods that are connected to each other by flexible wires. When current is passed through the rods, they generate heat. This type of heating can self-regulate the temperature, so it can be used without a thermostat.
Installation sequence of the rod infrared floor:
- creating a laying scheme;
- preparation of the base;
- laying thermal insulation;
- preparing the location for the sensor;
- laying out the strips and connecting the cable according to the drawn up diagram;
- fixing the strips to the base using mounting tape;
- installation of a thermostat;
- connecting the sensor and cable to the thermostat;
- connecting the thermostat to the network;
- system testing;
- pouring screed;
- laying tiles.
For such a floor, the best finishing coating is ceramic tiles; it is laid in a screed, the thickness of which should be more than 2-3 centimeters.
Sequence of work
Before the screed, waterproofing, insulation and pipes for heated floors are laid. Be sure to reinforce the surface with metal mesh. It is important that each twig is at least 3 mm. The fittings should be at the bottom, and pipes are attached to it.
But there are experts who prefer to place the mesh above the water pipes for optimal load distribution. This will allow enough heat to escape from the concrete layer.
The waterproofing layer is applied over the rough screed using roll or liquid waterproofing. Next, they begin to install the insulation layer. Typically, dense polystyrene is chosen. The slabs are stacked compactly due to the presence of locking devices on the sides. The screed for heated floors is poured with concrete of such a consistency that it is easier to level. The solution is mixed by hand or with a concrete mixer. It uses 1 part cement and 4 parts sand, which is pre-sifted. Also add enough water to knead the dough-like mixture and a plasticizer for elasticity.
To make the screed strong, it is recommended to add fiber to the solution, which consists of synthetic fibrous materials.
Pouring the floor with mortar Source couo.ru
It is important to install it at the same time. You cannot fill one area and then do the rest a few days later. If you do this, cracks will appear in the future.
You should check the condition of the pipes; when the concrete hardens, there will be no access to them. Test the system by connecting the operating water pressure and check for leaks during the day. If smudges appear, they must be eliminated and only then proceed with filling.