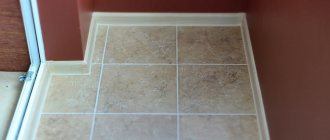
Ceramic tiles on the floor have a number of advantages. It is easy to keep clean, wash, remove debris, water and various organic contaminants, which are commonplace in the kitchen, bathrooms and utility rooms. Floor tiles have many advantages. The only drawback is that the floor is cold. Modern technologies make it possible to make ceramic tile floors warm using a heating system that is laid under the tiles, according to instructions and safety precautions.
Leveling the floor for tiles
Many people trust professional builders and renovators. But it costs a lot. How to save money, lay tiles yourself, and at the same time not violate the laying technology, so that the results of your labor are not in vain?
How to choose floor tiles and adhesive mixture?
When choosing tiles for the floor, it will not be enough to look only at the colors. You need to take into account the area to determine the number of tiles. It is worth buying it with a reserve, making an allowance in advance for the fact that the tiles may crack.
When choosing tiles, you need to consider the condition of the floor. Remember: the thinner the tile, the smoother the floor should be. The tile should not be shiny or slippery. You should choose tiles with a rough surface. Do not under any circumstances confuse wall tiles with floor tiles; they have different characteristics (thickness, density, strength and heaviness of floor tiles are greater). Typically, floor tiles are more expensive.
Ceramic floor tiles
When choosing an adhesive mixture for laying tiles, it is better to trust professional manufacturers. Dry building mixtures are the best you can come up with. In addition, they have individual characteristics, they can be selected for a specific room - frost-resistant, with moisture absorbers, water-repellent.
Adhesive for floor tiles Ceresit
When choosing an adhesive mixture, you need to take into account the place where the ceramic tiles will lie. For a street, veranda or cold corridor, the adhesive building mixture must be frost-resistant. While in the toilet, and especially in the bathroom, the adhesive mixture must meet the technical characteristics of building materials for wet rooms.
Practical recommendations
There is disagreement among developers about whether it is worth making self-leveling 3D floors. We will answer this question from the point of view of independent professionals and tell you about the disadvantages of such coatings.
- You only need to walk on 3D floors barefoot or, in extreme cases, in soft indoor slippers. There are no varnishes in nature that are not afraid of abrasive elements; because of them, scratches will appear on the surface, distorting the original 3D effect. You will have to sand the varnish or make a new coating. Both the first and second require time and financial resources.
- Household appliances should be moved very carefully on such surfaces, and it is best not to install them in the bathroom at all. Not all homeowners can afford this.
- Prolonged contact of topcoats with water is strongly discouraged. No bathroom is immune from various leaks of engineering systems. After prolonged contact with water, cloudiness may appear on the surface of the varnish; removing them requires a lot of effort. In addition, the varnish can develop microcracks under such operating conditions, which become noticeable over time.
Be careful with the self-leveling floor in your bathroom
3D floors that turn your bathroom into an ocean
This information will help you make an informed decision about the feasibility of installing 3D floors. Study the marble bathtub at the link.
Preparatory stage
Leveling the floor is an important stage of repair. Before laying the tiles, it is necessary to critically evaluate the condition of the floor, and, if necessary, dismantle it in order to then make it perfectly level. During a major renovation, the work on leveling the walls and ceilings must be completed, so you need to start leveling the floor after the walls and ceilings have been leveled.
It is necessary to take into account that when leveling the floor you will need tools - a spatula, floor level meters, several types of hammers and construction putty mixtures. You will also need rubber gloves that will protect your hands from aggressive mixtures and cleaning agents, as well as a chisel for dismantling old coatings - tiles or wooden boards.
Before leveling the floor, it is necessary to thoroughly ventilate the room by opening windows and doors, clear the surface of furniture and other interior items, and vacuum corners and crevices, if any. Plumbing items must also be removed.
The floor surface must be freed from dirt, oils, sand, dust, and old paint. This can be done using a blowtorch. All cracks must be puttied, sealed and rubbed. After this, it will take time for the solution used to seal the cracks to dry and harden.
After this, the room must be made airtight, eliminating drafts. The temperature of the floor surface for leveling should not deviate from room temperature (20 degrees, conventionally) by more than 5-7 degrees.
floor tiles
Answers (7)
I bet you that the old tiles do not hold firmly everywhere, remove the tiles. Pouring floors, especially in such an area, is not for an amateur. Find yourself an experienced “commander” for this. Otherwise, you know, the first damn thing is lumpy. Good luck!
Check the horizontal level of the floor; due to the old tiles, the filling level will rise and material consumption will increase. If the horizon is not important to you, check each tile. If it is durable, you can fill it, just buy a good self-leveling screed and read the instructions on the bags (the thickness of the filling is important)
What if you fill the places where there are no tiles with putty? Then floor consumption should decrease. I want to take IVSIL Tie Rod III floor and its floor leveler to cover large differences.
You will need a laser level (to find out where the differences are). Dismantle the tile - God forbid, it will become loose under your self-leveling floor! Again, if you don't have experience installing self-leveling floors, I don't recommend doing it yourself. Correcting errors can take a lot of time and money. A well-laid self-leveling mixture looks quite presentable (but I, however, do not exclude the possibility that in the future you will have to tint the surface - it depends on the load).
Features and differences between leveling concrete and wood floors
Typically, the base of the floor is concrete slabs. They often have an uneven surface due to depressions and sagging, and differences in floor level can reach 5 or even 10 cm. When laying tiles on such an uneven floor, difficulties arise that sometimes negate all the work. Therefore, before laying the tiles, you need to make sure that there are no dents or any unevenness on the floor.
A wooden floor, even though it has been washed, is not suitable as a base for laying ceramic tiles. Wood does not have sufficient rigidity, and therefore, even if the tiles are laid perfectly evenly on wood, they can peel off or crack when heavy objects are placed on it - for example, a washing machine, cabinet, kitchen stove.
Moreover, it is unacceptable to lay tiles on an old wooden floor.
Therefore, before laying the tiles, it is necessary to dismantle the boards, skirting boards, and then either fill the floor with a leveling mixture, screed, or lay new boards of high rigidity, 3 cm thick. After laying, the boards must be treated and impregnated with a special compound or paint that protects the wood from fungi, rotting, mold, insects.
Waterproofing and construction mesh are laid on top of the boards. Finally, the wood floor is filled with mortar (or mortar) for the final primer. In this case, it is imperative to ensure that there are no drips, grooves, or puddles. Moreover, the cracks must be filled with solution twice. The primer solution must be distributed evenly over the entire surface of the room with a spatula. It is necessary to take into account that such a floor will take a long time to dry - up to a month.
Dismantling the old coating
The preparation procedure depends on the condition of the apartment. In a new building, it is enough to clear the base of debris and apply a primer. In old premises the following actions are performed:
- Plumbing fixtures and baseboards are dismantled. Beat off the tiles with a hammer drill. Remove the adhesive solution.
- Assess the condition of the floor screed. Small cracks and chips are covered with tile adhesive, so there is no need for pre-treatment. If there are deep defects, remove the screed. This is done using a hammer drill, being careful not to damage the concrete slabs.
- Clean surfaces from construction debris and dust. It is recommended to use a construction or waste household vacuum cleaner.
- Apply a penetrating primer and dry the base.
Assessment and methods of eliminating floor unevenness
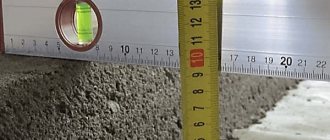
You can check the floor for evenness using a special device - a level. This device can be water and laser. Using a level, you need to find the highest point of the floor. The rest of the surface should be “pulled” to this point. It is necessary to make marks on the walls that correspond in height to the highest point. Using a laser level, assessing the curvature of the floor can be easier, faster and more accurate.
Level
The water level will require more patience and attention, since you will have to determine the horizontal with the help of a pencil and ropes. This operation is best done together. How to do it?
By eye you need to determine the highest place on the floor. Usually such a place is located near the wall, near the baseboard. From the highest place you need to measure 3-4 cm upward using a tape measure or ruler and put a mark. Using a sheet of drywall, a long rope or a piece of profile, you need to “walk” the entire room in a circle, leaving marks on the wall. If desired, you can connect the marks with a pencil (charcoal, chalk) line. This will become the outline of the future “ideal” floor.
Just in case, make sure that the highest place is not inside the room. To do this, you can take a long rope and connect the marks from opposite walls. If the rope does not touch the floor, it means that you have identified the highest place correctly.
Having identified unevenness using the level, you can begin to correct them.
laser level
Self-leveling flowable mixtures
Floor mixture
There are several reliable ways to perfectly level an uneven floor.
The first is the simplest and most reliable - filling the floor with a self-leveling mixture. Such building mixtures are sold dry and have a cement base. The purpose of such mixtures is narrow: they are used exclusively for preparing the base for laying decorative floor coverings (tiles, linoleum, mosaics, etc.)
Mixtures of this type are divided into 2 types: thick - for initial leveling, liquid - for finishing coating.
- The first is less fluid and provides a coating approximately 4 cm thick.
- The second is more fluid, applied in a thin layer, necessary for final leveling, giving the floor a perfectly flat surface.
Both mixtures require careful cleaning of the base, otherwise insufficient adhesion between the surfaces will lead to the mixture cracking or peeling after drying.
It is not difficult to prepare such a mixture. To do this, pour it into a special container, fill it with water in accordance with the attached instructions and grind thoroughly using a construction mixer or a special device until the lumps disappear. The thickness of the mixture should resemble rich sour cream.
Do not violate the proportions specified in the instructions. This will not improve the “smoothness”, but the strength of the floor leveling coating may significantly deteriorate.
When dissolving a dry building mixture, you should not use warm water, since the chemical processes of hardening in the mixture may begin to occur earlier and faster than the mixture spreads over the surface and fills the required floor space. It is better to use cold water for the solution.
Due to rapid thickening, large portions of the composition should not be made. To fully use the composition there is no more than 20 minutes, then the composition will lose its fluidity.
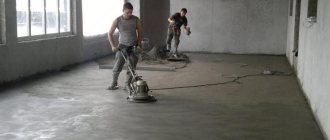
Self-leveling flowable mixtures
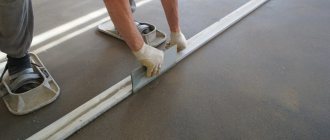
It is wiser to work with such mixtures together: one person prepares the solution, the second pours the fresh mixture onto the surface. It is important to maintain a fast pace in your work, since you cannot allow the edge of one layer to dry before applying the second. This will worsen the leveling properties of the mixture.
Before pouring the mixture, it is necessary to exclude any air movements and drafts: close doors and windows tightly. After this, the prepared composition is poured out in whole strips 45-50 cm wide and quickly leveled with a spatula.
Working with such mixtures is easy and pleasant. The only negative is the high cost. In rooms with a pronounced, deep curvature, the use of expensive mixtures can be economically painful.
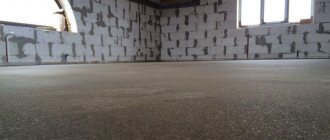
self-leveling mixture
Cement strainer
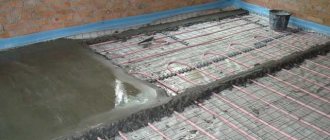
The second method, proven, reliable and, importantly, cheaper, is cement screed. This method is especially good where the difference in curvature is more than 5 cm.
Cement screed for tiles
This method is stressful and time-consuming. But, compared to using expensive building leveling mixtures, it is much more economical financially.
How to make a screed without making mistakes? After thoroughly cleaning the floor and marking the walls, it is necessary to install “beacons”. A flat wooden beam is usually used as “beacons”. The first “beacon” is installed 2-3 cm from the wall, at the point of the highest section of the floor. The second “beacon” is approximately 70-80 cm. The third is at the same distance, etc. Each “beacon” is checked using a level and compared with wall marks. This method requires care, since all the “beacons” must be at the same level. If there is a difference between them, you need to put something down: a wooden beam, a little cement.
When all the “beacons” are placed, you can begin to prepare the cement mortar. It is best to take Portland cement and clean dry sand, the mixture proportions are 1:3. You need to start filling the space with cement from the far corner, gradually moving along the “beacons” in the direction of the door. The “beacons” can be left in the cement, or taken out when the solution “sets”, after which you need to fill the recesses and level the surface.
When making cement mortar for screed, dry sand should be used. Wet, damp, damp sand will reduce the strength of the screed. You should also not force the drying of the screed by heating the room with gas or an electric heater. It is better to carry out such repair work before the cold weather, since it is undesirable even for the heating radiators to work during drying. It is also extremely undesirable for the drying screed to be exposed to sunlight.
At the end of the cement pouring process, cover the surface with plastic wrap and leave until completely dry.
cement
DIY waterproofing process
The quality of the protective layer is the main requirement for this stage of work. The layer is laid between the floor slab and the main screed. The work order includes:
- Gluing the joints between the floor and the walls with special tape.
- Application of waterproofing mastic. When distributing the material, cover the lower parts of the walls of the room. The mastic is applied evenly, eliminating the appearance of streaks and sagging. Otherwise, the waterproofing becomes ineffective or begins to interfere with the laying of the screed.
- Drying the waterproofing layer.
A mixture of glue and sawdust for wooden surfaces
The third method is suitable for wooden floors. A floor that has become warped over time and has become “wavey” can be straightened using a simple mixture of PVA glue and ordinary sawdust.
A mixture of sawdust and glue
The procedure is the same: you need to find the highest place on the floor, and from this place, using “beacons,” fill the curvature with sawdust mixture. To prevent the mixture from thickening too quickly, the sawdust can be moistened with water.
If the floor is like an accordion, after preliminary cleaning you can cover it with chipboard, thick plywood, nailing and leveling the surfaces. After this, all gaps, cracks and seams are treated with a mixture of PVA and sawdust.
If the floor is like an accordion, after preliminary cleaning you can cover it with chipboard, thick plywood, nailing and leveling the surfaces
This method has a drawback: the glue takes a long time to dry. However, after drying, such a surface acquires the properties of hard plastic.
It is better to leave wooden surfaces where there is no heavy load on the tiles - on terraces, verandas, etc.
chipboard sheet
Completing the floor leveling
After completing all of the above steps, you must wait until the leveling mixtures dry. This takes from 10 to 74 hours. Don't trust a dry surface. In the depths the mixture does not harden sometimes even after 12 hours. In this case, not only the composition of the mixture plays a role, but also the macroclimate of the room - temperature, air humidity.
A wooden floor under primer can take up to a month to dry. During this time, children and animals should be removed from the premises and any walking on the hardening solution should be avoided.
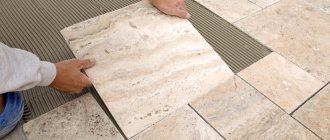
Once everything is dry, you can start laying the tiles.
Drying time
The self-leveling floor under the tiles usually begins to set and harden after 15 minutes. after filling. Final hardness occurs after 8 hours. Usually the manufacturer indicates in the instructions how long you need to wait before starting to lay the tiles.
On average you need to wait 1-3 days. But it all depends on what components are in the solution, what type of mixture, and the thickness of the applied layer. If the self-leveling floor is quick-hardening, then you can start installing the finishing coating much earlier.
The question of whether a self-leveling floor is needed under tiles is still relevant. Some make do with a concrete screed, others with a substrate. Be that as it may, you need to understand that self-leveling flooring under tiles will significantly speed up the tiling work and make it much easier. And when everything is done correctly, the result will please you for many years.