Icer
37851 0 8
Icer September 28, 2016Specialization: master in the construction of plasterboard structures, finishing work and laying floor coverings. Installation of door and window units, finishing of facades, installation of electrical, plumbing and heating - I can give detailed advice on all types of work.
During my career, I had to work a lot with drywall and build a wide variety of structures. When constructing a frame, the reliability of the structure depends on how firmly the connection of the profiles is made. This work can be done in different ways, sometimes you can use the best option, and sometimes you can proceed from the current situation and use what is at hand.
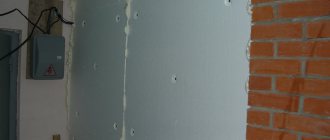
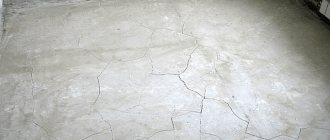
In the photo: the frame must be strong, otherwise cracks will appear on the surface of the drywall
We will figure out what options for carrying out the work can be used and what you need to pay special attention to in order to achieve the best result. All technologies are easy to implement and do not require any special skills; the main thing is to have everything you need at hand and follow the recommendations outlined below.
Species diversity of profiles
There are different types of profiles, based on your goals and work plan, depending on the type of drywall they consider:
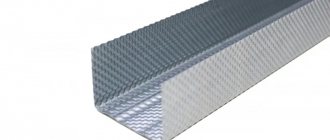
PN (UW) - the basic profile that is used for basic work. Drywall, plastic, etc. are attached to it. Its dimensions are standard one size deep, forty millimeters. And there are different options for width: fifty, seventy-five or one hundred millimeters, depending on how thick the wall is.
PNP (UD) - they are similar to the previous ones, but are used for ceiling work, for example, when installing multi-level ceilings.
PS (CW) - it is used to build new walls and light partitions. It is installed together with the PN.
PP (CD) is also used for ceiling work, secured with anchors or hangers.
PM - is attached under the plaster (or other means for leveling) and serves as a guide during operation.
UP – used for convex and internal corners. With this profile, the corners will always look perfectly straight.
Varieties
In addition to the starting one, there are other types of moldings. F-shaped is used when it is necessary to beautifully “close” the joining of the ends. For example, these could be corners where two sheets of PVC, windows or doors, or other slopes meet, or they could be joints of two different materials, for example, plastic panels and wallpaper. In other words, it is used when moving to another plane. Judging by the name, you can guess that this connecting profile is shaped like the letter F.
The next mounting molding - connecting - is selected in situations where two panels need to be connected to each other. For example, when it turns out that the height of the panel is much smaller than the walls, and you have to “grow” it. This profile resembles the letter H and is therefore also called H-shaped.
External corner, as the name suggests, hides the places where the panels form external right angles. The outer corner is considered to be the outer corner. The internal corner, in turn, masks the joining of sheets in the internal corners, which are always straight.
A general-purpose universal corner has approximately the same characteristics as a decorative corner. It is available on the market in several sizes: its sides can be from 10 to 50 millimeters. It is used to hide those places where the panels meet at right angles. This molding can serve both external and internal corners; thanks to its design, it bends in the desired direction.
Galtel, also known as ceiling plinth, is used at the joints of the ceiling and the upper edges of PVC panels. It masks this transition and adds completeness to the overall picture. This molding can be colored and thus fits perfectly into any interior. In addition to the fillets, you can also find profiles at the top called external corners. They are used when peculiar protrusions are created at the top, for example, columns or beams. Finally, interior corners on the ceiling are mounted where the walls form the interior corner.
If necessary, the ceiling plinth is supplemented with a connecting element. This detail secures two skirting boards together when one is simply not enough. It is worth noting that the length of a standard plinth is 3 meters, but in large rooms this may not be enough. Guide rails for sheathing, according to some experts, are also considered a type of profile. The purpose of this element is to simplify the installation of PVC panels. If the sheathing, like the sheets themselves, is made of plastic, then they are connected using special clips.
Finish molding, as again you can guess from the name, is used to secure the last panel. It “completes” the entire structure.
Preparatory work
The profile is attached only to perfectly clean walls. You need to get rid of old wallpaper, plaster, tiles and other coverings, leaving bare walls. It is imperative to remove all nails, dowels, and other elements. The next step in preparation is to putty all the unevenness and cracks. Prime the work surface well.
After the soil mixture has completely dried, at least a day later, you can apply markings to the working surface. Of course, you should already have a clear plan on paper that you will transfer to the walls and ceilings. Use levels so that the lines are aligned and no mistakes occur.
Why attach profiles to each other?
It is necessary to fasten the profiles to each other in order to increase the length of the profile to the required length. Another reason is that the finished structure is very durable. It must withstand kitchen cabinets with dishes, hanging TVs, paintings and other items.
The profile can be connected using piercing or drilling screws. The main thing is that the screws are intended for fastening metal to metal.
In general, profiles can be connected in many ways. Standard ones, which are indicated in the instructions, and new ones, which are passed on from master to master.
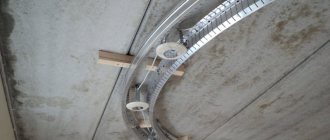
Curved surfaces
To bend the profile along a curved line, sectors with the same pitch are symmetrically cut out in the side flanges of the profile. The smaller the bend radius, the more often trimming is done. The bend line will be smoother if the step and cutting angle are smaller. Multi-level frames are mounted starting from the top level, and then the contour lines of the next level are drawn. Then the profile is cut to the required width and attached along the line to the upper frame.
Ceiling profile. It is also called rack-mount. It is in greatest demand and is designated CD or PP. It has a U-shaped section with longitudinal stiffeners knurled along the working plane.
Guide profile. Designation: UD. Serves as support for the ends of the supporting frame profiles along the perimeter.
Fastening with a cutter
A cutter is a professional tool for fastening profiles. If you do the repairs yourself and don’t plan to do such work anymore, then there is no point in buying it. It's expensive. But it greatly simplifies the streaming work of specialists. However, it is not always possible to use a cutter; sometimes they simply cannot get through and then you have to resort to self-tapping screws.
Fastening with self-tapping screws
It is easy to use self-tapping screws when working with profiles; no special experience or additional tools are required. But the reliability of fastening is much lower compared to working with a cutter. Self-tapping screws should only be used when you were unable to find a special fastener for the profile and you know for sure that nothing heavy will be attached to this section of the wall or ceiling.
Suitable dowels for drywall
Recommendations for location and screwing
Before calculating how many self-tapping screws will be needed for a structure, it is logical to familiarize yourself with the norms and rules for their placement. The following nuances are taken into account:
- The distance between adjacent screws must be more than 10 cm, otherwise the plaster of the sheet will begin to crumble when screwed in.
- When leveling walls or installing partitions, a step of 25–35 cm is taken between the fastening points. It is reduced to 15–20 cm if in the future it is planned to cover the surface with heavy material, such as ceramic tiles.
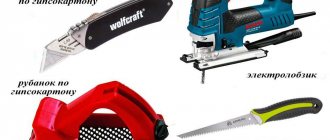
USEFUL INFORMATION: Tools for drywall work: marking, profile fastening, cutting and installation of gypsum boards
- More hardware is used for the ceiling sheathing, since they are attached more often: the step is 15–20 cm. The rule works here: the thicker and heavier the drywall, the smaller the distance between the attachment points.
- When installing in two layers, the first one is attached less frequently - every 45–60 cm. The screws that secure the second layer are 10 cm longer. When screwed in, they additionally secure the first one. This reduces the consumption of hardware and eliminates unnecessary costs.
- The number of required attachment points increases when constructing curved structures. Here the pitch between the screws is chosen so as to fix the desired surface shape.
How to properly attach a profile without cutting
First, install the guide on the wall or ceiling, and attach the main profile to the mounted elements. Measure everything to length in advance and cut if it turns out longer.
When fixing the profile with self-tapping screws, fix it well with your hands so that it does not move. Then the future drywall structure will be level.
T-shaped connections of racks and jumpers between racks
When organizing a doorway, constructing niches, hatches and for laying communications in the partition, it is necessary to install jumpers made of PN profiles between the rack profiles (PS) of the frame. You can install the jumper in several ways:
If the entire structure is made from PN 50×27 guide profiles, then the T-shaped connection is made in a non-standard way.
How to choose a suitable cutter
Any hardware store should have a good selection of tools. There are several types of cutters:
- Manual - quite compact, easy to use, strong and powerful. It has a small handle, which allows you to crawl even into hard-to-reach places.
- Reinforced - the self-explanatory name is true. Most likely, it will serve you for many years; if the “knives” are worn out, they can be replaced without buying a new tool.
- Professional – not suitable for routine repairs. Very massive and powerful, its purpose is to help in the construction of buildings. And the price of the tool will be equal to the cost of the entire repair.
Price
The table shows prices for steel profiles and Knauf components from Yandex Market, current for 2022.
| Product name, size, material | Cost (in rub.) |
| PP 3000*60*27 mm | 154-198 |
| PPN 3000*27*28 mm | 104-144 |
| PS 3000*50*50 mm | 224-253 |
| PN 3000*50*40 mm | 193-214 |
| PS 3000*75*50 mm | 262 |
| PN 3000*75*40 mm | 274 |
| PS 3000*100*50 mm | 301-319 |
| Direct suspension for PP 60*27 mm | from 7 |
| Anchor suspension/pull 1000 mm | from 34/7 |
| “Crab”/two-level/T-connector | from 14/17/36 |
| Extension | from 13 |
The technical characteristics of profiles produced by Knauf allow the use of products inside a building with any humidity. Outside, it is better to choose aluminum products. Connecting parts are used to control the level of the plane and enhance the rigidity of the frame. Hardware is determined according to density; these can be self-tapping screws with dowels or anchor bolts.
Installation rules depending on type
First you need to cut the guides to the dimensions of the future structure. The elements need to be fastened from bottom to top, from floor to ceiling. For fastening, dowels are usually used in one-meter increments, with a minimum of three dowels for each individual part.
Vertical profiles are easy to install. They are inserted into already mounted guides. They are installed in increments of one meter and twenty centimeters - the standard size of drywall.
The corner profile is attached to all corners of the room. It will protect them from chips and other damage.
Particular attention should be paid to doorways; it is best to strengthen the fastening there so as not to worry about its reliability during door installation.
Tool structure
The profile cutter consists of the following parts:
- two extended handles;
- working part. On one side it has a working head with a bat. On the other side, jaws with a hole for a bat are attached to it;
- connecting parts. They are located between the jaws so that the bit influences the front part of the part. This includes the punch and die. They are the ones that most often need to be replaced during the operation of the tool. You can buy a set of these elements with different parameters (size and shape) at once, so as not to run to the store every time.
Note! It is not recommended to replace the punch or die frequently. This can lead to rapid breakdown of the seat and, as a result, malfunction of the entire tool.
Often, a manual cutter for connecting profiles has a straight head. Here only one bit is inserted into the slot. But there are tool models equipped with a turret head. It is a type of drum on which bits with different diameters are attached. The equipment is easily changed by turning the drum. The hand tool is designed to be used with one hand. It is much easier to work with than a stapler.
Features of mounting to the ceiling and wall
The markings for the ceiling, as well as for the wall, must first be carried out in great detail on paper. It is easier to draw the markings for the ceiling on the floor, and then transfer them to the work surface.
Small plasterboard structures such as a screen for a battery, which are not required to support much weight in the future, can be installed directly on the guides. They are easily inserted into each other and are fixed with self-tapping screws at the beginning, in the middle and at the end.
We have already written that in addition to the mounting methods recommended in the instructions, you can use your imagination. Do it as you feel comfortable, the main thing is to make a strong connection.
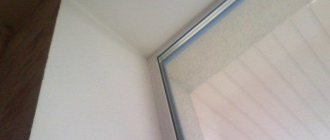
Methods for finishing slopes
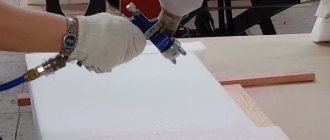
Slopes can be internal and external, and both of these types require proper finishing. Of course, their design is aesthetic in nature, because appearance plays a big role. However, this is necessary not only for beauty. The foam that fills the space between the window and the wall of the house must be protected from adverse conditions. Everyone knows that it is afraid of moisture and tends to absorb it, after which it swells and deforms the plastic window.
There are several ways to improve the appearance of the window space:
- Plastering is an old finishing method that takes a lot of time and effort. Unfortunately, it does not have the property of heat and sound insulation and over time may move away from the surface due to shrinkage of the house. Since the finishing work takes place in several stages and requires subsequent painting, I decided that I would not bother using this option.
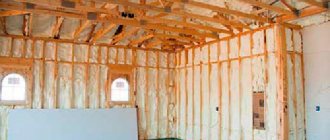
- Plasterboard - this option is better than the first and if you insulate such slopes, they will last longer and will retain heat in the house. But one significant drawback made me refuse to use drywall - the fear of moisture. A prerequisite for long service life is a dry room with a low level of humidity. And the installation of such slopes is not far removed from plaster, and I already said that I wouldn’t want to bother.
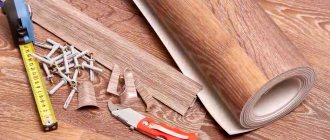
- From PVC panels - a simple and affordable way that I immediately liked. Long service life and quick installation prompted me to choose plastic slopes, and most importantly, they are not afraid of moisture.
When I decided which method I would use, all that remained was to get acquainted with additional components for PVC and learn the installation technology.
How to connect drywall profiles together without a crab
If the profile length is not enough, you can correct the situation. The first way is using an extension cord. It resembles a piece of the profile itself with holes for fastenings.
We take two pieces of profile, which together make up the length you need. We insert the ends of these parts into the extension cord; they should immediately fit tightly and securely there. Using pliers we connect and bend the edges of the profile and connector together. We secure all this with self-tapping screws at the junction.
Another method is suitable if the extension cord is not at hand, but you need to continue working. We take two profiles together that make up the required length and plus ten centimeters on each part. Using metal scissors or another tool, cut off the curved edges by five centimeters. We insert the profiles ten centimeters into each other where the cuts were made. We strengthen it with self-tapping screws.
Fastener selection
Before considering ways to install a profile under wall plasterboard, you should understand what fasteners and tools you may need during the work.
Special fasteners
Manufacturers of metal profiles also produce special fasteners designed to connect sections and nodes of the frame being created:
- The profile extension is designed for extending metal strips. The insert is made of the same material as all the elements of the future frame and fits in size to the galvanized slats produced by the manufacturer, precisely connecting and strengthening them.
- A single-level “crab” quickly and rigidly fixes profiles in one plane. The connection point is additionally twisted with self-tapping screws for reliability.
- A two-level connector fastens and fixes profiles located one below the other.
- The side connector creates T-shaped connections by securing perpendicular profiles.
To use these special fasteners, you must first create a sketch of the mounted frame and calculate the required number.
Self-tapping screws
Hardware is the main fastener when constructing a frame for drywall. With their help, the connection is strengthened with special elements or the entire structure is completely mounted. Self-tapping screws are also used to screw profile hangers to a wooden wall.
Advice! Do not buy self-tapping screws with a drill; small hardware with a sharp tip (the so-called “bugs”) will be more convenient for assembling the frame.
The length of the screws for connecting the metal profile should be 9 or 11 mm. The material from which the hardware is made will not affect the build quality of the structure in any way, so you can buy any available in the store. On average, the consumption of this fastener is 20-25 pieces per 1 sq.m. constructed structure.
Dowel-nails
This fastener is necessary for fixing hangers to a concrete or brick wall. The optimal length of the dowel-nail is 37 mm, and the diameter is 6 mm.