Have you already built your garage? If the foundation is ready, you have erected the box and completed the interior decoration of the garage, then all that remains is to take care of its appearance from the outside. After all, this will be the business card of your garage. It should look presentable and tasteful. If you are not a supporter of external beauty, then we want to assure you that decorating the outside of the garage is not done only for appearance. Thanks to this finishing, you can protect the walls of the garage from external influences and extend its service life for many years. Is this already interesting? If yes, then we invite you to find out what materials you can cover your garage with.
The matter is not limited to banal dyeing or applying a fur coat. There are really a lot of materials for work and they all have their own characteristics. Let's look at each of them separately.
Stage 3. Ceiling finishing
Ceiling made of corrugated sheets
After finishing the walls from the inside, you should pay attention to the ceiling. At this stage, the most relevant materials for finishing the ceiling are plaster and PVC panels
Typically, the choice of material for finishing the ceiling is determined by the presence or absence of ceilings in the garage and the garage owner’s own taste preferences.
If your garage does not have a ceiling, then you can only retain heat through internal wall cladding. Car enthusiasts often choose to finish the ceiling with clapboard. Why? Yes, because this particular material is economical, aesthetic and easy to install. In addition, it is worth considering that the ceiling covering is not, as a rule, subject to mechanical damage, as happens with the walls of the room.
If you would like to clarify details about a particular method of interior decoration, write comments to the article. Our experts will kindly answer all questions.
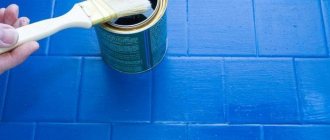
No. 9. Varnish
If the garage was built of brick, then you don’t have to worry about finishing, but simply varnish the walls. This will give additional protection to the masonry. Among the advantages of this option:
- low cost;
- ease of application;
- the varnish will additionally protect the brick from moisture and aggressive substances;
- additional strengthening, the walls will be very strong;
- protection against fungus and mold thanks to the antiseptics included in the composition;
- dust and dirt almost do not “stick” to the varnish coating, and keeping the walls clean will be easy;
- brick is not afraid of fire and temperature changes;
- varnish makes the masonry more attractive.
Minuses:
- the brick wall should be more or less attractive, otherwise the result will not be very aesthetic;
- internal insulation is excluded.
The varnish can also be used for additional protection of concrete, plaster, and plywood.
The choice of material and method of its installation depends on many factors. This includes budget, availability of the material itself, the ability to do the installation yourself, personal preferences, and the need to carry out internal insulation of the walls. Therefore, think three times, take into account all the factors and only then make a choice.
Source link
No. 2. Ceramic tile
Ceramic tiles are another material that almost completely meets all the requirements put forward, which is why this type of cladding is often found in garages. Its main advantages include:
- resistance to moisture and frost resistance , so that harsh garage operating conditions will not particularly damage the coating;
- fire resistance;
- hygiene . Dirt does not stick to the surface, and if something happens, almost any dirt can be washed off the wall with minimal effort;
- sufficient strength ;
- durability;
- wide choice and aesthetics. Ceramic tiles are produced in almost all colors, shapes and sizes, and manufacturers’ collections are replenished every season, so it will not be difficult to find a suitable material in this variety. Even the simplest plain tile will look great. From an operational point of view, it is best to go with clinker - it is stronger than ordinary tiles, although it does not have such a wide variety of colors.
There were some downsides :
- the cost of the material, as well as the need to pay for its proper installation if you can’t do it yourself;
- weight . Tile is a heavy material, so the optimal base for it would be brick walls;
- relatively long installation .
Since the main deterrent to the widespread use of tiles in garages is their price, you can use a trick by combining materials . The lower part of the walls is the most vulnerable, so clinker can be used here, and the rest can be made from cheaper tiles. You can make the bottom of tiles and finish the top with plaster. In this case, we get all the benefits inherent in tiled flooring, but we can save a lot.
The garage can be lined with clapboard belonging to classes A or B. Installation is carried out on a wooden sheathing. Installation is facilitated by the tongue/groove system. The boards are fixed using nails, clamps or staples.
Finishing garage walls with stone
The most durable, durable and high-quality finishing material is stone. If you have unlimited financial possibilities, you can clad the garage façade with natural stone, which allows you to create a rich and unique appearance, as well as ensure the durability of such a coating.
In order to save money, you can select a certain artificial material that has an acceptable cost and an average level of quality. However, a wall lined with such stone also looks interesting and allows you to choose the material among a wide variety of its types.
Installation of natural and artificial stone requires a professional and responsible approach, which involves a sufficiently large amount of adhesive solution to properly glue the stone to the surface of the walls.
Video: getting to know siding better
Now you can find out even more useful information about siding. It is this material that is increasingly popular as the main exterior cladding of garage walls.
This video tells in detail about siding, its main technical characteristics, and advantages.
Have you finally decided to use siding to cover the walls of your garage? It's a good choice. But you will need to understand in more detail how best to install a metal profile under the siding. The following video will help you.
Watch the video carefully. It clearly presents instructions for installing a metal profile under siding. By following the recommendations, you will achieve reliability and durability of the cladding.
Have you already built your garage? If the foundation is ready, you have erected the box and completed the interior decoration of the garage, then all that remains is to take care of its appearance from the outside. After all, this will be the business card of your garage. It should look presentable and tasteful. If you are not a supporter of external beauty, then we want to assure you that decorating the outside of the garage is not done only for appearance. Thanks to this finishing, you can protect the walls of the garage from external influences and extend its service life for many years. Is this already interesting? If yes, then we invite you to find out what materials you can cover your garage with.
The matter is not limited to banal dyeing or applying a fur coat. There are really a lot of materials for work and they all have their own characteristics. Let's look at each of them separately.
Types of construction
Many owners of private houses are thinking about building a garage if they don’t have one in the first place. For residents of multi-storey apartments, this will be a little more difficult, because for so many residents it is difficult to allocate space for a car for everyone, and not everyone has one.
To know what exactly is best to build, you need to have a clear idea of what type of structure is best suited for a particular home. It is believed that the most successful option is a built-in garage, which is a single building along with the house. It is easy to supply light and water and is much more convenient to use, but it also has its drawbacks. Due to the entry and exit of cars in this room, exhaust gases are released that enter the house. This in itself is of little use, but there are also people who are especially sensitive to odors.
The way out of the situation can be considered a good hood or ventilation, but it can be noisy, which will create discomfort, or ineffective, and money and time on its installation will simply be wasted. In this regard, in houses where people live permanently, they try not to build a house with a built-in garage.
Another type is the garage under the house. This is a rarely used option due to the risk of fire. In addition, the cost of constructing such a building will be approximately equal to a residential building, which is completely unprofitable.
You can make an extension to the house so as to use one of its walls for a garage, but do not combine it with a residential building. This option will make it easy to carry out all communications and not harm household members with harmful fumes from the garage. Essentially, he is building separately, only using one wall of the house.
You can build a garage separately from the house. This is done if an extension is impossible or the location of the house does not allow convenient and quick access to the garage. A separate room can be made of different materials. The simplest would be a metal garage; sometimes it can be purchased ready-made and simply installed on a prepared foundation. In addition, you can build it from brick or cinder block so that the construction is permanent.
A metal garage can also be lined with masonry to be able to insulate it, and maybe even add a second floor. It will be easier with brick options, they are initially ready for the fact that you can add a meter of masonry to them, install a roof and there will be a second floor in the form of an attic room, which can be used as a pantry, warehouse or corner of the owner of the house.
Buildings finished with metal sheets are easy to install, but they are very cold in the winter. In addition, it can be easily hacked and there is a high risk of fire. If you build a building from corrugated sheets, then the positive aspect will be its cost and simplicity of design, and the negative aspect will be the cold in winter.
Sandwich panels, which can be easily assembled, are frost-resistant, aesthetically pleasing and environmentally friendly - are an excellent option for creating a motorhome.
A wooden garage is considered a budget option, but is environmentally friendly and durable. It also has significant disadvantages - it is afraid of moisture and fire, and also strongly absorbs odors.
You can build a garage from polycarbonate, which in the right hands looks great, is lightweight, has good heat and sound insulation, does not burn, is durable and wear-resistant. The only downside is that it can be hacked.
As for garage designs, the following options are distinguished:
- frame rooms - made of wood;
- collapsible - made of metal;
- Shell garages and pencil case garages are small spaces exclusively for a car;
- awning structures;
- construction from a sea container.
Paint and varnish finishing materials
Paints and varnishes are one of the most popular building materials used to decorate the inside of a house. In addition to their decorative function, they protect external and internal structural elements from aggressive environmental influences. Depending on the composition, the material is used for both external and internal coatings.
Regardless of the type, the composition of the paint includes:
- Matrix binding component
– provides adhesion (adhesion) to the surface being treated. - Filler
– gives the paint the necessary consistency to form a layer. - Pigment
is a coloring element of natural (iron lead, ocher, umber) or synthetic (zinc white, chromium oxide) origin. - Additional additives
(plasticizers, solvents) - individual for each type, are responsible for the technical and operational characteristics of the paint.
The main criterion for choosing paint or varnish is the binding component. Each type of binder forms its own group of paints and varnishes, determining its purpose and popularity.
- Water-based paint
is the most popular and widely used in construction. It is odorless, environmentally friendly, dries quickly enough, ideal for interior decoration. - Water-dispersion paint.
The main binding element is synthetic polymers. Working with this group will not bring any inconvenience, since the paint is odorless and can be brought to the required consistency with ordinary water. After hardening, it forms a waterproof and fireproof coating. - Oil paint.
The binder is drying oil. The chemical reaction of drying oil hardening occurs due to the oxidation of the substance with oxygen from the atmospheric air. To speed up the process, drier catalysts are added to the oil paint. The same drying oil is used as a thinner to give the required consistency. - Enamel paint
is a mixture of varnish and dry pigments. For repair work, alkyd and nitro-enamel paints are used. They are brought to the required concentration with white spirit or turpentine, so they have a persistent, pungent odor. A day or two after applying the paint, the surface is ready for further use. Nitroenamel dries within an hour, forming a smooth, mirror-like surface effect. But this advantage is annulled by certain disadvantages - toxicity and fire hazard. They are rarely used in the interior finishing process. - Varnish.
Varnishes contain synthetic or natural resins and organic solvents. After complete drying, the varnish gives a fairly wear-resistant transparent or matte film on the surface. The presence of an organic solvent in the composition makes the varnish a toxic and fire-hazardous building material. Work with varnish at enterprises takes place in special chambers with good exhaust ventilation. At home, in the absence of large amounts of work, it is advisable to apply varnish outdoors. If surface varnishing takes place inside the house, it is necessary to ensure ventilation of the room. Under no circumstances should explosive solvent vapors be allowed to accumulate in a small area.
Note! The interior decoration of a private house involves the use of environmentally friendly water-based paints - water-based and water-dispersed. Water-dispersion paint
Working with water-based paints is not difficult, since they adhere well to almost any material, but the quality of painting depends on the degree of preparation of the surface.
- We carefully clean the base from dust and, of course, from traces of oil or soot.
- We treat the surface with a primer. The primer not only increases adhesion, it prevents paint from being absorbed into the pores of the base material, making it possible to achieve full-quality painting using fewer layers.
- Apply paint with a roller or brush, distributing it evenly over the surface of the base. Depending on the composition and consistency of the paint, 2-3 layers are required. Each subsequent layer is applied after the previous one has completely dried.
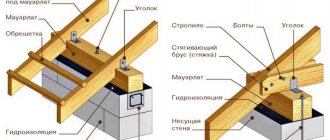
Frame assembly
Assembling a frame for a garage begins with arranging vertical supports. In this case, the supports can be concreted into the foundation slab during the pouring process, or can be attached to the concrete base with anchor connections, along with the lower frame. The highest quality and most reliable option is concreting the racks with penetration into the foundation slab and soil. It is used for construction in open areas with high wind loads. It requires the construction of a pit for each support and its separate cementing.
Stands in the ground with concreting.
A simpler and more affordable option is to use lower joists and fasteners. In this method, the vertical support is not buried in the ground, but is attached using a metal angle to a concrete floor or wooden beam, which acts as a lower frame. Such a beam is first attached to the foundation slab, and then the frame supports are installed on it.
Upper horizontal logs are placed on top of the vertical load-bearing supports. On them they construct floors for the roof. The roof itself is constructed from roofing sheets, which are laid on top of the floor joists (roof frame elements). The bottom row of the roof is laid with a slight overhang.
Its edge should extend beyond the perimeter of the building by 50-60 cm. Such an overhang of the roof prevents excessive wetting of the walls and thereby ensures their dryness, durability and the absence of moisture and mold in the garage. The minimum size of the cornice, up to half a meter, guarantees protection of the walls from drainage of waste rainwater.
The roof of the garage can be made in the form of a single or double slope structure. To do the work yourself with minimal construction experience, it is easier to build a pitched roof. In this case, rainwater will be drained to one side of the garage building. In order to distribute the drain evenly on both sides of the garage, the roof structure is made gable.
Single pitch roof.
To construct a pitched roof, the garage walls are made at different heights. One wall is raised higher than the other by 300, 400 or more mm. The difference in the height of the walls determines the angle of the roof, which, in turn, depends on the amount of snow precipitation in the winter.
With a difference in wall height of 300-400 mm and a garage width of 3 m, the roof slopes by 10-15°. Which is enough for snow rolling in regions with moderate rainfall. To build a garage in areas with heavy snowfall, the roof slope is made large, up to 30°.
A pitched roof made using frame technology.
After constructing the frame, they begin to hang the roofing elements. Step-by-step instructions for a frame garage regulate the rules for installing roof panels. Work begins with laying the bottom row of roofing sheets. Lay the sheets of the next row on top. The last row to be laid is the top row, located along the raised wall. Thus, the roofing sheets overlap each other and prevent moisture from entering the garage space during rain and snowfall.
To construct a gable roof, the frame is assembled from triangular frame elements. Their size is determined by the width of the garage and the angle of the roof. The triangular elements are assembled on the ground and then lifted to the roof. Here they are installed on the top frame of the walls. Slate or metal profile is laid on top of the finished roof frame.
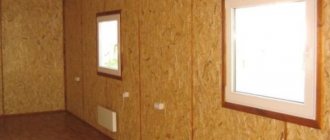
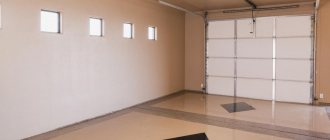
The interior decoration of the utility room is often completely absent. Especially if the garage is built without insulation. Less often, when arranging a warm garage, it becomes necessary to close the insulating material from the interior space. In this case, interior decoration becomes necessary and mandatory.
There are no moisture resistance requirements for the material of the internal wall cladding. Therefore, panels made from wood waste (OSB, chipboard) or plywood sheets are often used. If necessary, make shelves and cabinets built into the wall, attaching them to the supports of the garage frame.
The need for insulation arises when it is necessary to carry out any work in the garage in winter. Or when you plan to set up a warm garage with the ability to dry the bottom of the car after driving in the cold and wet season.
Do-it-yourself insulation.
Insulating a garage differs from similar work in residential buildings in the choice of heat insulator. If it is important to ensure a healthy microclimate in residential premises and arrange natural air circulation, then insulation in a garage is easier. You can get by with a forced periodically operating hood. And also use less useful and cheaper insulation materials - polystyrene foam and glass wool.
When insulating with glass wool, it is placed between the vertical posts. Thanks to its compressibility, it is easily held in space. The thickness of the cotton insulation is determined by the level of winter temperatures. For residential buildings at an average temperature of -10°C, choose a thickness of cotton wool insulation of up to 100 mm. For garages and other utility rooms, choose a thickness of up to 50 mm.
Foam insulation does not have the disadvantages of using glass wool. The foam does not settle over time and does not lose its shape. At the same time, it is quite inexpensive, which makes it a popular material for frame garage insulation.
If residential premises are not recommended to be insulated with polystyrene foam due to possible harmful fumes, then this type of insulation is optimal for a garage space. It is inexpensive, easy to install and works for a long time as a heat insulator, retaining heat inside the building.
When installing foam plastic, gaps form between the frame posts. This is due to the rigidity of foam boards. The resulting mounting gaps are filled with foam.
Types of garage doors
The frame garages in the photo differ in the design of the entrance gate. Traditionally, garage doors are made with double-leaf doors. However, other designs are also possible. What types of garage doors can there be?
Gates.
Swing gates are a traditional form of gate in the form of doors that swing open to the outside of the room. The simplest and most accessible design to build with your own hands. Opens manually.
Sliding is an improved form of garage entry, which can be supplemented with an automatic device. In this version, the garage door slides to the side along rails when a signal is given from a remote device.
Lifting and roller shutter structures are also possible, but their cost is much higher, so they are less often used in frame structures.
How to tile the outside of a bathhouse yourself
The owners of a newly erected bathhouse structure in the form of a wooden frame made of rounded logs or timber do not face the problem of how to cover the outside of the bathhouse. If, when assembling the log house, all technological requirements for insulation and waterproofing were met, and the wooden material underwent the appropriate protective bio-, hydro- and pyro-treatment with impregnations, then the bathhouse already has a completed appearance in terms of beauty, and does not require any additional insulation or external cladding walls
The question of what is the best way to sheathe the outside of a bathhouse arises when the bathhouse was built of brick, or an already completed building was converted into a bathhouse, requiring external finishing and insulation.
Materials for external wall cladding
Before you finally decide how to cover the outside of the bathhouse, look at the photos with the final results of external cladding work using various decorative building materials.
For exterior finishing work on walls built from brick, stone or untreated wooden parts, a variety of natural or artificial materials are used:
- wood (lining, block house, board, etc.);
- plastic (siding, lining, etc.);
- stone (natural and artificial);
- decorative brick;
- metal profile;
- USB plates;
- cement-sand mortar (fur coat), etc.
Advice! A more complete vision of the cladding process and its final effect, depending on what you use to cover the outside of the bathhouse with your own hands, is provided by videos posted in many places on the Internet.
External finishing of the bathhouse with siding
The option to sheathe the outside of the bathhouse with siding is primarily supported by the performance characteristics of this finishing material, namely:
- lack of hygroscopicity;
- counteraction to the processes of decay and proliferation of microorganisms;
- resistance to seasonal temperature changes;
- ease of cleaning;
- environmental cleanliness;
- attractive decor with a rich range of colors, etc.
As an alternative, you can sheathe the outside of the bathhouse with boards, but this requires significant additional costs, expressed in the need for additional processing to protect the wood from moisture, fungus formation, fading and increasing fire resistance. Therefore, before you cover the outside of a bathhouse with your own hands, you need to weigh all the positive and negative aspects of a particular finishing material.
Siding, for example, in addition to obvious positive qualities, has certain features that can complicate its use. Before covering the outside of the bathhouse with siding yourself, you need to level the walls so that they are level. Only walls that are as flat as possible ensure reliable fastening of the cladding panels to the sheathing.
An installation diagram for the sheathing must be drawn up before sheathing the outside of the bathhouse with your own hands, and the drawings can help with this. Using the drawings, the dimensions of the lathing cells and the amount of material required are calculated.
If the building is made in the form of a wooden frame, then before you sheathe the outside of the bathhouse yourself using siding panels as cladding, you must wait a certain time for the final shrinkage of the entire structure. The maximum shrinkage period can reach 2 years.
Application of OSB panels for exterior finishing
The use of siding is possible only with the simultaneous installation of heat and waterproofing materials, since this material only protects the walls from mechanical damage and aggressive environmental influences. The use of OSB panels (oriented particle boards) for cladding will help solve the problem of thermal insulation of external walls and their protection at the same time.
Before covering the outside of the bathhouse with OSB panels with your own hands, you need to prepare the walls, leveling them as evenly as possible in order to avoid gaps between them and the slabs. Condensation can accumulate in such voids, which will negatively affect the material of the load-bearing walls and change the heat transfer characteristics.
Important! OSB boards are also called “the best wood”, since, on the one hand, it is a durable and at the same time elastic material. Unlike natural wood, there are no natural defects in the form of knots or changes in the direction of the internal fibers
During the production process, the slabs undergo a special (ContiFinish) treatment, which gives them water-repellent and fire-resistant properties.
Various materials can be used to cover the outside of a bathhouse, but it is necessary to take into account, first of all, the building material from which the structure is built, wishes for appearance and financial capabilities.
Facing
Considering various types of finishing, it is impossible not to mention wall cladding with materials such as:
- thermal panels;
- clinker tiles;
- a natural stone;
- brick.
Next, we will take a closer look at all these materials and methods of their installation.
Thermal panel covered with clinker tiles
Thermal panels
Thermal panels are facade slabs that consist of two layers:
- bases - is an insulation made of polyurethane foam, polystyrene foam or extruded polystyrene foam;
- decorative coating - this can be marble chips, clinker tiles or other material that performs a decorative function and protects the insulation from environmental influences.
Thus, thermal panels make it possible not only to cladding, but also to insulate walls. Their installation does not require a frame, since they are fixed using dowels.
Installation of thermal panel
The cost of thermal panels depends on the manufacturers and materials from which they are made, but in general these panels cannot be called budget:
| Material grade | Cost in rubles per square meter |
| PC “Flexible stone” (foam-based, covered with marble chips) | From 1000 |
| Feldhaus Klinker R200 Amari Liso (polyurethane foam covered with clinker tiles) | 2800 |
| Dikarka QZ-03 (polyurethane foam covered with porcelain tiles) | 2 400 |
| Rokk (panels based on extruded polystyrene foam, covered with quartz granite imitating wood) | 1500 |
Clinker tiles
Clinker tiles
If you are thinking about how to decorate a facade for decades, then it is best to give preference to clinker tiles. Some manufacturers guarantee it for 100 years or even more.
The fact is that this material is really durable and at the same time not afraid of atmospheric influences. Externally, the tile resembles a brick, so a wall finished with it cannot be distinguished from brickwork. Moreover, there is a large selection of its colors and shades on sale.
The clinker is glued to the walls like regular tiles using special glue. True, this process cannot be called simple, since the tiles must be evenly positioned and the seams must be uniform. In addition, grouting joints is a rather complicated procedure, so it is better to entrust tiling to specialists.
Installation of clinker tiles
The cost of clinker tiles starts on average from 1000 rubles per square meter. The cost of tiles from European manufacturers can reach several thousand rubles per square meter.
A natural stone
Natural stone on facades always looks fashionable and attractive. In addition, this material is practically eternal. True, along with its advantages, it also has some disadvantages:
- has a lot of weight, as a result of which it places a large load on the foundation;
- the cost is quite high compared to other materials - the price of processed stone starts from 800-1000 rubles per square meter. True, in order to reduce the cost of finishing, natural stone can be replaced with its artificial counterpart, made of plastic concrete.
Therefore, stone is most often used to decorate not the entire facade, but only its individual elements, such as the base, corners of the building, etc.
Stone and other decorative elements in facade decoration
Brick
Brick has been one of the most popular facing materials for many years. This is due to its attractive appearance, strength and durability. In addition, it reliably protects the facade walls from negative influences.
Cladding a house with bricks
But, like other materials, brick has its disadvantages:
- heavy weight - therefore, before finishing the facade, it is necessary to make a foundation, unless the foundation of the house was originally designed for such cladding;
- high cost - starts from 10-15 rubles per brick;
- installation is quite complex - the facing masonry must be done by a high-class mason.
The construction of facing masonry resembles the construction of an ordinary “half-brick” wall. The only thing is that every three rows must be connected with flexible ties. In addition, vents should be made at the top and bottom of the wall to ventilate the space between the walls.
Here, in fact, is all the information about how and how to beautifully decorate the facade of a house.
Sheathing a house using sheathing
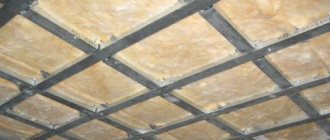
An insulating facade system using lathing, can be installed in one or two layers. The position of the frame bars will depend on how you plan to install the decorative cladding.
Installation of façade sheathing
- To install the sheathing correctly, it is better to first mark the wall. In this case, you need to take into account the width of the insulation mats.
- Then bars or metal profiles are mounted on the surface of the walls.
- If you are sheathing a wooden wall, then before laying insulation, you should attach a vapor barrier film to the entire surface of the walls.
- Next, insulation mats are laid between the sheathing bars. If necessary, they are secured to the wall with mushroom anchors.
Insulation is placed between the sheathing guides
- Having installed the insulating layer, a superdiffusion membrane is stretched on top of it, securing it to the sheathing bars with the staples of a construction stapler.
- Next, you can install decorative cladding material.
Another option for installing the sheathing is done a little differently.
Markings are also made on the wall and hangers are fixed along it at a distance of 40-60 cm from each other. Their edge holders should protrude from the wall to the thickness of the insulation and wooden blocks that will be attached to them.
Facade insulation scheme with installation of sheathing on metal hangers
- These elements will be fastening not only for the bars, but also for the installed insulation.
- Insulation mats are marked and cut in places where they will be placed on metal elements.
- Then the insulation is mounted on the wall, and a diffuse membrane is stretched and secured on top of it.
- Next, wooden sheathing bars are installed in the hangers, they press the insulation tightly against the wall and secure them in metal holders with self-tapping screws.
- Decorative sheathing material is also installed on top of this system, using the installed sheathing bars as guides.
putty
Facade finishing putty
An equally popular option for finishing the exterior walls of buildings is putty. The application process, unlike plaster, is several times easier, so everyone can handle it. When mixing the solution, it is important to strictly follow the proportions indicated on the packaging, but do not forget to independently control the consistency. An ideal putty holds its shape well on a spatula and stretches across the wall without difficulty.
Modern manufacturers use an adhesive base to create a solution. That is why it is necessary to apply it very carefully to the walls, to ensure evenness and smoothness, since grouting it will not be possible. When performing work, professionals use exclusively wide spatulas, which allows them to cover a large surface. It is also worth using this technique. As a result, the process will be accelerated several times, which means finishing work will be carried out quickly.
To quickly achieve the effect of even and smooth walls, it is worth using reinforced polymer mesh at the first stage. Before applying the finishing layer, the entire surface must be thoroughly primed.
Note! When choosing putty, you should consider options intended exclusively for outdoor use.
Wall and ceiling treatment
First of all the ceiling, and then the walls.
- Check the surface. Remove any high spots and caulk any low spots. Before doing this, wet the areas that you will be covering.
- Apply primer for good adhesion.
- Once the primer is dry, apply putty. It will take several layers, each one centimeter long. The first layer is needed for adhesion to concrete. The second is for alignment. The last one is for grouting.
- Excess dust and debris must be removed. Add some water or primer.
- Apply a final coat of putty to level the surface.
- Wait for the mixture to dry.
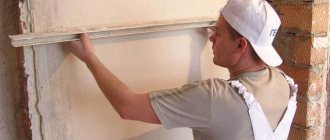
- Cover the walls in your garage with paint or primer.
You can also treat the garage externally. Suitable for this:
- Plaster.
- Vinyl siding.
- Cover the garage with clapboard.
- Stone processing.
As you can see, there are many ways to decorate a garage with your own hands. They all have their own advantages and disadvantages. You should choose the one that is most suitable for your space.
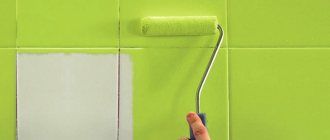
Coloring
Painting walls
Among the cheapest and most affordable exterior finishing options, paint is worth highlighting. Don’t think that this method is short-lived; manufacturers produce a fairly large range of high-quality paints. Before applying a layer of water-based or acrylic paint, the surface is carefully prepared, that is, puttied and leveled. To get a high-quality result, it is worth applying several layers of paint. Each one must be completely dry before the next one is applied.
Note! In order for the paint layer to adhere well to the plaster, it must first be primed. Thanks to this, paint consumption will be minimized and adhesion will also increase.
Is external insulation necessary?
Baths come in different types: wooden, frame, built of brick and concrete blocks. And they are used in different ways: some often and throughout the season, others only in the summer, once a week. Before you can cover the outside of a bathhouse cheaply and beautifully (or expensively and solidly), you need to resolve the issue of the need for its external thermal insulation. Then it will be more difficult to do this - you will have to remove and redo the decorative cladding.
When thermal insulation is not required
It is clear that summer baths, even those used daily, do not need insulation. But not all all-season buildings need it.
Log or timber bathhouse.
They are dressed in a “fur coat” only for commercial use, when it is important to keep warm constantly and spend less money on heating. To insulate private baths, high-quality caulking of the seams is sufficient to prevent heat leakage through the cracks
Wood has very low thermal conductivity, it “holds” the temperature inside the steam room well and does not allow frosty air from the street to penetrate. And if the frequency of fires does not exceed 2-3 times a week, there is no point in external insulation.
A log house made of timber with windproof seams does not need to be insulated Source i1.wp.com
Frame bath.
In such structures, thermal insulation material is already part of the structure.
Baths for periodic use.
If you steam no more than once a week, it makes no sense to insulate the bathhouse from the outside, regardless of the material of the walls. During this time, it will freeze through in any case, unless you maintain a positive temperature in it with heating devices. Therefore, you don’t have to worry about this and think only about how best to line the outside of the bathhouse.
When is it better to insulate a bathhouse?
It is necessary to insulate the walls from the outside if:
- the sauna is heated frequently and it is necessary that it does not get too cold between sessions, especially if there is water left in the tank;
- the number of steamers in a family or company is large, the procedure takes a long time and it is necessary to maintain the desired temperature all this time.
In such cases, external thermal insulation significantly reduces fuel consumption, which ultimately saves money and simplifies the work of the stoker. It is especially needed for buildings built from heat-intensive materials - concrete, stone, brick.
High-quality insulation saves the bathhouse owner’s energy, time and money Source yandex.net
Using lining
In some cases, lining, which is made from coniferous and deciduous trees, is used to cover the outer walls of garages. It is a safe and natural material and has a special tongue-and-groove fastening, which makes it easy to connect the panels to each other.
There are several classes of lining, and the most ideal option is premium class material, which is characterized by excellent quality and a fairly high price, but it does not allow the presence of any defects or flaws on both surfaces. For a garage, you can use class A, which refers to the first grade and allows minor defects while maintaining the normal quality of the panels.
No. 4. PVC panels
Relatively cheap PVC panels are used to finish both walls and ceilings in the garage. They are mounted, like drywall, on a frame, or directly on the wall. Among the main advantages of the material:
- low price;
- high resistance to moisture;
- ease of care. Almost any contamination can be washed off the surface of the panel without much effort;
- light weight: the material will not load the walls and foundation, so the panels can be mounted in garages built from any materials;
- simple installation, and if the frame method is used, then insulation can be used;
- maintainability. If any part of the finishing has become unusable, then it is enough to simply replace it with a new one;
- high temperature resistance
- there is no need for additional finishing, since the panels themselves have a good appearance and are already well protected from moisture.
Minuses:
- The panel is easily damaged even with a slight impact. The appearance of cracks affects not only the appearance, but also the performance. However, the problem can be solved by easily replacing the damaged panel;
- sensitivity to temperature changes, so it’s better not to save money and buy panels designed for facade work. You can also find on sale a special finish designed for cladding a garage - such panels cope better with constant temperature changes and are designed for use in an unheated room;
- During the first time after installation, an unpleasant odor may appear, but it quickly dissipates.
Decorative plaster
Decorative facade plaster is a solution made from various building materials, which contains fillers and binding ingredients. Plaster compositions are classified according to the type of binder component:
- Cement;
- Acrylic;
- Silicate or liquid glass;
- Silicone.
When applied correctly, decorative plaster provides facades with an attractive appearance that is resistant to sunlight, wind and snow loads, high air humidity and serious temperature changes.
Brick
Brick is one of the oldest finishing materials. In the classic version, it is made from red clay and modifiers. Among its advantages are high strength, low moisture absorption coefficient, frost resistance, durability and attractive appearance. Like any other finishing elements, brick cladding performs two functions at once - protective and decorative.
Facade brick
Currently, there is a huge variety of facade bricks, which open up endless possibilities for creating durable, attractive and stylish facades. The advantages of this type of cladding are: weather resistance, ease of installation, versatility of use and excellent thermal insulation properties.
Brick look tiles
Brick-like facing tiles have become widespread in recent years. The rapid growth in popularity of this type of finishing material is due to its affordable cost, aesthetically attractive appearance, and an impressive variety of colors, shapes, sizes and textures. Today, the following types of brick-like facade tiles are available to customers:
- Ceramic;
- Clinker;
- Pressed concrete;
- Porcelain tiles;
- Plaster.
The choice of material is made based on the characteristics and specific operating conditions.
Plywood
In frame housing construction, plywood is used both for interior cladding of premises and for cladding walls on the street side. However, when choosing this finishing material, you should keep in mind that it has low moisture resistance, and therefore sheet cladding in most cases performs a form-building function and serves as a rough surface for finishing facades.
Shingle
Shingles or wooden tiles are a versatile material with an interesting and exclusive appearance. Most often, coniferous trees are used for its production, which are distinguished by their resin content and high hardness.
The shingle manufacturing process is complex and involves several labor-intensive steps, which explains its high cost. In the decoration of facades, wooden tiles make it possible to provide a frame building with an individual and noble appearance.
Clinker tiles
Clinker tiles are a specific facade cladding that is close to ordinary tiles in a number of properties. In essence, we are talking about a more economical and subtle variation of the familiar clinker brick. To obtain the material, refractory types of clay, sand, iron oxide and various additives are used to give color to the finished cladding. A building lined with such tiles is practically indistinguishable from traditional brickwork.
Fake diamond
Artificial stone is a fairly new facing material that is a reliable imitation of rocks and minerals. As practice shows, unlike natural stone, artificial stone has more attractive properties from an aesthetic and operational point of view. In particular, it is distinguished by its relatively light weight, which does not create excessive loads on the frame and ceiling of the cottage.
A natural stone
Finishing facades with natural stone is a time-tested option for protective and decorative cladding of the walls of residential buildings. Natural material has a solid and respectable appearance, which gives the frame cottage an aura of reliability and prosperity. Most often used for external cladding: marble, granite, shell rock, sandstone, travertine, limestone.
Alternative materials
The construction market offers an impressive range of traditional, modern and alternative finishing materials intended for cladding the facades of frame buildings. For example, an interesting option would be to use mosaics made of broken glass, porcelain, pebbles, tiles and stone fragments as external cladding.
In recent years, special polymer compositions are increasingly used for the decorative design of facades, to which granite or marble chips, crushed quartz and other components are added.
Calculation of material for plastering walls
Anyone can calculate the amount of plaster mixture. Let's say you know the area of the garage walls without taking into account the openings Sst in m2. The main thing is to determine the average layer thickness tsl. To do this, measure the deviation in several places with a two-meter level and calculate its average value.
Manufacturers indicate the consumption of cement plaster on the packaging. On average, this value is 8 kg per 1 m2 with a layer thickness of 10 mm.
Required amount of mixture: Ncm=Sstx tslx8 kg.
Most often, dry plaster mixture is supplied in bags weighing 30 kg. Divide the resulting Ncm value by 30 and round the number up. You receive the number of bags needed to plaster the walls.
The required amount of paint Ncr also depends on the consumption indicated by the manufacturer on the packaging.
Example:
Let's calculate the amount of material in a garage with walls 4.5 m and 3.5 m long and a room height of 2.5 m.
The area of the garage walls is: (4.5+3.5)x2.5=40 m2. Having measured the deviation from the vertical, we obtained the following values: 3.5 cm, 2.5 cm, 1.5 cm, 3 cm.
Average layer thickness: tl=(3.5+2.5+1.5+3)/4=2.6 cm, rounded to 3 cm (0.03 m).
Amount of mixture: Ncm=40x3x8=960 kg. Number of bags: 960/30=32 pcs.
Epoxy paints for painting walls in 2 layers have a consumption of about 400 g per 1 m2 (0.4 kg/m2).
Amount of paint: Ncr=40x0.4=16 kg. Packaging of paints from 5 kg per container and above.
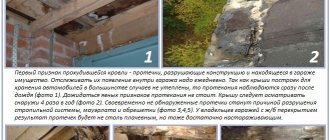
Why sheathe garage doors?
As a rule, a garage built independently or purchased already has thermally insulated walls and a roof. At the same time, gates are the main source of heat loss. Therefore, insulating garage doors should be done without delay. Covering the doors will save on heating costs in winter and keep you cool on hot summer days.
Garage doors come in different types. One of the most common ones is made of a material having a three-layer structure (sandwich panels). This gate option is quite frost-resistant and moisture-proof; it will be quite warm in the garage. Meanwhile, metal gates cause the formation of ice during the cold season and require insulation.
Sandwich construction
During frosts, this type of shutter transfers cold air from outside into a room with a positive temperature.
Hinged door design
The resulting ice is fraught with the following negative consequences:
- rapid occurrence of rust on the doors;
- condensation settling on the metal body of the car. As a result, the car body becomes susceptible to premature corrosion;
- a large accumulation of layered ice mass that prevents the gate from opening.
Frame assembly procedure
Timely prevention of the problem will eliminate the mentioned consequences in the future. Therefore, it is better not to put off insulating the gate and quickly select a suitable material for covering.
Sectional Representative Scheme
Among the existing types of gates (swing, overhead, sectional), only swing gates are insulated. Other types of sashes are insulated during production with polyurethane foam panels 4.5 mm thick.
The modern market offers thermal insulation materials of several variations, which have many advantages, with a high coefficient of resistance to heat transfer and increased fire resistance.
Insulation with mineral wool
How to build a frame garage with your own hands
There is nothing difficult about building a garage yourself. This is a simple design that requires minimal effort. This does not require special equipment, there is no need to specially hire a team or draw drawings. If a place for construction is found, then decide on the size of the garage, clear the place of plants and create a gravel bed. The earth must be compacted. After this, construction can begin directly. It will consist of the following stages:
- Creating a foundation
- Frame assembly
- Roof construction
- Wall cladding
- Gate installation
Tools and building materials
We will need various materials. It will depend on what frame for the garage we choose.
Tools you will need:
- Hammer
- Shovels
- Level
- Gloves
- Formwork
It's minimum. Wood will be needed as a building material. It could be aspen, linden, larch. You will need beams with a cross section of 100x100, 100x50. To pour the foundation you will need to prepare a good concrete solution.