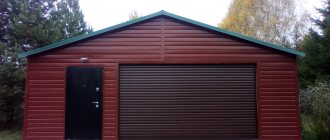
If you want to transform the room in which the car is stored and make it more comfortable, then covering the garage with OSB boards will solve this problem 100%. OSB boards are used for cladding ceilings and walls; their installation does not require a lot of knowledge, so it can be done independently. The panels last a long time, and their affordable price means that the garage owner’s wallet won’t suffer a severe blow.
Rules to follow
Regardless of which method of fastening OSB sheets is chosen, there are a number of recommendations that will help ensure the maximum permissible strength of the structure and ensure a long service life of the building and the material used.
- To make holes for door and window openings, you should use a circular saw or jigsaw. To obtain even cuts and joints, you should contact a furniture production workshop, taking the necessary measurements in advance. For a reasonable fee, specialists will perform the necessary manipulations carefully and in the shortest possible time.
- OSB boards do not fit close to each other. A gap of several millimeters should be left so that the subsequently expanded slab does not become deformed.
- A gap of a centimeter is made between the foundation and the bottom slab, which will prevent the accumulation of excess moisture.
- Self-tapping screws are mounted at a distance of 10-15 cm from each other. An indent of a centimeter is made from the edge of the slab.
Using OSB for external walls
Due to the high moisture resistance, OSB-3 and OSB-4 can be successfully used for exterior finishing. We will not consider the option of sheets for the roof, since this is not a finish, but a foundation device, but wall cladding requires the closest attention. This method is ideal for frame structures, as well as for protecting old buildings trimmed with wood paneling. Let's figure out how exterior cladding is made from OSB boards, first I'll show you a diagram that shows the ideal structure of a frame structure, this will allow you to understand , how the entire work process should be carried out, because we are only analyzing its last stage.
Exterior finishing is carried out according to the following algorithm:
- The entire surface of the facade must be covered with a windproof film, which will protect the structure from adverse influences and allow all its elements to maintain strength and reliability for as long as possible. The easiest way to fasten the material is with a special construction stapler;
- Next, you need to secure the outer sheathing; you can use either a block or a planed board for it; it is much more convenient due to its large width. The distance between the elements depends on the thickness of the OSB board; the most often used option is 10-12 mm, under which the sheathing should be fixed in increments of no more than 40 cm;
- As for the arrangement of sheets, all the requirements that apply inside are also relevant outside. The space at the top and bottom should be at least 10 mm, and gaps of 3-5 mm should be left between the sheets, since temperature differences outside are greater, which means the material will expand more;
- As for window openings, it is best to cut them directly into the sheet, this produces the most durable option. It is important to make a reliable frame of the opening in order to secure the material as best as possible;
- Fastening is done using screw nails 50 mm long or self-tapping screws 41 mm long. The spacing at the joints is 15 cm, at the edges - 10 cm, on the elements in the middle of the sheet responsible for rigidity - 30 cm. The distance from the edge is at least 10 mm, and better yet 15-20, which is why it is better to make the sheathing from wider materials.
How to finish the slab indoors?
The interior decoration of wooden country houses as in the photo can be completely different in cost and design. Various materials are used to finish surfaces made of OSB sheets. Let's consider them further.
Is it possible to attach drywall to OSB?
Can. Moreover, for this it is not necessary to use a metal profile, but simply screw the material to the base with self-tapping screws.
The main thing here is that the level of humidity in the room is not high, since otherwise this can lead to deformation of the OSB and, consequently, the plasterboard sheathing itself. Self-tapping screws are screwed in around the perimeter and in the center of the gypsum board in increments of 10-15 cm.
Painting with varnish and acrylic paint
increases moisture resistance
Acrylic paint is also a good option for finishing OSB. It rolls well over the surface with a roller and forms a durable and “breathable” coating.
To get the best effect, it is advisable to paint in two layers.
Puttying with gypsum putty
Putty materials do not adhere well to wood. Therefore, it is best to use compounds that have maximum adhesion to wooden surfaces. These can be dry mixtures “Rodband” or “Goldband”, containing polymer additives and most suitable for working with wood. Vitonit KR can be used as a finishing putty.
Before puttying, OSB is primed with a special compound, to which glue, interlining and a little putty mixture are added. If this measure is neglected, the base impregnation may bleed onto the finished surface, causing the finish to become stained.
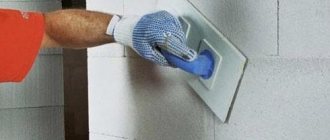
How to plaster a surface made of OSB boards?
Knauf Sevener
- The joints between the slabs are puttied and covered with sickle tape.
- The surface is treated with a primer (you can take Knauf Tifengrund).
- Apply the first layer of plaster and embed the reinforcing mesh into it.
- A covering and leveling layer is applied on top.
Glass wallpaper sticker
If the slabs are smooth (polished), wallpaper can be glued directly onto them. Otherwise, you will have to plaster and putty the surface, doing this using the technology described above.
Fiberglass wallpaper is glued to special compounds. In this case, the dry mixture “Methylane Fiberglass Premium” and the granular composition “Methylane Granulate Premium” are suitable.
Find out how to hang wallpaper on OSB from the video:
How to glue ceramic tiles?
There are several ways to stick this on:
- fix the expanded mesh to the surface and lay the cladding on any adhesive for ceramic tiles;
- perform installation directly on the OSB board using glue for deformable surfaces;
- use epoxy grout instead of adhesive.
Liquid wallpaper
prepare the foundation
12 hours before the start of work, the liquid wallpaper composition is mixed and left in a plastic bag. The finished material is applied using a spatula in a uniform layer of 3 to 7 mm.
One of the advantages of such a material is that it is not afraid of small surface defects. They simply smooth out when the mixture is applied.
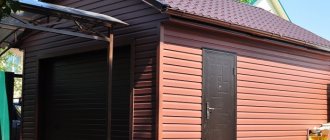
Is it possible to sheathe a bathhouse and a garage inside with an OSB board?
OSB sheets are a material that is suitable not only for finishing residential premises. It can also be successfully used for cladding a bathhouse or garage.
In the first case, of course, you need to use only environmentally friendly brands of material.
OSB in a bath should be treated with 2-3 layers of water-soluble varnish, which will add shine to the surface and protect it from moisture.
As for garage cladding, OSB of any marking is suitable here, since in non-residential premises, concern for the environment is the tenth thing and the harmfulness of the material does not matter.
From all of the above, we can conclude that OSB boards are a universal product suitable for use with various types of finishing. This quality, combined with the strength of the panels, makes OSB a worthy representative of the category of sheet materials.
How to putty OSB with your own hands - a detailed course for beginners:
Garage frame
We continue to talk in detail about how to properly build a frame garage without large investments with your own hands. After laying the foundation, you will need to make the skeleton of the building, for which you can use a wooden beam, metal profile, etc.
The permissible load of the frame will largely depend on the chosen option. The technology for constructing wooden and metal structures will be different, which is important to understand before starting work.
Construction operations plan:
- frame construction of a garage begins with the installation of the lower framing of the frame;
- then they assemble and raise the walls;
- secure the top trim;
- they cover the walls from the inside and/or outside, which will give the frame structure strength;
- install the roof frame structure.
Things to consider
To make your garage look beautiful and the finish to last a long time, you must follow some rules when installing all components, as well as subsequent decorative finishing.
- If the height of the sheet is not enough to cover the entire space from floor to ceiling, it is necessary to follow the principle used when attaching drywall - install the sheets “in a staggered manner”, without creating cross-shaped joints.
- It is necessary to leave a small compensation gap of three to four millimeters between the adjacent sheet and the sheets. It will allow the panels to deform slightly from humidity and changes in temperature conditions, preventing the sheet from warping. The gap is filled with sealant during finishing.
- If the garage is humid, it would be a good idea to cover all surfaces with clear or tinted varnish. However, it cannot simply be applied directly to an unprepared surface. First, you should go over all the walls with medium-sized sandpaper, prime them, and only after that apply varnish. This treatment will significantly improve the ability of pockmarks to withstand exposure to water and increase the service life of the surface.
How finishing is done
In principle, finishing garage walls with OSB slabs is carried out using exactly the same technology as decorating with plasterboard or other types of panels. You will need to assemble a sheathing or frame to which the sheets will be attached. However, here it is worth paying attention to the fact that a frame in a garage space is still preferable - it will allow you to put insulation into the wall and improve the situation with heat conservation.
There is only one nuance that sometimes prevents the assembly of a full-fledged frame - the small dimensions of the room. If the size of your garage is small, sheathing will be a better choice, since it “eats up” much less space. The principles of assembling the frame and sheathing are no different from installing exactly the same structures under sheets of plasterboard or decorating with plastic panels.
Protection of OSB from insects, birds and mice
Almost any of the existing methods for installing OSB boards provides for the provision of a gap for ventilation. Thanks to a small air gap, an influx of air will be ensured, which will flow from the lower edge of the wall from the environment and flow through the top back into the atmosphere. It is unacceptable to make the gap blind, which will negate the efforts and costs. A closed air cavity will not perform its intended functions. Birds, mice and bees penetrate into such places, thereby reducing the original characteristics of the wall surface. Protection from such visitors is necessary and should be planned during the first stage of construction or renovation work.
Protection against rodents can be carried out in the following way:
- Application of perforated facade material at the top and bottom of the wall. This can be a soffit, which is used in combination with siding.
- Painting mesh. The cost of the material is reasonable, the strength indicator is low (rodents can handle it quickly).
- Installation of metal mesh based on sheet material, in which small holes are made in large quantities. Stainless steel is best suited as it will not corrode over time due to excessive moisture. Strips or a mesh of metal are attached to the upper and lower parts of the wall immediately behind the OSB sheets, which will not affect the appearance of the building in any way.
Video consultation on installation of OSB panels:
Do-it-yourself interior partitions made of OSB
OSB partitions in a room are easy to create yourself. To do this, you will need a building level and plumb line, a tape measure, an electric drill with a set of cue balls for screwing in self-tapping screws and the hardware itself, a jigsaw and a tape seal.
To create a frame you need a 50x50mm beam or a metal profile for plasterboard.
How to install OSB inside an apartment when constructing a partition structure:
- Take the necessary measurements and mark the junction of the frame and the walls.
- Create a frame base. If the walls are concrete, the guides should be fixed with butterfly dowels. In frame houses you can use self-tapping screws or self-tapping screws. The distance between the vertical elements of the frame should not be more than 62.5 cm. Select the pitch based on the dimensions of the OSB.
- If necessary, install electrical cables in corrugated tubes inside the frame.
- Install the slabs using self-tapping screws 35–40 mm long. The step between them is 15 cm. The screws are screwed in strictly perpendicularly. A technological gap of at least 3 mm must be left between the sheets to compensate for expansion.
After installation, finishing is carried out. If desired, insulation and sound insulation can be laid between the sheets. The method of bringing walls into a perfectly flat state using OSB is similar in technology to erecting a partition, but the frame is installed directly on the wall.
There is almost no load on the metal profile, and thanks to the rigidity of the sheet, you can securely fasten the elements without fear that they will break or crack.
Construction site preparation
Preparatory work before the construction of a frame garage is extremely important, because the final result of the work largely depends on the quality of its implementation.
We begin work by selecting a site for construction, clearing it, creating a drawing of the future structure with a selected description of all its details and features of the site itself. The better the area is cleared of existing outbuildings, dilapidated buildings, garbage, dry branches, grass, etc., the more strong and durable the foundation for the future motorhome will be created. And without a good foundation, a frame for a garage is unlikely to be truly reliable.
In the marked area, you need to remove the top fertile layer of soil 15-20 cm thick. The use of special equipment will significantly speed up the process of completing the work, but to save money, this operation can be performed using a bayonet and shovel.
The first will allow you to easily mark the border, the depth of the soil layer, and trim it, the second will allow you to remove excess soil. Among the tools in the process of preparing a site, you may also need a rule, a plumb line, a broom, a dustpan, a wheelbarrow, or a roller.
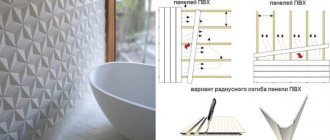
Basic rules for installing OSB boards
OSB board is easy to process. You can easily change its dimensions to suit your individual needs. The easiest way is to take the appropriate measurements in advance and cut the panels at the place of purchase.
Most supermarkets and building supply stores perform such services using precision tools.
The alternative is manual cutting, which will not be as accurate, but is still quite simple. The panels can be easily cut to size using a table saw or handsaw. Even a simple handsaw will do the job.
All OSB boards should be connected using special nails or screws. The frequency of their placement is standard and is 30 cm in the middle of the panel, and 15 cm around the perimeter. Make sure that the nail or screw is no closer than 1 cm from the edge of the slab. Fixed too close to the edge, it will not perform its functions. It is also possible to fix the panels with glue, but this is a rather rare solution. When installing, you should also leave a small interval
This is important because the OSB board may slightly change its size under the influence of changes in humidity levels. The gaps will allow the panels to expand freely
They can be filled with flexible wood glue.
Currently, OSB is the most popular wood materials for finishing, repair and construction work. They are also great for interior finishing work. There are several types of such material, each of which has many uses.
The main stages of work on the construction of a frame garage
The procedure for completing the work of building a frame garage with your own hands is very similar to the step-by-step instructions for building a small house.
The main stages of construction are as follows:
- preparation of a construction site includes selecting a site for construction and clearing it of debris;
- organization of a pit, creation of a foundation;
- performing markings, installing the building frame, tying the frame;
- erection of the roof on pre-prepared frame posts;
- floor arrangement;
- insulation work inside the building;
- covering walls with finishing materials;
- installing garage doors on a sheathed garage frame.
Let us consider each of the mentioned processes in more detail so that the reader can cope with their implementation on his own without much difficulty.
What is OSB board
OSB panels additionally insulate the room, as they consist of wood chips
The raw material for OSB, as well as for chipboard, is wood chips. Both conifers and some hardwoods, such as maple, are used. Dried shavings are mixed with resinous compounds of natural and synthetic origin and laid in layers. The material is then compressed. The result was a plate-shaped body. It is cut to standard sizes.
There are boards on sale with different characteristics, tailored for a specific application. They are usually divided into 4 classes.
- OSB-4 boards have better characteristics, but also a rather high price. If the owner of the house wants to decorate the room with OSB from the outside, he should prefer this option.
- Third class boards (OSB-3) are quite resistant to moisture. It is preferable to sheathe the room from the inside with them.
- Class II products are more durable, but are still susceptible to moisture. It can be used in dry air environment.
- First-class products are the cheapest, but inferior in strength and moisture resistance to other options. It is suitable for furniture making and packaging, but should not be purchased for interior decoration.
Arrangement of chip layers in OSB board
Resin compounds containing formaldehyde are often used in the manufacture of OSB. In this regard, concerns are sometimes raised about the possible harmfulness of sheet cladding to the health of residents.
There are two classes of this substance in products: E1 and E2. This division exists in both Russia and Europe, while the requirements of Western companies are noticeably stricter. Category E1 includes material with a gas content of up to 8 mg per 100 g, E2 – 8-15 mg. Russian standards regulate the presence of less than 10 mg of formaldehyde in the composition for class E1 and 10-30 mg for E2.
To be sure of the safety of the product, you should buy European license plates of class E1 and pay attention to the substance content. If a homeowner wants to sheathe the inside of a garage with OSB or otherwise use the material for finishing non-residential buildings, he should not worry, since these premises are not places for sleeping or permanent residence
Pros and cons of the material
After installation on the walls, the OSB slabs will need to be coated with paint.
The slabs can be easily cut without crumbling and mounted on the sheathing. Other advantages of the material include:
- low price;
- attractive appearance;
- sufficient strength (but for a sheet of plywood of the same thickness it is greater than for slabs of any class except the fourth);
- thermal insulation qualities;
- resistance to mold and fungal colonies;
- good moisture tolerance, if it does not fall on the slabs regularly and in large quantities (if you use OSB-3 for exterior decoration, after 5 years the material will be damaged quite seriously).
The disadvantages include the formaldehyde content in the composition and swelling with delamination when regularly exposed to moisture. Due to the last factor, slabs (except for the fourth class) should not be used for external cladding. They can be used to decorate the inside of a garage and other non-residential buildings that are sufficiently protected from precipitation without any fear.
Separately, it should be said about the degree of flammability of the material. Newly purchased third class slabs almost do not have this property, although they are charred in a fire flame. As the slabs are used, this feature disappears. Scraps of material purchased 5 years ago are highly flammable.
Suitable materials
To decorate the inside of a garage yourself, it is very important to choose the right raw materials. Not only the appearance and safety of operation, but also the service life depend on this.
The material must comply with the following standards:
- Optimal fire resistance.
- Protecting the wall surface from the destructive effects of temperature changes and moisture.
- Resistance to specific substances that are typical for the maintenance and operation of a car (motor oil, gasoline).
- Maximum service life without loss of original characteristics.
- If the garage is not heated, then for cladding it is better to choose products that cope well with sub-zero temperatures.
In-demand natural material
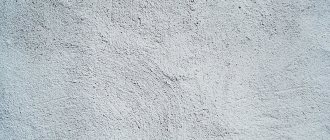
Plaster is the cheapest option
Using sand-cement mortar to finish walls in non-residential premises is an old and proven method. A layer of plaster will protect against excess moisture and slightly insulate the garage. In addition, cement and sand are non-flammable substances, which means the level of fire safety increases.
The mortar for plaster is prepared in the usual way. For one part of cement, take three, four or five (depending on the brand of cement) parts of sifted sand. Then, using a trowel, the mixture is applied to the surface. If the walls are uneven, you can apply several layers.
To increase durability and improve appearance, all walls can be painted. For these purposes, it is better to take waterproof or facade paints. In this case, the surface can be washed.
Stage 2. Wall cladding
The simplest method of finishing brick garage walls is to use plaster mortar. In this simple way you can level out unevenness and protect the surface of the walls. An additional protective layer of paint can be applied over the plaster. This type of finishing can also be used for cladding the inside of walls made of foam blocks and aerated concrete. The main advantages of plastered walls include the fire resistance of the finished coating and protection of the base of the wall from all types of damage.
Plastering walls
Plaster, like any other facing material, has its drawbacks. It is worth noting here that the process takes a long time; in addition, it is a dirty and wet job. In order for you to get a smooth and durable surface the first time, you need to thoroughly learn the basic principles of how to plaster correctly
It is important to strictly adhere to the technology of applying each individual layer of plaster
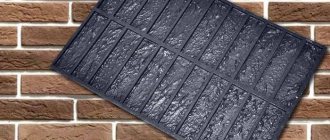
If you are not satisfied with wall cladding with simple plaster, then you can choose another, more attractive, in your opinion, option. One of the best garage wall coverings is ceramic tile. It has good strength, resistance to chemical and mechanical influences. The material is, among other things, fireproof and moisture resistant. A garage, the walls of which are decorated with ceramic tiles, looks well-groomed, neat and aesthetically pleasing.
Wall tiling
Ceramic tiles, of course, have their drawbacks, including, for example, the length of the laying process. In addition, if you do not know how to lay tiles yourself, hiring workers will cost you a pretty penny. However, without rushing, you, in principle, can cope with this process on your own.
Plastic panels and lining are also often used to decorate garages. The main advantage of this finishing material is the speed of installation. In addition, the price of the source material, compared to plaster and ceramic tiles, is negligible. There are also advantages during the installation process, because it takes place practically without dust and without a drop of dirt.
Some experts agree that facade lining, which is made of polyvinyl chloride, is best suited for a garage. This type of plastic is hygienic, fireproof and waterproof. To fix the panels, you must first make a metal or wooden sheathing, which should be screwed using self-tapping screws to the surface of the garage walls.
Plastic panels
Facade lining or plastic panels are best suited for interior decoration of metal garages. This material, in addition to its other advantages, also allows you to insulate a vehicle storage room. So, you can place insulating board material between the garage frame and the lining.
Among the disadvantages of lining, particular emphasis is placed on weak strength and a significant narrowing of the space inside the garage, by at least 8 centimeters. You will also have to pay attention to the location of the sheathing, because only on it can you later make fastenings for cabinets, shelves and mezzanines.
Foundation for a frame structure
When building frame garages, it is extremely important to pay sufficient attention to organizing the foundation for the building. After all, this is the key to high practicality, durability, and resistance to external influences of the future motorhome.
If the soil on the site is dense, it will easily support the weight of the structure itself, as well as the car in it. For such a case, you can organize a pile, columnar, slab, strip foundation. If the soil is sandy and may shrink over time, it is better to prefer a strip or slab option.
In any case, the corner points for the walls of the future foundation, regardless of its type, are outlined in the same way.
Work on marking the boundaries of the base should be done as follows:
- We mark one of the corner points, taking into account the location of other objects on the site.
- We install marking cast-offs at the designated point. Devices of this kind are ordinary stakes connected to each other by a crossbar board.
- We tie the ropes to the cast-offs. When constructing a strip base, you will need two pieces of rope on each side, the distance between them will be equal to the width of the planned strip.
- We stretch the rope on both sides of the future base over the entire length of the wall surface, and fasten it to the cast-offs on the opposite side.
- Similarly, we determine the approximate location of the last corner and connect it with two adjacent corners using a rope.
- It is important to ensure that the corners are straight. The cast-off crossbar allows you to move the point of fixation of the rope on it within small limits. To make sure that the angles of the structure are correct, you can measure the length of both diagonals and compare them with each other. A square's diagonals are equal in length.
On a note! To achieve exact perpendicularity of the sides, it is worth applying the rule of the “Egyptian triangle”: the sides must be multiples of 3, 4 and 5 in length. They always create a right angle. You can lay out such a triangle using long, even slats, reinforcing rods, and strong rope.
If you plan to build a columnar foundation, you will need to additionally mark the internal area. This will allow you to accurately determine the location of the supports. It’s not worth saying that this is an ideal option for a motorhome.
After all, only a powerful boardwalk can support the weight of a car, and its creation requires additional costs. You will also need to arrange an entrance to the premises - an entrance ramp.
It is better to prefer the strip base option if you plan to equip an inspection hole in a motorhome for repair work. Of course, it is worth considering that making a strip base will be somewhat more difficult, and it will take more time. But the final result of the work will be convenient, durable, and practical.
But if you make it shallow, you can get an ideal option for a frame motorhome. Set up the slab base as follows:
- on the site along the perimeter of the future building, they dig a trench 40-50 cm deep;
- further, formwork is installed on three sides;
- reinforcement of the base is carried out using a special mesh or metal rods;
- the reinforcement is filled with a concrete solution based on sand or based on sand and crushed stone;
- The concrete is left for 5 days until completely dry.
Ceiling insulation
To increase the comfort of working in the garage, it is necessary to insulate it. By the way, insulating does not mean heating. Insulation is organized so that after turning on the heating device in the garage, the temperature in the room rises faster. Heat, as we know, escapes through the ceiling, the insulation of which will help to avoid such situations.
a certain number of bags of perlite are laid
We tighten screws from the bottom of the vertical walls at a certain distance into the transverse beams. We stretch a polypropylene twine between them and carefully lay the cotton wool directly on it, firmly adhering to the beams. Then we file the ceiling slabs. Thanks to this design, an additional air gap is provided between the insulation and the slab, which better retains heat flows.
conclusions
Provided that a garage is built from OSB boards in a dry climate, such a building without reconstruction and finishing can last about 30 years. In cold climates with high temperature differences, a garage box will last 10-15 years.
Arrangement of a garage and its insulation requires compliance with several recommendations, since this room is most often exposed to the adverse effects of temperature changes. For example, the whitewash on a garage ceiling can peel off and crumble due to humidity. Therefore, first you need to decide what material can be used to cover the ceiling in the garage so that the work does not take a lot of time and effort. The cost of materials for covering the ceiling surface of the garage is also taken into account .
Of course, thanks to the variety of building materials, choosing the most suitable one is not difficult. Let's say a suspended ceiling could be a good option. But for a more reliable ceiling finish in the garage, we recommend using OSB board, the average thickness of which is 6 or 8 mm.
How and how to decorate walls in block structures
In this case, block structures mean buildings made of brick, cinder block, foam or aerated concrete, as well as solid or prefabricated reinforced concrete structures.
Good old plaster
As long as capital construction has existed, people have been plastering buildings. Therefore, the list of how to decorate the walls of a block garage is traditionally topped by plaster.
You can create comfortable conditions in the room and make it warm and cozy by covering the garage with OSB slabs. This modern finishing material is suitable for cladding walls and ceilings and has many advantages over conventional plywood or lining.
OSB boards are panels made from wood shavings. This is a building material consisting of wood chips (thin chips) glued together with various resins with the addition of synthetic wax and boric acid. Sawdust from coniferous and other species is laid in several longitudinal and transverse layers, impregnated with paraffin and various synthetic resins. To give strength and durability, the material is compressed under pressure at high temperatures.
The resulting slabs are durable and free of cracks, chips and other defects. Covering walls with this material has many advantages:
- such slabs do not delaminate;
- thanks to antiseptic impregnation, fungi and mold do not appear on them;
- the panels are flexible and easy to install on uneven surfaces;
- the cladding is not destroyed by moisture.
The product labeling will tell you how large the amount of synthetic resin is. The largest number of these components have slabs of classes E2 and E3, and the smallest are panels with the E0 and E1 symbol. Since the garage is not a residential space, it can be finished with OSB with any marking.
Recommendations
When working with sheets, it is worth pre-coating one side with several layers of waterproofing or varnish to avoid saturation of the material with moisture and its destruction. The slabs are attached with the painted side to the frame; waterproofing should also be applied to the frame.
Before covering the room with OSB sheets, you need to disperse and attach the wiring, preferably with a protective corrugated casing to avoid destruction of the wire braid from temperature and humidity changes.
To increase thermal insulation, fill the frame with insulation, preferably glass wool. This will increase the heat transfer of the entire structure and protect it from destruction by rodents. All calculations should be written down in a notebook so that there are no difficulties with the installation of lighting in the future.
Once the garage has been completely sealed, the gate should also be opened with varnish so that the OSB panels do not deteriorate when open.
To learn how to cover a garage ceiling with OSB boards, see the following video.
Areas of application
The slabs are mainly used in the construction of houses using frame technology.
- They are used to install decking and level floors in houses.
- A number of roofing materials will perform well on a base made of OSB boards.
- Wide application is possible due to the ease of fastening of the material. The slabs are fixed using ordinary wood or metal screws, depending on the supporting structure on which they rest.
- The flooring is installed using pre-installed wooden joists. In the case of roofing work, the support will be wooden sheathing.
- Wall cladding with slabs is carried out using pre-installed metal profiles, or, again, using wooden structures. The reliability of the resulting structure will depend on the profile pitch; experts recommend making it no more than 40 cm.
- To summarize, we can say that the use of OSB boards is possible in many construction areas.
It is quite obvious that OSB boards are an indispensable building material.
Modern material allows you to work at high speed, and the resulting result can please you with a long service life.
Advantages of frame construction
The practice of recent years demonstrates the wide interest of people in the construction of frame structures for various purposes. It is especially common to build frame garages on your own, which allows you to provide your car with reliable shelter from negative factors in the external environment in a short time.
But why, after all, does the construction of frame garages attract domestic consumers?
Let us next consider the main advantages of frame-panel garages:
- practicality, durability due to the presence of a reliable base and high-quality fastenings of frame elements;
- simple installation, the ability to carry out the work on your own without spending money to pay for the work of a construction team;
- efficiency of installation work;
- accessibility in material terms;
- light weight of building materials, which allows installation operations to be performed without the use of specialized construction equipment;
- high thermal insulation qualities, provided that the walls are properly thermally and waterproofed.
What are the requirements for finishing a garage?
The material used for cladding must be:
- Resistant to deformation. Remember that when using a garage, its wall surfaces will be subject to significant loads. In view of this, the material used for cladding must have high strength.
- Resistant to chemicals. When carrying out work indoors, you will not avoid contamination of the walls with flammable, oily and acidic liquids.
- Easy to care for. Wall surfaces should be easy to clean. You should not choose a material that will require you to frequently paint or varnish the walls.
Criteria for choosing material for cladding
So that all the work you have done is not in vain, you need to choose the right material for each surface in the garage
It is important that it is able to withstand a certain load, the influence of the external environment, as well as aggressive technical substances that are typical for a garage. If you make a list of requirements, it will look like this:
If we continue the topic of general requirements for the characteristics of finishing materials, then they also exist and there are many of them:
- Each material must be fire-resistant and not burn. A garage is a room with a high risk of fire, as it contains flammable substances;
- the finishing surface must be resistant to chemical attack;
- No less important is the material’s resistance to moisture;
- in the event that the garage will not be insulated, choose materials that are resistant to temperature fluctuations;
- In order not to change the cladding after a few years, choose high-quality and durable material. It’s better to pay more, but do it once and for several decades.
Among other things, I would like to note one more factor, it is not the main one, but it is important - the aesthetic side. Then being inside will be pleasant not only for you, but also for other visitors.
Metal hanging frame
- This option is similar in its design to the installation of a wooden frame. The marking is carried out according to the same scheme: the perimeter is outlined, and after it the joints of the slats with the walls. Afterwards, hangers intended for the CD profile are attached, with an indentation of half a meter.
- However, here there is also a UD profile, fixed along the walls and directed with the lower part towards the pre-battered wall. This profile carries two functions at once and acts as both a holder and a guide. Pairs of dowel-screws are attached every 40 - 50 centimeters.
- Having done all of the above, you need to secure the CD-to-UD-profiles in the marked places. Before this, each unit of the metal frame is shortened to a suitable length, taking into account a tolerance of 5 mm (the profile will be shorter than the distance from wall to wall by a centimeter), and then placed in the guides, ignoring the hangers for now.
- By stretching a nylon thread under the frame perpendicular to it, you will get a guide for alignment. To prevent sagging profiles from interfering, lift them higher, enveloping them with wings of hangers. After this, the profiles at the height of the thread are attached to the guides and hangers with small self-tapping screws.
Since the hangers are mounted on 6 mm dowels, screws with a diameter of 4-5 mm would be best. Neglecting this recommendation will result in the dowel falling out of the hole, since it will not be widened enough.
Communities › Dream Garage › Blog › Covering the garage with OSB panels. Fast and easy.
Comments 56
I had a garage that was lined and completely burned down.
I covered it three years ago, so far so good, I like it
It was necessary to paint the walls white or light gray to make it lighter))
The operator needs treatment. Or don't drink.
Brilliant! Especially falling yourself in the frame!
I watched the whole video, but I still didn’t see the screws.
How will insulation on the inside affect the wall? After all, the wall will become damp under the slab.
What drives you with questions like these? There are neighbors' garages on the sides, there is also a garage behind the back wall, but you want to insulate yourself, dear experts, tell us how to do this? After all, you can’t insulate the inside, etc. and blah blah blah
CaptivodaTD
How will insulation on the inside affect the wall? After all, the wall will become damp under the slab.
Oh this is a long moonlight from the Detective Agency
nope, not the one from KVN
can I have a link to the video?
nope, not the one from KVN
no, this one is fatter and shorter... only the scalp is similar