In the previous article, we looked at a way to strengthen putty and plaster using a painting mesh . But in addition to the walls, it is also necessary to strengthen the corners, especially where the possibility of touching is quite high. And for these purposes, special painting perforated corners are produced.
In addition, with the help of these corners, it becomes possible to more easily align the angle, and not only the right angle, but also the curved one. Now we will look at what types of painting corners there are and what is the technology for using a painting corner.
Purpose of devices
The main purpose of a perforated corner is to create an elastic and rigid base and give ideal shapes to corners and various junctions. Less commonly, it is used as a beacon for applying plaster. Depending on the specific task, a straight perforated corner can be used or a special one for arches, flexible, and made of plastic to form the necessary bend of the opening.
This is the most common type of material. Can be internal or external. The perforated corner is made from a variety of materials (plastic, galvanized) and differs in the width of the margins.
Plastic perforated devices can be easily cut with a regular stationery knife. For galvanized steel, it is better to use metal shears.
You can use perforated corner in the following finishing areas:
- slopes;
- arches;
- corners of drywall structures;
- alignment of walls.
Purpose of paint corners for putty
Before applying the finishing coat, perforated aluminum profiles are attached to the corner. They not only help align joints, but also provide surface protection. The length of the metal elements can vary from 2.5 to 3 m, the edges are trimmed to obtain the desired size. After this, the painting corners are attached to the walls (perforations are created for better fixation).
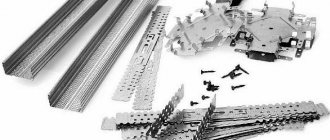
For the manufacture of corner profiles, various materials are used: metal and polymer. The metal group includes perforated products made of steel and aluminum. To protect the product from corrosion, the steel is coated with zinc. The thickness of the strips of metal profiles does not exceed 0.4 mm, they are easy to install, but are only suitable for straight joints (it is impossible to assemble an arch and other shapes using such elements).
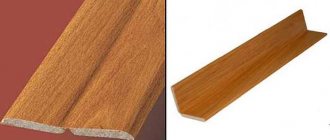
Due to their natural plasticity, polymer corners can be used not only for straight but also for rounded joints. In addition, the products are resistant to moisture and are cheaper than other analogues.
Main advantages of the elements:
- high-quality fixation;
- can be used both indoors and outdoors;
- corrosion resistance;
- easy installation;
- light weight;
- durability and safety.
Rules for installing the outer corner
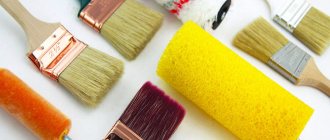
The process of mounting a perforated corner is not as complicated as it might seem at first glance. First you need to collect a small set of tools and materials:
- 2 spatulas approximately 50 and 150 mm;
- drill with attachment (mixer);
- brush;
- level;
- primer;
- gypsum putty.
To prepare the solution, the required amount of water is collected in a container, the dry mixture is poured into it and the whole thing is stirred with a mixer until a homogeneous creamy mass.
After the mixture is ready, you can, armed with spatulas, begin to apply it to the corner. Use small strokes to cover one side of the corner along its entire length. Next, take a corner of the required length and simply press it into the solution. To begin with, it is better to align it more or less evenly by eye, and then, after removing the solution squeezed out through the holes with a spatula, use a level. Having measured all areas one by one and achieved the required level, you can consolidate the result by applying the solution on both sides of the corner.
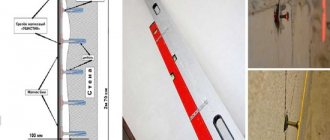
You can wait a little and let the existing mixture dry, which will avoid displacement when puttying. It is worth noting that sometimes, due to the nature of the base, it is not possible to position and plaster the perforated corner. It slips and shifts. Ordinary self-tapping screws screwed into the holes will help solve this problem. After drying, they can be removed, and the nests formed after them can be carefully filled with putty.
Correct positioning of the angle relative to the plane
If everything is clear with the positioning of the perforated corner for painting - it is installed with the most protruding part in the same plane with the walls, then with positioning for the wallpaper the situation is different. Here we will consider the second version of the corner. After understanding how the “wallpaper” corner should be positioned, there should be no difficulties with other products.
So, let's go through the installation options from best to least acceptable.
Perhaps this installation option can be considered ideal: the profile is installed in a specially made recess, followed by filling. Therefore, the plane of both walls remains straight.
However, the option above is not always suitable for any specific case: the base is made of unplastered concrete, thin (9.5 mm) drywall, or there is simply no time to make a notch for the corner (you need it cheap and cheerful).
By the way, 12.5 mm. Drywall recess is perfectly chosen when there is time. The main thing you need to understand is that if you plan to paint without reinforcement (with the same fiberglass), it is better not to make a recess!
In general, it would be a good idea to initially install the gypsum board with a thin factory edge on the outer corners - then the notch at the corner will appear on its own.
In fact, such an angle in reality does not look as scary as in this diagram. Broken planes can be pulled out efficiently, but wouldn’t it be easier to sample the base before installing the corner?
In the second option, no sampling of the base is done. Instead, you will have to stretch both planes near the corner with a wide spatula or a small rule.
In this option, the corner for wallpaper is used in the same way as for painting, without a protruding corner. This method is the easiest to implement and any profile will do.
The third option is the most common among finishers, because it is the easiest to implement. Since the groove for the wallpaper at the “spike” is filled with putty, the operation of pulling the corner is greatly simplified.
The third method has a significant drawback: when gluing wallpaper, the corner will have to be turned around and it is unlikely that you will be able to make a seam at the corner itself. And sometimes this is required: different wallpapers in different areas, pairing the wallpaper with the surfaces to be painted (for example, slopes). Therefore, this option can be modified:
This is a scheme for finalizing the third option: after puttying, the recesses for the edges of the wallpaper are simply sanded.
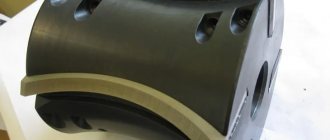
Modifications - corner with mesh
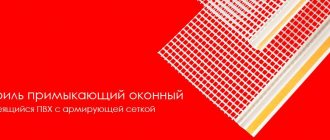
The construction industry does not stand still and continues to produce new materials and devices in order to make the work of finishers easier. The latest innovation can be considered a perforated corner with a mesh. It is a very ordinary corner with holes to which a mesh is attached. In some cases, special glue may be applied to the adjacent parts for more convenient installation.
This type of corner with a mesh is used for plastering walls with a large layer of mortar, although it can be successfully used in any other areas of finishing: drywall, arches or leveling slopes. The mesh in the design gives additional reinforcement and strength to the entire treated area.
Two fundamental differences between perforation angles
In addition to plastic and metal, there are two types of corners: for painting and for wallpaper. The difference is that the wallpaper product implies a protrusion for inserting the wallpaper sheet, fiberglass, etc. During operation, this protrusion takes on all mechanical impacts on the outer corner and does not allow the wallpaper to move away from the base.
A corner for painting, when used with wallpaper, certainly enhances the mechanical strength of the corner, but does not protect the wallpaper from fraying and peeling. As a rule, when gluing wallpaper, such a corner is simply wrapped with a single strip of wallpaper, without making a seam on the outermost corner, which is not very practical. Not practical both in terms of gluing and operation (although some may argue here).
“To be wallpapered” or “to be painted” is rather a popular classification; this important fact is often not indicated in store catalogs. However, a competent consultant will understand the differences well.
Moreover, for high-quality painting, fiberglass is usually used, which does not allow corners to go around - therefore, in such a case, it is also better to use a product for wallpaper.
Let me add: I have only seen plastic products for wallpaper; I have only seen metal ones for painting.
Such products have side dimensions of 20-25 millimeters and a length of 260 centimeters, less often 270 or 300. There is also a profile of 6 meters in length, but it is not easy to find.
Preparation for installing corners for putty for wall reinforcement
Before fixing the part to the wall, it is necessary to pre-treat the surface. To do this, you need to clean it from dust and dirt particles using a degreaser.
If you plan to reinforce an area where wallpaper is already covered, you should remove the strip of covering before installing the element. To do this, attach the structures tightly to the corner, mark the lines with a pencil, and then carefully make cuts with a stationery knife. After this, apply a primer and then secure the part completely.
Installation of painting putty corners in the room on the slope or corners
Perforated corner for putty
Finishing is done as follows:
- First, the perpendicularity of the planes is measured using special tools.
- Adjust the depth of the missing layer. If the vertical and horizontal deviation is insignificant, then level the corners of the walls with a thin screed.
- Prepare aluminum corners (cut to the required length).
- After leveling the wall, prepare a solution and apply it with a spatula to the surface.
- The finishing layer is distributed over the area and carefully rubbed with a corner.
- Apply a paint corner and press (this work is done before the mixture sets; it should flow out through the hole in the aluminum profile).
- Evenly distributes the mass flowing through the perforations, levels the layer, and removes residues.
- After the mixture has dried, sand the corner.
- After preparing the wall, the surface is painted or covered with other decorative materials.
Particular attention is paid to the location of the painting corners when attaching them to slopes. To finish window openings, plastic corners are most often used, because... they are affordable, durable, easy to install, and are fixed over a putty or plaster base. In construction stores, profiles are presented in different sizes, in most cases the angle is at least 90°. The products help hide minor irregularities and other wall defects.
Decorative corners on slopes are often used. The profile must be smooth, symmetrical, without defects. Before installing the painting elements, prepare the surface, measure the required length, and attach the strip.
A painting corner with a mesh is often used for facade finishing work. The material is securely fixed in the plaster and protects the surface from chipping.
Arched
To decorate arched openings, flexible perforated profiles are purchased; they are suitable for working with curved and multi-level structures. The arched perforated corner for putty can be hard or soft. A rigid profile is indispensable when working with three-dimensional structures (where there are many smooth shapes and bends), but the price of such an angle is higher.
For finishing small details in the interior (where there are many beautiful transitions, etc.), arched openings with a small radius, it makes sense to use arched corners made of soft materials. The lack of rigidity of these products is fraught with the further formation of pits and nodules that can destroy smooth transitions. To avoid such difficulties, arched corners are installed using gypsum mixtures. In addition, this installation method allows you to correct visual defects during plastering.
Materials for making profiles for leveling wall corners
The following corners are available on the market:
- Steel
. Galvanized steel materials are strong, reliable, resistant to corrosion (thanks to this coating), and combine well with cement-lime plaster. However, if the profiles are used for a long time in a humid environment, rust may form. Galvanized elements are designed to strengthen the external corners of walls, as well as window and door slopes.
- PVC (polyvinyl chloride)
. Plastic corners are not subject to corrosion, rotting and deformation. The price of these products is low, however, they have fewer advantages than metal profiles. A minimal amount of putty is required to secure them. PVC profiles are most often used for finishing various fragments and plasterboard walls. Excellent for treating rooms with high air humidity.
- Aluminum
. For finishing internal and external surfaces, profiles with increased rigidity are required. In this case, aluminum materials are offered to customers. They are often used in construction because... The elements are lightweight, resistant to corrosion, and provide a durable and aesthetic design. The product is a narrow long corner 2.5 cm wide; in specialized stores you can find both decorative and perforated aluminum profiles.
The aluminum paint corner for putty is designed not only to protect the corners of external walls from mechanical damage, but also to improve the geometry of external and internal finishing. Durable material allows these profiles to be used in wet areas, including bathrooms, swimming pools, etc. (aluminum does not deteriorate when exposed to water). The following sizes of aluminum painting corners are available: 2.5, 2.6, 3 m. Sheet metal scissors are used to adjust the length.
Aluminum is also used for the manufacture of half-angles (in demand in construction and repairs). The profiles are used to strengthen the corners of walls covered with cement, lime and gypsum plaster, as well as internal surfaces made of plasterboard.