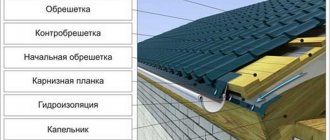
When arranging a roof, it is important to pay attention to the smallest details. Despite the high levels of insulation of the pie and the strength of the materials, the structure can be vulnerable in the area of the junction with the walls. Gutters on their own are not able to protect the completely load-bearing structures of the house from precipitation (after 3–4 years the walls may become covered with mold or sprout moss). Therefore, for reinforcement, additional roofing elements (soffits) are used, among which a large role is played by the drip edge.
What is a drip and why is it needed?
Roof drip line (overhang apron) is an extension made of a thin sheet of galvanized metal. With its help, moisture falling on the roof during precipitation is directed to the drainage system (gutter). Otherwise, water flowing from the roof can wash away the building compounds from the masonry, which can lead to gradual destruction of the load-bearing structures.
The addition completes the appearance of the cornice with the help of clear geometry (i.e., it plays an aesthetic role), strengthens the edges of the roof (protects from gusty winds, loads from snow and ice, penetration of cold air and drafts), and seals the vertical junctions of the roof with the walls.
The structure is also attached along the cornice above windows and external doors to protect the openings from the negative effects of precipitation.
Drip location diagram
Peculiarities
The liquid that ends up on the roof weighs quite a lot to increase the load on the roof. It may not hold up (especially if water usually collects on a specific area of the roof).
The drainage system helps prevent this, and the drip provides protection for the structural elements.
Design and principle of operation
Front drip
Roof drips are a metal plate with two or three bends at a given angle. The bends separate the fastening panel and the apron and add rigidity to the structure. The degree of angle depends on the model of the product and its purpose. The bends are made by special machines - sheet benders.
Additional parts are mainly made from galvanized steel, treated with paint or polymer compounds (polyvinyl chloride), which improve adhesion (cohesion of dissimilar structures) and increase anti-corrosion protection.
Any type of top covering of a home is not capable of protecting walls from moisture 100%. The ability of the liquid to bend in the opposite direction from the edge of the roof and stay on the edge in the form of drops leads to its contact with the facade.
A specifically designed and correctly installed extension directs melt or rainwater directly into the gutter, which then flows down the drainpipe.
A metal apron for a single or gable roof has two types of fastening:
- Cornice. It is installed on the lower part of the overhang (the part of the roof that protrudes beyond the walls of the structure). It is installed after fixing the hooks under the drainage system, before laying the roofing sheet. The shape resembles the letter G (the long part corresponds to the direction of the roof, and the second directs moisture into the gutter). The operating principle is identical to the window sill.
- The front tin soffit looks like an inverted letter T (three stiffening ribs). They are mounted on the gables in such a way that precipitation flows down in the same way as from the roof surface. The upper part is mounted on top of the underlay carpet, and then meets the eaves strip.
Some roofing materials, for example, soft tiles, require two types of drips.
Design
A drip edge for metal tiles looks like a metal strip bent along its length. The angle at which it bends depends on the purpose of the product and its type. To give the necessary rigidity, manufacturers make an additional fold at the edge of the skirt. The design is chosen so as not to interfere with the free movement of air, but at the same time prevent liquid from entering the space under the roof.
Dimensions
The drip device involves all types of roofing installation work. It has a standard length of 2 or 3 meters and a thickness of 0.55 to 0.77 mm. But when using rolled copper or titanium-zinc sheet, its thickness is 0.2 mm, and for painted aluminum it is 0.3 mm.
The “working” dimensions of a standard soffit are 1.8 – 1.9 m. The dimensions of the extension can be increased by making it yourself or “to order”.
Note! The required rigidity of the extension is achieved with a length of 2 meters. When departing from the standards, there is a risk of deformation of the drip pipes.
The dimensions of the drip can be adjusted as needed. From a galvanized steel sheet 2 X 1.25 m, 6 or 8 decorative strips are obtained with a length of total bends from 1.25 (factory sheet width) to 4.0 m (custom-made).
How to make a choice
Before starting roof construction, special attention should be paid not only to the choice of roofing material, but also to all additional structural elements. The reliability and durability of the entire roof will largely depend on this. Experts advise choosing a drip tube taking into account the following factors:
- View.
- Installation location.
- Dimensions.
- Material and its thickness.
- Installation conditions.
- Color.
You also need to pay attention to the presence of an anti-corrosion protective layer.
Kinds
Depending on the coating, it is necessary to take into account the design features, material and methods of installing drips.
For metal tiles
Drip pan for metal tiles
Additional parts for metal tile roofing are made from thin galvanized sheets with a protective layer applied.
Standard dimensions: Length – 200 cm, total width – 100 cm, bend width – 10 cm, height – 60 cm.
Narrow flanged strips are bent at right angles, and the edges of the long side can be bent at an angle of 45 or 90°. During the arrangement, a cornice type of installation of the extension is used.
Sometimes elements are replaced with end trims.
A drip cap for metal tiles is a necessary measure to protect the sheathing and rafter structure from rotting, and helps to postpone roof repairs for at least 5–7 years.
When installing a drip line under a metal tile, it is convenient to lay a sealant made of foamed polyethylene. It perfectly follows the shape of the corrugated sheet, so it completely seals the internal space.
For soft roof
Drip line for soft roofing
Flexible coating includes roll materials for “flat” and “pitched” roofs, as well as bitumen tiles, which are laid only on the “pitched” surface. Installing a protective “safety net” of the soft cover (tiles and fiberglass impregnated with modified bitumen, with a securing layer of stone chips) with soffits is necessary for the durability of the roof.
To install a drip line under a soft roof, the frontal and cornice types are used simultaneously. They enhance and complement each other's functions.
For corrugated sheets
Drip line for corrugated sheets
Drip line for corrugated sheets (profiled steel sheet with a wave “crest” height of 35 to 57 mm) has installation features. Experienced builders recommend:
- Attach the eaves drip after the roof sheathing. The “step” of fastening with self-tapping screws is from 25 to 30 mm;
- The gable panels are installed from bottom to top (overlapping the previous one) after laying the corrugated board.
Note! Installation work is carried out in such a way that the plate does not block the ventilation holes.
The extensions must be made of the same material as the corrugated sheeting (galvanized or polymer), with a thickness of 0.5 to 0.9 mm.
For seam roofing
Drip line for seam roofing
Seam roofing is considered the most reliable, since metal strips, shaped at the factory for subsequent seam, do not require holes (a source of penetration of moisture and condensation inside), but are hiddenly attached to the sheathing using clasps.
As a rule, the same drip edges are suitable for a seam roof as for other metal structures. But sheets with built-in protection (special tip) from moisture have appeared on the construction market, which greatly simplifies roofing work.
Lathing for soft roofing
The following materials can be used to make the sheathing:
- Edged board with a thickness of no more than 3 cm.
- Sheets of plywood.
- OSB boards.
The sheathing of boards is filled in increments depending on the roofing material. Most often it is solid, but for natural expansion of the wood it is still necessary to leave a gap of 5 mm.
Installation of OSB boards is carried out with a gap of up to 3 mm using rough nails or self-tapping screws.
Plywood for sheathing must be moisture-resistant or tongue-and-groove. The thickness of the material can range from 12-20 cm.
All wooden elements of the sheathing must first be dried and then treated with an antiseptic.
Element characteristics
For the production of drip edges, galvanized steel is most often used.
The addition to protect the end of the roof as part of the roofing system must be resistant to corrosion and mechanical damage, therefore, in production, a galvanized steel workpiece is first coated with zinc - aluminum, and then, with a protective - decorative polymer film, matte ( REMA) or glossy (PE).
The performance characteristics of “gloss” are lower than those of its matte counterpart, so it costs less.
A wide range of colors makes it possible to choose an overhang apron to match the main cover.
Purpose
The drip line removes excess liquid from under the roof and protects the walls and roof from high humidity. Such elements are installed along the eaves boards, above doors and windows.
The drip tip is designed to perform the following functions:
- giving the house completeness and aesthetics, since it covers the ends of the roof;
- increasing the service life of the roof;
- sound reflection;
- preventing the destruction of building coatings, protecting surfaces from condensation, moss, fungus, mold, draining liquid from walls and sheathing.
Drip edge and cornice strip
The main additional details for arranging the roof structure are the eaves strip and the drip edge. Guided by financial savings, some developers install only one additional roof, believing that this is enough to protect the roof. But parts that perform the same tasks (precipitation removal, ventilation, decorative function) still have differences in their intended purpose. Therefore, only the combined installation of both panels will ensure the strength of the roof, and therefore the durability of the entire structure.
Differences in purpose
Although the drip rail and the cornice strip have a similar design, they perform different functions and differ in their installation location.
Despite the similar design and some common functions, the drip rail and the cornice strip differ in their purpose:
Firstly, the eaves strip is mounted on top of the sheathing and leads directly into the gutter, redirecting streams of water from the slope into the drain, and the overhang apron is installed under the gutter to drain moisture. Its lower part hangs from the beam to remove condensation from under the roofing pie (waterproofing layer) and protect the front strip.
Secondly, the strip protects the roof surface from overheating and promotes natural ventilation. The panel also forms an overhang, covering the edges of the rafter and sheathing system.
Important! The extensions cannot be interchangeable, since they have different profiles and are mounted only in the places intended for them.
Conclusion: the overhang apron protects the facade of the building, and the eaves strip protects the roof deck.
Drip design
Appearance of the
drip edge The eave aprons, thanks to two bending lines, form three working surfaces. The first is fixed to the roof, the second (“skirt”) is designed to drain condensate and water. The third (flanging) serves as a stiffening rib (increases the strength of the flange and facilitates installation).
The gable elements have a more complicated design due to an increase in the number of bends that divide the extension into an apron, a “skirt” and a dividing step.
Cornice strip design
As you can see from the photo, the design of the cornice strip does not differ from the design of the drip edge.
The only difference is in the installation location and purpose . Depending on the purpose, the planks are divided into several types: standard, reinforced and profiled.
- The standard longitudinal element is a strip 0.45 mm thick, hot-dip galvanized and bent at an angle of 120°;
- A reinforced model with large shoulder widths (on request) helps reduce the amount of moisture penetrating under the roof;
- Features of the profiled extension - a complex design with 90° angles and stiffening ribs.
Parts are treated with anti-corrosion polymer dyes that are resistant to negative atmospheric influences (precipitation, UV rays).
Types of eaves strips
Types of curtain rod sheets vary depending on the purpose and installation location.
The eaves panel is necessary to protect the ventilation space under the roof from precipitation. Mounted around the perimeter of the lower part of the roof;
End (gable), installed on the sides of the slope to protect the overhang from gusty winds and sound insulation;
The ridge protects the upper horizontal rib (ridge), formed at the junction of the slope, from rotting;
The junction soffit is installed at the junction of the roof and supporting structures.
Installation of drip
The installation of the extensions is carried out before laying the roofing sheet, when the rafter frame is already equipped.
- In order for the sheathing to be able to withstand the load increased due to the installation of a gutter, it is further strengthened;
- At the second stage, brackets are installed (distance 30–50 cm) to fix the gutter for moisture drainage;
- Then the first strip of the overhang apron is fixed with galvanized self-tapping screws with rubber seals (in increments of 20 cm);
- The second and subsequent strips are laid with an overlap of the previous one by at least 20–50 mm.
Note! A waterproofing film or rubber between the extensions and the rafter system will reliably protect the structure from condensation penetration.
In addition to the general principles, the technology for installing front and cornice strips for some coatings has its own nuances.
To properly equip a drip yourself with your own hands, you can watch a selection of videos from professional builders.
For corrugated sheets, ondulin and tiles
When working with rigid materials that have a clear geometry (wavy shape), a sparse lathing is required, where an additional element is mounted on its initial strip. The screws are screwed in a checkerboard pattern into the decline of the wave, and the overlap of the strips is 50–60 mm.
Important! Spraying water will prevent the bottom edge of the panel from being placed directly into the gutter.
The waterproofing sheet is secured with double-sided adhesive tape.
For bitumen shingles
Bituminous (flexible) shingles based on fiberglass treated with bitumen and granulate (small stone powder) are classified as soft roof coverings, so a combination of two types of moisture drains is required to protect the roofing pie and walls. Installation of the drip line is carried out on a continuous sheathing.
The gable strip is designed to remove moisture from load-bearing structures, so work begins from the cornice.
To join the cornice and gable panels (20 mm overlap), the cornice sheets are not attached to the sheathing itself, but are placed on the lining. Installation of planks is carried out up to the very ridge of the roof.
Installation Tips
When installing the roof yourself, the advice of experienced roofers will certainly come in handy.
- The planks are attached with an overlap (each subsequent element overlaps the already fixed plank by 0.5 - 1.5 cm);
- Products are cut with special metal scissors, an electric jigsaw or a hacksaw, starting from the fastening part. The “grinder” can melt the polymer coating, and the damaged area will quickly become covered with rust;
- Before installation, remove the protective film from the elements;
- The joints of the strips must be treated with frost-resistant sealant. Reliable waterproofing will be provided by silicone or polyurethane compounds;
- The overhang apron will perfectly protect the roofing pie if the eaves of the slope are smooth, without distortions.
Video materials posted by experts on the Internet will help you visually familiarize yourself with the nuances and correctly install the drip.
Required Tools
To install additional elements you will need special tools:
- Metal scissors, electric jigsaw or hacksaw.
- Roofing mites.
- A screwdriver (cordless), or a drill equipped with a chuck rotation speed regulator.
- Wooden mallet.
- Hammer.
- Set of screwdrivers (phillips and flat head).
You will also need a square, rulers and markers of a contrasting color to the material for marking.
Proper design of eaves overhangs, slope connection points and the area where the roof adjoins the walls of the house with drip edges and eaves strips will ensure long-term protection of the home from adverse weather conditions. Elements matched to the tone will give the building a complete and respectable look.
Required Tools
A core is a hand-held metalworking tool designed for marking central holes for the initial installation of a drill.
To attach droppers, a standard set of household tools is quite sufficient:
- roulette;
- hammer;
- level;
- square;
- metal scissors;
- screwdriver;
- marker;
- core;
- paint brush.
Stairs or scaffolding can be rented. If there is another construction project, it makes sense to purchase these devices for yourself or by sharing with your neighbors.
