In a wooden house, wooden floors are traditionally laid. Such floors fit perfectly into the interior of a log and timber country cottage and dacha, preserving the aesthetics and color of wooden housing construction. The flooring is constantly under increased stress and quite quickly loses its original attractiveness. Therefore, the floor, and especially the wooden one, must be periodically updated. Painting a wooden floor with varnish will not only renew the coating and give it a noble look, but will also protect it from moisture and mechanical damage. The article provides recommendations from experts on how and with what varnish it is best to coat the floor in order to obtain a high-quality and beautiful coating.
Why do you need to varnish wood flooring?
Applying a composition of this type to a wooden floor is required due to the whimsical nature of the material itself, which requires additional protection for full and long-term operation. In many ways, opening wood with varnish helps improve technical qualities and protect it from a number of negative influences:
- Water protection. Moisture seeps deep into the wood and over a period of time it evaporates, as a result of which the dimensions of the material partially change. In these cases, the wood begins to dry out, and in the opposite situations, it begins to swell. If there is varnish on the surface of the floor covering, there is no change in the level of humidity inside the material.
- The wood exposed by it increases the resistance of floorboards to mechanical damage, including abrasive loads.
- To remove dirt from the floor surface, you have to spend less effort, since the varnish prevents the absorption of significant amounts of dirt.
- When opened with this composition, it is possible to emphasize the natural pattern of the wood. The top layer will keep the flooring in its original condition and prevent it from wearing out.
- Natural wood is very often damaged by various insects and microorganisms. Varnish reduces this danger to a minimum.
Note! When you open a wooden floor with varnish, its level of strength increases and the likelihood of scratches on its surface is eliminated.
The need to varnish wood
The varnish has excellent decorative characteristics. It is suitable for covering plank floors, parquet, lining floors, and eurolining. The coating forms a transparent, translucent or matte film on the surface.
Finishing the lining with varnish allows you to reveal and emphasize the natural beauty of the wood pattern. The varnish also has high protective properties, thanks to which the varnished surface receives reliable protection from moisture and microorganisms.
Varnishing increases the strength of the floor covering, preventing the formation of scratches on it and reducing the vulnerability of the wood to mechanical stress. Caring for varnished floors is greatly simplified because it absorbs dirt and dust much less.
Types of varnish for wooden floors
Based on the type of solvent, all compositions are divided into water-soluble and organic-soluble. The latter have a pungent aroma when drying and are characterized by the presence of toxic substances. During the hardening of water-soluble varnishes, only water vapor evaporates from them with a small amount of components contained in the resins. However, a significant part of organic-based mixtures have higher strength, withstanding shocks and other mechanical influences.
Due to the fact that there are quite a large number of types of varnishes on the market, before giving preference to any particular composition, you should familiarize yourself with each of them in more detail.
Polyurethane
Considered to be the best option. These are what most experts recommend using. They are made on the basis of polyurethane resins, which give the varnish coating strength, elasticity, resistance to organic and inorganic acids, as well as to ultraviolet rays.
In addition, polyurethane compounds can withstand temperature fluctuations from -50 to +100°C, dry quickly and have a high degree of adhesion to any surface. Their main disadvantage is their significant cost.
Polyurethane-acrylic
They are cheaper than polyurethane varnishes, but also have less elasticity and strength. In view of this, acrylic is added to the composition to reduce cost, and due to lower technical indicators, the mixtures are the best option for rooms that are not subject to significant mechanical loads. Their advantage is better distribution of liquid over the surface compared to polyurethane varnishes.
Acrylic
Mixtures of this variety do not have too high resistance to wear and shock, but they have optimal elasticity and fluidity. Acrylic varnishes are quite affordable, and since they are made exclusively on a water basis, they do not contain any components harmful to health. In addition, during opening and drying there is no change in the texture and shade of the floor. The main disadvantage of these mixtures is their rather low resistance to moisture, which is why it is better to avoid their use in rooms with high levels of dampness or where the floor covering is regularly subjected to wet cleaning. The second disadvantage is the significant drying time.
Urethane
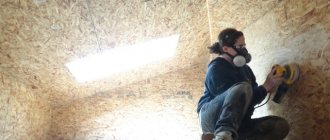
These varnishes have average abrasion resistance and are quite affordable. In many of their technical indicators, they are not much inferior to polyurethane-based mixtures. They are highly resistant to chemicals, abrasion and exposure to sunlight, so they do not cause fading. In addition, urethane varnishes are recommended for use in conditions of constant changes in temperature and moisture levels. They generally dry within 12 hours, but during this process they release toxins that are hazardous to health, which requires the use of a respirator during application.
Urethane-alkyd
These compositions have all the qualities of urethane varnishes, but due to the presence of alkyd resins, they also have high strength, moisture resistance and abrasion resistance.
The disadvantage of these mixtures is their higher cost.
Alkyd
Varnishes of this variety are mixtures containing alkyd resins and organic solvents, which ensure their environmental friendliness. They are used with hardeners, due to which their drying period is reduced from 3 days to 1 day. Alkyd varnishes withstand abrasion, have low elasticity and average resistance to impact. In addition, when used, most detergents and some acids are not capable of harming the floor covering painted with them, just like the sun's rays. The disadvantage of alkyd varnishes is the strong odor, when applying which you should wear a respirator, and then ensure that the room is fully ventilated until the mixture dries completely. In addition, due to the evaporation of solvents, the composition layer decreases.
Epoxy
These varnishes contain epoxy resins, hardeners, organic solvents and other additives. They are distinguished by high mechanical characteristics, but it should be taken into account that not only during their application, but also after opening the floor covering for 3-4 days, they release toxic substances that can harm health. Taking this into account, it is necessary to cover the floor while wearing a respirator, without which it is not recommended to stay in the room for the next few days after painting. Their other advantages are resistance to chemicals, high drying speed, resistance to moisture and affordable cost.
Urea-formaldehyde
One of the most affordable varnishes, characterized by high strength and resistance to external influences. Their main drawback is the presence of formaldehyde in the composition, which is hazardous to health and weathering of which occurs only after 4 days.
Alcohol
They are made on the basis of alcohol with the addition of sandarac and shellac resins. Due to the high rate of evaporation of the first and the slow dissolution of the second, the floor covering can be opened with a large number of layers of varnish without disturbing the damage previously applied. They are affordable, do not contain substances hazardous to health, and have an optimal level of adhesion. A floor covered with alcohol-based varnish has mechanical strength, but it is not able to fully protect the wood from moisture.
Oily
These mixtures contain vegetable oils, natural resins and organic solvents. Oil varnishes are used for the initial opening of floor coverings. After they dry, a durable film is formed on the surface of the wood, the color of which depends on the substances present, which is why it is brown and light yellow.
Oil-based varnishes are easy to sand, are fairly inexpensive, and also have high elasticity and resistance to moisture. The disadvantages include the need for a constant microclimate during drying and the duration of this process.
Preparation
Varnishing must be done in suitable conditions; for this you need to check:
- air temperature. The instructions for applying the varnish composition will indicate in what temperature range it can be applied. If the temperature goes beyond the maximum permissible range, this will certainly have a detrimental effect on the quality of work; the varnished layer will not be very strong and durable. Usually it is recommended to varnish at a temperature from +5 to +25 degrees;
- humidity. If aqualak, that is, a water-based solution, is applied to the floor, then there must be high air humidity. All other types of varnish are recommended to be applied at air humidity from 50% to 80%. If the humidity is too high, the drying and polymerization process will be disrupted, and as a result, the protective film will not be very durable. In addition, high humidity will negatively affect how long it takes for the varnish layer to dry;
- presence of drafts. It is necessary to ventilate the room if acid-curing mixtures are applied, and when varnishing with other solutions, the presence of drafts can impair the quality of the work performed.
Choosing varnish according to the type of room
When selecting a composition for wood flooring, it is necessary to take into account the room in which it will be opened:
- In the bathroom and kitchen, it is better to give preference to mixtures that can withstand moisture. These include polyurethane, urethane-alkyd and urethane varnishes.
- For a children's room, it is necessary to choose polyurethane water-soluble and solvent-soluble compounds, since the toxins present in them are released only during the process of application and drying. Suitable mixtures are marked on the container with the corresponding “EN 71.3” designation.
- For the living room, hall and stairs made of wood, it is necessary to purchase compounds that can withstand abrasion. These include epoxy, urea-formaldehyde, as well as organosoluble and water-soluble mixtures based on polyurethane resins.
- At the dacha, it is optimal to resort to opening the wooden floor with urethane-alkyd and urethane varnishes, which are highly elastic, maintaining their own positive qualities even with significant differences in the size of the wood, which are formed when the temperature and moisture level changes.
- It is advisable to open areas with increased load with urethane varnishes that have an anti-slip effect.
Varnishing the floor in different rooms
Moisture-resistant compounds are used for the bathroom.
The purpose of the room is also taken into account when choosing a coating . Where frequent rearrangement of furniture and high traffic levels are planned, they rely on the durability of the varnish and choose expensive products. If the area is not subject to high traffic, a less expensive and less sustainable option may be available.
In a “wet area” (bathroom, kitchen, toilet, etc.), it is better to apply moisture-resistant materials yourself, which include urethane, polyurethane and urethane-alkyd bases. On steps, in reception areas, in halls and corridors, it is recommended to give preference to acid-hardening and polyurethane compositions.
Preparatory work
A new wooden floor that has not previously been varnished does not require pre-treatment. If the floor covering has already been painted with it, as well as in cases where it has not been previously treated and consists of spruce or pine, then preparatory work, which includes sanding, must be carried out without fail.
They must be carried out in the following sequence:
- The first step is to remove furniture and other objects from the room that are located on the floor or that could interfere with the work being carried out.
- Next, you need to inspect the floor covering for knots, loose nails or incompletely screwed in screws, as well as other elements that can lead to damage to the sandpaper or sanding machine during its use. If detected, they should be eliminated. In the case of fasteners, they must be finished off with a hammer or tightened with a screwdriver so that their heads are eventually slightly recessed into the floor covering.
- If some of the laid boards have significant damage, then the best solution is to replace them with new similar floorboards.
- To eliminate small cracks, you need to use a special wood putty.
- Next, it is necessary to hide the places where the boards are fixed with fasteners and knots with a similar composition.
In addition to it, you can prepare a paste yourself from wood sawdust and wood glue. These mixtures should be applied in a circular motion using a spatula. Afterwards you need to wait for the composition to completely harden. - Floor coverings made of coniferous wood must first be cleaned of resin before opening with varnish, for which you need to resort to using regular gasoline.
If the floor is additionally treated with wax to increase protection, then it must also be removed, since it leads to significant contamination of the sandpaper. To avoid this, you can resort to using a special composition or white spirit.
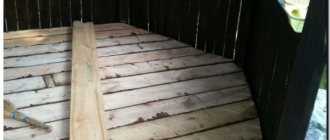
Next you need to sand the wooden floor. For this task, you need to resort to using a grinding machine, through which it will be possible to remove various irregularities and other defects from its surface. In addition, mechanical sanding should be carried out to remove the top faded shade from the wood, so that it can be refreshed.
The process itself is recommended to be performed as follows:
- The initial treatment of the floor, during which it is necessary to remove dirt and old coatings from its surface, should be done using coarse sandpaper.
- Next, it needs to be replaced with a medium-grain one, which will allow the wood to be leveled and give it its initial color.
- Upon completion, it is necessary to sand the floor with a grinding machine equipped with fine-grain sandpaper.
Note! Corners and other hard-to-reach areas should be passed by hand or using a special machine designed for ends and corners.
- After this, it is necessary to open the surface of the floor covering with an antiseptic composition. This step is not necessary, but thanks to it it will be possible to protect the tree from mold, mildew and insects. Complete absorption of the antiseptic occurs within 24 hours.
- In addition, the floor needs to be vacuumed, since after treatment small waste remains on it, which can cause a deterioration in its appearance, forming the effect of “grains of sand” on the surface.
- To completely remove dust, you can use a regular damp cloth. It is better to use microfiber as it removes debris from both wet and dry flooring.
- Washing the floor must be done with warm water with the addition of a detergent. The first step is to wipe a small area of the surface, and then proceed to wipe the rest.
Note! If the wood takes on a purple tint, this means the presence of tannin in its composition. In such a situation, it is necessary to exclude the addition of detergent. In addition, they should not be used when washing chestnut and oak parquet.
Upon completion, the floor covering must be wiped several times with a damp cloth and wait until it is completely dry before proceeding to the next steps.
Parquet coating with special means
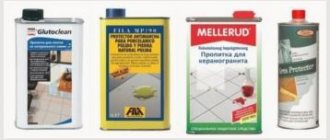
Parquet, parquet and floor boards are made of wood, which is susceptible to the negative effects of water, street dirt, mold, fungi, and abrasive loads. To protect against all these factors, special products are applied to the surface of the parquet, which can be combined into 5 main groups.
Primers and impregnations
They contain antiseptic, biocidal, fire retardant and tinting additives that protect the wood from mold, wood-boring beetles, fire, and also give a certain shade. For the latter, stains and drying oils, widely known in the post-Soviet space, are also used.
Primers significantly reduce the consumption of base material. Often, instead of impregnating compositions, a base varnish is used, diluted with a solvent in the ratio indicated on the product label (20:80, 40:60, etc.).
Oils
They are rubbed into the wood with a hard brush, making it resistant to water and dirt, but do not protect against abrasion and impact loads.
Oils are chosen by those who care about the safety of their family and prefer to enjoy the touch of warm natural wood.
Waxes
Carnauba, candelilla and beeswax are applied to the surface with rubbing strokes, creating a moisture-resistant film that is not resistant to impacts and significant foot traffic.
The coating must be renewed periodically.
Oils with hard waxes
The parquet surface is treated using Scotch-Brite, a silicone spatula or a soft cloth. The special composition makes it possible not only to saturate the top layer of wood by 2-5 mm, but also to create a thin layer of wax film on the surface.
This coating perfectly protects the parquet from pests, mold, water and other harmful factors, and does not crack or peel over time.
Lucky
Varnishes are recognized as the best and most practical means of protecting wood from negative factors.
Thanks to their protection, dirt and dust do not eat into the structure of the parquet plank, and the appearance of the floor remains in its original condition for many decades, subject to proper care. The disadvantage of this type of finishing coating is that minor damage is difficult to restore.
Opening the floor with a primer
Before varnishing a wooden floor, you must also cover it with a primer - nitro varnish. The primer should be applied with a brush 10 cm wide and 1-5 cm thick along the length of the wood structure, avoiding missing areas.
When opening the surface with a primer mixture, it is necessary to take into account the following nuances:
- If the wood contains tannins, which primarily applies to oak, due to which darkening occurs when interacting with polyurethane varnishes. To avoid this, it is necessary to pre-treat oak parquet with a special cutting primer.
- A special primer mixture, but with other qualities, must be used when preliminary opening the beech due to its instability. Before applying water-soluble varnish to a beech floor, it must be opened with a primer, which does not lead to gluing of the edges of the lamellas.
- Before opening, exotic wood should be varnished with a special primer mixture that paralyzes essential oils. Some of them (iroko and lepacho) contain inhibitors that slow down the action of the hardeners of the composition, which must be treated with a cutting primer, which is intended for heavy wood.
Wood oil
Special antiseptic oil is also a fairly popular means of protection for wood. There are several varieties of it. For example, teak oil is used to treat hardwood. Like Danish, it is often used to finish the floors of terraces, verandas and porches, since it is moisture resistant and is not afraid of temperature changes. The most popular option is linseed oil, which can be used to treat floors in almost any room.
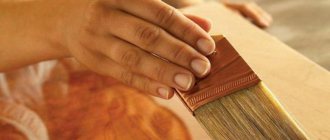
This product is applied with a soft brush in the direction of the fibers. It is important not to leave untreated areas and rub it in as thoroughly as possible. After the oil is absorbed into the wood, remove the excess with a clean rag (it must be applied liberally). Half an hour after treatment, the floor surface needs to be polished. This can also be done with a rag.
So how to cover a wooden floor in an apartment? Varnish? Wax? Oil? If you need the most durable coverage, you should choose a varnish. However, it should be taken into account that such a film is not very resistant to mechanical damage. To obtain the most natural surface possible, use oil or wax. This coating, among other things, is almost impossible to scratch. However, it wears out quite quickly.
Applying varnish to a wooden floor
Opening the floor covering must be done as follows:
- It is necessary to varnish a wooden floor when the room temperature is within +12-25°C. Only in this range will the mixture be able to fully dry out and retain its own decorative and protective qualities.
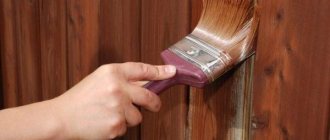
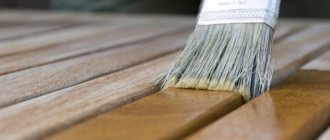
- When choosing a tool, you can give preference to a roller, spray gun or paint brush. The latter option is more preferable, since opening the floor with varnish has a number of certain features. It is recommended to give preference to a soft brush about 10 cm wide, which does not fade. In most cases, they are appropriately called “varnish brushes.”
- During the application of the composition, there should be a towel nearby, with which it will be possible to repeatedly wipe the individual boards before opening it.
- In addition, before starting work, you should select the optimal painting sequence so that upon completion there is free access to the exit from the room.
- The application of varnish should be done barefoot with previously washed feet, since it is in this case that it is possible to leave a minimal amount of dust and marks on the surface.
- At the next stage, you first need to open a small, inconspicuous area of the surface with a layer of insignificant thickness to ensure that the selected shade is correct. Only after final drying can you begin further treatment of the floor with the mixture.
- If you plan to use a primer, then it is advisable to apply the first coat with a diluted varnish composition that can penetrate deep into the wood. To do this, add a solvent to the mixture in a ratio of 1:3 or 1:2 relative to the varnish.
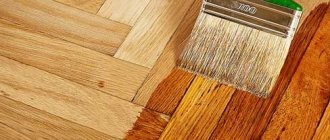
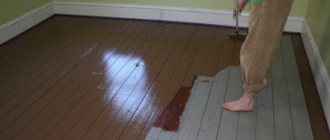
- Next, you need to use a new brush, the dimensions of which should be similar to the one used when applying the primer, and cover the surface of the wooden floor with the first layer of varnish. It is advisable to apply it from the window towards the door along the length of the wood fibers, thoroughly treating each of the boards. Opening is usually done in a U-shaped motion so that the brush intersects with the freshly applied edges.
Note! It is necessary to avoid opening the floor with a layer that is too thick, since in this case it will not have an optimally neat appearance.
- Giving preference to a roller, it should be treated with varnish using cross-shaped movements. It is necessary to apply the composition with cross strokes, and to level it along the length.
Following this, the tool must be raised to ¾ of its width and the entire cycle must be repeated. - After opening the surface with varnish, you need to wait for it to dry completely before applying a second coat. For different formulations, it takes a different amount of time, which is indicated on the container label, which is why you should carefully read the instructions before use.
- To prevent the brush from becoming unusable while the varnish is drying, it must be placed in a separate container with poured solvent. There is also a second method: a rag must be moistened generously in solvent, which must be wrapped around the brush, and then wrapped in a bag. Without these steps, the tool will dry out and become unsuitable for further use ahead of time.
- After the first layer has hardened, the wood will partially “heave up” slightly. To give the surface an ideal smoothness, it is necessary to sand each coat of varnish, not taking into account the last one. This process is mainly done manually using fine-grit sandpaper.
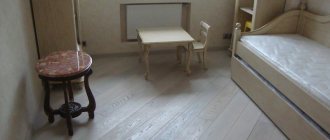
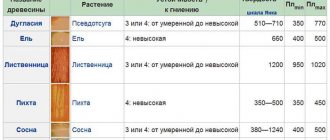
- After sanding the first layer of varnish, remove dust from the surface, vacuum well and wash the floor covering. After the floor has dried, you can begin to open it with a second layer of varnish. Depending on the type of wood and its level of hardness, it is necessary to apply different numbers of layers of varnish. It is recommended to open spruce and pine three times, and in other cases it is optimal to apply 2 coatings. Application of the 3rd layer should also be carried out in rooms with increased traffic.
- Upon completion of painting the floor covering with the optimal number of layers, you need to wait for it to dry completely, the duration of which is indicated on the label of the container. For the next few days after this, it is advisable to avoid moving furniture items on the varnished floor.
- After the final coat of the flooring has been applied, it will still be sticky. To eliminate this defect, you need to wipe the floor with a soap solution.
For this task, you can resort to using liquid used for washing dishes.
Wood wax
Varnish is a very popular floor covering. However, other types of products designed to protect wood are sometimes used. This could be, for example, wax. When applied in two layers, this product allows you to enhance the natural color of the wood and its shine.
In addition, wax, like varnish, serves as a protective barrier against mechanical damage to the floor, absorption of water and damage by various types of chemicals. Typically, wax is applied to the surface with a soft cloth. At the same time, it is carefully rubbed into the wood. Some varieties need to be applied with a brush. After the wax has dried, until it completely hardens, the surface covered with it must be polished with a clean cloth until it is completely smooth.
Mistakes when varnishing a wooden floor
Quite often, when processing flooring with their own hands, novice craftsmen encounter a number of the following difficulties:
- Poor curing of varnish. In most cases, this problem occurs when the composition is incorrectly selected or if the optimal room temperature is not maintained during its application. When using a two-component mixture, slow hardening indicates a lack of hardener.
- Formation of whitish stains on a varnished floor. They indicate that moisture has penetrated into the composition due to increased dampness in the room.
- The appearance of air bubbles on the surface and swelling of the coating. These problems arise due to non-compliance with the technology of opening the floor with varnish. To eliminate them, after applying a new layer to the floor covering, you should run the edge of the brush along the floorboard in the places where they are present.
- Uneven coloring. This mistake is often made by craftsmen with insufficient experience, since some types of varnish harden in too limited a period of time, as a result of which a person without the appropriate skills does not have time to properly apply it to the floor surface.
Note! After completion of the opening of the floor covering composition, in order to eliminate the unpleasant odor from the room, it must be fully ventilated.
Having learned how to properly varnish a wooden floor, and following the correct sequence of work and important nuances in the process, you will be able to do the painting yourself properly and avoid a number of possible shortcomings that may be made and negatively affect the final result.
Video:
Nuances of correct varnishing
Before directly varnishing the floors, you will need to carry out a set of preparatory work, neglect of which destroys the very essence of the actions aimed at varnishing a wooden floor.
Initial preparation of the treated area
Before painting a wooden floor with varnish, a number of preparatory measures should be taken:
- Extracted fibers and large hangnails should be removed.
- You need to level the screws and nails with the floor - if they stick out, they will ruin the sandpaper that will be needed later.
- Recesses from nail heads should be masked with wood putty of the appropriate tone. You can mix the putty with your own hands: combine wood glue (or purchased varnish) with fine-grained sawdust. There is no point in overdoing the putty - it is enough to achieve the desired density. It is better to leave the floor until completely dry.
- If the wood was previously covered with a protective layer of wax, before covering the floor with a primer, it will need to be washed with a special solution.
- Resin from wood also needs to be removed (conifers are full of it). A rag soaked in gasoline will help you cope with this.
Once all instructions have been followed, the wood is ready for sanding.
In the video: varnishing the floor.
Surface priming and varnishing
After sanding, there is a stage of priming and varnishing the floor, which includes the following:
- When working with paints and varnishes, you must use protective equipment; prepare a respirator, protective suit and gloves. A clean cloth is useful for cleaning up dust.
- The optimal temperature regime is 10-25°C. You should maintain air fluctuations in the room (do not close all windows), but do not create a draft;
- Provide escape routes (for example, flights of stairs are covered by a step);
- It is recommended to test the new solution in an area hidden from view: see how the board reacts to the mixture.
- How to properly varnish a floor - it is applied evenly only to the primed surface.
- You can use nitro varnish. Finishing varnish can also be used for this purpose, having previously diluted it by 1/3 with the main solvent;
You cannot prime all tree species with one type of primer: oak darkens from polyurethane mixtures (it needs a primer with interfering qualities), beech sticks together from water-based mixtures.
- Some breeds resist the hardening process of the paint mixture. Essential oils and resins are neutralized with a cut-off primer (this is their key function);
- The directional vector is along the fibers of the board. A suitable brush is 100 mm, 10-50 mm thick.
- After the primer has dried, it’s time to manipulate the layer-by-layer application of varnish.
- Before starting work, mix the varnish, leave it for a while until the air bubbles disappear;
- The working tool is a similar priming brush or roller. Use a brush to make arched movements, crossing each next strip with the previous one. Use a roller to work crosswise: pour the material across the floorboards and spread it lengthwise with the roller. The stripes of the valiva should also intersect - by 1/3-1/4 of its length;
- Do not cover the floor with excess mortar - excess looks unsightly;
- After applying the base layer, there is no need to monitor the wood; it is left to dry. The situation is similar with each new layer;
- Sand all layers separately (except for the finishing layer), then the pattern will be rich and uniform (with your own hands using 220-400 sandpaper). An alternative option is to carefully practice the grinding technique, but such actions will require more concentration;
- Complete drying will occur after 7 days. The surface is ready for use.
How to varnish wooden floors (2 videos)
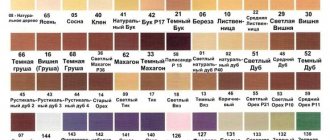
Different types of floor varnish (28 photos)
Floor varnishing technology
To obtain a perfectly smooth and beautiful varnish coating, careful preparatory work is required. If the floors are new, it is enough to sand them, fill in minor defects with putty and remove all the resulting dust.
It is more difficult to prepare a previously painted or varnished surface. The old coating must be cleaned using a spatula, abrasive materials, or a grinder until it becomes matte. Then it is sanded to remove irregularities, dust is removed, washed and dried. Defects are corrected with putty or a special repair gel polish.