Plywood is a unique material from which a wide variety of things are made: this material is used for leveling walls, making floors and furniture. However, it is important to know that under no circumstances should you use plywood coverings in bathrooms and places of high humidity. In all other respects, this building material is irreplaceable. To properly carry out repairs and make the coatings perfectly smooth, it is recommended to first prime the surface and then putty the plywood. This is necessary not only for ideal shapes, but also to protect products from mold and rot.
Composition and technical characteristics
Today, most putties consist of a latex base and acrylic resin. These polymers are mixed with drying oil or PVA glue to strengthen the consistency. Plaster of Paris, chalk and a piece of laundry soap are also added. Depending on the purpose for which the mixture is used, the proportion of ingredients changes. Technical characteristics of putties depending on the material from which they are made:
- gypsum (inexpensive, does not crack, is elastic, but when it dries, it loses this property and collapses, especially in damp places or places of high vibration: 1st floor, railway, highway);
- acrylic (ideal moisture protection for plywood, improves its adhesion, sells at high prices).
- If you don’t have the opportunity to buy a polymer consistency, you can make it at home: PVA + crushed chalk + sawdust.
Consumption per 1 m2
One square meter accounts for approximately half a kg of dry putty mixture. The solution must be applied evenly with a spatula or brush, having previously primed the surface.
Reasons for the formation of cracks in the floor
Gaps between boards bother homeowners for many reasons. If there is a ventilated foundation under the floor, then cold penetrates into the room through the cracks.
Due to the fact that various debris gets clogged into the gaps, the floors take on an unaesthetic appearance. In addition, the boards themselves may begin to rot.
The cause of cracks can be:
- Drying of wood. This is the most common reason when using regular wooden boards. You don’t have to worry about drying out if the floor is made of factory boards treated with the “vacuum drying” method.
- Installation error. Gaps may form immediately after construction is completed if the floor installation was performed incorrectly. In this case, the gaps arise due to the fact that the boards are “walking”.
- Dry air. If the air in the room is dry, then there is no need to remove cracks on the wooden floor. After some time, boards pulled together tightly will go in “waves.” You can check air humidity using a hygrometer.
- Small rodents. The cracks made by mice are not easy to repair. You must first get rid of the rodents themselves.
With timely care and careful use of a wooden floor, you can get by with only cosmetic repairs. The choice of method and means will depend on the size, location of the defects and the reasons for their occurrence.
Features of finishing wood fiber boards
Before finishing, it is necessary to take into account some features of wood boards that must be puttied:
- Uneven thickness (it is impossible to achieve ideal surfaces, so puttying of products is mandatory).
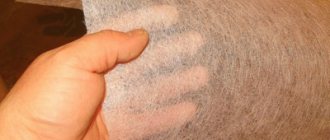
- Fiber structure (first the plywood is primed and then puttied to hide the fibers).
- Inhomogeneity of paint (without putty, all potholes and irregularities will be visible to the naked eye).
- Fastening (if you make repairs without putty, all the nails and screws will rust in a year and ruin the appearance of the wallpaper).
- Changes in the structure under the influence of the external environment (with a constant change in temperature, the texture of the slabs themselves also changes - they can expand and, conversely, narrow if putty is neglected).
Types and properties of plywood
Plywood is classified not only by the material from which it is made. There are also other signs that characterize the moisture resistance, strength, and elasticity of veneer. So, there is a classification of veneer types:
- regarding moisture resistance: with increased moisture resistance (birch plywood for indoor use, aviation);
- regarding veneer processing: laminated + sanded on the 1st side (W 1); laminir + polishings. on 2 sides (W 2). Most often they use NS – not laminated at all.
- made of pine, spruce, larch;
- thickness – 3-30 mm; area – 1250*2500 mm.
Plywood is a material that should not be used in places of high humidity. When laminated, the product becomes strong and wear-resistant, which is why plywood sheets are in great demand in various industries.
Video description
Laying plywood on a screed.
Installation on plank floors
Laying plywood over plank flooring is the easiest way. The sheets are fastened with ordinary self-tapping screws. If the wooden base is strong, then it will be enough to use sheets with a thickness of 3 mm.
When the boards are very old and rotten in places, they will definitely need to be replaced with new ones. If there are any mechanical defects on the surface, it is recommended to use thicker plywood products (at least 1 cm).
Plywood is laid on a dry and flat surface of a wooden floor, without the use of adhesives and mastics, unless required by base repairs Source green-ply.ru
Purposes of puttying
Not yet fully experienced builders are wondering: is it possible to putty plywood or not? The answer is obvious - of course, it is possible, and even necessary. After all, you need to take into account the water-repellent capabilities of plywood; if it is not primed in time, a number of problems may arise:
- the wood pattern will be visible through the wallpaper;
- all nails, spatulas, as well as other materials for fastening will also be illuminated and create a repulsive effect;
- No matter how ideally the plywood sheets are made, in any case their thickness will differ from each other by fractions of millimeters, so if the surface is not primed, all the flaws will be visible at the joints of the sheets.
IMPORTANT. It is strongly recommended not to use plywood as a building material in areas of high humidity.
The product is primed in order to carry out the process of disinfecting the plywood from all bacteria and fungi, which in the future could completely ruin the repair. Next, the plywood sheet is puttied. At the same time, the applied solution itself becomes a finishing material, especially if it matches the color of the veneer. Also, putty for plywood is necessary in order to maximize the adhesive properties of veneer.
Is it possible to putty plywood on the ceiling before painting?
Many construction and finishing works related to the preparation of walls for painting or wallpapering are accompanied by the use of plasterboard to level the surface before the final decoration. However, ordinary veneer plywood can also be used for the same purposes. Despite the fact that the price of a plywood sheet is slightly higher than the cost of plasterboard, this material has significantly greater strength.
Putty on plywood surface.
Features of surface puttying
In order for the putty layer to lie smoothly on the surface without the slightest flaws, it is necessary to prime the surface. This is especially true for those plywoods that have a rough surface (for example, OSB boards). Also, many novice builders have a question: do they need to process laminated plywood - definitely yes. Just before doing this, you need to know that you need to remove the laminated layer using sandpaper.
This will make the surface rough, which in turn will improve the adhesive property. The putty should be applied evenly, the thickness should be approximately 3-4 mm. It is especially important to properly work out the places at the joints. To avoid having to sand the plywood with sandpaper after the putty layer has dried, you need to sift the putty mixture through a sieve in advance.
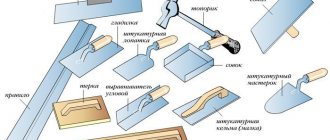
How to apply putty correctly, tools
In general, the technique of applying putty to plywood is no different from other substrates, such as brick or concrete. Tools you will need:
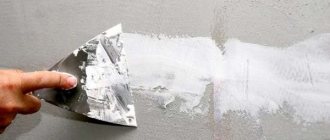
The putty mixture is applied to the primed surface in a thin layer of 2-3 mm. The solution is taken with a short spatula and spread on a long one. They go especially carefully to the places where the sheets are attached, filling the voids. After drying, grains of the mixture may remain on the plywood, which are removed with sandpaper. When the surface is completely dry, you can begin decorative finishing.
Having collected all the information about whether it is possible to plaster plywood, the answer is clear. Masters believe that this is a fairly easy job. The only thing you need to remember is that plywood, like any wood material, is afraid of moisture, so great attention should be paid to priming.
Technology of puttying OSB boards before finishing
Bonding plywood to concrete floor
Is it possible to putty chipboard and what is the best way to do it?
How to properly putty a ceiling for painting
Source
Types of mixtures
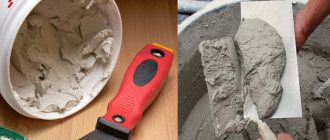
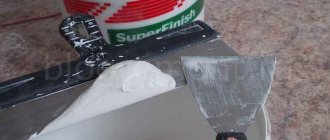
If you want to finish the product faster, you can buy a ready-made mixture. As a rule, it is sold in plastic buckets. Construction stores also sell a cheaper version of the product in powder form. And the point is not at all that the first mixture is inferior to the second in quality - it’s just that the powdered material will need to be diluted with water to the desired consistency.
Of course, most often people buy powder. This saves money and allows you to dilute it to the desired thickness. In order to prepare plywood for painting, it is necessary to use finer powders. After all, plywood itself is a flat base that does not need to be primed with starting putty.
Types of mixtures:
- façade;
- interior;
- latex;
- acrylic.
All these varieties are intended for internal use. Of course, you can often see how builders decorate the outside walls of houses with such solutions. However, this is not entirely correct, because precipitation and temperature changes can lead to cracking of the putty layer, which will lead to the finish falling off. Therefore, it is best to cement surfaces for external use.
IMPORTANT. Ready-made solutions have a high density, so when they harden, they turn into hard stone. If you need to putty a building that is regularly exposed to strong vibrations from the outside (for example, a railway, a highway), then use a ready-made solution in buckets.
Securing the joint
The panels that are joined must be rigidly fixed so that they cannot move relative to each other. The easiest way is to place a piece of board under the joint and screw the panels to it with self-tapping screws, having previously drilled holes for them and made recesses for the caps. The diameter of the hole should be such that the self-tapping screw falls freely into the hole, but does not dangle in it. The depth of the recess under the cap should be such that the cap goes 0.5 mm deeper than the surface. If the panel is attached to a hard surface, for example, a door trim, then you just need to put additional screws along the seam; holes and recesses for the caps are also needed for them.
A common mistake is sealing joints in wall panels without fastening them. Such a seal lasts until the first good vibration.
Impregnation with drying oil or PVA
Drying oil or PVA glue is used to strengthen the plywood before linoleum is laid on it. First, the plywood is secured and then the sheets are coated with these materials to strengthen and protect them.
IMPORTANT. It is important to remember that in no case should you “help the plywood” dry; you need to wait until the glue itself has completely dried, and then continue working. Otherwise, the material will quickly deteriorate, crack and rot.
After the glue has dried, you need to move on to the next stage of work - treat the surface with an antiseptic solution against fungal formations. This product can be found at any hardware store. Next you need to take acrylic varnish and cover the plywood with it.
If you use drying oil in your work, then you need to adhere to the following instructions:
- Heat to a temperature of 50 degrees Celsius (if it is exceeded, the plywood sheets will deteriorate).
- Apply to plywood using a brush or roller.
- Take a hair dryer and dry the product with it.
- If large drops appear that are no longer absorbed, finish drying with a hair dryer. The end areas need to be dried the longest, since it is in these places that fungal infections subsequently appear if the work is performed incorrectly.
Sequencing
At the beginning of the repair, a plastic film is spread on the floor, the panels of which should overlap each other by about 20 cm. This is done to prevent the access of moisture from the lower rooms.
Mineral wool is cut into strips approximately 3-4 centimeters thick, which are attached around the perimeter of each room. Why install bars at a distance slightly less than the width of the insulation boards? The evenness of the installation is controlled by a level. Insulation boards are laid between them, which should fit tightly into the rectangles between the bars.
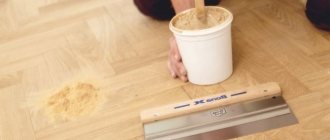
What exactly to do with the boards depends on whether it will be a rough layer or a final one. If you need to level an old wooden floor by laying a new covering on top, the boards can be laid out at small intervals. Then the next step will be to lay sheets of fiberboard or plywood on top of the boards as a base for a decorative coating. The photo above in the article shows wooden floors after renovation.
Padding
In order to putty plywood, you need to take into account some features: you need to buy a primer exclusively for lumber. Such a solution will contain a fungicidal and insecticidal drug that will not allow bacteria and mold to live. The adhesive properties of the surface will also improve.
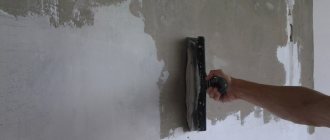
Before applying primer, veneers must be as clean as possible, so you can first wipe them with a barely damp cloth to remove various types of dirt and dust. The primer dries in approximately 3 – 6 hours at normal air humidity. It is applied to the surface using a brush or roller.
Types of joining materials
Leveling a wooden floor with plywood
Concrete, cement, plastered, brick walls. Make sure that the crack does not tend to get bigger. If the edges are crumbling, then everything that is crumbling must be removed, and the surface should be impregnated with a penetrating and bonding primer. Repairing cracks in such surfaces will in any case require the application of a suitable primer.
Plastic and laminated panels. Apply suitable primer. The primer should, on the one hand, fit well on the plastic, and on the other hand, be combined with acrylic paint and primer. A good primer is Tikkurila (Tikkurila) Otex (Otex). Our domestic GF-021 is suitable, but it must be thoroughly dried. Some acrylic paints and primers tend to curl up on it if not dried thoroughly.
Tips and tricks
The purpose of puttying is to level the surface. After all, you don’t really want to put linoleum on untreated sheets. Therefore, in order to avoid the slightest mistakes, it is enough just to know a few rules, without which you cannot do your work:
- Putty for plywood is a very important process, before which it is necessary to first prime the surface. What will happen if you putty it without a primer? The plywood fibers will be visible, which means that unevenness will appear on the wall. After applying the primer, just wait until it dries (3 - 5 hours depending on the level of humidity in your region), and then start applying the putty solution.
- All tools must be washed immediately after work (spatulas, brushes, rollers, spray bottles).
- Before priming the surface, it is necessary to clean the surface as much as possible from dirt and dust.
- If the plywood is on the ceiling and you are applying putty on it, wear clear glasses to prevent the contents from dripping into your eyes.
- If putty gets into your eyes, you must immediately wash them with running water.
- It is best to sand laminated plywood to remove the varnish layer and improve the adhesive properties of the veneer.
- If you are still in doubt whether to putty the plywood or not, think about the fact that over time, rust from the screws will appear at the places of attachment through the wallpaper, an accordion will form at the joints, since a slight temperature difference causes the wood to either increase or decrease in size. sizes.
How to remove cracks in a wooden floor ideas for a better floor
Leveling the floor with a self-leveling mixture with your own hands
There are quite a lot of ideas that allow you to solve the problem of how to seal cracks in a wooden floor without compromising its appearance, but they all depend on the presence of some professional tool - at least a hand router. It is this that allows you to give some semblance of order to the randomly separated seams - in general, to make it as if it was intended to be so. There are plenty of options for such decoration.
- Chamfers. By installing a cone tool on the router and deepening the cutter to a certain level into the wood, you can make even grooves at the junction of the floorboards - so to speak, to show the joints. Well, then, when the cracks are in order, fill them with colored acrylic putty and, after sanding the floor, open the whole thing with varnish. By and large, in this way you can even create the appearance of parquet or parquet boards, on which you can even cut patterns if desired.
- As an option, in order not to mess with putties, you can mill wide blind grooves in the area of the seams and fill them with a pre-prepared strip - you need a tight groove in which the strip will be held with glue. As in the previous case, this also opens up wide opportunities for creativity - if you master a hand router, then using this technology you can even create patterns with smooth curved lines. By the way, the floor will look much richer if the inserts are made in a different color - at least they can be covered with stain. As in all other cases, the floor is finally sanded and varnished. Alternatively, you can rub it with wax-containing oil.
In principle, if you think carefully, you can come up with your own technology for solving the question of how to seal cracks in the floor? The options you described are simply the most common and almost all craftsmen resort to using them - especially when it comes to the option with sheet material.
The methods are simple, but it is important to understand one thing - cracks in the floors themselves appear very rarely. As a rule, they have at least one travel companion - this is a creaking, which needs to be eliminated first, before proceeding directly to the question of how to seal the cracks in a wooden floor? And they can be eliminated simply - each board needs to be scrolled along the joists with a couple of screws
Only after this procedure will it be possible to begin the fight against cracks.
Factors influencing the appearance of cracks
And finally, to prevent cracks from appearing, you need to know the reasons for their formation. Such knowledge will also help eliminate their consequences. So, the appearance of cracks can occur due to:
- low-quality raw materials (for example, if the boards are damp and laid on the floor, over time they will begin to dry out, forming spaces);
- increased dryness in the room and the prevalence of high temperatures. Optimal indicators: humidity 45-65%, and temperature - no higher than 25 degrees;
- unsuitable material that was used for laying the floor. Ideal raw materials are species of coniferous and tropical trees, as well as oak boards;
- rodent settlements. Only in this case the cracks will be equal and uneven. The best way to eliminate such problems is to completely replace them with a new board.
There are many other reasons why cracks may appear in boards. In any case, it is better to eliminate them while they are small in size.
Need to know: how to seal a mouse hole
There are mice in both rural and urban areas. If there are any cracks in the houses, then mice can easily enter the living space; they will not only harm human health, as they are carriers of leptosperosis, toxocariasis, streptobacillosis and many others, which can lead to death, but also harm the room, its decoration, can penetrate into food products.
The most proven options for sealing holes in the wall from mice are:
- Glass wool sealing;
- Repairing the defect with cement;
- Polyurethane foam also helps a lot, mice don’t chew it, and it seals the hole tightly.
Expert advice boils down to broken glass being placed in mouse holes.
Primer
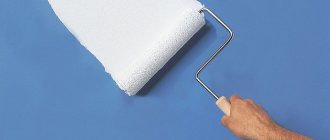
Alkyd primer is most conveniently applied with a roller. Once it's dry, you can start painting the plywood with alkyd or acrylic paint. The drying time for alkyd paint is slightly longer than for acrylic paint.
If you reduce the number of preparatory steps, a distinct relief may subsequently appear on the surface, which some even welcome. In exceptional cases, plywood on the floor is opened only with primer and paint.
A layer of acrylic primer can be applied to a smooth surface.
Applying a primer and covering with a continuous layer of putty is carried out in order to:
- ensure uniform absorption throughout the entire plywood sheet;
- fill the cracks and voids in the inner surface of the glued veneer;
- increase the service life of the plywood covering;
- protect from destruction.
Putty for a wooden floor: which one to choose for wood, how to level a wooden floor under a laminate with your own putty
But this composition dries quickly and can be successfully used in non-residential premises. If you need to level the surface, then it is best to use homemade mixtures, which are a less expensive option.
Expert opinion
Strebizh Viktor Fedorovich, leading construction foreman
During repair work, special attention should be paid to the finishing layer of putty; the future result depends on it. If you want to clarify something, please contact me!
Practical comparison
Chipboard is cheaper, but has harmful inclusions in the form of volatile carcinogens.
It is worth conducting several tests to assess the practicality of materials:
- The first test will be for flexibility and maintaining the same shape. Let's put a centimeter sheet of plywood on two beams and stand on it. The material will bend for a while, and after we get off it, it will take its previous shape. In such a situation, the chipboard will simply crack.
- The next test will be for moisture resistance. Let's place the two materials in water and wait for the changes. The chipboard will very quickly begin to thicken and become limp, losing its shape and becoming completely unusable.
- The last test will be for fragility.
Using a hammer, apply several blows to the materials. The chipboard will crumble, and the plywood will absorb the impact, causing minor dents.
All these positive distinctive features of plywood are acquired by the material thanks to a special manufacturing technology. Plywood is a wood board whose layers are glued together. Chipboard is pressed from chips.
All tests performed show that plywood is in any case better than particle board.