9107 0 6
Icer January 23, 2017 Specialization: master in the construction of plasterboard structures, finishing work and laying floor coverings. Installation of door and window units, finishing of facades, installation of electrical, plumbing and heating - I can give detailed advice on all types of work.
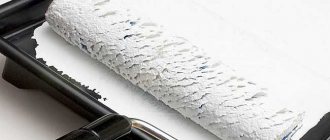
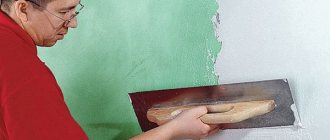
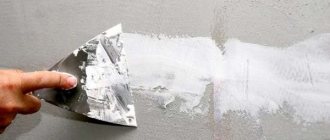
In the photo: to repaint a wall painted with oil paint, it must be properly prepared
This article is addressed to novice painters who do not know what to do when a layer of old paint holds firmly and does not peel off. The problem can be solved if the bases are treated with special compounds using a special technology. I'll tell you which primer to choose and how to apply it correctly so that the new paint sticks firmly.
It is very difficult to remove a firmly adhered layer, it is better to do it easier and prime it
If oil paint was applied to wood, the material can also be primed and a different type of composition applied
Is it possible to putty on a ceiling with water-based paint?
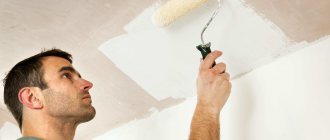
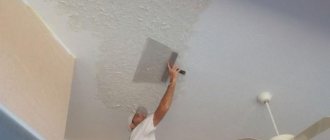
Applying putty to a whitewashed surface
The answer to such a question is a categorical no. The reason is that it always crumbles, and therefore, when putty is applied to it, it will not adhere well. If you want the putty to perform its functions, you must first carry out cleaning activities and remove as much whitewash as possible.
To do this you need to apply water to it and wait a little time. Then use a spatula to remove the applied chalk or lime. Many people apply a primer to the whitewash in the hope that it will create a strong bond. But, unfortunately, such actions are in vain, because the wet method will not keep the whitewash on the surface, but, on the contrary, will promote rapid detachment.
How to putty a ceiling correctly: applying the material
You can putty the ceiling yourself, or you can invite specially trained craftsmen. Ceiling putty is the main and most common finishing. However, any ceiling surface requires special preparation before applying putty.
What are the advantages of puttying over other methods of wall finishing:
- Gypsum putty is ideal for residential apartments because it does not contain harmful substances and helps create a favorable microclimate;
- It has a very good property - when there is an excess of moisture, it absorbs it, and when there is a lack, it gives it back, thereby regulating humidity and creating a favorable environment;
- The putty can be applied to any surface - brick, concrete, made of plasterboard;
- The structure of the putty mixture allows it to easily adhere to any materials;
- Allows you to save money, since its consumption is much less than that of similar cement mixtures;
- It is easy to apply and sand, making the process of working with it easy and fast.
Ceiling putty is universal, so it can be applied to almost any surface.
Of course, there are some disadvantages to using putty. Creates a lot of dust - during finishing and sanding, a lot of white dust is poured out, which causes some discomfort to the residents of the apartment and requires constant wet cleaning of the room. It is necessary to constantly dilute the mixture - this requires some effort. You cannot prepare a lot of the mixture at once, because after a certain time it becomes unsuitable for use.
However, despite these disadvantages, using putty to finish the ceiling is one of the most popular methods in the world of construction.
Before you start puttingtying the ceiling, careful preparation of the surface is necessary. If there was wallpaper on the ceiling, you need to carefully remove it with a wet roller and spatula. For better adhesion to the surface, a primer is used. If the ceiling was simply puttied, then it is necessary to remove the old plaster also with a wet roller.
REMOVAL OF WATER-BASED PAINT REMOVAL
Ceiling primer for putty
For better adhesion of the putty to the surface, it is necessary to use a primer.
- A primer mixture must be applied to the leveled and prepared ceiling surface. And only after it has completely dried, we putty on the ceiling.
- There is no need to sand the surface after applying the primer. To properly prime the walls, it is recommended to watch a video tutorial on following the correct application technology or study priming and putty lessons in specialized articles.
- The technology for processing a painted ceiling is slightly different - first you need to remove the paint, then start puttingty and apply a primer to the ceiling .
READ How to cover bathroom walls
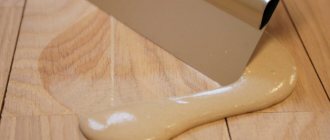
Consumption of "Betonokontakt"
If the cleaning of the surface was successful, the wall did not crumble, no holes were formed and the surface is smooth, then the consumption will be small, from 0.15 to 0.25 kilograms; if there is porosity and it is significant, then the consumption will increase accordingly. At this stage, it is better not to skimp on the primer. The strength of contact between surfaces and the durability of the entire repair undertaken depend on this.
It’s better not to skimp on primer
Is it possible to putty on a ceiling with water-based paint?
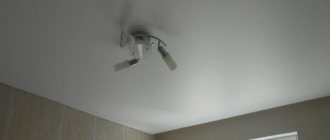
It often happens that the surface of the ceiling and walls are covered with water-based paint, for example, in the bathroom or kitchen. You need to clearly remember that it will not be possible to putty the surface with such a finishing coat, since the paint is capable of absorbing moisture and the treated surface will crumble over time. To determine the type of paint applied, you need to moisten the surface with a wet sponge. When foaming occurred, water-based paint .
This paint must first be removed and then the putty must be applied to the ceiling.
Application area of soil
This soil is used for the following purposes:
- interior work in residential premises, in preparation for plastering and putty;
- processing of monolithic concrete surfaces that have low moisture permeability;
- preparation for decoration of external facade buildings and concrete structures;
- carrying plaster and putty onto paint;
- adhesion to such materials as glass and ceramics.
Concrete contact is used for concrete surfaces
Putty and polishing
After the primer has dried, you can putty it. Apply the material in two layers.
After the first, they pause to allow it to dry completely. Then the work continues.
- The primer is applied to the paint from the corner, moving towards the opposite edge. It is important to simply tighten the surface without large layers.
- Irregularities are hidden with strokes, applying them longitudinally along the lines of formation.
- A putty mesh is first laid over the cracks.
- Irregularities are smoothed over with sandpaper. Air bubbles formed in the material are sanded onto the dried layer. Do not overdo it: excessive effort may create new irregularities. We'll have to repeat everything again.
- After sanding, sweep the ceiling with a soft broom or cloth.
- The quality of the work is checked by holding a light bulb to the treated area to see all possible defects.
For minor corrections, use a soft broom. Medium-thick paint is applied to it, diluted to the consistency of thin sour cream. Two layers of acrylic or latex paint are enough. The first layer must be completely dry before applying the second.
Any puttying method, regardless of the degree of removal of the previous finish, has its advantages and disadvantages. Both the choice of solution and responsibility for the results lie entirely with the master.
Removing paint
As already noted, water-based paint can be easily removed using water. After it is completely washed off, the surface needs to be thoroughly dried. The situation is different with oil solutions and enamels. There are several options that are used to remove such compounds. This:
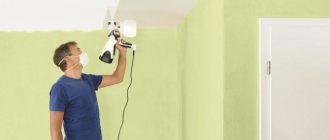
- Mechanical method To remove the coating, use special tools and electrical devices. This method requires a lot of physical strength. It leaves behind a lot of dust and dirt. For work, it is advisable to wear a respirator and safety glasses.
- Chemical method Special chemical reagents are used. They are applied to the painted surface. Under their influence, the layer is destroyed. Work is performed in protective clothing, gloves and goggles.
- Thermal method: A hair dryer is used. Under the jets of hot air, the paint begins to rise. It is easy to clean.
What do you need to get in the end? It's okay if some painted areas remain. The most important thing is to ensure that there is no peeling. The places where the old layer remains must be well cleaned and free of swelling and swelling. Then you can not be afraid and putty on the paint.
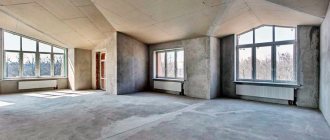
Surface preparation
Before you putty the walls and ceiling, they need to be prepared. Any surface requires thorough cleaning of paint, paint and dirt. If there are oil stains, they are removed using a soap solution. It is possible that when removing painted areas, the integrity of the coating was compromised. That is, potholes, cracks, and chips appeared. They need to be sealed.
It is important not to forget that there is always such an important stage as priming. Due to the fact that all surfaces that are coated with paint are very smooth, this process must not be forgotten. Only then can it be achieved that the adhesion of the putty mixture to the painted section of the wall will be as strong as possible. This will also give greater strength to the old coating. Any neglect will result in the solution peeling off. That is, the putty will not adhere to the paint.
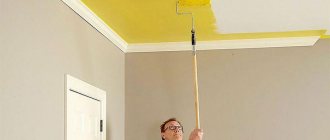
Methods for final rough finishing of the ceiling
At the final stage, finishing the ceiling involves several methods.
- You can just rub it in and leave it at that.
- Another method involves finishing the ceiling with foam boards. This can be done quite quickly and at quite reasonable prices.
- At the final stage of applying putty, you can decorate the ceiling with some kind of pattern.
The decorative slab looks great on any ceiling surface. Wallpapering the ceiling is also a fairly common decoration. However, this option is not applicable everywhere due to the use of non-moisture resistant coating.
It is still recommended to finish a concrete or brick ceiling with gypsum putty.
Depending on the type of putty used, its consumption will also differ. Thus, starting putty requires a high consumption if an uneven surface with large differences is being processed. The finishing putty will have less consumption.
Is it possible to putty on a ceiling with water-based paint?
Any finishing work involves surface preparation. This is especially important when it comes to repairs. It is then that a situation arises in which you have to remove the old coating from the walls. Most often this is wallpaper or various paints and varnishes. If everything is clear with the first option, then the second one causes a lot of difficulties. It is not always possible to completely remove a layer of paint, then a reasonable question arises: is it possible to putty over paint?
This question is not idle. The fact is that it is not always possible to remove the entire painted layer. There are always mistakes left. They can be removed, but then you will have to remove part of the coating. And this, in turn, leads to additional costs. And in general, will the putty layer stick then?
Conclusion
Now you know that it is not necessary to remove oil paint from walls or other structures before repainting. You can use the tips from this review and prepare the surface much faster and easier. The video in this article will help you understand some aspects even better, and if you have questions, write them in the comments below.
Did you like the article? Subscribe to our Yandex.Zen channel
January 23, 2022
Paint, Finishing materials, Construction Chemicals, Dry building mixtures
If you want to express gratitude, add a clarification or objection, or ask the author something, add a comment or say thank you!
How to sand a ceiling after puttying
First, starting putty is applied to the walls, which covers all the necessary cracks, holes, and eliminates defects. Then the surface is covered with a special construction mesh, which is buried in the first finishing layer. Such methods of wall treatment are provided for by GOST standards.
READ Seal the seams on the ceiling between the slabs
Further surface treatment should occur only after the previous layer has thoroughly dried. How long the putty dries depends on its type, method of application and environmental conditions. So, the standard drying time is from 2 to 24 hours.
Drying speed is influenced by factors such as:
- Temperature conditions;
- Humidity;
- How many layers of plaster do you plan to apply to the ceiling;
- Type of putty.
After applying the finishing putty, the ceiling surface requires sanding. This is done using a special sandpaper or a grinding machine. The first option will be more labor-intensive, but less expensive.
In order to start grinding the surface, you need to prepare all the necessary materials:
- Sandpaper;
- Sanding beam;
- Sanding sponge for hard-to-reach areas;
- Putty knife;
- Wear a respirator or mask to prevent construction dust from entering your lungs.
The process of sanding the ceiling after puttying takes place in 2 stages. First, you need to sand the surface using coarse-grained sandpaper, and then the final processing is done with fine-grained material.
Sanding should be carried out only after the previous layer has thoroughly dried. It is very important to provide good lighting - the flow of light should come at a slight angle to the surface being treated. Be sure to wear a mask and protect your head from getting sanding dust on your head or in your mouth. Large protrusions are removed with a regular construction spatula. Then a coarse-grained sandpaper is attached to the sanding beam from left to right, and the main process of sanding irregularities begins.
There is no need to sand the entire surface at once - it is mentally divided into small square areas, which are processed one after another.
If you are starting this type of work for the first time, you need to practice on a small area. During the grouting process, do not press the block intensely; light pressure is sufficient. There is also no need to sand the ceiling for a long time. If, while polishing the ceiling, you notice small holes, you need to skip them and subsequently fill them up again with putty.
Application Feature
It is strictly forbidden to apply primer to a damp surface, this is especially true in the demi-season when covering open brick concrete surfaces.
The temperature should range from +5 to +30 degrees.
The product should only be used on a clean, dust- and sand-free wall.
Start plastering the surface when the soil is completely dry. Drying time depends on the manufacturer (read the instructions), layer and air temperature. The higher the temperature, the faster the soil dries.
Wall section treated with concrete contact
How to putty a ceiling correctly: applying the material
You can putty the ceiling yourself, or you can invite specially trained craftsmen. Ceiling putty is the main and most common finishing. However, any ceiling surface requires special preparation before applying putty.
What are the advantages of puttying over other methods of wall finishing:
- Gypsum putty is ideal for residential apartments because it does not contain harmful substances and helps create a favorable microclimate;
- It has a very good property - when there is an excess of moisture, it absorbs it, and when there is a lack, it gives it back, thereby regulating humidity and creating a favorable environment;
- The putty can be applied to any surface - brick, concrete, made of plasterboard;
- The structure of the putty mixture allows it to easily adhere to any materials;
- Allows you to save money, since its consumption is much less than that of similar cement mixtures;
- It is easy to apply and sand, making the process of working with it easy and fast.
Of course, there are some disadvantages to using putty. Creates a lot of dust - during finishing and sanding, a lot of white dust is poured out, which causes some discomfort to the residents of the apartment and requires constant wet cleaning of the room. It is necessary to constantly dilute the mixture - this requires some effort. You cannot prepare a lot of the mixture at once, because after a certain time it becomes unsuitable for use.
However, despite these disadvantages, using putty to finish the ceiling is one of the most popular methods in the world of construction.
Before you start puttingtying the ceiling, careful preparation of the surface is necessary. If there was wallpaper on the ceiling, you need to carefully remove it with a wet roller and spatula. For better adhesion to the surface, a primer is used. If the ceiling was simply puttied, then it is necessary to remove the old plaster also with a wet roller.
Sources:
https://englishpromo.ru/2019/12/mozhno-li-shpaklevat-po-vodojemulsionnoj-kraske/
"Betonokontakt" properties
This miracle product consists of various fillers, binding polymers and other elements. Each manufacturer certainly keeps its formula secret. However, this primer is capable of establishing strong contact with virtually non-adhesive surfaces and is even used to bond minerals and glass. “Betonokontakt” is indicated for use in cases where walls have low moisture absorption capacity. If you pre-treat monolithic concrete with the specified solution, the contact strength increases many times. This primer is used for both interior and exterior work.
This primer will create strong contact with a non-adhesive surface.