Home/Repair and finishing/How to properly putty walls after applying primer?
The process of applying putty to primer is very important. During repairs, a large number of people think about whether it is possible to apply putty immediately on the primer, because this can help save time spent on repairs. The primed surface must dry thoroughly in order to form a protective layer on the surface, which is why putty cannot be applied immediately.
How long should I wait between coats of primer?
You will need to wait 20 hours or more for this. An important criterion will be the air temperature in the room. Glypthal primer takes the longest to dry. This product may take more than 24 hours to dry.
Interesting materials:
How to pack things for moving? How to use a gainer to gain muscle mass? How to consume protein for muscle growth? How to install fonts for Photoshop? How to install driver for Canon printer? How to install a driver for a web camera? How to install drivers for Nvidia video card? How to install a dishwasher if there is no space? How to install a browser extension on Android? How to install the Safari extension?
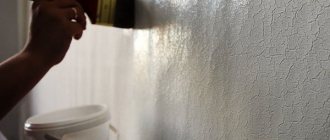
Is the wall ready for applying putty or not? How to determine?
In order to determine whether the wall is ready for applying putty, you need to touch it with your hand; if a protective film appears on the wall, then the wall is ready. But what to do if there is no film, but only dust? This indicates that the primer needs to be applied again. Application must be continued until that same protective film appears. Walls from the pores of the material require at least three applications. It is imperative to remember that each layer of primer must dry thoroughly before applying a new one. The exact drying time for the primer is always indicated on its packaging. You can wait a little more than the specified time, but in no case less.
If you follow all the rules for applying primer and putty to the wall, the work will turn out to be of very high quality and reliable. Even those who have done repairs for the first time in their life will understand that a primer must be used for some types of repair work.
AlinaAuthor of the article
Did you like the article?
Share with your friends:
Why does putty bubble?
Sometimes the putty layer begins to bubble.
Another important question that is often asked is: “Why does the putty bubble after priming?” This effect may be due to several factors:
- too thick a layer of putty is applied;
- A wet wall was primed, then the soil dried out, and now the wall is drying. Acrylic primer allows steam to pass through, it comes out and blows up bubbles;
- the primer is not diluted correctly;
- the wall was poorly prepared and there was dust left on it;
- The humidity in the room dropped sharply. This happens when you start working in a cold room and in the process heat it up with a heater.
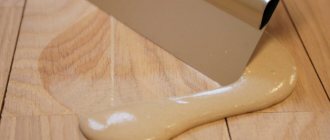
Apply the putty in a thin layer.
If you are sure that you first dried and prepared the walls well, selected the right primer and diluted it according to the instructions, then try mixing a “cooler” putty. In some cases, this measure helps.
How long can you putty after priming - advice from experts
Many developers have a similar question. How important is information about how long after priming the wall can be puttied, what effect does wet soil have on further finishing, and does it dry at all? Today we will try to figure out how long it takes to putty after priming.
- Do I need to use a primer?
- What determines the time for complete drying?
- Advice from the experts
- When can I putty the walls after priming?
What affects drying time?
The following factors influence polymerization:
- Coating thickness. The larger it is, the slower the evaporation process in the mixture occurs.
- Temperature. Excessively high and low rates negatively affect the drying process. The recommended temperature for applying the primer is +15… +30°C. Humidity should not exceed 80%. If the indicators are lower, then polymerization will take longer.
- Composition of the mixture. If earlier it was necessary to use the same primer composition for finishing work, today, thanks to the rapid development of industry and wide technological capabilities, it is possible to use different types of mortar (for different purposes and tasks).
- Best before date. Please pay attention to this factor before using the product. The drying time, adhesion and strength of the coating depend on the quality of the solution.
Choosing a composition for different surfaces
Despite the same purpose, there are a large number of varieties of primer that are suitable for different substrates. If you neglect and do not take this condition into account, and use the material for other purposes, you can only do harm, and the finished surface will not be as ideal as you want it to be.
For wood
There are different types of primer, which is intended for treatment before puttying, which differ in penetration depth and composition.
This:
- Adhesive (alkyd). These are supposed to be alkyd-based compositions that require deep impregnation. The material consists of small particles. They are well absorbed into the wood material and harden in it, making the fibers stronger. These compounds are needed in cases where it is necessary to obtain adhesion between different types of surfaces.
- Acrylate (leveling). Such primers may contain polymers of latex, vinyl or styrene. The particles of acrylate primers are quite large and leave a significant dry residue on the surface. These types of primers are not absorbed, but are distributed over the surface and fill all its gaps. In this way, you can level out various defects and cover the material with an invisible protective film. This type of primer is relevant for further painting. With it, the surface is free from spotting and reduces the consumption of finishing material.
The advantages of soil mixtures for a wooden base are as follows:
- The ability to level the surface and hide defects;
- Extending service life;
- Possibility to save on paint and varnish materials during finishing;
- Giving an aesthetic appearance;
- Ensuring reliable adhesion between the main surface and a further layer of decorative material (paint or varnish);
- Protecting wood flooring from attack by mold, mildew and other diseases.
For concrete walls
Such a primer composition for putty should have an antiseptic and vapor-permeable effect. Under plaster, it is important to use a primer that penetrates deeply through such a hard and dense base.
A reliable soil composition for concrete assumes the following properties:
- Uniform application;
- Increased water resistance;
- Formation of a water-repellent layer;
- Deep impact.
From plasterboard
Drywall itself is a material that is far from finished. As usual, it is painted, bleached or covered with wallpaper and even tiles. Therefore, the answer to the question of how to prime walls before puttying is so that the finishing coating firmly covers the layer of finishing materials. In this situation, the composition improves adhesion and protects the material from various influences.
Important! Drywall primer is a must.
A primer that is suitable for drywall should have the following properties:
- When installing heavy wallpaper or tiles, it is better to use a composition that has deep penetration and improves good connection with drywall.
- If the repair is carried out in a room with high humidity, a moisture-resistant primer is needed.
- When the finishing coating is light wallpaper, a composition with surface penetration and fairly low adhesion properties is suitable.
Advice! In order to prime drywall, you can use a universal acrylic-based mixture.
This composition is characterized by high hygroscopic properties and good adhesion, and also does not contain toxins, has sufficient breathability and dries quickly.
The drywall primer must be compatible with the finishing material. Especially with paint, which can be added in small quantities to the mixture itself
What determines the time for complete drying?
The drying process depends on certain factors:
- room temperature. The soil takes a long time to dry if the room is too hot or cool;
- the thinness of the applied layer speeds up the drying process;
- the primer mixture contains special additives that quickly evaporate from the wall surface;
- The drying time is affected by the structure of the walls. If the primer penetrates deep into the pores, it takes longer to dry.
In most cases, manufacturers indicate information about the constituent components and the time required for final drying of the mixture. In addition, the type of material used affects the drying speed. Acrylic compositions dry for at least five hours; alkyd mixtures will take much longer - up to a day. Griftal compositions take a long time to dry - you have to wait more than twenty-four hours. A water-based primer requires the least amount of time - after applying it, work can continue after twenty minutes.
Continuing to figure out how long after priming you can putty, here are a few rules that must be followed:
- a stable optimal air temperature is maintained in the room;
- drafts are eliminated.
It is prohibited to artificially accelerate the drying process.
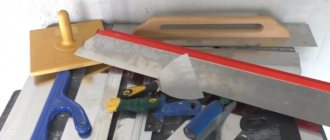
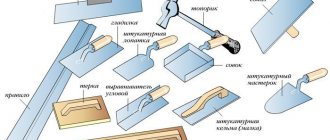
List of tools for work
We will give a list of the most necessary tools for applying putty to various surfaces.
Tools for work
The fact is that the higher the quality, the easier it is not only to work, but also to study. Crooked and rough spatulas make it very difficult to apply putty even for experienced professionals, let alone beginners. The material is permanently glued not to the wall, but to the surface of the spatula, does not flow, the tool leaves behind noticeable marks, etc.
Currently, most craftsmen are switching to polymer putty; it is more expensive than usual, but significantly increases labor productivity. Due to this, the increase in cost has almost no negative impact on the construction estimate. What needs to be prepared for puttying?
- Spatulas. There must be at least two: a wide one with a length of 30 cm or more and a narrow one with a length of 5–10 cm. The length of a wide spatula can reach 50 cm, it all depends on the skill of the performer and the characteristics of the wall. Using a short spatula, the material is applied to a long one, and the latter stretches it along the wall. It is not recommended to buy spatulas with a narrow blade; little material can be placed on them, you have to add it often, and this requires time and extra effort. Spatulas can have straight and shaped handles, parallel or semicircular side edges.
- Ironing irons. The tools are much more convenient for work; the sizes and shapes of the handles are different. But learning to work with such tools is difficult; you can switch to them if you have practical experience. You will feel more or less confident after puttying 150–200 m2 of surface. Instead of a trowel, you can use a spatula for mechanized application, but this is a rather expensive tool.
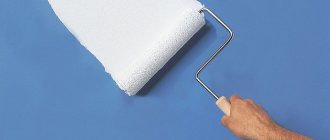
Why is it necessary to prime walls?
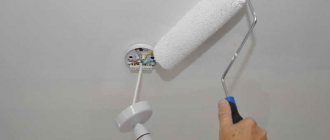
If you carefully examine the surface of the walls being prepared for painting or pasting from a close distance, you can see depressions and roughness on them.
Due to their presence, the quality of adhesion to the finishing material may deteriorate, and the smooth surface of the wallpaper may also be damaged.
The performance properties of the primer depend on its type. The strengthening composition ensures the gluing of microparticles of the surface structure, resulting in the formation of a smooth, dust-free surface. This makes it easy to apply glue or paint to it.
Deep penetration soils fill the microscopic pores of the base, due to which the working surface acquires additional strength.
Using a primer for treating walls has a number of positive aspects:
- the surface acquires a uniform, smooth structure and becomes more durable;
- eliminates paint odor;
- the glossy surface becomes more shiny;
- the risk of mold and rot formation is reduced;
- paint and glue adhere well to the surface, which at the same time absorbs less material.