By laying insulation under drywall, you can achieve the solution of several problems at the same time - providing optimal thermal insulation, leveling the walls and performing sound insulation.
If there is a need to build several additional partitions in an apartment or house, then it is cheaper and faster to build them using plasterboard, and insulating partitions from plasterboard will provide additional warmth and sound insulation.
Application of new developments
Competition in the construction market forces manufacturers to look for ways to improve product quality. To achieve this, work is being done in the following directions:
- creation of acoustic drywall;
- use of special filler with noise-absorbing properties for partitions;
- elastic pads under the frame, reducing the sound of impacts;
- filling partitions and creating false walls;
- spraying cellulose fibers inside partitions.
Acoustic drywall
and Aku-Line have mastered the production of acoustic plasterboard, which reduces the noise level when finishing interior partitions and when covering walls. Increased sound insulation of the partition is achieved due to a large number of holes, creating a reflection of a passing sound wave directed at the wall surface. In addition, a non-woven fabric is glued to the cardboard on the reverse side, which absorbs sound.
Acoustic plasterboard "Knauf"
Sound-absorbing filler inside partitions
Sound insulation of plasterboard partitions also requires the presence of a sound-absorbing filler between them. The same companies are developing it. Expanded polystyrene is widely used - a foamed thermoplastic made from fused granules with air cavities. The material also successfully copes with the function of thermal insulation. The addition of a fire retardant can increase the fire resistance of polystyrene foam. Judging by customer reviews, domestic polystyrene foam is a very poor thermal insulator.
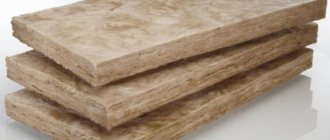
Mineral wool slabs have high protective properties against sound propagation. produces a wide range of acoustic stone wool slabs, among which 4 cm thick products are often used for soundproofing walls. For effective dispersion of sound waves, the homogeneity of the slabs, which acoustic mats have, is of great importance.
Acoustic mats "Rockwool"
Partition materials with improved soundproofing properties are more expensive than usual, but with their help they achieve complete sound insulation. In addition, you can use filler of a smaller thickness, which will reduce costs and loss of room volume.
Membranes made of thin fabric with a fleecy coating are a high-quality sound absorber. The layer can be from 2.5 to 12 mm thick.
Polyester or polyurethane foam panels are used for internal filling and to create false walls. Some of them may be a fire hazard due to the content of flammable substances.
The cheapest filler for plasterboard walls is polystyrene foam. It reduces noise to some extent, but its efficiency is low.
Spraying sound-absorbing coatings
Spraying cellulose fibers with an adhesive composition is often used due to its low cost and the possibility of mechanizing the process. The method is used to correct acoustics indoors for entertainment and public purposes.
How does cellulose spraying occur?
Ready-made Sonaspray coatings have a texture like fur coat plaster. It can be coarse or uniform, depending on the size of the cellulose flakes. Since the coatings look impressive, dyes of a wide variety of shades are added to the solution. The coating can be painted after it has been applied.
The ability to spray a foamed cellulose solution on the surface of walls and ceilings made of building materials eliminates the need to create a frame that is used to hold gypsum board cladding. The manufacturability and cost-effectiveness of the process allows the team of specialists to ensure a productivity of 300 m² per day.
If you have the necessary equipment, the sound insulation of a plasterboard interior partition can be improved by applying cellulose from the inside.
How to choose materials
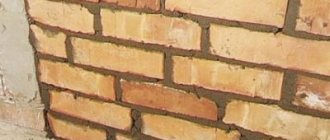
Previously, before the invention of drywall, sound insulation was achieved by building a heavy brick or concrete wall. But it is obvious that this increases the load on the floor. Even earlier, partitions were made from so-called shingles. This is an interlacing of wooden slats, smeared with clay. This material is fragile and flammable, and the durability of the wall leaves much to be desired, fire safety even more so.
Fortunately, drywall is free from the following disadvantages:
- The material is non-flammable. If you choose a metal frame and mineral wool insulation, then you don’t have to worry about a fire in such a room. Plaster does not burn.
- The weight of one meter of brickwork is almost one and a half tons. A square meter of a single-layer gypsum partition weighs only 50 kg.
- A plasterboard partition is easy and quick to install. You just need to carefully mark everything and follow the instructions.
- The excellent sound insulation of the plasterboard surface in combination with other qualities makes the material the best option for building an interior wall.
The ceiling is both beautiful and protects from noise
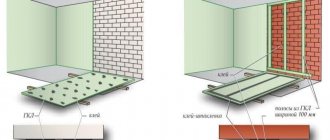
Penoplex insulation under drywall without frame
Step-by-step instructions will be like this:
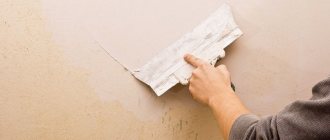
- At the first stage, the base surface is prepared: the old coating is removed, cracks and potholes are sealed, and protrusions are knocked down. The wall should be as flat as possible.
- The surface is treated with a deep penetration primer.
- According to the manufacturer's recommendations, a special composition is prepared. If you don't have it, you can use tile adhesive.
- The inside of the insulation board is rolled with a needle roller. Another option is to brush it with a metal brush. This will ensure good adhesion to the adhesive solution.
- A fragment of insulation is applied to the wall and held for a minute. Be sure to check the correct installation at the building level.
- Begin gluing the penoplex from the bottom. It is recommended to move the rows relative to each other so that the slabs are staggered.
- The seams between the plates are filled with silicone sealant; wide cracks can be sealed with polyurethane foam.
- Drywall is attached to the insulation using glue. The scheme for applying the composition is the same as for penoplex slabs. It is recommended to place a layer of vapor barrier between them.
- After the glue has dried, which will take 24 hours, the drywall is finished. The seams are sealed using putty and serpyanka mesh, rubbed down, after which the entire surface is covered with a double layer of primer.
Sheathing rules
When forming soundproofing partitions, two types of drywall are used. The first is a standard sheet 16 mm thick, the main material for the construction of non-permanent vertical planes. The second type is acoustic plasterboard, which has a network of dot embossing or through perforations. The essence of the work of such a material is to create a heterogeneous environment in which mechanical vibrations propagate less well, as well as to reduce the contact area between the skin layers.
Acoustic (perforated) plasterboard
It is believed that the covering of gypsum board partitions with good sound insulation must necessarily be multi-layered. However, this rule misses the point, because simply increasing the thickness of the shell is not enough to prevent noise penetration. We will share one universal recipe that has shown good results in practice.
The first layer of plasterboard is sewn to the profiles in increments of about 20 cm, while the sheathing must be separated from the frame with an elastic tape, for example, made of polyethylene foam. Next, a layer of foam rubber up to 10 mm thick is attached to the formed plane with PVA glue. The joints between the divider sheets must be placed either horizontally or along the line of the profiles. The second layer of plasterboard is sewn on so that it is attached not to the supporting system, but to the inner layer of drywall in the space between the studs. Typically, the fastening consists of two vertical rows of self-tapping screws in a checkerboard pattern at a distance of 15–20 cm from each other. It is important to follow two rules: the total number of fasteners for the second layer must be twice as high as when attaching the internal one to the frame, and the distance of the second layer fasteners from the rack profiles must also be maintained at least 150 mm.
Installation of sound-absorbing panels
To assemble and cover the frame you will need the following tools:
- laser level;
- drill;
- screwdriver;
- construction stapler.
- metal profile;
- elastic polymer tape;
- plasterboard (from 12 mm);
- mineral wool slabs (thickness from 100 mm);
- polyethylene film;
- self-tapping screws;
- sealant.
The work is carried out in the following order:
The working principle of sound insulation.
- The walls are marked under a plasterboard frame using a level.
- The profile is placed along the perimeter of the wall surface (or between the walls if a false wall is being built), then guide profiles are attached to it in increments of 40-60 cm, fixing them with self-tapping screws every 60 cm.
- To increase the sound insulation of the walls, an elastic insulating tape is laid along the edges of the frame, which should fit tightly to the profile and base.
- If a new wall is built, the frame is covered with gypsum board on one side using special self-tapping screws.
- Mineral wool slabs intended for sound insulation are placed in the cells between the sheathing elements.
- The top of the mineral wool is overlapped with waterproofing, attaching the film with a stapler.
- The frame, filled with insulating material, is covered with plasterboard sheathing.
- The seams between the sheathing and the floor are filled with sealant.
Now you can fill the seams and finish the plasterboard walls.
The technology used makes it possible to reduce the noise level to small values, since the combination of the air gap (in front of the sheathing) and the loose structure of the mineral wool dampens sounds well.
Soundproofing the walls simultaneously serves as their insulation, which is especially in demand in corner apartments.
If a room requires enhanced sound insulation, it can be obtained by combining rigid and elastic materials. Such combined sound insulation can be created, for example, by combining cork and fiberglass materials.
Soundproofing protection
There are special building regulations according to which the level of airborne noise insulation in residential premises must be at least 43 dB. If this indicator is higher than normal, this means that the interior partitions do an excellent job of soundproofing the room. It should be noted that this does not apply to low frequency sounds.
A thickened interior partition isolates the room from low-frequency sounds much better than a frame structure, with the same noise insulation indices. In addition, such structures made of ceramics, plasterboard, aerated concrete, and shell rock are capable of absorbing and reflecting any sounds.
The thickness of such structures is at least ten centimeters. They provide a fairly high sound insulation index (about 40 dB).
Excellent sound insulation in a private house or cottage is provided by standard types of interior partitions. Such designs perfectly isolate various noises, creating a comfortable and cozy indoor environment.
To improve the sound insulation of the room during the construction of partitions, it is necessary to additionally create an air gap or cover the walls with plasterboard.
Multilayer structures are no less effective. The outer hard layers of such structures are capable of reflecting various sounds, while the inner soft layers absorb them perfectly. Special slabs made of basalt fiber are most often used as internal soft layers. This building material is laid in a dense layer under the facing material. The use of a double layer of facing building materials, as well as special sound-proofing and heat-insulating materials in the process of erecting interior partitions can significantly increase the quality of sound insulation of premises.
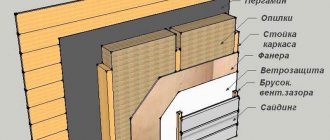
Technology of thermal insulation of walls with plasterboard from the inside
The technology of insulating the walls of a room with plasterboard from the inside does not require special training of workers or expensive equipment. General construction skills and a universal tool are enough.
Tools and materials
During the work you will need:
- guides (metal profiles or wooden bars);
- gypsum boards;
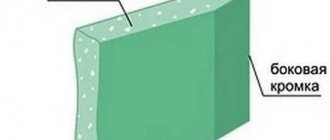
- insulation in slabs or rolls;
- double sided tape;
- vapor barrier membrane;
- screws, dowels and other fasteners;
- anti-mold agents;
- putty;
- drill;
- screwdriver;
- hand tool.
The floor in the room must be cleared of debris and foreign objects.
Design
At this stage, the type of insulation, gypsum board and guides is selected.
If you are insulating a kitchen or bathroom, you should choose moisture-resistant plasterboard. For the boiler room, it is recommended to use fire-resistant.
Wooden guides are cheaper, but they are at risk of drying out and deforming in the event of temperature changes. The metal profile does not have such disadvantages. The number of guides is calculated based on a standard step of 60 cm.
When calculating the volume of materials purchased, a 5% reserve should be made in case of damage to gypsum boards and for cutting complex elements of walls and ceilings.
Stages of work execution
At the first stage, it is necessary to perform a number of preparatory work:
- clean the walls from dirt and mortar drips;
- dismantle all protruding objects: fasteners, remnants of fittings, sockets, lamps, etc.;
- fill all cracks and irregularities;
- treat with a composition against fungus and mold;
- dry the surface.
Next, marking work begins. Use a plumb line or a laser rangefinder and a chop cord
special attention should be paid to:
- parallelism of the marking of the mounting points of the guides;
- marking in corners and junctions of building structures: arches, window and door openings, columns, bay windows, ceiling beams.
After marking, they proceed to the installation of frame guides.
- The starting profile is glued to the floor using double-sided tape; the adhesive tape will improve sound insulation and protect against drafts;
- vertical profiles are attached to the starting strip with metal screws, and to the wall with screws on dowels.
The process of insulating walls with plasterboard
A very important stage is laying insulation into the guides. The quality of insulation will directly depend on the accuracy of the work:
- insulation sheets are placed in the guides from bottom to top;
- they should fit between the profiles without gaps, with some effort;
- the sheets are additionally attached to the wall with adhesive or disc-shaped dowels;
- All cracks and gaps must be tightly filled with scraps of material or sealed with foam.
Now it's time to install a vapor barrier:
- penofol is mounted with foil inside the room;
- The vapor barrier membrane is attached with the rough side inward; double-sided tape is used for installation.
And the final stage is the installation of drywall sheets. They are mounted horizontally, from bottom to top. Before screwing the sheet to the guides, you need to use markings and a level to make sure that it is positioned strictly horizontally. After the first layer is secured along all the guides, the next one is installed on top of it. Here you also need to ensure that the position is horizontal and that the gaps between the sheets are minimal.
As a rule, the size of the room does not allow installing only whole sheets of drywall. Pieces have to be mounted in corners and under the ceiling. Drywall should be cut on the floor, in a horizontal position, on a flat surface. It is enough to cut through the top layer of paper with a mounting knife. Now the cut piece can be broken off along the cut line.
Upon completion of installation, all joints between the sheets should be thoroughly puttied. After the composition has dried, it is leveled with fine sandpaper, achieving a completely flat surface of the wall or ceiling.
Now the surface of the insulated wall is ready for final finishing. Two main types are used:
- wallpaper;
- water-based paint.
When insulating rooms with high humidity with plasterboard, moisture-resistant types of plasterboard with special hydrophobic and antifungal impregnations are used. These panels are easy to distinguish: they are painted green. In wet rooms it is also necessary to arrange supply and exhaust ventilation to prevent air stagnation and mold formation.
Primary requirements
Interior partitions are intended to divide the general space of a building into separate small spaces (rooms), while they are not load-bearing structures. Therefore, to make such a structure, you can use various materials: wood, plasterboard, sand-lime brick and others.
Sound insulation, environmental friendliness, home safety, etc. depend on how well the work on installing interior partitions is done. These indicators are also influenced by the type of material used to build a given structure.
Interior partitions must meet a number of requirements and have excellent technical and operational characteristics.
- High strength and reliability. Partitions should not create even the slightest danger for residents of the house and their guests throughout the entire life of the structures.
- The surface of the structure and the points of connection with other structures should not have any damage, cracks, crevices, etc.
- There are special requirements for partitions in bathrooms and laundry rooms. In addition to the main characteristics, the design must have increased resistance to the penetration of moist air and steam. When choosing a material, moisture resistance indicators should be taken into account. And when installing the partition, certain rules must be followed to prevent moisture from entering the structure. The best option for such structures is a special waterproof cladding material.
- For interior partitions installed on the second and subsequent floors, as well as in the attics of houses with wooden floors, an important factor is the weight of the structure. This is explained by the fact that floors made of wood can withstand only minor loads.
- To provide lighting to a room located in the back of the house, you should use a translucent structure made of special glass blocks. You can also install a partition with glass inserts.
- In stationary interior partitions, which have increased thickness, various communication systems are often installed, for example, a chimney, water pipes, electrical wiring, etc.
- Interior partitions that divide rooms with different temperature conditions must have excellent thermal insulation properties.
- To ensure reliable sound insulation of the room, when installing lightweight interior partitions, it is necessary to use special soundproofing building materials. Massive structures do not require additional equipment and are able to cope with this task independently.
What not to do
Often, when trying to limit themselves from noise, many people use materials that are not the most suitable for this. First of all, this applies to polyurethane foam.
Not only does it provide poor protection from noise, but it is also not fire safe. The foam melts perfectly and releases a suffocating gas. The same can be said about polystyrene foam.
By creating a simple partition made of gypsum sheets to protect against noise, and not filling it with a noise absorber, they thereby turn it into a large resonator, which only worsens the situation.
Insulation from sound penetrating through technological openings - sockets, air ducts and the like - is required. If nothing special is done with the air ducts and ventilation ducts, then the outlet can be treated from the inside even with a simple sealant, which, although slightly, will reduce the amount of incoming noise.
When using roll sound insulators and membranes, you must not leave joints or gaps between the parts of the coating. It is necessary to glue them overlapping.
General recommendations
The measures described should never be redundant. Isolation from extraneous sounds in residential premises is very important for comfortable living, but if you overdo it in this matter, you can doom yourself to unreasonable costs and loss of usable space. Therefore, you need to understand that the partition between the kitchen and the living room has different requirements than the partition separating the bathroom or children's room.
The problem of high-quality sound insulation is not only technical; much depends on proper planning, predicting noise loads by determining the sources and paths of propagation of extraneous sounds. Much depends on the finishing materials. For gypsum plasterboard partitions made according to schemes from technical albums, painting and wallpapering are recommended, while tiling forces the use of hinged fasteners, increasing the number of layers and using the capabilities of damping materials.
When is it necessary to insulate indoor walls?
The most effective option for wall insulation is installing thermal insulation on the outside of the façade. But only owners of private houses can afford this. This method is also expensive. In apartment buildings, if they are not insulated from the outside with thermal insulation materials, residents have only one choice for insulating the walls themselves - internal thermal insulation. Private homeowners also often choose this option as an economical one.
They prefer to use plasterboard for wall cladding because it has a number of advantages over other finishing materials:
- lightweight and easy to handle;
- has thermal insulation properties;
- allows you to quickly create perfectly smooth surfaces;
- under such a coating you can place any type of insulation, even soft ones;
- its cost is not high.
Thermal insulation properties of plasterboard
The use of plasterboard slabs allows you to create high thermal and sound insulation not only due to the pores that form inside it, but also due to the air layer that is located behind the slab. Therefore, for a relatively warm climate, you may not need to use additional insulation. As for the gypsum board itself, the level of thermal insulation is determined by the thermal conductivity coefficient. For example, drywall has a thermal conductivity coefficient of only 0.15, which is significantly lower than reinforced concrete. This allows you to not only create warmth in the winter, but also coolness in the summer.
It is worth noting that the method of installing drywall affects the level of thermal insulation. To achieve greater effect, it is recommended to use a frame option rather than glue. The resulting layer under the frame creates additional insulation of the walls. But, one way or another, to create a warm atmosphere you will need insulation.
Features of thermal insulation with plasterboard
Advantages of gypsum board cladding in terms of wall insulation in an apartment:
- low conductivity of panels;
- installation is carried out only on flat surfaces, most often the sheets are installed on the sheathing - such a frame forms an air gap between the wall and the sheathing, which has a positive effect on retaining heat in the room;
- free space (cells in the sheathing) can be filled with materials with a high ability to retain thermal energy;
- In summer, such rooms will be cooler due to the fact that additional layers will not allow heat from outside.
Installation of insulation under plasterboard is carried out only on flat surfaces.
In apartment buildings, internal insulation is more accessible than external insulation; plasterboard is one of its most economical options. The panels are easy to process and undemanding in maintenance, they can be applied with any type of finishing, they form a perfectly flat surface without weighing down the load-bearing structures
GCRs are combined with most types of insulating (hard, soft) and finishing materials, which is important when creating interior design
Good advice
- By insulating walls with gypsum, you can avoid the cost of purchasing some building materials. The vapor barrier layer must consist of a special membrane whose density ranges from 90 to 150 micrometers.
- Using hardware, choose a product with a wide head. It will serve as a reliable fixation for the drywall sheet.
- It is not recommended to choose drywall that is too low in cost. Such savings may later result in unscheduled repairs, since the quality of the material may be much lower than expected.
- When insulating a wooden house, you need to place an additional layer of insulation made of non-combustible material between the surface of the wall and the drywall.
- Sheets of material are installed exactly end-to-end, regardless of their thickness. Neglecting this advice may result in the wall surface not being very smooth even under a layer of plaster.
- When using wooden beams as sheathing material, make sure that it is not damaged by insects. It is better to treat the wood with an antiseptic compound before installation.
- The type and dimensions of the material must be in accordance with the purpose of the room where the drywall is installed.
- All corners of the material are secured with special care when laying the insulation. Otherwise, any carelessness will lead to damage to the sheet section.
The basic principles of working with plasterboard when insulating walls in a home from the room side are outlined above. Regardless of the material of the walls of a residential building, thermal insulation and cladding of the wall surface using plasterboard should be carried out as carefully and efficiently as possible. Otherwise, the result will not be able to meet expectations, which threatens premature repair of the plasterboard wall.
Stages of thermal insulation of a wall
In order for the work process to proceed quickly and properly, you should prepare the necessary tools. This will significantly speed up the work on protecting the walls with insulation.
The following materials will be required:
- plasterboard sheets;
- self-adhesive tape;
- insulation;
- membrane to ensure maximum vapor barrier;
- screws, nails;
- hammer, screwdriver, hacksaw;
- yardstick;
- metal profiles or wooden slats for constructing the frame;
- fastening materials.
For 1 sheet you need approximately 30 pieces of self-tapping screws. It is best to buy screws 20 mm long.
As for the manufacture of the frame, the profile must be taken of 2 types: marked CD and UD. The length is selected based on the size of the room.
Frame design
It consists of drawing the perimeter and thinking through how the frame will be positioned on the wall. A simple pencil and a building level are enough.
Preparation:
- surface cleaning;
- smooth out all the unevenness and fill up the cracks and depressions;
- drying with a heater or blow dryer;
- getting rid of mold and mildew.
Sometimes it is necessary to treat the walls with a special waterproofing putty to prevent the occurrence of dampness. First, the layer is applied vertically, then horizontally.
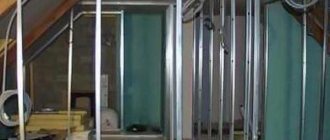
Frame construction
Installation of a frame from profiles for plasterboard You need to mount the frame according to pre-made marks. To avoid contact of the metal structure with the wall, a tape prepared in advance is glued to the base of the profile. The frame parts are fastened to the wall using self-tapping screws and dowels.
Before laying the insulator, the surface is prepared in advance. Weak areas of plaster are removed or restored. To eliminate the possibility of the formation of fungus and mold, it is necessary to treat with a primer and an antiseptic.
Sheets of plasterboard are installed on a frame made of metal or wood. A metal frame will last significantly longer than one made of timber.
In the area where batteries are located, where installing thermal insulation is difficult, penofol can be used.
You can make a frame from bars under drywall
Assembling the frame begins with the installation of guides created from the UD profile. The slats are mounted on the ceiling and floor with a distance of 50-60 mm from the walls. A section of the rack profile is inserted into the guides. The ends are fixed using small self-tapping screws (“fleas”). The edges of the hangers are folded from the sides and connected to the slats. The pitch between the profiles must be observed so that there are 3-4 slats per sheet.
To improve the rigidity of the structure, it is necessary to make transverse bridges from the CD profile. The profile is cut so that its length overlaps the adjacent slats by half. Use metal scissors to cut off the shelves. Then the blanks are fixed with fleas onto the frame.
Vapor barrier device
Penofol is often used as a vapor barrier. Before attaching it, you need to make sure that the side of the material with foil is facing inside the room.
As for the vapor barrier material, which has a rough surface, its uneven side should also be directed into the room.
Insulation
The insulation should be cut using a special knife. The insulation should be cut into pieces, the size of which should match the parameters of the frame cells.
If you use foam plastic as a thermal insulation material, then it should be attached with special glue prepared with the addition of water. Each piece should fit tightly to the surface. If gaps appear between the parts, they are filled with polyurethane foam. After the glue has dried, the foam is fixed with dowel umbrellas. Dowels should be placed in the corners of the sheet and one in the center.
After laying the internal thermal insulation, they begin to sheathe the frame with sheets of plasterboard.
When the screw is screwed in, its head should sink slightly, by 1-1.5 mm, but without tearing the cardboard. To make fixing easier, it is better to buy bits with a limiter.
After the walls are completely covered with plasterboard sheets, the surface is finished in any usual way. Insulated walls can also be covered with wallpaper or painted.
Which way to choose - from the inside or the outside?
If the thermal insulation material is placed outside, that is, the facade of the house is directly insulated, the dew point (condensation forms along this boundary during temperature changes) falls precisely on the additional layer. In this way, the impact of temperature changes and changes in air humidity on the load-bearing wall is neutralized, resulting in an extended service life of the building.
If insulation is carried out from the inside using mineral wool covered with gypsum board or similar cladding, the dew point moves. Usually this boundary is between the wall and the insulation, in such conditions there is a high risk of fungi and mold growing. If internal thermal insulation of partitions and walls in an apartment is carried out, two conditions must be taken into account - the presence of a protective layer on the side of the facade and the total thickness of the wall. The best option is to strengthen the load-bearing structures on both sides.
Advantages and disadvantages of plasterboard wall structures
To begin with, it probably makes sense to briefly highlight the positive and negative aspects of a wall frame structure made of plasterboard. Having understood them, it will be possible to competently decide whether such a partition is suitable for a particular case or not.
After finishing work, the plasterboard structure will look like a full wall.
So, the advantages of plasterboard partition structures include the following points:
The materials used for the construction of such walls are quite light, so they will not weigh down the interfloor floors. Consequently, the mounted structure will be absolutely safe for the building. Walls and partitions made of plasterboard are not permanent, so their construction does not require obtaining a permit, the obtaining of which involves the loss of a considerable amount of time, money, effort and nerves. Drywall is produced in several versions - these are simple sheets (GKL), moisture-resistant (GKLV), fire-resistant (GKLO). Lightweight sheets are produced for ceiling structures
Therefore, walls and partitions can be erected from this material in any of the rooms, including in the bathroom or near the stove or fireplace. The affordable cost of both the drywall itself and the components for building the frame allows a family to purchase them for repairs, even with a modest budget. It is quite possible to design and install plasterboard walls that have complex decorative and useful shapes, such as arched doorways or functional niches and cabinets, allowing you to avoid purchasing furniture accessories. When leveling walls with this material, you will not need to remove the old plaster. The construction of walls made of plasterboard (or when leveling walls with plasterboard using a frame method) allows for immediate insulation and sound insulation work. You can hide electrical wiring in the frame of the wall being built. There is a complete opportunity to do without the involvement of a team of builders, since all the work can be done independently or with one assistant. The material is “breathable” and environmentally friendly, which is important for furnishing residential premises. A wall or partition erected using this method turns out perfectly smooth, suitable for any facing material, be it wallpaper, paint or ceramic tiles.
Moisture-resistant plasterboard sheets are used to level or line the walls in the bathroom.
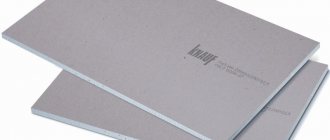
Drywall prices
drywall
Now, for the objectivity of the picture, it is necessary to consider the negative aspects of the plasterboard structure. It is advisable to know about them in advance, so that later, when using the rooms, you do not encounter some unexpected inconveniences. :
Wooden bookmarks in a metal frame of a plasterboard structure
- A wall made of this material will not be able to withstand hanging any heavy objects directly onto the plasterboard, since the sheets are quite thin (12.5 mm), fragile, and the gypsum itself is not particularly strong. Therefore, if in the future there is a plan to hang, for example, a TV or sconce on the wall, then their location must be determined at the design planning stage, and additional jumpers made of a metal profile with wooden bookmarks must be provided for fastening.
- The wall structure will have a minimum thickness of about 80 mm, and often much more. This reduces the area of the room somewhat. But think about it, what if you use other materials for the partition? Almost any other will give even greater thickness. Therefore, this drawback can be called very doubtful.
Soundproofing of plasterboard partitions
Properly selected material for soundproofing plasterboard partitions is the key to peace and quiet. By protecting against intrusive conversations, music or TV in the next room, it helps maintain nerves and healthy relationships.
A typical modern interior partition is made of a wooden or metal frame covered with plasterboard on both sides. Such a wall does not resist the passage of sound well. If a similar redevelopment has been made in the apartment, then only soundproofing of plasterboard partitions will save you from noise.
Best materials
The most effective material that completely guarantees results does not yet exist and is unlikely to ever be made. There is also no universal, one-size-fits-all guide to follow when making a room barrier.
The effectiveness of activities depends on each stage. The very first is the installation of the frame. Its design will simply ring if you do not take protective measures - insulate the floor and ceiling from it. Without using a damper tape, it is impossible to achieve any significant results. An excellent damper is the proven Vibrostek-M tape.
As for the frame, there is not much to think about what to choose from - either wood or a metal profile. Their indicators are approximately the same, and little depends on the choice in favor of one or the other.
The panels covering the frame play a significant role. Acoustic plasterboard produced by Knauf or similar products from the Aku-Line line manufactured by Giprok can significantly reduce penetrating noise.
A responsible approach to the task requires that the sheets be laid in 2 layers. Just one layer does not give a quality result. Acoustic triplex, a specialized three-layer material for sound insulation, can also be used as sound insulation under drywall.
A good triplex is produced under the SOUNDLINE-dB brand.
The main role is played by the layer of aggregate laid between the panels. Sound-absorbing boards SCHUMANET-ECO have good performance and suitability for domestic use in apartments.
If the partition has already been built, there is not much to choose from. But it is not necessary to disassemble it and rebuild it. Sound absorption can be significantly improved by using wall membranes. Thanks to them, the volume of reflected sounds directed at the surface of the walls is reduced.
The process of installing sound insulation in a plasterboard partition
A good result depends not only on the materials, but also on how correctly and responsibly the sound insulation is done. Here we can highlight the following, most significant stages:
- Soundproofing a plasterboard wall in an apartment begins with mounting its frame on vibrating tape. It is laid in two layers, attached to the walls, floor and to each other with vibration sealant;
- Frame installation. It is advisable not to place sockets and switches on the future wall - sounds are transmitted very well through them. A rational solution would be to make the distances between the profiles correspond to the size of the soundproofing slab;
- Installation of plasterboard sheets of partitions on one side. Acoustic plasterboard is installed with perforations facing outwards;
- Laying sound-absorbing slabs in the interior partition. Their thickness determines what the thickness of the interior partitions will be;
- The final stage is when the slabs are covered with gypsum boards. To do everything correctly here, the joints need to be sealed with vibration sealant.
Vapor barrier film
Such raw materials are quite popular among people doing repairs. However, you should consider all the pros and cons.
Flaws
- Since polyethylene does not allow air to pass through, creating a greenhouse effect on the surface, the craftsmen came up with a trick. Some experts recommend walking over the surface of the polyethylene with a needle roller. Thus, according to repairmen, the surface begins to breathe and provides the desired effect. Other experts say that this idea is wrong. In any case, the pores created in this way will not perform the required function, allowing moisture to pass in both directions and not retaining it inside.
- Experts say that the film cannot be confidently positioned as a vapor barrier. The raw material is not specially prepared to perform the function of retaining steam in its coating.
Based on the above, it can be understood that plastic film is not the best option. But, if temporary repairs are required or there are no funds, polyethylene film can be considered as an alternative to professional materials.