Moisture-resistant gypsum fiber sheets - advantages and disadvantages
Building material for dry type premises is widely used in finishing work. Gypsum fiber sheet does not have a cardboard covering, which is resistant to moisture and is also hard. We also suggest that you understand the advantages of gypsum fiber boards, the features of moisture-resistant panels, as well as which of them are best to use. Read on and you can learn about the technical characteristics, qualities, main differences between panels and gypsum plasterboard and methods for installing moisture-resistant gypsum board.
Definition and varieties
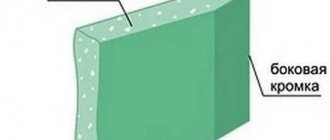
Moisture-resistant drywall is marked with the abbreviation GKLV. It is interpreted as a moisture-resistant plasterboard sheet. It also includes two layers of durable cardboard separated by a layer of plaster. But each layer is impregnated with a special composition, which increases the material’s resistance to moisture.
Another type of moisture-resistant boards is GKLVO. The letter “O” in the abbreviation stands for “fireproof”. Therefore, GKLVO is not only moisture-resistant, but also fire-resistant material that prevents the spread of fire.
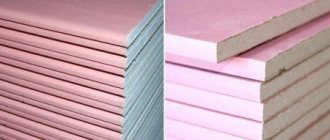
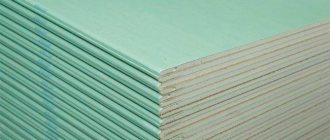
Previously, different types of drywall were produced in different colors. The simple slabs were grey, the moisture resistant slabs were green. Now many manufacturers offer colored plasterboard.
Laying gypsum fiber board on the floor
Before installing gypsum fiber board sheets on the floor, it is necessary to carefully prepare the base. The old coating must be removed and all debris must be removed. Even contaminants, which ideally should not exist, deserve special attention - they do not contribute to adhesion. Irregularities and defects must be eliminated using the cement mortar from which the screed is made. Then a layer of waterproofing is laid on the floor. If necessary, resort to adding expanded clay; this is done for additional thermal insulation of the floor. After the above steps, you can proceed directly to laying gypsum fiber sheets.
This is done as follows:
First, you should apply the damper tape.
Next, the sheets themselves are laid on the floor. Their fastening is carried out by using glue or self-tapping screws
It is important to remember that screws should be screwed in, maintaining a certain distance between them (approximately 35-40 cm is recommended). The new row is laid with a seam offset of at least 20 cm. At the final stage, all joints between the sheets must be carefully processed
This can be done using leftover glue, but it is better to use putty. Then any covering can be laid on the gypsum fiber sheets.
Specifications
Main characteristics of GKLV:
- Moisture resistance is 90% higher compared to simple plasterboard.
- Flammability group - G1 (low flammability, do not burn in the absence of a fire source).
- Flammability - B2 (hardly flammable materials).
- Smoke generation group - D1 (low smoke generation ability).
- Toxicity group - T1 (low hazardous materials).
Advantages of moisture-resistant drywall:
- Resistant to moisture, steam - you can regularly carry out wet cleaning.
- Increased strength and density compared to conventional plasterboard.
- Large selection of sizes and thicknesses.
- Easy installation.
Video description
Video instructions for creating sound insulation from GVL on a concrete floor:
Laying on a wooden floor
Installation of gypsum fiber sheets on a wooden floor or joists must be carried out with leveling the surface and subsequent checking the level, as well as with preliminary antiseptic treatment of all wooden structures.
Often, the option under consideration involves laying gypsum fiber board on a wooden floor under the tiles. Then, after fixing the material, a special glue under the ceramics is applied to its surface, and then its stage-by-stage installation is carried out. In this case, there is no need to fill the gaps formed between the sheets during installation - since the adhesive base seals them.
Prefabricated Flooring on Cushion
Often, to level the surface with large differences in height or to give the ceiling maximum thermal insulation, granular materials are used, for example, expanded clay. The main advantage of the method is the maximum speed of installation and the absence of the need to work with solutions. In addition, this filler is quite lightweight and can be used on a wooden base.
Review of manufacturers
Moisture-resistant drywall is produced in Russia and abroad. The most popular manufacturer is Knauf (Germany). It has representative offices in 30 countries. In Russia it has 10 factories, which are known as Knauf.
Other foreign manufacturers of gypsum boards sold in Russia:
- Compagnie de Saint-Gobain SA (France);
- Lafarge Group (Poland);
- Gyproc (Scandinavia).
Moisture-resistant plasterboard of domestic production occupies only 20% of the entire Russian gypsum board market. The most popular manufacturers of this material in the Russian Federation:
- JSC Gips (produces GKLV Volma);
- OJSC Sverdlovsk Gypsum Products Plant (produces GKLV Gifas);
- Arakchinsky Gypsum LLC (manufactures Abdullingips sheets).
Functional Features
The modern construction market offers many types of gypsum fiber boards, each of which has certain characteristics:
- KNAUF superlist “Standard” . It does not contain harmful impurities, environmentally friendly, high-quality material. Scope of application: dry construction work, cladding of premises with high requirements for fire safety standards, strength, heat and sound insulation;
- KNAUF super sheet “Moisture resistant” . The main features are reduced moisture absorption (due to the use of hydrophobic additives), fire protection and good sound absorption. The sheets are subjected to grinding and special impregnation against chalking;
- KNAUF superlist “Moisture resistant. Small format" . Its characteristics are identical to conventional moisture-resistant sheets. The difference lies in the overall dimensions (length, height, weight). Ideal when performing work by one person and using the frameless method;
- System (or floor element, EP) Knauf-superfloor . It is used for dry screeding of the base under the floor covering. The product consists of 2 moisture-resistant gypsum fiber sheets connected with glue. The total thickness is 20 mm.
How to choose?
When choosing drywall, you need to look at its markings. Here's what the symbols on the packaging mean:
- A - standard size sheet;
- D - density depends on operating conditions;
- E - vapor permeable (for facade);
- F - fire resistant;
- H - moisture resistant;
- I - increased hardness;
- P - for tiles or plaster;
- R - increased bending strength.
For the manufacture of radius structures, choose flexible sheets with a thickness of 5–6.5 mm. For arches with slight curvature and flat planes, 9.5 mm sheets are suitable. For finishing bathroom walls and a single-level ceiling, the optimal thickness is 12.5 mm. For interior partitions - from 14 mm.
Differences between GVL and GKL
Despite their similar composition, gypsum fiber and plasterboard sheets have different structures, which determines the difference in the technical and operational characteristics of these finishing materials:
- The homogeneous structure of gypsum fiber ensures an even cut without chipping, while plasterboard can crumble at the cut points. In this regard, gypsum boards are usually used in solid pieces, but gypsum fiber can be cut into elements of any size.
- The use of GVL instead of GCR is advisable in places where increased resistance to shock and damage is required.
- Drywall has high plasticity, which allows you to create a variety of structures of any shape, while gypsum fiber breaks when strongly bent.
- GKL and GVL differ in their level of frost resistance. Drywall can withstand only 4 cycles of freezing and thawing, after which cracks appear on it, gypsum fiber can withstand 15 cycles.
- The fire resistance of gypsum fiber is much higher than that of plasterboard.
- The materials have a difference in price - ordinary drywall is 2 times cheaper than a gypsum fiber sheet of the same thickness.
For comparison, here is a table of approximate prices for different types of gypsum fiber boards and gypsum boards from KNAUF:
Instructions for use
Basic rules for working with gypsum boards:
- Sheets can be secured not only with self-tapping screws, but also with glue. If they begin to bulge during drying, they can be straightened with a rubber hammer.
- There must be a gap of at least 1 mm between the floor and the gypsum board. A small gap should be left between adjacent sheets.
- Thin sheets are not suitable for installing partitions - they are deformed.
- To fold the sheet, mark the fold line with a needle roller, then wet it. Once wet, the material will bend easily.
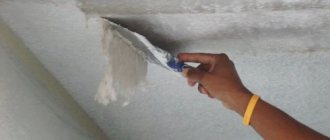
Scratches on gypsum plasterboard are easily masked with putty. To maintain the strength of the finish, scratches should be covered with reinforcing tape before puttying.
Which side should I attach?
The front side is inside the room, the back side is towards the wall. The front surface is lighter than the back surface, which is also distinguished by the presence of markings.
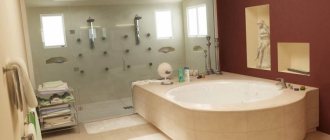
Can it be used in the bathroom?
Yes. GKLV is an excellent material for finishing walls and ceilings in the bathroom. But there must be a finishing touch (tiles, plastic panels), since moisture-resistant drywall is only resistant to high humidity - it will collapse from direct exposure to water.
Is it possible to glue wallpaper?
Yes. Moisture-resistant plasterboard sheets are suitable for wallpapering, but only after puttying. Otherwise, the wallpaper will be painted in the color of the gypsum board, the joints will protrude, and stains from the markings will appear. Without putty, the wallpaper can only be torn off with a layer of cardboard.
What to cut with?
GKLV can be cut:
- sharp knife;
- jigsaw;
- hacksaw for metal.
Thin sheets can even be cut with a stationery knife.
Using panels in the construction process
Now you know all the dimensions of the moisture-resistant gypsum fiber sheet and you can consider the features of installing the material.
Laying material on the floor
Installation of a dry floor made from slabs is simple and quick. The work algorithm is as follows:
- Cover everything with waterproofing.
- Apply the edge tape along the overall room perimeter.
- Lay an expanded clay layer (the fraction of the bulk material should be no more than ½ cm).
- Installation of the first layer should start from the walls opposite the door.
- The row that is laid on top should be covered with an adhesive composition; the second row is covered.
- This is followed by sealing the joints.
- Laying the finished floor.
If the GVL has a size of 1.2 * 1.5 meters, the brickwork method is used. Please note that the second row is laid out extremely carefully so that the bottom layer is not displaced. The builders called the technology waste-free; the pruning is transferred to the next row. GVL will be connected depending on the dimensions, and all products must be glued. Large formats are secured with self-tapping screws over the total area every 0.3 meters, and small ones every 0.2 meters. Small sizes are suitable for household purposes, because large products are extremely inconvenient to work with.
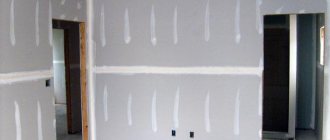
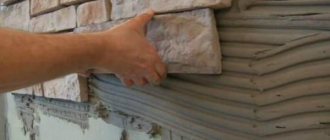
For wall decoration
There are frameless and frame methods for installing sheets, and moisture-resistant gypsum fiber board is used for wall finishing. With the frameless method, GVL must be installed in this way:
- Gypsum putty must be applied to the sheets in a thin layer and glued to the wall surfaces. This method is used when wall irregularities are no more than 0.4 cm.
- If the wall errors are from 0.5 to 2 cm, the adhesive composition is applied from the middle to the edges.
- GVL strips are installed on uneven walls (the error will be more than 2 cm). Only after this the gypsum fiber material is installed.
With frameless methods, preparation work is carried out. It is important to clean the walls from paint, plaster, dirt and carry out the priming process. Afterwards, the vertical and horizontal surfaces are leveled. In order to prepare the solution, you need to take the required amount of water. Afterwards, the mixture is poured into water and mixed as best as possible. Next, it is important to maintain a technological pause - from 5 to 10 minutes and mix again. The thickness of the applied layer of plaster should not be greater than recommended.
Helpful advice! The adhesive composition is applied over the entire area of the material, and there should be more putty on the edges so that the GVL does not begin to press through when drying.
The slabs are installed on the frame if the walls are uneven. The sheathing needs to be made from a metal profile or timber, and it is important to prepare the walls - clean and prime them. GVL installation steps:
- Apply markings with a profile step of 0.5-0.6 meters.
- Install hangers.
- Install the racks.
- Check everything using a building level.
The gypsum fiber board must be screwed around the common perimeter so that the material does not deform.
Moisture-resistant gypsum fiber sheet GVLV
Gypsum fiber, like plasterboard, is a sheet-type finishing material made from special building gypsum with various additives, reinforced with dissolved cellulose. It differs from drywall in its uniformity. The sheet does not have an additional cardboard shell, but at the same time it has a much higher density, which is 1250 kg/m3. Thanks to this, such layers are much stronger than standard gypsum analogues.
There are two types of similar panels:
- standard;
- moisture resistant sheets.
The difference between drywall and gypsum fiber is also strength.
The characteristics of the finishing material determine the scope of their application. We propose to take a closer look at gypsum fiber using the example of high-quality KNAUF boards.
General installation principles
Preparing the base
In order for gypsum fiber boards to lay correctly and not deform, you must first prepare the surface before installation:
- To do this, remove the entire old layer and clean it well from the surface if it fits tightly enough.
- Then the base is examined for cracks, dimples, and deformations. If there are, then they are cleaned well and slightly increased in volume.
- Then you need to clean the surface from construction debris and dust. This is done with a broom or vacuum cleaner. If dust has settled in sufficient quantities on the joints, then you need to wash the floor with a damp cloth.
- Cover the dried surface with primer. You can prime several times.
- When the composition is completely absorbed, begin installing the beacons.
Lighthouses
The level determines the zero point, from which the height of the entire surface is calculated. Once all the marks on the walls have been made, you can install the beacons. They must be placed over the entire surface of the floor at equal distances from each other.
Beacons are placed first along the edge of the wall. You need to maintain a distance from it - approximately 10 cm. This will help you work with tools smoothly when leveling the surface. It is necessary that the rule and the spatula pass easily and do not get stuck between the beacons.
Expanded clay backfill
For large volumes of pouring, for example, in a country house, it is best to order a ready-made mortar for the screed. For rooms with a small area, it is better to use a dry mixture like expanded clay. Expanded clay must be poured strictly along the beacons so that the layer thickness is not less than 20 mm. Do not exceed the maximum backfill height, which is set at 100 mm.
Attention After sealing the perimeter of the room and the flooring with vapor barrier, the expanded clay is pressed tightly to compact it. All unnecessary elements are removed with a spatula
It is added to the missing places (joints, cracks, recesses) and leveled.
Installation
They begin to lay the GVP from left to right of the doorway.
- From the first slab, which is closer to the opening, the outermost connecting quarter is cut out. The third and fourth sheets are laid out on the floor in the same way.
- The second row begins with cutting off the tiles that remain from the first row. The seams of adjacent rows in this case are shifted by a small length.
- When three rows are laid out, their joints are fastened with self-tapping screws and a screwdriver. Step - at least 300 mm.
- After laying all the sheets, the surface is cleaned from construction dust with a vacuum cleaner. This must be done immediately after completion of installation work.