As soon as renovations begin in secondary housing, the owners think about remodeling the premises. It is often necessary to demolish one or more partitions and install new partitions in a different location. And here the question arises, how to make a doorway from plasterboard? Is it possible to do this work yourself, or will you have to hire a team?
Installation of a plasterboard doorway
There are a lot of materials for making plasterboard structures, but the most popular and popular is plasterboard. This material is universal. Firstly, it is inexpensive, secondly, you can make a doorway out of plasterboard with your own hands, and thirdly, it is easy to finish. But you should not think that using drywall to install a doorway is easy, since it has its own characteristics, and they should not be neglected.
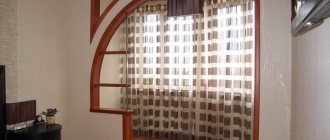
Doorway made of plasterboard in the interior of an apartment
Despite the fact that gypsum plasterboard, when constructing a doorway from plasterboard, is attached to metal profiles, the structure under horizontal loads may lose strength and begin to loosen. Especially if the door leaf is heavy.
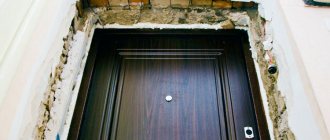
An example of finishing a plasterboard doorway
Important! When constructing a partition with a doorway, the structure must be strengthened at the installation stage. The main positive point when installing plasterboard structures is the ability to do everything yourself.
Video on how to install a door
Final works
In order for the process to be completely completed, the door should be decorated and ennobled. To do this, use platbands. It is better to choose them immediately, especially those that come complete with the door leaf. If there are none, then be guided by color. It is better to refrain from various patterns and designs if you are not a designer or an artist. Platbands are usually nailed with special nails that have a flattened head so that the gap and foam are closed.
The planks are cut in such a way that they are joined end-to-end at 45 degrees each, and then the result is the coveted angle of 90 degrees. As you can see, everything is very simple. If the cost of cutting in the store is not too high, it is better to do it immediately upon purchase. The fact is that otherwise you will need a guide template or sleight of hand, since even the slightest deviation from the given angle will be fraught with damage to the plank. The trim should be nailed with a hammer around the perimeter of the door in increments of 0.2-0.25 meters.
Installation of a partition with a doorway
If you want to sew up a doorway with plasterboard yourself, then the step-by-step instructions given below will help make this a reality.
This method may be needed not only in renovating an old apartment, but also in a new one, since they are often rented out as one room, in which you need to do the layout yourself.
But it is worth noting that all redevelopment work must be agreed upon. Before starting work, you need to plan the partition, since it will not be possible to first build the structure and only then arrange the opening - everything must be done in accordance with a specific work plan.
Diagram with dimensions for installing a partition with a doorway
And in this case, it doesn’t matter whether you want to mount a plasterboard arch or a full-fledged doorway. The main task is to build a strong and stable structure.
Planning and marking
Installation is carried out in stages. It is important to maintain strict consistency. You need to start with planning:
- First of all, you need to decide where the plasterboard wall with the door will be located, so as not to miss important points during installation. Errors arise due to haste and lack of experience if the structure is built with your own hands. For accuracy in calculations, you need to use a tape measure.
- Once it is decided where the plasterboard partition with the doorway will be located, we determine the location of the opening. It all depends on the layout of the apartment and the interior. It is important to make not only a beautiful partition, but also an ergonomic and comfortable one.
Design option for a partition with a door
Consider the most rational options for placing the door opening so as not to take up useful space when opening it. - Next comes drawing up a drawing of the future structure; the location should be planned very precisely, this is the only way you will get a high-quality and reliable frame.
- This stage of construction will be completed only if you apply markings on the plane, which are carried out along all surfaces adjacent to the partition. Markings on walls are carried out using a plumb line - this is a more reliable option, since the level may have errors.
Note! If you have the opportunity to borrow a laser level from professionals, then you can use this device for marking - it is much more convenient and faster.
Materials
Construction and fastening of the frame of a plasterboard partition with a doorway
- Drywall. Sheets of plasterboard with a thickness of 12.5 mm are used for walls; they are more reliable and durable. If the air humidity in the room is high, then it is worth buying green slabs - moisture-resistant plasterboard.
- Metallic profile. You shouldn’t skimp on it, buy 50x100 mm rack elements and a 50x50 mm guide. A regular profile will make the wall only six centimeters thick, which is not the norm both in terms of sound insulation of a plasterboard partition and in terms of strength.
- Soundproofer. You can use mineral wool. It is inexpensive and has excellent sound absorption characteristics.
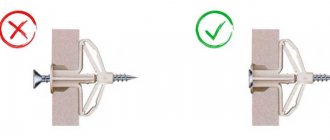
- Fasteners are self-tapping screws and dowels of different calibers, with the help of which the structure is assembled into a single whole.
Tool
For installation you need the following set of tools:
- perforator for punching holes in surfaces. If the house is wooden, then it will not be needed;
- a screwdriver is the most necessary tool, since you will have to tighten a lot of screws;
- sharp metal scissors, for profiles;
- level, pencil and tape measure, for measurements and markings;
- construction knife and metal ruler for quick and accurate cutting of drywall.
Frame installation
The frame is an important structure in the construction of a partition with a doorway; it must be performed according to the instructions:
- Install the guide profile on the markings that were made earlier.
An example of attaching a guide profile to the floor.
If one is missing, then it is worth making sections of the required length using iron scissors. If the element falls on a corner, then there is no need to cut the profile completely, just cut it on the sides and bend it at an angle of 90 degrees. In this case, the rigidity of the structure will be greater. - Next, you need to drill holes into which the dowel will be installed in increments of 20 cm.
- The guides are attached to dowels; for quick installation, you can make holes directly through the metal element.
- Once the guides are installed, racks are mounted in them along the entire perimeter of the structure. For connections, small self-tapping screws “seeds” are used; they reliably fasten the elements together. Profile pitch 60 cm.
Doorway
How to cover a doorway with plasterboard? Let's take a closer look. This design is easy to implement:
- Place two rack profiles along the edges of the proposed opening. If a door frame is installed in it, the width must be increased by 5 cm.
- When installing the door leaf, the load on the profile will increase significantly, so it should be strengthened. This can be done in two ways: install a 5 block into the drywall profile, or insert a second profile element.
- The structure is reinforced with transverse jumpers, the number of which will depend on the degree of reinforcement.
- At this stage, power supply wires are installed in the partition. They are installed in a special corrugated hose.
Plasterboard covering and sound insulation
- How to sheathe? First, one side with gypsum board slabs. For this you need to use black drywall screws, the pitch of which should not exceed 20 cm;
- Install mineral wool in the gaps between the profiles, trying to ensure that there are no large gaps between the material;
- Once the sound insulation is installed, the structure can be completely sealed. If doors are installed, there is no need to sheathe the inside of the opening. When arranging an empty opening, strips of material are installed on the sides.
The video shows step-by-step instructions for installing a plasterboard doorway.
Finishing
How is a doorway finished? When installing the door leaf subsequently, you can simply stick sickle tape onto the seams and putty the partition on both sides. The facing material is selected based on the overall design of the room. If the opening is empty, additionally perforated corners are installed. Doorways made of plasterboard can be finished with any materials.
What types of slopes are there?
- in doorways;
- in window openings;
- from the inside of the garage door.
A variety of materials are used for these purposes. Let's briefly look at the advantages and disadvantages of each of them.
Brickwork can be used both on the indoor and outdoor sides. The material can be not only decorative brick, but also natural or artificial stone. Such slopes are reliable, but also the most expensive. Among the disadvantages are:
- the possibility of being destroyed over time under the influence of moisture and frost from the street;
- accumulate a lot of dust and dirt on its surface from the room side, which is difficult to remove from a rough surface;
- poor interior adaptability.
Ceramic tiles are perhaps the best option for finishing slopes, but inside residential premises they do not look entirely appropriate. It is quite expensive both in terms of the cost of the materials themselves and the work involved. In addition, the method of its installation, like brickwork, is quite dirty due to the need to work with mortar, which is not always acceptable in residential areas. The maximum place where it can be used for slopes is in the bathroom.
Plaster is becoming a thing of the past, although quite recently it was almost the only material for finishing slopes. It is practical and inexpensive, but working with it requires special skills that a beginner does not always possess. Again, the factor of the dirtiness of the work being performed does not speak in its favor.
PVC panels are installed quickly and are inexpensive, but extremely unreliable. Any minor impact on the surface will leave a scratch or crack, to repair which you will have to replace the entire sheet with almost complete disassembly of the slope, which is expensive and inconvenient. Moreover, plastic practically does not allow air to pass through and is a flammable material, and this violates sanitary and fire safety standards.
Laminate for slopes is only suitable for high grades and is moisture resistant. It has the same disadvantages as plastic, only because of the peculiarities of its coloring it conceals the volume of the opening, which is not always good.
Drywall is the most suitable material for non-professionals to work with. In addition, it is the cheapest and most practical. It is also used when finishing slopes with tiles, for example, if the construction of complex geometric openings is required. This feature of the material makes it very popular and indispensable at some stages of construction work.
Let's take a closer look at how to practically decorate a plasterboard doorway with your own hands.
Aligning the opening with plasterboard
The simplest solution for aligning the contours of a doorway is to use plasterboard. The work is not difficult, but it has its own characteristics. We need to prepare:
- 1 sheet of drywall;
- the adhesive composition is a special gypsum-based material. This composition dries quickly, while firmly gluing the gypsum board to any surface;
Step-by-step process for installing a partition frame with a doorway - a knife for cutting drywall, a pencil, a tape measure, a level and a construction bucket for preparing the composition - these are all the tools that can be useful to us.
The process of aligning the opening
This process must be done in stages:
- Preparing the surface. We clean from all foreign objects in the form of sagging, lumps, and dirt. If there are large uneven areas on the base, they must be repaired with plaster. You should not try to create a perfect surface, as you can close the doorway with drywall.
- Take measurements of the side parts in order to correctly cut the drywall. The first step is to cut out a piece of drywall and glue the top element. Only after this can you begin arranging the sidewalls. Important! Before applying the adhesive composition, treat the side parts of the opening with deep penetration primer to improve adhesion.
Diagram of installation of a doorway in a partition - Apply the adhesive composition to the material in large splashes. Then the strip is placed on the side of the opening and pressed firmly. In order for the opening to be level, it is necessary to use a building level. Drywall adhesive sets quickly, so you shouldn’t leave leveling the element for later.
- After a couple of hours, the solution will dry completely, and you can begin finishing the structure. The same adhesive composition is used to fill the gaps between the base and the drywall, and install the corners. As soon as the composition has dried, you can begin finishing.
This is an inexpensive and simple option for sealing a doorway with plasterboard, which allows you to make the opening perfectly smooth, but it has one big drawback - it is impossible to install a door on such a structure.
Features of the material
First of all, you should familiarize yourself with the properties of drywall. GCR is a fairly popular building material, it is used in almost any field, it allows you to build both small decorative extensions and quite massive elements. Using drywall, you can quickly level the surface of a wall or build partitions, both solid and shaped, including making a doorway.
Benefits of drywall:
- Ease. The slabs vary in thickness, but in general their weight is negligible. There are lightweight options for finishing the ceiling, which has a positive effect on the condition of the supporting structures.
- Availability. You can purchase gypsum boards in any construction department at a price that is quite affordable for the majority of the population.
- Wide scope of application. It is used almost everywhere, not only in the field of rough construction, but also for decoration.
- Strength. Despite its visual fragility and small thickness, drywall can withstand enormous loads. With proper finishing and use, it does not deteriorate and retains its properties for decades.
- Ease of processing. The material is quite pliable and very easy to work with. You can give it almost any shape with your own hands.
- Quick installation. The plates are attached with glue or self-tapping screws to the frame; this can be done even alone in the shortest possible time.
- Additional properties. Some types of drywall have additional distinctive characteristics. For example, blue plasterboard is moisture-resistant, red is fire-resistant. There are also plasterboard sandwich panels with insulation.
The main advantages of drywall are lightness and quick installation.
Installation of a doorway using a metal profile
Mounted frame of a plasterboard partition with a doorway made of a metal profile.
If the doorway is in poor condition or needs to be reduced, then a metal frame will be the most correct solution. Firstly, this will make it even, and secondly, the structure will be rigid and durable. This method combines those described above, since a frame will be constructed from metal profiles that will be attached to a concrete base.
Doorway arrangement technology
Before constructing the structure, you need to decide how you will reduce the opening, on one side or on both sides.
- Remove the plaster from both sides of the doorway at a distance of 20 cm from the edge - this will allow you to do the job quickly.
- Using a level, pencil and tape measure, we make markings for the structure. Try to do everything right. Even a minor mistake can lead to damage to the material.
Drawing with dimensions of the doorway structure - Draw lines on the floor and at the top of the opening that will determine the guidelines for the future structure.
- Secure the guide profile to the marking areas. Before this, it needs to be cut into elements of the required length and screwed using dowel nails.
- If you need to reduce the height of the opening, then it is enough to build a frame in the upper part. It is important to remember when installing the frame that it will be covered with plasterboard, and it is imperative to take this fact into account, otherwise you may end up with a step.
- If, after leveling, it is planned to install a door in the opening, then the structure should be strengthened.
- Once the construction of the frame has come to an end, you can begin cutting out the drywall. We will attach the gypsum board in two ways: on the frame, in the place where the opening is reduced, and with an adhesive composition to the wall. The result will be a rigid and reliable structure.
Scheme for fastening plasterboard sheets - The last stage will be finishing the plasterboard wall. At the junction of the gypsum board and plaster on the wall, stick serpyanka and plaster the seam so that it is invisible. Install a perforated corner profile at the corners. Putty the structure.
What do you need for work?
To seal the opening yourself, you will need the following tools:
- hammer drill or drill with impact function;
- screwdriver;
- metal scissors;
- mounting knife;
- building level and plumb line.
You need to dwell in more detail on the choice of building materials.
GKL
Drywall is produced in different types according to purpose and thickness. The standard size of plasterboard sheets is 2500x1200 mm. To seal the opening, wall material with a thickness of 12.5 mm is optimal.
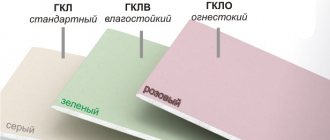
GCR is also classified according to its properties - the main types are ordinary, moisture-resistant and fire-resistant materials. So, for living rooms, as a rule, they use ordinary plasterboard with a gray front side. And for rooms with high levels of humidity, moisture-resistant products are optimal; they are greenish in color.
Figure 1. Varieties of plasterboard sheets
Usually one sheet of plasterboard is enough to cover a doorway on one side. At the same time, keep in mind that it is better to apply solid (pre-cut to the size of the opening) fragments on both sides.
Profile
To construct the frame, you can use either wooden blocks or a special metal profile. However, wood is less durable, so preference is often given to galvanized profiles, which are available in standard sizes.
Table 1. Types and sizes of profiles for the frame for installation of drywall
| Name | Appearance | Brand | Length, m | Weight 1 linear m, kg | Application |
| Ceiling profile | PP 60/27 | 2,75; 3,0; 4,0; 4,5 | 0,6 | Used as horizontal jumpers, absorbs the main loads during operation | |
| Guide profile | Mon 28/27 | 0,4 | Used for installation around the perimeter of the opening, allows you to create a mounting plane for gypsum boards |
Self-tapping screws
To attach the frame to the wall, use self-tapping screws and dowels. To fix the gypsum board to the sheathing, special black wood screws (photo 2) are optimal, which have a rarer thread than metal threads, which are available in different lengths. To attach metal profiles to each other, you will also need short metal screws. They can be either with a drill (photo 3) or without it (photo 4).
Photo 2. Self-tapping screws for gypsum boards and a bit for a screwdriver
Photo 3. Self-tapping screws with a drill for attaching profiles to each other
Photo 4. Self-tapping screws without a drill for attaching profiles to each other
Arch made of plasterboard on a metal frame
The methods described above involve the installation of a straight doorway. But if you decide to make a plasterboard arch in the doorway, then the upper part needs to be made arched. The technology for arranging a direct opening is the same in all cases, so we will consider the arrangement of only an arched element.
Arch arrangement technology
You need to do the following:
- Decide on the design of the structure in order to make the markings correctly, and then not make mistakes with the installation of the structure. Once you have created a design project, you can install the base of the structure, which is made from a wall profile.
- The next step is to create a curved element or semi-arch. Take the guide element and make cuts along the sides at a distance of 4 cm. From such a profile you can make a curve of any shape. Important! The stronger the bend, the more often the cuts need to be made.
- Attach the cut profile to the opening and give it the desired shape. In order for both elements to be bent equally, you need to prepare two segments before installation.
Forming an arch from a profile
To simplify the work, you can use a special arched profile; it is flexible and takes on different curved shapes. This material is sold in construction stores in meter form. - Attach the prepared arched profiles to the base using small self-tapping screws. Install jumpers between the arched elements, so the structure will be rigid and durable.
- As soon as the structure is ready, you can begin attaching the gypsum plasterboard. You need to start from the side parts. It is important to accurately transfer the bend to the slab so that it fits neatly into the structure. As a last resort, you can slightly adjust the drywall to fit the structure with a construction knife.
- Now it’s time to sheathe the curved part of the arch. To do this, you need to cut a piece of material to fit the bend.
Drawing with dimensions for covering a plasterboard arch - Using a needle roller, you need to make small holes in this section without applying much effort.
- The surface is moistened with water and left for a few minutes to become wet. This way the material will bend without any effort.
- To install the element, it is better to invite an assistant who will hold the material, and you will start screwing it from the middle of the arch.
- Then install the arched perforated corners on the gypsum plaster at the corners. After this, the wall structure is puttied and finished according to the general design of the apartment.
Finishing
After covering, the plasterboard openings are subjected to finishing. The work is carried out in the following order:
- The gypsum plasterboard doorway is primed. Do not perform any actions until completely dry.
- The joints and screw heads are treated with serpyanka and glue. A perforated corner is glued to the corners.
- The surface is leveled with a starting layer of putty and a plastic mesh is glued.
- The structure is covered with finishing putty on top of the frozen layer. After the finishing layer has dried, grouting is done with a sanding mesh or sandpaper.
For better adhesion, the sanded surface can be treated with a primer. After it dries, the new doorway is painted, covered with wallpaper or other material of your choice.
Working with gypsum plasterboard is so simple that you can arrange even the most complex doorway in 1–2 days.
A selection of photos on decorating a doorway with plasterboard
Let's sum it up
When performing all stages of the work described above, it is recommended to exercise great care. Avoiding the use of low-quality materials. Any unreliable connections will manifest themselves in the very near future. And of course, when starting to build such a structure as a plasterboard doorway, you should always use such a simple device as a level. In no case should you allow something to be done by eye, because everything, even minor irregularities, will eventually appear and lead to the need to redo the entire work, which may require re-purchasing all materials used during installation.
Installation
Installation of a sliding door into a wall or plasterboard partition is carried out in the following order:
- Measure the wall, floor and ceiling of the room in which the partition will be installed.
- Draw up a diagram of the installation of the frame and a sketch of the finished structure with the door. Select materials, type of mechanism, additional devices.
- Calculate the required amount of profile, drywall and other materials.
- Make an outline of the location of the frame on the wall or ceiling and floor. Secure the guide profiles. Stick them into their racks and secure them too.
- Cover the frame with plasterboard.
- Install the mechanism and door leaf with embedded handles.
- Cover the drywall with your chosen finishing material.
Installing a door that slides into a plasterboard structure will help solve many of the difficulties of room planning, while requiring little investment in time and money.
Installation
Installation of a sliding door into a wall or plasterboard partition is carried out in the following order:
- Measure the wall, floor and ceiling of the room in which the partition will be installed.
- Draw up a diagram of the installation of the frame and a sketch of the finished structure with the door. Select materials, type of mechanism, additional accessories.
- Calculate the required amount of profile, drywall and other materials.
- Make an outline of the location of the frame on the wall or ceiling and floor. Secure the guide profiles. Insert the racks into them and secure them too.
- Cover the frame with plasterboard.
- Install the mechanism and door leaf with embedded handles.
- Cover the drywall with the selected finishing material.
Installing a door that slides into a plasterboard structure will help solve many room planning problems, while requiring a small investment of time and money.