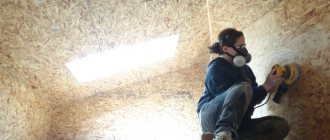
Many materials are used to decorate the walls in the apartment. Plasterboard sheets have deservedly gained popularity in repair work. They attach quickly and easily, and the appearance of the interior becomes attractive. For installation, you can use self-tapping screws, but more and more craftsmen prefer to attach them with special adhesives.
Application and advantages of glue
The use of mounting adhesive for drywall is advisable in the following cases:
- when leveling the surface of walls with differences of up to 5 mm;
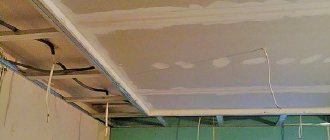
- in the process of ceiling leveling;
- for finishing door and window slopes;
- when attaching sheets to each other.
There are several advantages in favor of using glue for repair work:
- Since the sheets are mounted on a prepared surface, the space in the room is not hidden.
- The cost of mixtures is less compared to the use of frame metal profiles.
- High speed of work.
- The applied composition dries quickly, which can be seen in the photo of drywall adhesive.
- Increasing the strength of the coating.
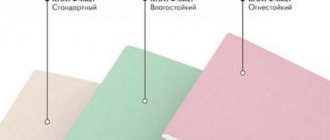
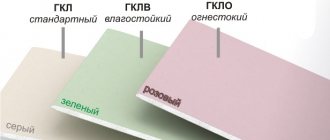
How to glue drywall to walls or another sheet of drywall
How to glue drywall to walls or another sheet of drywall.
Drywall is a good alternative to finishing walls with plaster. True, gypsum board has the only drawback - it reduces the area of the building, especially small ones. The main advantage of plasterboard finishing is that when leveling the walls, the finishing process takes much less time. Plasterboard sheets can either be glued or mounted to a special frame made of profiles. These methods are quite simple and not difficult to use. This article will tell you how to glue drywall to a wall.
The process of gluing drywall to the wall is an economical option compared to frame. It is not recommended to glue plasterboard sheets to cold walls, as it is impossible to insulate it. These two variations can be combined, moreover, using such a solution in the same room.
An aspect that affects the finishing of walls with plasterboard is their condition. You will find out more detailed information about methods of covering walls with plasterboard below.
To ensure that the adhesion of materials becomes strong and reliable, prepare the surface correctly.
Requirements for walls before gluing drywall.
The wall must be flat, a deviation of 2 cm is allowed, otherwise the plasterboard sheet will not lend itself to pasting.
The wall intended for gluing drywall should not freeze.
A good base for gluing drywall to the wall is concrete panels. Although they may not be installed vertically, the surface of such slabs is flat.
How to prepare the surface.
When covering walls with plasterboard, you can avoid the preparatory stage, which is an advantage of this process.
Covering walls with plasterboard requires minimal processing.
To measure and check the base, use a plumb line. This way you will know if the base is bent or tilted vertically. This is necessary to determine the optimal gluing method.
Remove all protruding imperfections from the plane - nails, screws, dowels (the surface of the wall should be perfectly flat.
Clean the wall surface from dust and other contaminants. Make wall markings.
An important step is the distribution of electrical networks. It is necessary to lay the power cables in grooves. In those areas where you will install sockets or switches, make special recesses for mounting installation boxes.
Draw lines on the floor along which you will align the finishing material. Considering the thickness of the material is 9.5 mm or 12.5 mm, draw a straight line. Use a plumb line to check if there are any inaccuracies, and do the same on the ceiling. This allows you to install plasterboard sheets at the same level.
If there is poor surface adhesion, treat the walls with a primer that will strengthen it. If the walls are characterized by high moisture absorption, use a product that will reduce this property.
When choosing a primer, consider the wall material. For example, for a concrete wall, it is recommended to use primers with adhesion.
Popular adhesives and materials needed for finishing.
To avoid the question of how to glue drywall to a wall, look at the list of the most popular adhesives. They include.
Perflix is a relatively inexpensive and simplified version of drywall adhesive used at home. An excellent alternative for those who plan to stick plasterboard sheets to a brick wall.
Which is better: heated floors or radiators?
Warm floorBatteries
Fugenfüller is a hand-mixed putty adhesive. Application must be done in a thin layer.
Ceresite CM11 or similar substances. Although the mixture is intended for ceramic tiles, it is also an excellent option for drywall.
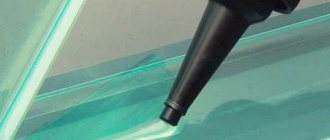
Silicone-based adhesive - connects plasterboard sheets to a mirror surface or ceramic tiles.
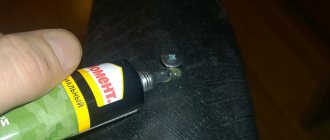
Assembly adhesive - recommended for gluing drywall to a concrete wall, easy to use and affordable.
To finish the walls with plasterboard, you will need.
After preparing the walls for finishing, you can safely begin work. You will need.
special glue or gypsum putty.
container to dilute the solution.
wooden block – 3 pcs.
reinforcement tape.
Gluing plasterboard sheets to smooth walls.
One of the simplest and most economical ways to cover walls with plasterboard is to stick it to flat walls. These include surfaces with plane differences of a maximum of 5 mm. As an adhesive, use gypsum-based putty plus with the addition of polymers. This putty is characterized by high elasticity and the ability to apply it in a thin layer. And now, more about how to glue drywall to a wall.
First, cut it to size. But keep in mind that you need to leave a gap (up to 1.5 cm) between the glued drywall and the floor covering. Another name for it is a heat-shrinkable seam, which is finally sealed with putty or sealant. Be sure to consider the size of the gap when marking.
Important! Marking of parts for installation in special areas, for example, at the junction with the opening, should be done after the previous sheet has been glued. This method will help save you time on cladding and reduce the risk of all kinds of mistakes.
Place sheets of drywall against the wall, back side up.
On the sides of the sheet, as well as in its central part, using a notched trowel, apply putty in strips, the width of which is about 130 mm.
With a plasterboard sheet thickness of 12.5 mm, one strip in the central part will be sufficient. If its thickness is 9.5 mm, then 2 longitudinal stripes should be applied. In those places that are planned to be tiled, for example, as well as in junction areas, it is recommended to apply glue completely over the entire surface.
Then lift up the plasterboard, place it on the pads and glue it down (you can use a piece of plasterboard as the pad). The designed position of the drywall can be achieved by pressing it against the wall using a long level or a plumb line.
Uneven walls? This can be solved.
Finishing uneven walls with plasterboard is done a little differently.
Here it is no longer putty that is used, but glue, the base of which is gypsum.
You can attach drywall to the wall with glue in the following way.
Apply glue using a special spatula in heaps every 25 cm throughout the entire sheet and 35 cm in the central part.
Next, install the material on the pads and glue as described above.
Much more work is required when gluing drywall to uneven walls whose defects are larger than 2 cm. In this case, finishing must be done as follows.
form a flat surface from strips of plasterboard sheets, 10 cm wide.
fix such beacons on the walls using glue (in groups every 35 cm.
Orient the stripes so that they are then located throughout the entire sheet and also in its center. Drywall should be glued using putty using the above method.
How to glue drywall together.
Sometimes it becomes necessary to glue drywall to drywall to a wall. Surface preparation before gluing is completely similar to that indicated above. The previously glued plasterboard sheet must be primed, and the seams must also be sealed to avoid unevenness. Follow the recommendations above.
Apply glue to the back side of the drywall randomly so that the substance is evenly distributed over the entire surface. Do not apply glue too close to the edges, because when gluing it may come out, which is not recommended.
Important! The seams of the outer and inner coverings should not match.
Gluing drywall to a wall is a great way to level out problematic surfaces. Frameless installation will save not only your money, but also the space of the room, and even a novice craftsman can do the work using a simple method using publicly available materials.
Assembly adhesive
This composition has moisture-resistant properties, and therefore can be installed in places where the humidity level deviates from the norm. This mixture should be applied to the walls with a spatula. Movements should be circular, and the intervals between strokes should be within 15-30 cm.
During use, the instructions for drywall adhesive must be strictly followed. This is due to the fact that the composition dries quickly, and the placement of the sheet on the wall can only be adjusted within 10 minutes. after fastening. It is also important to regulate the uniformity of sheet installation using the rule.
Workflow Description
First, let's figure out whether it is possible to glue drywall to drywall? My study of the documentation for the material and reading the recommendations from the manufacturer gave the following result: nowhere is it indicated that it is impossible to connect two sheets by gluing, which means that this option is allowed.
Therefore, you can rest assured that no incidents will occur, the elements can be very securely fastened with your own hands, the main thing is to follow a few simple recommendations and use high-quality materials.
Materials required for work
First, let's figure out what is needed to carry out the work, since we mean that we already have a surface finished with plasterboard, we will consider the process from the second layer of material. If you need to figure out how to glue the first layer, there is a separate review in which this process is described in detail.
To make it easier for you to understand, the information is presented in table form.
This glue will be our main material when working
| Material | Description |
| Adhesive composition | First you need to figure out how to glue the drywall together. I recommend using the proven composition “PENOSIL Premium Fix&Go Montage”, this is the so-called adhesive foam, which is sold in the same cans as regular polyurethane foam and fits the same guns. The composition is very easy to use, the bottle is enough for 10-15 squares, its price is about 400 rubles |
| Joint materials | I highly recommend sealing the joints between the sheets on the first layer of material. To do this, use serpyanka mesh and the Knauf Fugen compound, you will still have to make external connections, so immediately buy double the amount of materials to use them on the base, this will make the surface much more stable |
| Primer | If you are gluing drywall, be sure to strengthen the surface with a deep penetration primer. I most often use acrylic-based options; they penetrate the material well and improve glue adhesion |
Soil is a mandatory element of surface preparation
If you will be working in rooms with high humidity, it is better to choose a primer with antiseptic additives. It will not only strengthen the material, but also increase its resistance to mold and mildew.
Work tool
You cannot consider the question of how to attach gypsum boards to gypsum boards without understanding what working devices will be needed. Their list looks like this:
- To apply the adhesive we need a special spray foam gun. The tool can be bought at any hardware store, do not take the cheapest options, they are so unreliable that they can break on the very first cylinder. More or less reliable options cost from 400 rubles, you don’t need a professional option, it can be very simple, the main thing is reliability;
A gun is a mandatory attribute, without which the work cannot be carried out
- Strengthening the joints is done using two spatulas - wide and narrow; they are also needed for the main finishing, so, most likely, you will have them at hand;
- The primer is applied using a brush or roller; again, you should already have this tool, since you will have to apply the primer before finishing or covering the walls;
- Finally, we cannot do without a measuring tool: all the required measurements are taken using a tape measure; the level allows us to constantly monitor the plane when gluing drywall. Without a pencil, it is impossible to carry out high-quality and accurate markings, and to control the ideal geometry of the corners, you can use a construction square.
A measuring tool is an essential part of any finishing work.
Preparatory stage
Let's say you already have one layer of material attached, and, most likely, you glued it, otherwise you would not have a question about how to fix the drywall - in this case, you can simply screw it with self-tapping screws through the bottom sheet. You must first check whether all the elements are holding well; if there are problems somewhere, then it is better not to attach another layer, since it will not hold.
If everything is fine, then you can start preparing:
- First of all, you need to clean the surface from dust and dirt, since any foreign inclusions reduce the reliability of the fastening . Just sweep the walls with a broom or go through with a vacuum cleaner;
- Then you can start priming the seams, just treat all joints with the composition that will be used later. It is important that the solution gets into all areas, this will make the connections more durable;
The joint is well primed before it is reinforced
- Then you can start sealing the seams; to do this, first glue the serpyanka mesh, and then prepare the Knauf Fugen composition (how to do this, the instructions on the package will tell you), it hardens in literally half an hour, so you don’t need to do a lot of it. The composition is applied to the joints, after which it is leveled with a spatula, you should get a homogeneous, flat surface;
There is no need to leave excess putty; there should be no bulge at the joint
- After the composition has dried, which takes an hour or two, you can begin the final stage of preparation - applying the primer to the entire surface. Everything is simple here: spread the composition in an even layer, and then leave it for a day to dry completely before the main work.
The surface must be completely primed
Main stage
Now let's figure out how to glue gypsum board to gypsum board. The technology consists of several important stages:
This is what the workflow diagram looks like
- First, you must understand one simple truth: the seams of the outer and inner layers should under no circumstances match. Ideally, if there is a displacement of half the sheet, this ensures the highest reliability of the surface and the lowest probability of cracks at the joints. To make it easier for you to understand, below is a diagram that shows all the displacements of the outer and inner layers;
Before gluing the material, it is worth understanding its correct location; the joints should not coincide
- Next, you need to prepare the tool; for this, take a bottle of adhesive and screw it onto the threaded part of the gun until it stops. After this, you need to vigorously shake the composition for 10-15 seconds and carry out a test application of the composition on some surface. If everything is fine and the glue comes out in a straight line, then you can proceed to the next stage;
This is what the assembled structure looks like; when used, the gun turns over
- The glue is applied to the surface, along the perimeter with an indentation of 30 mm from the edge, and in the middle - in the form of a lattice measuring 30x30 cm or in a chaotic manner, but so that the composition is evenly distributed over the surface. You should not apply it too close to the edge, since when pressed the glue will simply come out, which is extremely undesirable;
This is how you apply glue to the back of drywall
- As for the correct location, here I meant maintaining gaps at the top and bottom. To prevent our drywall from deforming, it is necessary to leave a gap of 10-15 mm between the floor and the material, and at least 5 mm between the ceiling and the sheet. The easiest way is to place small pieces of drywall under the base; after the glue has hardened, they are simply removed;
Linings allow you to make the desired indentation from the floor surface
- The sheet is placed at its location, when you are sure that it is where it is needed, then it can be carefully pressed against the wall . The final leveling is done using a level; it is placed against the surface, after which its position is adjusted, if necessary, until a perfectly flat plane is obtained. Do not press the sheet too hard at once, you may distort the surface and have to tear it off;
The sheet must be placed very carefully and pressed, controlling the plane with a level
- In the same way, the work continues, here it is important for you to remember only that between the sheets you need to leave a gap of 2 to 5 mm , this is necessary to strengthen the joints in the future. When you have attached all the elements, you should wait about a day, after which you can finish the surface in the same way as conventional plasterboard structures.
Don't forget about the gaps between the sheets
Do not forget to control the level both on each sheet separately and on two or three elements at once. It is important that the plane is as level as possible; this will greatly simplify finishing work in the future.
If you are gluing tiles to the wall, then you only need to seal the joints and apply a primer to the surface. If you are preparing the surface for painting or wallpapering, then it is worth carrying out a full finishing process ; the process is described in detail in a separate review; if you are interested, read it before starting puttying.
Gypsum mastic
The composition of adhesive-mastic for drywall is gypsum with lime and glue. First, the adhesive mixture is poured with water and the solution is allowed to swell for 15-16 hours. Lime is diluted with water to obtain a thick paste-like consistency. Then it is added to the prepared adhesive solution. The gypsum is added last. This composition sets in 40-50 minutes.
In some cases, a mixture of gypsum sawdust is used. To prepare the solution, it is necessary to mix sawdust with gypsum in a ratio of 1:4, followed by the addition of an adhesive substance at a rate of 25 g of the mixture in dry form per 1 liter of water.
How to glue drywall
You can answer this question if you try to understand the abundance of adhesives. If you are planning to glue drywall, you should not experiment with adhesive mixtures; it is better to immediately buy drywall glue. After all, each material has its own types of glue, which will be useless when gluing materials for which they are not intended. An important point when choosing an adhesive for plasterboard structures is the peculiarity of the surface to which you are going to glue this material. The first type of adhesive for plasterboard is a dry adhesive mixture , which is designed specifically for gluing this type of material.
This glue is simply diluted with water and can be used immediately. Exploring the endless shelves of hardware stores, you can find a huge variety of glues and adhesive mixtures. But what kind of glue should you use if there is a need to glue plasterboard structures? If you need to glue plasterboard together or glue it to a perfectly flat wall, then you can use the first type of glue. But if you are finishing a less-than-ideal wall, then it is better to use a gypsum adhesive mixture. Important!
Marking of parts for installation in special areas, for example, at the junction with the opening, should be done after the previous sheet has been glued. This method will help save you time on cladding and reduce the risk of all kinds of mistakes. In the review, we figured out how to glue drywall, how to prepare the surface and how to position the elements correctly so that the surface is as strong as possible.
This technology cannot be called widespread, but, nevertheless, sometimes such work is required. If you do everything according to the recommendations from this review, you can rest assured about the quality.
Specialized glue
This composition is used when elevation differences are insignificant. The glue sets quickly, and the contents of a 750 ml bottle will cover up to 15 m2 of surface.
It is not advisable to use liquid nails due to the high cost of the material.
Polyurethane foam
Some builders use foam to cover walls with sheets. In this case, you need to know how to glue it yourself:
- up to 9 holes are made evenly over the surface area of the sheet;
- around these holes, with a distance of 30-40 mm from them, more holes with a diameter of up to 6 mm are drilled;
- foam rubber sections are attached at a distance of 100 mm from each hole;
- the sheet is applied to the wall and secured with screws;
- Foam is blown into 6 mm holes.
Material consumption
To find out how much mixture you will need to carry out the work, you need to study the instructions on the package. The consumption of drywall adhesive is also affected by the characteristics of the surface itself:
- if the wall is flat, then the consumption is 0.5 kg of mixture per 1 m2;
- if defects are present, then the use of the mixture increases to 3-5 kg;
- if there are irregularities less than 20 mm - 4-6 kg of mixture;
- arrangement of partitions will require 1.5-2 kg/1 m2.
How to calculate connectors, hangers for a profile
The formula will help determine the number of connectors for the profile: K = S*2, where S is the area of the suspended ceiling, K is the number of “crab” connectors. For example, for a room with an area of 6 m2, 12 connectors will be required.
If the area of the room is more than eight square meters, the calculation of the material is carried out according to the formula: K = S * 1.7.
It is equally important to correctly calculate the number of hangers using the following formula: P= S*0.7, where S is the area of the ceiling surface, P is the number of hangers.
Material selection
If the wall is brick or the surface is rough with unevenness and wide seams, then gypsum-based glue is used. You can attach it to a concrete base using a gypsum or cement composition; foam is also suitable. When attaching a sheet of drywall to a penoplex surface or polystyrene foam, it is better to use mounting foam or acrylic type putty.
Fastening sheets to each other allows the use of compounds with small seam parameters. Silicone sealant, liquid nails, and putty will also work.
Preparing the surface for installation of gypsum boards
Regardless of the adhesive chosen, the wall or ceiling must be cleared of any foreign materials that would interfere with adhesion. Remove old wallpaper, paint, etc. In cases where it is impractical to peel off the paint, it is necessary to make grooves (scratches) across the entire surface to improve adhesion. Be sure to remove dust and apply primer.
If the plane is significantly uneven, beacons are used for installation (marks made from pieces of drywall or long screws aligned, relying on which can avoid skewing of the sheets).