The modern world does not stand still - it is improving, making new discoveries that simplify human life and make it brighter. The wall finishing technology industry is also developing and offers a variety of decorative materials. Liquid wallpaper appeared on the market in 1997, but has already gained popularity all over the world. They have many advantages: a high degree of wear resistance, fireproof, do not attract dust, wall decoration has no joints or seams, and do not fade over time.. Anyone can apply liquid wallpaper to a wall.
Tools and materials
Before you start decorating the walls, you need to purchase all the tools and materials that will be needed when applying liquid wallpaper to the wall.
How to apply liquid wallpaper on walls, see this video.
Materials:
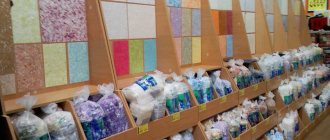
- Liquid wallpaper. You need to calculate the area of the walls in advance and buy the required number of packages of material, taking into account the fact that one package is consumed for 3-4 square meters. m. It’s better to play it safe and buy wallpaper with a reserve. In a separate article, you can read more about the types of liquid wallpaper.
- Plaster or putty. Both materials are actively used for the last stage of wall finishing, but the purpose of their use may be different. If putty is necessary to seal cracks and level the surface layer, then plaster can even out deviations from the level of up to 15 cm. Everyone can choose the desired type of dry material and prepare it themselves.
- Primer. Application of this composition is necessary to strengthen the surface and reduce moisture absorption. If the surface is too smooth, then choose a primer with sand.
- Acrylic lacquer. The solution will protect the wall in the kitchen or bathroom, covered with liquid wallpaper, from exposure to water.
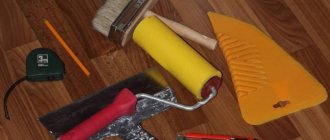
Tools:
- Deep containers. Containers are needed for preparing liquid wallpaper, so their volume must be at least 7 liters per package. A bucket or basin works great.
- Putty knife . It is necessary to choose from organic glass or stainless steel with a smooth surface.
- Trowel (transparent grater). A special tool for applying liquid wallpaper.
- Spray. Needed when applying material to a wall by spraying. It can be replaced by a special gun or Hopper spray gun.
- Putty . To prepare high-quality material, you will need a mixer, and to putty the walls, spatulas of different sizes.
- Paint roller or brush for applying primer to the surface.
- Structural roller. This tool will allow you to leave beautiful patterns on the wall.
- Pencil, eraser, ruler , if you plan to create a pattern on the wall.
The first nuance is the right choice
Understanding the rules of work is quite simple. Choose a room - it could even be a kitchen or bathroom, but with certain additional protection measures, since liquid wallpaper itself is not moisture-resistant. The first thing to do is calculate the material. Please note that the coating is packaged in 1 kg plastic bags. It is believed that this is enough to finish 5 square meters of surface, but in practice the actual consumption can be 3.5 square meters. m., so it is better to always buy material with a reserve. Moreover, it will later be useful for local repairs.
The first nuance is to buy the material with a reserve.
The second stage, which guarantees successful completion of the work, is the correct choice of manufacturer. A good option would be SILK PLASTER liquid wallpaper. This is a Russian manufacturer that produces material with a silk base. The coating also includes:
- cellulose and cotton fibers;
- colored quartz;
- mineral fillers;
- decorative additives;
- cellulose glue as a binder.
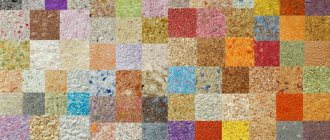
The company's product range includes about 100 colors and textures of safe and practical liquid wallpaper. It becomes clear why the material can be the basis of an interior in any style. The advantages of the coating include not only design variability, but also such advantages as:
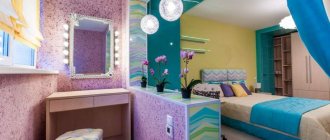
- the ability to combine different colors on one surface, creating colorful panels of any theme;
- excellent adhesion to drywall, a layer of plaster, brickwork, fiberboard;
- tactile warmth;
- possibility of seamless application;
- not subject to shrinkage, plastic.
Mixture consumption
The packaged mixture contains all the necessary components, so you can immediately pour it into a container and gradually fill it with warm water up to 40 degrees, stirring constantly. 1 package of liquid wallpaper weighing 1 kilogram requires 6 liters of water . However, these indicators may vary among different manufacturers, so before preparing the material you should definitely read the attached instructions. It will also be useful to read the article, liquid wallpaper at home.
A mixture of liquid wallpaper in a package
Asterisk IMPORTANT! For more convenient application to the surface, the solution must be left for 8-12 hours and thoroughly mixed again before starting work.
Independent preparation of the composition
The high consumption of bulk material for preparing wallpaper and its high cost encourage people to make their own. A homemade mixture, in addition to significant savings, will allow you to create a unique interior and turn a boring renovation into an exciting creative activity. You must make liquid wallpaper at home strictly according to the recipe. The strength, elasticity, and decorativeness of the material will depend on compliance with proportions and other conditions. When making it yourself, you can choose a base, a binding base, and decorative additives that suit a specific case.
Necessary equipment
First of all, you need to prepare the main components. The most affordable option is paper. Use sheets of any density (pages of old books, fragments of albums, newspapers). A base made of fabric fibers, sawdust, woolen threads, and cotton wool is also popular. One kilogram of dry substance will require 6 liters of water. To make a liquid wallpaper mixture at home, you need the following materials and tools:
- Components for tinting;
- Binding material (alabaster, gypsum);
- Wallpaper glue;
- Primer, acrylic varnish;
- Elements to make it decorative (glitter, chopped tinsel, bronze, silver powder);
- Drill with a special nozzle for uniform mixing;
- 12 l plastic bucket, tray;
- Several spatulas of different sizes;
- Transparent trowel.
What to use as a binding base
The best binding material is PVA glue. Just like Bustilat, it has an affordable price and is a durable, high-quality product. Disadvantages include long drying times. To increase adhesion, casein wallpaper glue is suitable. The mixture contains natural protein isolated from cow's milk. Disadvantages - poor resistance to moisture, short shelf life of the diluted composition. Liquid glue based on it will need to be used within 4 hours.
The most stable material for finishing walls and ceilings is created on the basis of acrylic putty. The disadvantage of such a binding base is a sharp, unpleasant odor, which is difficult to get rid of even in a ventilated room.
Variety of decorative additives
To solve important technical and decorative problems, special components are added to liquid wallpaper. When choosing suitable options, you need to focus on the similarity of structure, use only high-quality elements that are not subject to oxidation, mold and mildew. Decorative additives are introduced into the finished mass after it has matured in the bag.
Water-dispersed pigments are used as color additives. Solutions set the overall tone. Standout inclusions are obtained using particles of frozen paint and finely chopped multi-colored threads. Fungicides are used to protect natural fibers from rotting. A fire-resistant coating is created by adding fire retardants. For rapid hardening, plasticizers and other thickeners are added.
Using additives, you can successfully vary the thickness of the wallpaper coating. The layer will be made dense by beads of polymers and enlarged grains of minerals. A mixture with small inclusions can be used to create a translucent liquid substance 1 mm thick.
To make the coating as similar as possible to fabric, textile threads are added to the liquid wallpaper. The material intertwines when mixed and perfectly reinforces the mass when hardening. Filamentous inclusions are also a good addition to diversify the texture and color of the mixture. An interesting shimmer will be provided by gold and silver sparkles made from metallized powder, mica grains, and cut lurex.
Paper base
When making liquid wallpaper from paper, it is important to adhere to the principle - the better the quality of the raw materials, the better the result. The ideal option is white stationery paper without inscriptions or printing. If you only have used sheets on hand, you must take into account that the mixture may turn gray and be poorly tinted. The following step-by-step master class will teach you how to prepare decorative finishing material in the simplest way:
- Place finely chopped paper and egg trays in a plastic bucket and fill with warm water;
- Leave the raw material for several hours until completely soaked; 3. Add bleach and wait another 30 minutes;
- We wash the bleached mass under running water, filter and grind with a construction mixer to a pulp;
- Add dye, binders (100 ml of glue per 1 kg of paper), thickeners;
- Bring to the desired consistency. If the mass is very liquid, set aside for a while until the excess moisture evaporates. Add water to very thick wallpaper;
- Place in a bag and seal tightly. After 2 hours, add decorative additives.
Fabric fiber base
To prepare a finishing mixture based on textile fibers, crushed parts of flax, silk, cotton, wool, padding polyester, and polyester are used. The manufacturing recipe will differ depending on the volumetric weight of the materials and the length of their particles. The compilation of the working mass must begin with the selection of the best combination of components by reducing or increasing one of them.
The manufacturing technology consists of simple step-by-step steps. First, the textiles are crushed as much as possible by hand, pigments, plasticizers and other necessary components are added. The smaller the pieces of material, the smoother the liquid solution will lie on the surface. Alabaster and gypsum are not used in this case.
Before putting the mixture to ripening, it must be tested on a small section of the wall or ceiling. The material lags behind the wall - there is a lot of moisture, the composition is peeling - there are few binders, cracks on the surface - a lack of mineral filler.
Sawdust base
Simple sawdust will help to form an interesting relief structure. The pleasant-to-touch finish is very easy to apply. Waste from cutting wood materials provides wall and ceiling coverings with excellent heat and sound insulation. Liquid wallpaper based on sawdust allows air to pass through well and does not become moldy. The widespread availability of the compound component allows you to experiment with the main composition and independently adjust the proportions of ingredients for different rooms.
To properly prepare the composition for decorative finishing, you will need 1 kg of sawdust, 500 ml of glue, water, dyes, optional additives and an antiseptic composition. First, fine wood chips are prepared by sifting through a large-mesh sieve. Pour everything into a container, add pigment and fill with water. Liquid wallpaper should be mixed well with your hands or a mixer. Add glue and leave for complete impregnation for 8 hours.
Just before application, add alabaster to the surface. Bring it to a putty consistency. You need to work as quickly as possible, taking into account the rate of hardening of the adhesive mass.
Dye selection
The easiest way to achieve the desired result is to add pigment to a base mixture of pure white. In this case, you can get absolutely any shade. In order not to let all your work go down the drain, you need to choose a color for liquid mixtures and add it along with water.
Concentrated pigment can be organic or synthetic based. In the first case, the surface is less resistant to ultraviolet radiation, but has a greater variety of shades. The product has a paste-like or liquid consistency. Suitable dyes are intended for water-based paints and varnishes.
You can change the color of the liquid mixture at any time before application. Time for correction – 3 hours after preparation. Afterwards the shade will be distorted. It is necessary to understand that the painted mass in a bucket will look several tones brighter than on the wall. To add pigment to liquid wallpaper without problems, you need to listen to the following recommendations:
- It is necessary to strictly follow the mixing proportions indicated on the packaging by the manufacturer;
- The color must be dissolved in water intended for mixing the mixture;
- Crushed materials must be in the dye for at least 2 hours;
- You can achieve the same tone only by mixing the entire volume at once. If this is not possible, you need to accurately count and remember the proportions.
Surface preparation
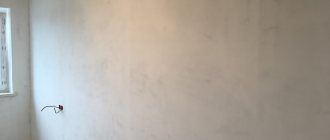
In order for the work to be of high quality and last a long time, you need to properly prepare the surface . First of all, old wallpaper and layers of paint are removed. If there are any unevenness or other defects, putty. After this, apply a primer to the wall. If you do not follow these recommendations, then when the liquid wallpaper dries, all the imperfections will be visible. It is better to take care of this in advance and do the job efficiently.
Priming walls before applying wallpaper
If there are any unevenness, the walls are puttied
How to calculate the volume of a mixture
To understand how much mixture to buy, you need to look at the packaging of the material. Manufacturers indicate its consumption. You need to know the area of the room. But it is also important to take into account several factors that influence the consumption of material so that the mixture is enough for the entire area of the room. This is how consumption is affected by:
- Layer thickness, manufacturers calculate consumption based on the thickness of the applied layer of 1-2 millimeters. But if there is a not very smooth surface, the thickness will become greater, so it is worth taking 10-15% more of the mixture;
- Inexperienced craftsmen do not apply the layer thickness evenly right away, so if the solution is not applied by a professional, then its amount needs to be increased by 10-20%;
- Corners, hard-to-reach places and curved walls affect the consumption of the solution. If there are a large number of such places in the room, then it is worth taking 10-20% more liquid wallpaper.
Accordingly, if all factors are present simultaneously, then the volume of the mixture must be increased by 40-60%.
It is important to take into account several factors that influence the consumption of material so that the mixture is sufficient for the entire area of the room.
To reduce consumption, you can resort to several methods:
- It is good to level the surface so that you do not have to cover the unevenness with a thick layer;
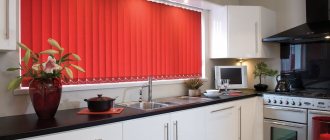
- Choose a spray bottle as a tool for distributing wallpaper; it allows you to apply a thin layer;
- Cover the wall with white putty so that dark places do not show through the wallpaper and they do not have to be made thicker;
- Prime the surface for better adhesion to the wall.
Choose a spray bottle as a tool for distributing wallpaper; it allows you to apply a thin layer.
How to glue correctly?
Wall decoration with liquid wallpaper has several methods of gluing . The structure of the material resembles a putty solution, so to say “glue” is somehow incongruous, so this process should be called “applying to the surface.”
Applying liquid wallpaper with a transparent trowel
Knowing all the nuances, rules and sequence of actions, each person will be able to not only finish the walls, but also do it efficiently.
Surface care: recommendations
This coating does not require special care. They repel dust and dirt well. There is no need to wash them; you can only use a slightly damp cloth. It is better to dry clean using a regular vacuum cleaner. Significant stains can be removed with a regular eraser. If you coat the surface with varnish, it can already be washed.
Wallpaper repels dust and dirt well.
It’s not difficult to hang liquid wallpaper yourself. The main thing is to follow the manufacturer's recommendations and act slowly, the result will last for several years.
Step-by-step instructions for beginners
Let's take a closer look at each of the methods of applying liquid wallpaper to the wall.
Method 1. Spatula
The mixture is already ready and has stood for about 12 hours . Immediately before work, you need to mix it thoroughly and perform the following steps:
- Step 1. Using a small spatula or simply using your hands, take the finished material from the container and applied to the wall.
- Step 2. Using a spatula you need to level the liquid wallpaper, the layer of which will be 1.5-3 mm.
- Step 3. The composition is applied in small areas, and after filling the surface area of 1-1.5 meters you need to level it with a transparent float or trowel, having previously moistened the instrument with water from a spray bottle;
Hand Right IMPORTANT! It would seem that this is the end of the step-by-step instructions, but you need to know the following rules:
- Liquid wallpaper should be leveled at eye level ; it is not recommended to bend over or stand on tiptoes to avoid defects and unevenness;
- you can take a spatula made of plastic or metal , the main thing is that it has a flat surface;
- movements to distribute the mixture should be short and directed in one direction.
After completing pasting the entire area of the wall, you should wait until it dries completely, which lasts up to three days , depending on the humidity in the room.
Method 2. Spray bottle
This method is used more often by specialists than by ordinary people. The main reason is expensive equipment. However, when using it, consumables are spent 2 times less and, accordingly, time too.
The video will show you how to apply liquid wallpaper with a spray bottle.
- Step 1. Fill the spray bottle with a mixture that should resemble liquid sour cream, so when making the solution you need to add a little more water than indicated in the instructions (for example, instead of 7 liters - 8.5).
- Step 2. Point the tool at the surface and smoothly, without stopping in place, move to the side, paying attention to the absence of empty areas.
- Step 3. After applying the wallpaper, you need to smooth it with a grater or trowel..
Star Half (Inverted) IMPORTANT! To prevent the appearance of empty or transparent areas, after the first layer has dried, you can apply a second one.
Method 3. Drawings
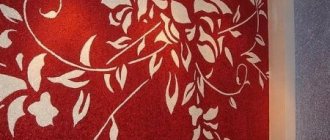
The advantages of liquid wallpaper are that with their help it is possible to implement any design idea , pattern or pattern on the surface. This method will require more time and patience.
- Step 1 . A drawing is drawn on the wall with a pencil.
- Step 2. The space inside the picture is filled with a mixture 2 mm wide , extending 1-2 mm beyond the boundaries, which is then moved with a spatula to create boundaries.
- Step 3 . After complete drying, liquid wallpaper is applied to the remaining surface, not reaching the edges a few millimeters.
- Step 4 . Using a small spatula, you need to move the layer towards the drawing to form a clear outline. Level the surface with a trowel.
On what surface can liquid wallpaper be applied?
- Pure concrete without finishing.
- Plastered brick.
- Putty (or painted) and primed wall, including drywall.
- Wood, plywood.
Fibreboard, chipboard, OSB are suitable for such work only with pre-treatment. Direct contact with moisture is contraindicated for them. Laminated boards are coated with an abrasive primer to increase adhesion.
The ceiling can also be finished with this material. In this case, it is inconvenient to distribute it with rollers and spatulas, so a special spray gun is used. Protruding fibers and irregularities can be easily removed with a spatula.
The plaster has good adhesive properties and therefore the wallpaper mixture “sticks” to it well. Builders recommend priming the moisture-absorbing coating.
But such a composition will not work on whitewash, since lime absorbs moisture from it and swells. As a result, yellow spots appear and the finishing layer crumbles. If this is your case, first clean the base and then prime it.
The main rule is that any surface should be monochromatic and solid. Anything that peels off or gets dirty needs to be removed and re-processed.
Instagram @silkplasterbarnaul
Instagram @silkplasterbarnaul
Protective varnish
Applying protective varnish to liquid wallpaper has many advantages:
- the coating becomes stronger , so its service life is extended;
- imparts moisture-repellent properties , which is a huge plus when the wallpaper was applied in the kitchen or bathroom;
- a layer of varnish fixes the original colors of the wallpaper, which does not threaten burnout in the future.
Protective varnish is applied after the wallpaper has completely dried with a wide brush, roller or spray . This type of varnish is almost invisible on the surface, so the material looks natural.
Tips and tricks
If you've never tried liquid wallpaper, don't be afraid to start today
Check out these helpful tips:
- The mixture is easily removed, so if something doesn’t work out, you can fix it later
- Do not apply the substance in a layer thicker than 4 mm. It will look sloppy and rude
- Use moderation with decorative components
- If you accidentally extend beyond the area intended for liquid wallpaper, wait until the material sets and carefully cut it off with a knife
- Liquid wallpaper looks great on the ceiling, as a decoration for wall niches and openings
Cute floral ensembles
If you want to realize all your creative dreams in renovation, and at the same time strive to keep costs to a minimum, liquid wallpaper will be the ideal solution. With them you will give your walls a new, interesting and vibrant life. Make them a subject of admiration and delight.
Down with standard factory wallpapers with template patterns. Today, even the most expensive ones, you won’t surprise anyone. Make the working material yourself, and your design will definitely not go unnoticed.
Watch a short video clip that clearly shows the whole process of working with silk plaster:
VIDEO: DIY liquid wallpaper
We make liquid wallpaper with our own hands: step-by-step instructions, tips, application techniques, as well as useful ones (85 Photos & Videos)
How to remove it yourself?
There are several types of removing wallpaper from the surface, but the simplest and most cost-effective option is to use water.
This short video will show you how to remove liquid wallpaper from a surface.
In this case you will need: warm water, a brush, a scraper or a metal spatula .
Dip the brush in water and brush it over the wall section several times. After 7-10 minutes, the material will be saturated with moisture and soften . After this, you need to carefully remove the layer using a spatula. If the process causes difficulties, then it is necessary to soak the liquid wallpaper with water again.
All about applying liquid wallpaper:
Tools
What can you apply finishing to?
Sequence of work
- Preparing the wall
- Mixing the material
- Sticking
- Decoration
Water protection
How to remove stains
Such a surface can be painted several times directly according to the old color; it is easy to repair, since in most cases it is removed with water. The material is used only for interior work.
Instagram @silkplasterbarnaul
Instagram @silk_plaster_izhevsk
Important to consider
In addition to the price, there is also a technical aspect, which most likely should be listed as a disadvantage. Like textured plaster, liquid wallpaper is applied directly to the wall, and if it has differences in surface composition or unevenness, all these defects will eventually appear on top of them. The presence of several layers of old paint, uneven putty or plaster, differences in level, and, consequently, the thickness of the wallpaper layer, metal objects coming to the surface (screws, nails, fittings, pipes) - all this will ultimately spoil the appearance of the result.
Liquid coating with the ability to draw
This opportunity will greatly delight designers and artists. After all, they can independently transform a room and make a unique ornament, pattern or design that is not in the manufacturer’s range.
Usually the process goes like this: the base of the drawing is made using a pencil or marker. Material of different colors is applied alternately, first 1 color completely, then another after the first has dried.
This process is very labor intensive, but it is worth it. Imagine painting the wallpaper yourself! This is a unique opportunity for creative people.