The application process is easy even for a non-professional, you can work alone, you just need to adapt to working with a trowel (plastic grout is suitable) so that the wet mixture does not slip or fall off. If the mixture gets on furniture or the floor, it can be easily removed. No dirt or foreign odors. You can stop at any time; the shelf life of the prepared mixture is 14 days. There is no need to worry about the joints, as with roll wallpaper. Rough walls? Decorating with liquid wallpaper perfectly masks unevenness. At any stage, it is permissible to ventilate the room - this does not harm the liquid wallpaper.
Convenience
It is easy to correct any flaws during the initial application or in the future, even from an already dry wall, just spray water on the place you want to correct, carefully remove the soaked material and reapply it. This is one of the main conveniences and properties of liquid wallpaper: remove and apply the coating repeatedly. The remaining wet mixture should not be thrown away, it must be dried at room temperature, it will not lose its properties and may be useful in the future.
Creative potential
For people who are inclined to create their own designs, working with liquid wallpaper is an opening for creativity. Using mixtures that differ in color or texture, you can carry out a combined application of the material, apply contrasting stripes, geometry or patterns. The ornament can be invented and applied to the surface even after finishing. You can easily make some crafts from small leftover mixtures, which will make children very happy. The products are dried, covered with additional decor using glue, and varnished. Decor can be pebbles, pieces of amber, buttons.
Economical repair
Dressing walls in silk is quite an affordable pleasure, considering both the cost of the material itself and the opportunity not to resort to the services of professionals. At the same time, you will get environmentally friendly, pleasant to the touch, surprisingly warm, beautiful and not “like everyone else” walls.
Minus one
: Liquid wallpaper should not be applied in damp areas. But you won’t cover your bathroom walls with them, will you?
Characteristic
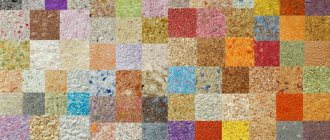
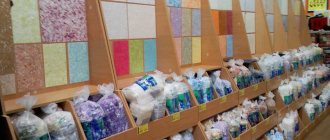
What is liquid wallpaper? This is a modern wall finishing material. In appearance, such wallpaper resembles sawdust or plaster. They consist of cellulose, silk or cotton fibers with the addition of acrylic, coloring, fungicidal and adhesive components. Sometimes they are supplemented with decorative elements: sparkles, stone chips. They are sold in two versions: as a dry mixture (in 1 kg plastic bags), which must be diluted with water, or as a ready-made solution.
Why is liquid wallpaper so attractive? The method of applying them differs from the labor-intensive gluing of rolls. This reduces repair time, which is good news. A layer of liquid plaster, just applied to the wall, resembles paint, but when it dries it turns out to be embossed, does not collect dust, lasts a long time and is easily removed when you get tired of it.
You can experiment with the coating. From a white mixture without additives, original compositions are prepared with the inclusion of various dyes and decorative elements. But this method is more accessible to professionals.
How to glue correctly: step-by-step instructions
Gluing wallpaper is not difficult, but this process includes several stages: surface preparation; the sticking itself; and final coating.
Gluing wallpaper is not difficult, but the process involves several steps.
Surface preparation
This type of wall finishing does not require a perfectly flat surface, but preparation is essential, otherwise the result will be of poor quality. Before pasting wallpaper, check the surface for:
- The surface must be durable, there should be no strong drops or potholes;
- The wall should not allow moisture to pass through easily;
- Large flaws are covered with putty, leveling them afterwards;
- Sanding should not be carried out; for good adhesion, the coating must be rough;
- The coating must be uniform;
- The white color of the surface will make it easier to stick, then a thin layer of wallpaper will be enough.
Standard steps for wall preparation:
- The first step is to remove the old coatings so that parts do not fall off over time;
- All protruding parts are removed from it, the depressions are covered;
- It is worth checking the evenness of the wall with a level, getting rid of strong unevenness if necessary;
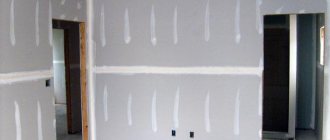
- If the wall is covered with plasterboard, it must be completely leveled; any flaws will be visible on it;
- The wall must be coated with a deep penetration primer. It is advisable to apply it in two layers, waiting for each layer to dry completely;
- Only after the surface has dried can you start gluing wallpaper.
This type of wall finishing does not require a perfectly flat surface, but preparation is essential, otherwise the result will be of poor quality.
How to apply wallpaper to a wall
There are several methods for gluing liquid wallpaper; to choose the appropriate option, it is better to consider each technology. In any case, you need to provide comfortable conditions and take care of good lighting. The first option is to use a spatula.
How to apply wallpaper with a spatula:
- The prepared and settled mixture is stirred again.
- Using a spatula, apply a small amount of mortar to the wall.
- Using also a spatula, the layer is leveled and brought to a thickness of 1-3 millimeters.
- Applying the composition in small parts, cover 1-1.5 meters, then level the resulting result with a transparent grater, first soak it in water.
When working, you should focus on the following recommendations:
- Alignment is done at eye level to ensure it is done correctly;
- The movements are kept short, always pointing the spatula in one direction.
Then the wall is left until it dries completely, which takes almost three days.
The movements are kept short, always pointing the spatula in one direction.
The second option is to use a spray bottle. This method is usually preferred by professionals due to the cost of the equipment used. But this technique reduces the consumption of funds by 2 times and spends less time:
- The solution used should have the consistency of liquid sour cream, which is poured into a spray bottle.
- The spray hole is directed towards the surface and smoothly moves in the other direction, leaving no untreated areas.
- Having covered the entire wall, it is leveled with a trowel or grater.
This technique reduces the consumption of funds by 2 times and less time is wasted.
Final stage
To create a water-repellent barrier, the surface can be coated with clear acrylic varnish. In addition, it will extend the life of the coating and fix the color. This coating will not stand out.
To create a water-repellent barrier, the surface can be coated with clear acrylic varnish.
Advantages and disadvantages
Liquid wallpaper can be considered a universal finishing material. They have a number of advantages over other finishing options:
- They are flexible, easy to prepare and apply to walls. Installation does not require special skills or expensive tools. They are convenient for pasting over corners and relief surfaces (arches).
- This is an environmentally friendly material that is safe for health. Such wallpaper can be glued in a children's room.
- Liquid wallpaper allows you to create patterns.
- They look attractive and neat. Has no seams.
- Wallpaper regulates indoor humidity by absorbing or releasing moisture, depending on its excess or deficiency.
- The coating is soft and warm to the touch.
- Wallpaper has antistatic properties.
- They do not absorb foreign odors.
- They repel fungus and prevent the development of mold.
- They have sound and heat insulation properties due to their porous structure.
- Do not cause allergic reactions.
- They are not afraid of shrinkage.
- Suitable for any premises.
- Easily restored in case of mechanical damage.
- Attaches to many types of surfaces: concrete, wood, metal, drywall and even painted surfaces.
Among the disadvantages, it is worth noting the rather high cost and non-standard rules of care (you cannot get it wet). This coating does not withstand mechanical loads well. Otherwise, liquid plaster is trustworthy.
Advice! Since liquid wallpaper is afraid of moisture, when finishing it is worth covering it with colorless varnish. The coating protected in this way is suitable for all types of rooms, including the bathroom and kitchen.
How to calculate the volume of a mixture
To understand how much mixture to buy, you need to look at the packaging of the material. Manufacturers indicate its consumption. You need to know the area of the room. But it is also important to take into account several factors that influence the consumption of material so that the mixture is enough for the entire area of the room. This is how consumption is affected by:
- Layer thickness, manufacturers calculate consumption based on the thickness of the applied layer of 1-2 millimeters. But if there is a not very smooth surface, the thickness will become greater, so it is worth taking 10-15% more of the mixture;
- Inexperienced craftsmen do not apply the layer thickness evenly right away, so if the solution is not applied by a professional, then its amount needs to be increased by 10-20%;
- Corners, hard-to-reach places and curved walls affect the consumption of the solution. If there are a large number of such places in the room, then it is worth taking 10-20% more liquid wallpaper.
Accordingly, if all factors are present simultaneously, then the volume of the mixture must be increased by 40-60%.
It is important to take into account several factors that influence the consumption of material so that the mixture is sufficient for the entire area of the room.
To reduce consumption, you can resort to several methods:
- It is good to level the surface so that you do not have to cover the unevenness with a thick layer;
- Choose a spray bottle as a tool for distributing wallpaper; it allows you to apply a thin layer;
- Cover the wall with white putty so that dark places do not show through the wallpaper and they do not have to be made thicker;
- Prime the surface for better adhesion to the wall.
Choose a spray bottle as a tool for distributing wallpaper; it allows you to apply a thin layer.
Preparatory stage: walls
Another advantage of liquid wallpaper: they can be applied to a wall that is not entirely smooth, as they smooth out small surface defects. However, a little preparation is required:
- First, the old finishing coating is removed. The plaster and paint are removed with a spatula, the old wallpaper is soaked with water and peeled off.
- The coating is applied only to a clean wall. The surface gets rid of dust and other contaminants, as well as small particles of old finishing. Cleaning is done with sandpaper.
- If there are nails in the wall, it is recommended to cover the heads with white enamel.
- Next, all cracks and chips are repaired. You need to putty the wall depending on its condition. If it is more or less even, then it is partially puttied. Minor defects will be hidden under the embossed liquid wallpaper.
- After the putty has dried, the base must be primed. There are special primers for sale on walls for gluing liquid wallpaper.
Advice! If the walls are made of plasterboard, then they must be puttied and covered with water emulsion. This will help prevent the surface from getting wet when applying the liquid layer. To increase moisture resistance, PVA glue (3:1) is added to the putty mixture.
All about applying liquid wallpaper:
Tools
What can you apply finishing to?
Sequence of work
- Preparing the wall
- Mixing the material
- Sticking
- Decoration
Water protection
How to remove stains
Such a surface can be painted several times directly according to the old color; it is easy to repair, since in most cases it is removed with water. The material is used only for interior work.
Instagram @silkplasterbarnaul
Instagram @silk_plaster_izhevsk
Preparing the mixture
More often, wallpaper is bought in bags in dry form. To paste liquid wallpaper on the wall, you need to prepare the mixture:
- Pour warm water into a deep container.
- Add the dry mixture in small portions, while stirring with a whisk. It is best to stir the composition with your hands to avoid damaging it.
- Add and stir until you get a thick, creamy mass.
- Decorative components can be added if desired.
- The mixture should be left for 15-20 minutes for the wallpaper to swell.
- Mix again, remove large lumps.
- The mixture is ready.
It is recommended to prepare a solution of liquid wallpaper for the entire room at once so that the finish is uniform in color. Follow the directions on the dry mix package for the most accurate results when mixing wallpaper.
How to remove it yourself?
There are several types of removing wallpaper from the surface, but the simplest and most cost-effective option is to use water.
This short video will show you how to remove liquid wallpaper from a surface.
In this case you will need: warm water, a brush, a scraper or a metal spatula .
Dip the brush in water and brush it over the wall section several times. After 7-10 minutes, the material will be saturated with moisture and soften . After this, you need to carefully remove the layer using a spatula. If the process causes difficulties, then it is necessary to soak the liquid wallpaper with water again.
How to stick
Wallpaper is applied in two ways: by spraying with a special gun or by spreading with a wide spatula. Since it is not always possible to obtain special equipment, we will consider the second method.
To glue, or rather apply liquid wallpaper, you will need:
- putty knife;
- knurling roller;
- colorless varnish.
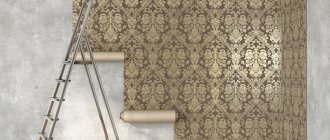
How to apply the mixture correctly:
- Using a spatula, scoop up a little solution and apply it to the wall so that no bulges or voids form under the coating. It is better to apply layers in a certain way: horizontal or vertical stripes, herringbone, zigzags or spirals. This will create a beautiful finish, but applying it in a chaotic manner will not create an aesthetically valuable coating.
- Let's even out the first portion.
- Now we distribute the next part of the finishing in exactly the same way.
- Each layer of wallpaper should smoothly transition into the next. Make sure the coating is uniform.
- Each square meter is leveled with a roller.
- If defects are found, we correct them without delay: lightly moisten the area with water, remove the bad coating with a spatula, apply a fresh portion and level it. Be careful: wallpaper does not tolerate contact with water well, so make adjustments no more than three times.
- The recommended layer thickness is from 1 to 3 mm.
- Wait until completely dry. This will take from 1 to 3 days, depending on the temperature and humidity. The warmer and drier the room, the faster liquid wallpaper dries.
- If necessary, the dried finish is coated with colorless varnish. Such wallpaper can be washed, and it also becomes more attractive to look at.
Advice! You should not press the wallpaper too hard, otherwise you will not be able to achieve a textured surface. But it is also not recommended to under-press: this way the wallpaper layer can come off under its own weight.
You can create a relief pattern on liquid wallpaper. To do this you will need a roller or brush. You need to wet the object and draw something on the wet surface. Drawings of different colors are created from liquid wallpaper.
You will need a stencil. Place it on the wall and fill it with one type of wallpaper, smooth the edges. The next layer is applied after the previous one has dried. At the same time, it is not necessary to maintain the same thickness of the parts of the design - individual elements can be thicker or thinner than the main layer, creating the effect of bas-relief or high relief, creating a three-dimensional composition.
On what surface can liquid wallpaper be applied?
- Pure concrete without finishing.
- Plastered brick.
- Putty (or painted) and primed wall, including drywall.
- Wood, plywood.
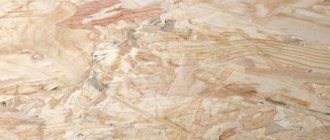
Fibreboard, chipboard, OSB are suitable for such work only with pre-treatment. Direct contact with moisture is contraindicated for them. Laminated boards are coated with an abrasive primer to increase adhesion.
The ceiling can also be finished with this material. In this case, it is inconvenient to distribute it with rollers and spatulas, so a special spray gun is used. Protruding fibers and irregularities can be easily removed with a spatula.
The plaster has good adhesive properties and therefore the wallpaper mixture “sticks” to it well. Builders recommend priming the moisture-absorbing coating.
But such a composition will not work on whitewash, since lime absorbs moisture from it and swells. As a result, yellow spots appear and the finishing layer crumbles. If this is your case, first clean the base and then prime it.
The main rule is that any surface should be monochromatic and solid. Anything that peels off or gets dirty needs to be removed and re-processed.
Instagram @silkplasterbarnaul
Instagram @silkplasterbarnaul
Useful tips
To ensure the repair lasts for a long time, follow these recommendations:
- The work is carried out in a room with an air temperature of at least +10 degrees.
- Tools should also be clean and free of grease, as should surfaces.
- Wallpapering walls with one color of wallpaper is done in one stage. Don't leave any finishing unfinished.
- If the solution does not stick, add a little water to it.
- When applying the mixture with a spatula, you can help yourself with your hands, as the composition is safe.
- After finishing work, ventilate the room well, as the coating takes on its final appearance after complete drying. However, avoid drafts.
- Do not use hard brushes or detergents to care for liquid wallpaper. They damage the coating, which is not resistant to mechanical stress.
- Do not throw away the remaining solution. It will be useful for adjusting the finished coating. Store it in an airtight container in a cool place. You can wait for the mixture to dry and pour it into a bag.
Liquid wallpaper is an alternative finishing option that does not require much time and effort. There is no need to take tedious measurements and be afraid that the wallpaper sheet will become covered with bubbles. Although the liquid version of wallpaper has its disadvantages, its advantages still exceed them. The final result of the installation will delight the owners with beauty, reliability and practicality if everything is done correctly.
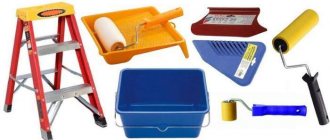
Necessary tool
It is advisable to begin the transition to any type of repair work with the preparation of the necessary materials and tools. Then you won’t have to worry about missing some tools during work. You need to prepare:
- Containers where you can prepare liquid wallpaper. It must have a volume of at least 7 liters;
- A spatula, it must be made of organic glass or stainless steel, its surface must be smooth;
- Transparent grater;
- Spray bottle, if the method of spraying the solution is chosen;
- Putty and spatulas to apply it are used to obtain a smooth wall;
- Paint roller or brush to prime the wall;
- Structural roller that allows you to create unusual designs;
- If you are going to draw a pattern, you will need a pencil, ruler and eraser.
Materials:
- Liquid wallpaper;
- Primer for the leveling and surface preparation stage;
- Acrylic varnish when planning to cover the surface of the wallpaper with it to create a protective barrier from moisture.
It is advisable to begin the transition to any type of repair work with the preparation of the necessary materials and tools.
Rules of care
Liquid wallpaper has a number of positive qualities: they look beautiful, they are easy to apply to the wall, and if damaged, they are easy to repair. Thanks to the textile fibers included in the composition, this coating has a good antistatic effect, that is, it almost does not attract dust. The only problem is heavy pollution.
This material does not belong to the class of washable wallpaper. A heavily contaminated area will have to be moistened with water to soften the layer, cleaned from the surface with a metal object and replaced with a new portion of wallpaper. After such local repairs there will be no seams on the wall.
This finishing material cannot be washed. When moisture gets on the surface, the wallpaper softens. But a wall covered with such finishing material can be vacuumed. The vacuum cleaner is used once every six months. Use only a soft brush. If varnish has been applied to the wall, heavy dirt can be removed with a damp cloth. However, after varnishing, wallpaper changes color greatly, so this coating is rarely used.