In this article I will present detailed step-by-step instructions for installing a stretch ceiling with a harpoon fastening system.
The ceiling has the shape of a rectangle with sides of 2.0 x 5.3 m and its installation is quite simple and straightforward.
Required tool:
- Laser level;
- Painting (beating) cord;
- Hammer;
- Screwdriver;
- A hacksaw for metal or an angle grinder with an abrasive wheel;
- Heat gun;
- Special spatulas.
Thermal gas gun for heating the stretch ceiling
material Materials:
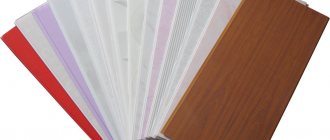
- Custom ceiling fabric;
- Special profile – baguette;
- Fasteners (screws and dowels);
- Punched paper tape;
- Chandelier base;
- Ring;
- Super glue.
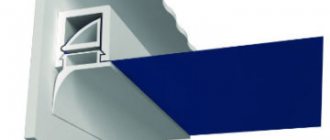
How to attach a baguette for suspended ceilings
To install the tension structure and fix the canvas in a tense state, you need a baguette. If you choose the right way to fasten the baguette, the ceiling system will last a long time.
- Purpose and types of baguettes for stretch ceilings
- Basic installation rules
- Fastening Features
- Preparation
- Marking
- Installation of baguette
- Features of installation on various surfaces
- Loose walls such as foam concrete
- Wood and drywall
- Concrete
1.7. Level transition device
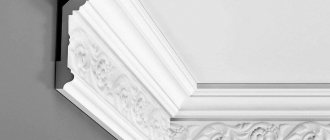
A level transition is a connection along a straight or curved section of several surfaces (both flat and higher orders) formed by suspended ceilings. This technique is usually used to bypass beams and crossbars. Level transitions are primarily divided into convex and concave (see Fig).
Sorry, this text is only available to dealers. You must be logged in as a dealer to see the hidden text.
A concave transition requires much more labor. It is available in two versions: with “separated by canvas” or “with a gusset”.
Sorry, this text is only available to dealers. You must be logged in as a dealer to see the hidden text.
After the installation of the form-building structure is completed, when the ceiling is stretched, the fabric will cover it and the required level transition will be obtained.
Purpose and types of baguettes for stretch ceilings
The baguette is responsible for the reliable fixation of the canvas. It is fixed at some distance from the main ceiling.
How to attach a baguette for a tension structure depends on the type of profile:
- Harpoon baguette made of polyvinyl chloride. Reliable and popular method. The price is a little more expensive than the others. The reason is that the canvas is welded onto the harpoon. You have to use special equipment and carefully measure the canvas. During the dismantling process, the suspended ceiling is not damaged.
- Pin. An elastic clamp is used here - a clip. The advantage of this method is that it does not require heating the canvas for installation. The edges of the material are tucked in with a round staple. Re-installation is eliminated because after installation, excess fabric is trimmed.
- Bead or wedge. Here you need not only a profile that is attached to the wall, but also a glazing bead for fixing the canvas. You will also need masking tape.
Basic installation rules
There are some installation rules that must be followed in order for the structure to last a long time:
- First, level the walls and corners.
- The profile is fixed at a distance of about 100 mm from the rough surface.
- Work begins with corners located diagonally.
- Straight parts of the baguette are installed end to end, strictly according to the level. The seams are taped with adhesive tape. It is impossible to connect segments in the corners, because the corners bear a significant load. Instead, a small section is cut out from the back side or a cut is made, and the outer part remains intact.
- The length of the profile is adjusted according to location.
- The maximum distance between screws is 200 mm, otherwise there is a risk of the baguette sagging.
- The distance from the edge when securing the profile is 15 mm.
- To attach the baguette to loose walls, use self-tapping screws with dowels and screw them into one mounting hole. If this method does not help, install spacers.
- For uneven walls, you should use a plastic molding, as it fits tightly to the surface. If there are a lot of wires in the area, you should choose a metal product, since it allows you to install ceiling molding fasteners at large intervals.
- To avoid the appearance of moisture between the base and the suspended structure, a hole is made in the profile to allow air to penetrate inside.
- The most important rule is to follow the instructions during installation of the product.
Fastening Features
Features will depend on the selected profile type. For example:
- The glazing bead structure is very easy to install, but its dismantling is almost impossible.
- Separating structures are chosen if the canvas is very large.
- There are double baguettes that allow you to install two tension structures at once.
- The clothespin holds the structure tightly and does not require masking.
- There are transparent designs made of aluminum. There is an LED strip inside them. This ceiling looks unusual.
Preparation
First you need to choose the right tools. Needed:
- hammer;
- hacksaw;
- screwdriver;
- perforator;
- dowels, anchors or screws;
- ladder;
- painting cord.
Before carrying out work, prepare the room. Remove all furniture or cover it. Make holes for fastenings (in increments of about 15 cm). Don't forget about cables that may be inside walls or ceilings. They are guided by lamps, switches and sockets.
Marking
A laser level is used to mark the plane of the fastenings. The normal height for fastenings is from 50 mm relative to the surface. Level marks are placed in each corner of the room. You can replace the laser device with a water level. It will take more time to mark, but the result will be the same. According to the marks, lines of the surface plane are drawn. To do this you will need a painting cord.
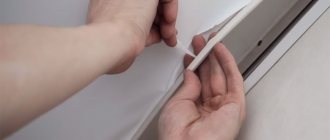
Installation of baguette
The profile is set up as follows:
- Holes are made in the frame. The distance between adjacent holes is about 10 cm.
- Screw the dowels onto the screws.
- Start installation from the corner. File down the back wall of the profile if the corner is internal. The front wall should not be damaged.
- If the corner is external, cut out the back side of the profile at an angle of 90, bend and secure it like an internal corner.
- Straight sections are mounted in the same way, but there is no need to saw down the baguette.
With an assistant, we glue ceiling plinths for painting
Tools for installing suspended ceilings and ceiling plinths
Use a piece of ceiling plinth to mark the size on the ceiling and walls. Then, with the help of a friend and a cord, I marked out the lines along which the baguette should lie. We used a simple foam baseboard with longitudinal projections. It is easy to glue, no need to adjust the pattern. We started from the corner. Using a miter box, we cut the end at an angle of 45° on one strip, then on the other, turning the plinth upside down with the bottom plane. Since the length was not enough for the entire wall, I immediately cut off the second end. The joint is better preserved and does not crack over time if it is cut obliquely. The bonding plane and resistance to deformation increases.
The ceiling molding is glued along two planes. They can be lubricated with putty or sealant. I prefer mounting adhesive. Polystyrene foam holds the composition best for polystyrene foam products.
I checked the correctness of the cut on the baseboards in the corner, placing them dry in place. Apply glue with a spatula to both surfaces of the baguette. After that, I carefully applied it, guided by the lines to glue it correctly, and pressed it along the entire length. Then the second one. The excess glue that came out was collected with a spatula. I entrusted my assistant to wipe the baseboards with warm water to use a sponge to wash away all the excess. If it dries, it will be difficult to clean. On the next strips of baguette, I greased the ends with joint glue. The cylinder is loaded into the mounting gun. I applied a little bit onto the foam and immediately removed the excess. A friend with warm water followed me.
The work of sealing joints is done with a rubber spatula so as not to harm the baseboard.
On the semi-column I prepared pieces of baguette with convex corners in advance. Marked the bottom edge. The ceiling plinth was turned over and placed on the miter box. I checked that the cutting direction was correct, the outer side was larger. Then I did everything the same way.
The next day, when the baguette was glued and dry, I went over the corners and joints with putty. I used a small rubber spatula without a handle to do this. Then I repeated and finished the treatment with acrylic putty. It was more difficult to fit the foam on the outer corners. Every time the solution dried, Vadik sanded it. A few days later I instructed a friend to prime everything and began painting.
Curved ceiling plinth
As a result, the “student” wrote down the order of work in his notes:
- Make markings on the walls and ceiling.
- Cut the baguette and check the correct angle.
- Spread with glue.
- Place along the line and glue.
- Wipe with water.
- Putty the joints and clean them.
The walls in the bathroom are tiled. In order not to smear it, I painted the ceiling molding on the front side. I cut the foam, laid it on the floor and brushed it a few days before gluing. Some of the paint from this can was left unpainted on the joints and corners after stripping.
The tiles have a hard, glossy surface. The plane adjacent to the ceiling and the ends were smeared with mounting glue. On the bottom I applied a thin strip of sealant at the top. He did it with a pistol. It is very important that the sealant does not protrude beyond the edge of the baguette. I know from experience that paint doesn’t stick to it and it’s impossible to clean it. To create a smooth transition, I pasted masking tape onto the tile, right under the foam. Then I sealed the gap with white acrylic putty and removed the excess with a tile spatula, a corner with a radius of 2 mm.
Features of installation on various surfaces
The installation process and choice of fasteners differ depending on the selected surface. Dowels and anchors are suitable for concrete. For wood, it is better to choose galvanized screws. If the walls are loose, several fasteners are installed in one hole at once.
Loose walls such as foam concrete
When self-tapping screws cannot fix the structure properly due to looseness of the walls, there are two options: using spacers or screwing additional screws into one hole for fastening. The second method should be tried first. 2-3 additional screws are simply added to the hole. If this does not help, resort to spacers.
Wood and drywall
The walls can be wooden or covered with wood and plasterboard.
- If wood panels or drywall are attached directly to a concrete base, then it is necessary to use a longer fastener so that the screw goes deep enough into a solid base.
- If the cladding is attached to a metal frame, the baguette must be attached to the frame elements. A magnet is used to find them.
- Before installing the plasterboard structure, you can lay a mortgage at the future location of the profile. Then standard self-tapping screws will do.
- You can use special dowels for hollow walls.
Concrete
Concrete walls are strong and can withstand significant loads. For concrete and brick, it is better to choose an anchor or dowel as a fastening.
Preparation
First of all, let's decide what tools we need to install the baguette.
How to properly lay a vapor barrier on the ceiling?- Is it possible to glue wallpaper on whitewashed walls?
- Imitation of a brick wall made of gypsum plaster
- hammer drill
- screwdriver
- hammer
- hacksaw
- painting cord
- ladder
- screws and dowels, a drill with a diameter of 6 mm and a drill with a diameter of 6 mm
Let's prepare the room. To do this, we will need to free up all the space around the perimeter of the room at a distance of 1 meter from the walls. There should be no plants or pets left in the room. All furniture that could not be removed must be covered with a special covering material. Also, to make it more convenient to attach the baguette, we need to prepare it: drill holes for the dowels. The distance between the holes should not exceed 15 cm, and the distance at the ends of the whip from the edge should not be more than 2 cm. It is not recommended to make the distance larger, since the profile will begin to pull and bend in the areas between the fastenings. The plastic baguette is drilled into a special stiffening rib; when viewed from the end, it looks like a cube. And the aluminum one goes into a special shelf. The photo shows how to prepare the profile for installation.
When preparing a room, it is worth considering another important point: where the electrical cable runs in the walls. This is especially true for brick houses built by Khrushchev. You need to navigate by the boxes, sockets, and switches located on the wall. In most cases, the wire runs at the level of the distribution boxes and runs vertically above each outlet or switch. The location of the wires should be taken into account at the stage of measuring the canvas.
The process of gluing ceiling plinths
Baguettes for ceiling decoration are glued in two ways:
- Before wallpapering.
- On top of pasted wallpaper.
In most cases, baguettes are pure white, so it is important to carry out installation work with absolutely clean hands. Before gluing baguettes, you must wash your hands with any detergent.
Marking
To mark the mounting plane of the baguette, use a special device - a laser level. The normal height for mounting is considered to be a distance from the ceiling of at least 5 cm. With this mark you will avoid getting into technical seams in the wall. Fix the laser level firmly and place marks at each corner of the room. You should choose a place to set the level from which all nooks and crannies can be shot. If the room has an intricate shape and it is not possible to highlight all the corners from one place, then after making all the available marks, the level can be moved further, focusing on the existing drawings.
If you don't have a laser level, don't worry. You can use a hydro level. This marking will take more time, but the result will be quite accurate. Fill the level with water at room temperature, preventing air from entering the hose. Combine the two flasks to check - the water boundary should be in the same plane in both flasks. Important: do not use hot or cold water, it should be as close as possible to the room temperature. Also, do not allow the hose to bend, this can lead to large errors in the readings. The marking technology is as follows. One installer stands in the first corner, the other installer stands in the second. Fix both flasks in the corners with one hand, and with the other make marks on the border of the water in the flask. After this, the first installer moves to the next unmarked corner, and the second remains in place. Next, the first installer approximately positions the flask to the corner, and the second, by lowering or raising his side, ensures that the water boundary coincides with his mark. When the vibrations stop, the first one puts his mark. The procedure is repeated sequentially with all angles. Next, we take a tape measure in our hands and measure all the distances from the marks to the ceiling. We subtract 5cm from the smallest one - this will be the total height. Then we mark from each mark, measure this value upward and put the final marking.
Now we need to draw straight lines from one mark to another - this will be the plane of our stretch ceiling. To do this we use a painting cord. We hold one end of the thread on one mark, the other end on the other. We pull it back with a pinch and release it; the click will leave a straight line on the wall. And so on in a circle.
Gluing process
What you need to stock up on before work:
- liquid nails or glue;
- brush;
- construction knife;
- pencil;
- miter box;
- clean rag or sponge;
- finishing putty;
- putty knife.
The process of gluing the ceiling baguette
So, how to glue baguettes to the ceiling? Professionals advise the following course of action:
- The whole process should start with leveling the surface. If the ceiling and walls have uneven surfaces, they need to be puttied. After this, apply primer.
- Gluing baguettes starts from the corner. The end of the ceiling plinth must be cut at an angle of 45 degrees. This way you will get a smooth and neat joint.
- Apply glue along the entire length of the product in an even layer. Don't forget to apply glue to the cut corners.
- Place the product on the surface to be glued and press firmly. If you made the cuts correctly, the corners will clearly coincide and form an angle.
- The installation is complete, and once the glue has dried, you can start painting.
Many people have difficulties in designing corners, so here we would like to go into more detail. Experts say that when joining two parts of a ceiling plinth end-to-end, it is necessary to carefully work the edges with glue and press the parts tightly to squeeze out any remaining glue, which should be removed with a napkin. Press down not with your fingers, but with the edge of your palm, so you will not leave indentations from your fingers.
Fastening
Installing a baguette should start from the most inconvenient or hard-to-reach corner. It is not allowed to join the profile in the corners, even if it is cut at 45°. When the canvas is stretched at an angle, the greatest load is applied, and the film will simply tear at the joint. Therefore, the baguette on the inner corners is sawed as follows: only the back wall is sawed, while the front wall remains intact, after which the profile is bent at the place of the saw.
Having secured the first baguette whip, we move on to the second. It is mounted end-to-end with the first one, and it is important to adjust the joint horizontally as best as possible; you should not get any steps. Having reached the next inner corner, we need to measure the distance. This can be done in two ways: using a tape measure or using a whole strand of baguette. The second option is more convenient and much faster. Turn the profile with the back wall outward, so that the groove for the harpoon is located at the bottom. Place one end against a corner, and direct the other along the level line, overlapping onto the secured baguette. Place a mark at a distance of 1 cm from the future joint, you need to move it towards the corner. Follow this mark and file the back wall. It is also not difficult to prepare the outer (or outer) corner. Press the end of the profile against the end of the already secured baguette and draw a line along the back wall, right at the corner. This will be the first cut. Further along the fastening path, place another mark at a distance of 2 cm from the first one. This will be the second cut. Saw through the back wall along both marks. Now we need to cut out the remainder between the cuts. For PVC profiles this is done with a regular construction knife; for aluminum it is easily broken off with pliers. After all this, fold the baguette exactly in the middle of the resulting recess.
After you have securely fastened the entire sheathing, be sure to seal the joints with tape. You can use gray utility tape sold at any hardware store. And for aluminum profiles, metallized tape is also suitable. It is important to be careful at all stages of installing a stretch ceiling.
Slicing
Let's look at the basic rules for cutting baguette.
- Cut the fillets with a good hacksaw. Only a few professionals are able to do this efficiently with a sharp knife.
- The most difficult moment during installation is adjusting the internal or external corners. To do this, it is better to use a standard device - a miter box, with which you can easily obtain an angle of 45°.
- If the walls in the apartment are not at right angles to each other, the adjustment is carried out manually, and possible flaws are repaired with putty.
Loose walls
Unfortunately, in our profession, cases of loose walls are not uncommon. What to do if the self-tapping screw screwed into the wall does not hold the profile well? There are two ways out: use spacers (jibs) or screw additional screws into one mounting hole. The second method in most cases saves the situation. One or two additional screws can securely fix the baguette. Well, if they didn’t help, then you should resort to using spacers. Take a 15 centimeter piece of baguette and drill a hole in one of the ends. Open the jib into the molding and the ceiling and place a mark through the hole in the ceiling. Drill under the dowel and drive it there. Take the jib and, tightening it with a self-tapping screw, open the baguette. The spacer should be rigid, and the profile should not move up and down and be pulled away from the wall.
Choosing the right glue
Each experienced craftsman uses his own proven adhesive to install the frieze. Such means may be:
The polymer composition is characterized by low stickiness. In order to reliably fix the molding with such glue, it must be held in the desired position for quite a long time, and this is not entirely easy to achieve for a two-meter part.
Installing the frieze using silicone and acrylic glue is quite quick and comfortable. Manufacturers package them in gun tubes. The product is applied with ease, and the diameter of the release hole at the tip controls its consumption.
The procedure for gluing a baguette with silicone and acrylic compounds is usually described in the instructions for the material. The negative side of such funds is their high price.
The most budget-friendly way to glue baguettes yourself is with traditional finishing putty or drywall compound, if it is used in finishing. This mixture is reliable, it takes less time to harden, so after half an hour you can already paint the ceiling and baguettes.
However, there are also disadvantages to using putty as glue:
- the inconvenience of applying a thin layer of the mixture with a spatula on the molding;
- Upon completion of gluing, excess putty or plasterboard glue will need to be thoroughly removed with a dampened brush. Otherwise, pieces of visible dry mixture will spoil the picture.
Wood and drywall
Modern houses are built not only from concrete and brick, but also often from wood. And half of the Soviet-built private sector is made of this material. In case of installation on wooden walls, you need to have with you not only self-tapping screws 51mm long, but also self-tapping screws of 75mm, 90mm, 110mm. Although the walls are wooden, the blocks can be hidden at a considerable depth under a good layer of plaster, and long screws will help us out perfectly.
It is not uncommon for sheets of plasterboard to be used to level walls. If the installers installing it have experience, and the client warned them in advance about stretch ceilings, then fixing it to plasterboard is a pleasure. Usually, experienced gypsum plasterboard craftsmen place an additional 60*28 profile along the top under the baguette fastening. In this case, the step for attaching the screws is the standard 12 - 15 cm. If there is no profile, it must be attached in a “herringbone” pattern at a distance of 8 - 15 cm.
After attaching the stretch ceiling frame, we move on to the next stage: marking and installing embedded parts for lamps, chandeliers and cornices.
Types of baguettes
Profiles for suspended ceilings differ in material, method of fastening and type of fixation of the canvas. Based on material, baguettes are divided into plastic and aluminum. They differ in characteristics and advantages.
The advantages of PVC baguettes include:
- flexibility, thanks to which the products fit tightly to uneven walls;
- low cost;
- lightness, reducing transportation costs;
- ease of installation (it’s easier to tighten screws, it’s not necessary to pre-drill);
- safety for the environment (will not damage new wallpaper or expensive furniture).
- fragility (10-15 years without replacing the canvas, and if you have to remove the film after 5-7 years, you will need a new baguette);
- fragility (withstands no more than 50 square meters of canvas);
- sometimes there is excessive softness, due to which the profile is deformed during installation (defects can be covered with a plinth, a plug will not work);
- increased rigidity is also a disadvantage: the baguette breaks in the corners, pieces break off from the front shelf during installation, so some of the elements have to be replaced;
- a large number of low quality products.
Advantages of an aluminum baguette:
- strength (does not deform, even on uneven walls it is easy to keep the frame level);
- the ability to install a suspended ceiling of any size;
- tight fit to the wall (combined with a masking insert);
- savings on fasteners (screws are screwed in less often);
- durability (even when replacing the canvas after 10-15 years).
But there are also disadvantages:
- high price;
- the difficulty of attaching to drywall (you have to drill the frame more often, which increases the total work time);
- difficulties when dismantling the canvas (the front shelf bends and the masking plug cannot be inserted back);
- conductivity of electric current (risk of injury during installation).
According to the method of fastening, baguettes are wall, ceiling and universal. The first option is used most often. The wall profile allows you to maintain different distances from the rough ceiling to the canvas. You can install built-in lighting, hide beams or communications running along the ceiling.
Ceiling profiles “eat up” the height of the room the least. But since they are attached directly to the floor slab, there is no way to adjust the level of the horizontal plane. Therefore, such a frame is placed only on a perfectly flat ceiling.
The universal profile is used for rooms with complex geometric shapes, built-in furniture and volumetric structures. Attaches to both walls and ceilings.
There are also types of frames depending on the system of fixation of the canvas. For PVC film, a harpoon or glazing bead (wedge) fastening is used; baguettes are produced in both plastic and aluminum. To stretch the fabric, only clip-on plastic profiles or glazing beads are used. Depending on the system of fastening the canvas, the design of the baguettes differs, but this does not affect the installation technology in any way.
As a rule, when installing suspended ceilings, the frame is always made from wall moldings. Other types are used only when it is not possible to attach the profile to the wall. If the room area is more than 50 m², only aluminum baguettes are used; in other cases, plastic ones are suitable. The fastening system is selected depending on the material of the canvas.
Preparation of tools and materials
To work you will need:
- ladder;
- laser level or hydraulic level;
- roulette;
- pencil;
- painting cord;
- hammer drill and drill with a diameter of 6 mm;
- screwdriver;
- hammer;
- hacksaw.
Before installation, you must purchase a sufficient amount of profile. For correct calculation proceed as follows:
- Determine the perimeter of the room in meters. In rectangular rooms, it is enough to measure the length and width, the result is added and multiplied by 2. For a more complex shape, you will have to measure all the walls.
- The resulting value is divided by 2.5 meters (the length of the standard profile) with rounding towards a larger number.
- Add 10-25% for margin for bends, cuts and installation errors. The more complex the configuration, the more it costs to add.
Now let's calculate the number of screws and dowels. The fastening step should be no more than 15 cm; for an aluminum profile it is permissible to increase the distance to 20 cm. Taking this into account, you can determine the required number of screws and dowels. It is also better to take fasteners with a reserve. You will need 5x40 mm self-tapping screws and 6x50 mm plastic dowels, as well as aluminum tape for processing the joints of the baguette.
Installation of a frame for a stretch ceiling
Let's consider the installation of the most common type of profile - a wall profile with a harpoon fastening system. In general, the technology for installing plastic and aluminum baguettes is the same. There are differences in some points, we will definitely explain them. The process includes three main stages: marking, attaching the baguette and processing the joints. Let's look at each of them in more detail.
Marking
At this stage it is convenient to use a laser level. The tool is installed so that all nooks and crannies are shot through. Sometimes this is not possible due to the complex configuration of the room. Then the level is moved and new marks are made, focusing on the old ones.
The work is carried out as follows:
- First you need to determine the height of the walls, and to do this, take measurements from floor to ceiling in each corner.
- The required distance is set aside from the lowest one. The minimum is 5 cm; when installing built-in lamps or large differences in height, the future ceiling may drop by 10-15 cm.
- Next, make marks at the same level in all corners.
- Then you need to draw lines along the walls. It is convenient to use a painting cord for this. The ends are held near the marks, the rope is pulled back and abruptly released. There will be a straight line on the wall.