One of the final stages of renovation work in a room is the installation of ceiling plinths. Choosing a plinth is a serious task. On the one hand, it is designed to hide the joining seams between the surfaces of the ceiling and walls, and on the other hand, it plays an extremely important role from a design point of view in the decoration of the room.
Skirting boards should fit into the interior, not disturb the harmony of the colors of the walls and ceiling, etc. Laying fillets, especially with your own hands, is quite an exciting activity. But in order for the room to delight you with its finished appearance for a long time, you need to have a little knowledge: how to properly lay the plinth and how to glue the ceiling plinth.
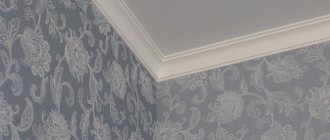
Ceiling plinth in the kitchen: simple but tasteful
We hope that all the material presented below, which describes the installation of skirting boards, video and photo illustrations, will be of good help to you in this.
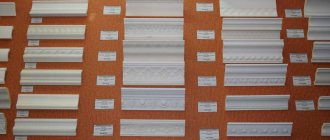
Types of ceiling plinths
Fillet or baguette is a decorative finishing material. On the construction market it can be found in a wide range - from various materials, different palettes, shapes, and patterns. The advantage of ceiling plinths is ease of installation and accessibility. This finishing does not require the involvement of specialists. And lastly: ceiling plinth is the most budget-friendly finishing material (compared to stucco and other options).
The choice of texture, size, and color of the fillet depends not only on the type of interior design, but also on the size of the room, ceiling height and even lighting. Types of finishing skirting boards for ceilings, depending on many quality parameters, are presented below.
Finishing the wall and ceiling with polyurethane will be the most economical, lightweight and problem-free option, since attaching a ceiling plinth made of this material, due to its lightness and plasticity, will not cause problems for anyone. Friezes are easily repainted. For gluing, use polyurethane-based glue or liquid nails.
Plastic ceiling skirting boards are economical and flexible. And finishing work with them is as simple as when installing polyurethane ones. The plastic must be attached exclusively to a flat surface, without bends. On the market you can find a varied assortment of friezes, textures, and a rich palette - for example, wood or metal. These skirting boards are moisture resistant and are attached using self-tapping screws and staples. The downside is that they cannot be painted.
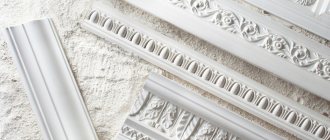
Types of skirting boards:
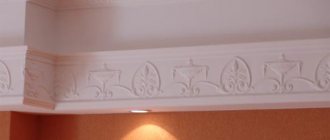
- Gypsum is a very beautiful finishing element. It is quite expensive, most often it is made to order, but such a plinth is suitable for an interior with a certain stylistic meaning.
- Expanded polystyrene is the most popular, inexpensive injection (with convex thread) ceiling plinth. Variable in texture and friezes (threads), resistant to mechanical stress and temperature changes. But it is recommended to install this type of fillet away from heating devices due to its high flammability. It's also quite fragile.
- A wooden baguette is a classic. It is beautiful, aesthetically pleasing and relatively expensive. Most often made of ash and oak. The most durable option. This type of ceiling plinth is the most environmentally friendly, but the texture and patterns on it are the simplest. Attached with self-tapping screws.
Depending on the texture of the decorative finish, extruded and laminated ceiling moldings are distinguished. The first option has relief friezes, various recesses and textured patterns. The second is a laminated plinth, absolutely smooth, which allows you to hide defects without overloading the interior with decorative elements.
The width and length of the fillet also matters. Wide and geometric ceiling plinths are suitable for spacious rooms with sufficient lighting. Narrow, without many patterns and bends, the baguette is almost universal. Long skirting boards are more difficult to attach. Short ones are suitable for intermediate finishing.
First of all, the interior features of the room being designed determine the texture, design, color and size of the ceiling skirting boards.
Stage 3. Painting fillets
The cornice is painted together with the ceiling, usually in one tone, but if necessary, you can separate the colors. First, the ceiling is painted, and then, after drying, it is separated with masking tape - the cornice is painted separately. The same technology is used in the case of a wall - first the wall is painted, and then it is separated with masking tape.
The installation of so-called ceiling fillets most often occurs at the very end of the renovation - it is the fillets that will give the ceiling a finished image and make the ceiling one with the entire space of the room. Can you guess what the main purpose of their installation is? Do you know how to install ceiling fillets? If not, we will answer all these and other related questions during the course of our article...
See also: How much does it cost to hang a lamp on the ceiling?
Let's start with the purpose of this element - as you probably already guessed, the main purpose of installing fillets is to decorate the interior, as well as hide its defects, to be more precise - cracks and cracks in the ceiling. Almost all modern skirting boards are made from so-called polystyrene - a large assortment of fillets allows you to choose the most unusual textures, colors and shapes.
Installation of ceiling fillets begins with the selection of suitable skirting boards. To do this, you need to select the required width and length of the plinth, as well as its shape and texture. How to calculate how many skirting boards are needed in each specific case? It’s very simple – just measure the perimeter of the room. What are the most common sizes of skirting boards? Most often, the ceiling plinth has a standard size - two meters. However, it is more advisable to purchase plinths with a small margin - this is done for the reasons that installing ceiling fillets involves surprises and it is better to be ready for them right away. To glue the ceiling plinth you need straight hands - installation can be done even without relevant experience.
Calculation of the required amount of material
For a rational calculation, you need to determine the perimeter of the room. If the room has openings or projections, then each distance from the outer to the inner corner is measured separately and then summed up.
The results obtained will be useful for the following steps:
- The perimeter of the room is divided by the length of the ceiling plinth strip - standard 2 m.
- The number is rounded up.
- When purchasing fillets, glue for skirting boards, fasteners (if necessary), immediately add 2 strips to the stock and take all finishing materials based on the overall perimeter of the room (for example, check the glue consumption according to the instructions).
Flaws
Unfortunately, scientists have not yet come up with a material that will be free of disadvantages.
The plinth on the plastic ceiling also has some flaws. If you compare foam and PVC profiles, you can understand that products of the first type have a wider base. Due to the fact that the vinyl profile has a narrow base, it cannot cope with hiding wide cracks. And this is not just a matter of installation errors.
PVC has a fairly high coefficient of thermal expansion. And the larger the volume of the room, the greater the distance between adjacent baguettes and the wall should be. And this in no way contributes to improving the aesthetic appearance of the room.
Installation of PVC skirting boards complicates the procedure a little
installation of ceiling panels
. For example, it is not easy to fasten the last panel in a row so that nails or screws are not visible.
Tools for installing ceiling skirting boards
To install finishing elements on the ceiling, you will need the following tools:
- stationery knife and pencil;
- spatulas of different sizes;
- tape measure and square, if necessary, a protractor;
- finishing putty and container for it;
- assembly adhesive and construction gun;
- hacksaw and scissors;
- acrylic based sealant;
- VDK paint;
- for painting – foam sponge, narrow brush, mixer.
In addition to tools and baseboards, you may need a miter box - it will help you accurately adjust the corners to the desired size and align the edges.
Advantages of flexible plinth
Flexible polyurethane plinth for ceiling
Firstly, this material is excellent for creating shaped surfaces. Due to its elasticity, a flexible plinth can be mounted even on a surface with slight curvature.
Secondly, polyurethane is lightweight and easy to install. It is not difficult to place this material on glue. It is enough to use so-called liquid nails - an adhesive mass based on polyurethane.
Important! It's difficult to cut. A good hacksaw is used to cut out a certain angle. You can use a construction knife, but first you need to sharpen it thoroughly.
Thirdly, the material looks attractive both on the ceiling and on the walls.
Marking at the installation site
To ensure the accuracy of the work, it is necessary to resort to markings. How to do this without error?
- When applying markings, it is important to achieve accurate calculations for placing the baguette.
- You will need a chemical pencil and a construction cord - this is the first option. Second: the plinth strip is applied to the wall and ceiling, pressed tightly in both planes, and then marked with a pencil without pressing it too hard.
- The markings are applied so that after gluing it is covered with fillets, that is, at least 0.5 cm less than the width of the ceiling plinths.
It is better to check in advance the evenness of all surfaces involved in the process - at the connection points, and if necessary, try to eliminate defects using any construction putty. Installation of the plinth on a flat surface will be easy and quick.
Cutting ceiling skirting boards
By accurately and perfectly evenly fitting and cutting the edges of the plinth at the desired angle, you can avoid unevenness and gaps. To do this, use a miter box - the exact direction of the cut is determined using this tool.
The correct right angle can only be obtained after careful marking. The fillet strip is placed tightly deep into the wall of the miter box with the side on which the glue will be applied - this guarantees the correctness of the calculations.
Features of cutting ceiling plinths:
- A special tool will help you cut the plinth straight if necessary; the design allows you to accurately determine the right angle.
- The finished two planks are combined at the junction of the edges, taking into account the pattern and recesses.
- Do not forget about the asymmetry of the main part of any fillets; for example, the shorter part is always attached to the ceiling.
It is important that the baseboard does not move when cutting. Inaccuracy can lead to defects in the finishing, namely the appearance of a gap at the joint area - then only putty will help.
How to cut ceiling plinths in corners without a miter box
When decorating on your own, the owner of an apartment or house does not always have a miter box. An alternative option is to purchase a corner adapter from a specialized store, into which the straight edges of the baseboards are inserted on both sides. In this case, precise cutting is not required. Below is a diagram of how to correctly measure and cut a baguette in the corners without using a special tool.
- We try on the plinth to the ceiling surface and draw a clear line along the ceiling surface - on both sides of the corner.
- At the intersection of straight lines, mark the baguette, then draw a line from the markings on the plinth to its lower corner. The corner on our trim will be cut along this line.
- After cutting both sides, press them into a corner and check all cuts for accuracy.
The cut skirting boards are again deepened inside the attachment point, checking the length. After adjustment, the baguette is glued or screwed.
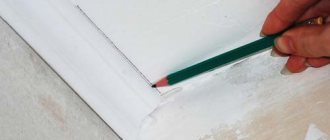
Make the markings
The fillets are easy to move when gluing, then their joints will not match, and the frame itself will be uneven. To prevent this from happening, the skirting boards must be placed on the same level. And to do this, in turn, you need to put one of the parts in its place and mark its lower edge with a pencil. Next, use this line to draw a line around the perimeter of all the walls.
Illustration: Artyom Kozoriz / Lifehacker
If the ceiling is flat, it is enough to measure the distance from the mark to the ceiling, make several more similar points and connect them with a pencil and a rule.
Illustration: Artyom Kozoriz / Lifehacker
When the ceilings are not perfectly level, you first need to draw a line in one of the corners at an arbitrary height. Then use a water level or laser level to transfer the mark to the remaining corners and connect. The result will be a reference line set strictly along the horizon, from which the distance to the bottom of the baguette should be measured.
How to properly cut the inner corner of a ceiling fillet
As for the internal corners, the joint between the ceiling plinths is sealed with acrylic sealant. In order not to mess up when pruning, experts recommend that beginners practice using leftover finishing materials.
Cut out the ceiling frieze along the inner corner:
- We try on the baguette to the corner of the room, make markings - we carry out the procedure on both sides - the point where the lines intersect will be the top mark, and it is necessary to make a cut from it.
- We place the plinth in the corner and transfer the crossing point to the fillet.
- The last thing is to connect the lower and upper marks on the cornice and along this line we make a cut from the end. We attach the baseboard.
Another option: you can trim the baguette using a homemade paper template. This method is most likely to work if the angle is 90 degrees.
A more expensive option for cutting fillets is to create some kind of pattern from a wooden block or cardboard base:
- the cardboard blank is bent at the angle that you measured along the corner of the room;
- then cardboard is applied to the wooden block intended for cutting the corner and a line is drawn along which it is necessary to cut the block - this is the template;
- To cut the plank, place a wooden template on top of the plinth, and cut the required angle along the block.
Important! The length of the workpiece is always measured from the corner, and not vice versa.
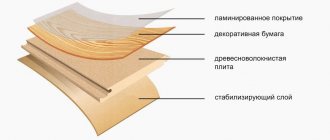
Wood imitation
Not everyone can afford wooden ceiling fillets. Therefore, manufacturers of skirting boards successfully reduce the cost of their products by making them from synthetic materials:
- polystyrene foam;
- polyurethane;
- MDF boards;
- plastic;
- expanded polystyrene.
Next, the blanks are covered with dyes or wood-look film. They also make products from cheap wood, veneered to imitate more expensive species.
Of course, connoisseurs of natural materials and exquisite decor with high incomes will give preference to traditional wooden baseboards. For people with modest incomes, more budget-friendly options for finishing ceilings are suitable, which, nevertheless, look quite presentable and aesthetically pleasing.
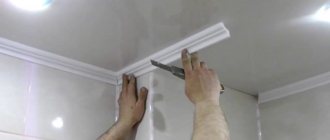
Pasting. Adhesive for skirting boards
Ceiling friezes are mounted on ready-made surfaces - with a ready-made screed, on glued wallpaper or on suspended ceiling structures. Prepare the blanks and glue in advance - it is best to give preference to the polymer-alcohol composition. It is the most durable, waterproof and quick-drying.
Here's the step-by-step plan:
- It is necessary to smear the back corners with glue - the mixture should not protrude outward.
- Attach the plinth to the landing site, then remove it and lay it down for a couple of minutes with the back side facing up. This is necessary in order to give the glue time to set.
- After 2-3 minutes you need to lay the fillet in the same place. This is done with pressure, but without effort - to avoid the appearance of dents or breaks.
- Next, when attaching the ceiling plinth, the remaining friezes are installed end-to-end with the previous workpiece.
- When approaching a corner, you need to measure the distance to it, using a miter box for cutting or using manual markings with a protractor.
Having completed the design of the entire perimeter, you need to seal the gaps, cracks and joint areas using acrylic or finishing putty.
The final touch is painting. Plain and paintable materials are used.
Install the rest of the items
When all the baguettes in the corners are glued, you can start gluing the intermediate parts. Since it is much easier to fit an element with straight ends than with ones cut at 45°, it is most convenient to do just that.
Straight sections are glued using the same technology. The only difference is that putty or glue must be applied not only to the edges on the back side of the cornice, but also to the junction of the straight ends. Also cover the cracks with putty: after drying and painting, they will not be visible.
Nuances and tips for attaching ceiling plinths
It is necessary to take into account some specific aspects of cutting and riveting the ceiling plinth, especially if a beginner takes on the job:
- The plinth will have to be adjusted to the existing corner size manually if the walls in the room are uneven.
- If you have to cut the blanks into pieces, there is no need to throw away the remains - they can be used for installation on other sections of the wall.
- When adjusting the length of the ceiling plinth for installation in the corners, do not forget: so that the baguette does not become shorter than the required length, its unmarked part is not shortened until an exact connection is achieved.
- If installation is carried out on suspended ceilings, the baguette is glued only to the plane of the wall, but never attached to the ceiling.
- Only after all measurements have been taken and both blanks have been accurately cut are they mounted in place.
- The most durable and high-quality fillets are wooden, but they are difficult to join accurately without the use of a miter box. Wooden baguettes are formed with a fine-tooth hacksaw or miter saw.
- Any excess on the outer corners of the workpieces can always be removed with sandpaper.
- A table pushed into a corner against the wall can serve as an accurate miter box at home.
Attaching the ceiling plinth with your own hands is quite possible. As in any finishing work, you will need experience and accuracy of calculations. If you follow step-by-step instructions and do not neglect expert advice, the result will meet your expectations.