Is it possible to glue skirting boards to a suspended ceiling?
To hide the gap between the wall and the ceiling, a decorative insert is usually used. It’s simple, quick and included in the price of the work, but a more beautiful decoration for the joint is a plinth.
The main condition is that the fillet can only be glued to the wall:
- under the weight of the baguette, thin stretched material or PVC film will sag over time;
- adhesives can damage or dissolve the ceiling surface;
- glue that has dried on the ceiling can cause cracks, folds, and distortions to form on it;
- A plinth glued to the film cannot be replaced, since the film may become deformed and traces of glue will appear on it.
Preparatory stage
- Make accurate measurements, buy the required number of fillets of standard length (it is better to buy not long products - no more than 1.3÷1.5 m.).
- Before installation work, you need to prepare the wall surface for attaching the plinth. For reliable, durable fastening, the surface must be clean, degreased, without traces of paint or putty.
- Make markings with a tapping cord or draw the bottom line with a pencil. This stage is needed to attach the decoration element evenly, without displacement.
- Prepare elements for installation, paint them in the desired color (preferably before installation, but possible after installation).
Tools that will be useful during installation
You need to prepare in advance:
- Simple pencil;
- Yardstick;
- Cord for marking the required length;
- Knife, hacksaw;
- Putty knife;
- Angle ruler or miter box;
- Suitable adhesive composition (putty);
- A small amount of sealant;
- Table with a flat surface;
- Ladder.
To avoid such troubles as, for example, dissolution of products, penetration of glue onto the outer surface of the skirting boards, leaving yellow marks on it, etc., the skirting boards must be glued with adhesive (putty) suitable for such work.
Tools required for work Procedure for using a miter box Trimming, preparing parts for installation
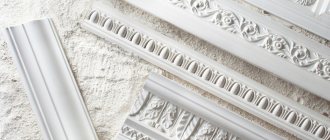
Choice of skirting boards
The most popular material for moldings is polymers. MDF, wood or plaster cannot be used - the skirting boards are too heavy, their installation is difficult and requires additional fixation.
It is best to use expanded polystyrene (foam) baguettes for a suspended ceiling.
Foam
They can have a smooth or embossed surface, the pattern of which most often imitates stucco. A white baguette goes on sale, but after gluing it can be painted any color. Foam skirting boards are easy to attach, and if they accidentally come off due to their low weight, they will not harm anyone, even if they fall on their head. Due to their low ability to absorb moisture and steam, they are glued in bathrooms.
They serve from 15 to 20 years. During operation, cleaning with a vacuum cleaner or liquid detergents is allowed. They cost from 13 to 20 rubles. a piece.
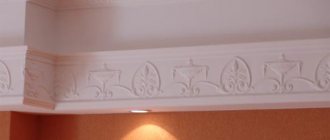
Pattern options
The skirting boards are very brittle, do not bend, and form an unreliable grip on a crooked wall. Unresistant to solvents and materials based on them. It should not be placed near lighting, since the material has low heat resistance, and when burned it begins to release styrene. When exposed to sunlight, the foam baseboard begins to turn yellow.
Polyurethane
Stronger than foam. Made from polymers that do not contain toxic styrene. They can be smooth, with patterns or relief. Visually, stucco models resemble plaster, but cost less. The plinth is resistant to mechanical stress, easy to clean and painted with acrylic-based dyes.
Polyurethane bends easily, so it can be used to form curved structures and design uneven surfaces. They decorate columns and bay windows. Polyurethane baguette is reliable, durable, and resistant to temperature changes. Does not absorb odors, making it ideal for the kitchen. Thanks to the dense structure of the material, it is easy to care for.
Negative sides:
- cost 2 times more than foam plastic ones;
- they have a lot of weight, so they need to be “planted” with special glue, and large structures must be additionally fixed with self-tapping screws;
- due to high rigidity, a miter saw is used for cutting;
- high glue consumption.
Plastic
They have a design feature in the form of a groove-lock. Designed for stretch ceilings attached using the harpoon method. No glue is used during installation, since the molding can be easily inserted into the recess of the profile. Additional elements are used to decorate the corners, so there is no need to file down the material to join it.
The advantages include quick installation:
- no glue needed, parts are fixed with latches;
- no painting or filling of gaps required.
The downside is that it is only available in a white version, requires preliminary leveling of the walls and is only suitable for the harpoon fastening system.
Installation methods
There are two main options for installing fillets. The first assumes that the walls are first covered, then the suspended ceiling is installed, and then the plinth is attached. This is a convenient and least time-consuming method.
The second approach is based on the fact that you should first stretch the ceiling, then glue the baseboard. Lastly, the walls are finished. The method is not without its drawbacks. Firstly, while working with the wall, you can damage the canvas. Secondly, when installing the ceiling, all the shortcomings of the wall will appear, since its finishing cladding has not yet been completed. It is up to the homeowners to decide which sticker method to choose. Sometimes it is not possible to finish the wall cladding before installing the ceilings, so you have to adhere to a non-standard sequence.
What to glue
- Liquid Nails. Universal glue Moment or composition for polystyrene foam is often used - Installation Express Decor. It is white in color, resistant to moisture, harmless, and does not destroy the texture of the foam. Apply with a pistol with a dispenser.
- Polymer-based adhesive (Econ-nast, Master, Elitas). It is water based. It's inexpensive. It takes longer to dry. Due to the need to press the plinth against the wall for 5-10 seconds, the installation time is lengthened.
- PVA. Safe composition that can be easily removed with water. Dries for at least 3 minutes.
- Acrylic putty (Uniprof, Master Teks HM). Does not contain solvents, is produced on the basis of acrylic dispersion, and is resistant to moisture. Any decorative parts made of polystyrene and polyurethane are glued. Dries quickly.
You can glue it with a homemade composition made from PVA and finishing putty, combined in a ratio of 1:4. Water is gradually added to the mixture until the consistency of a liquid dough is obtained. After obtaining a homogeneous composition, it settles for 10 minutes, mixes and applies. Homemade glue is prepared immediately before installation; gluing the baguette must be done in 1.5-2 hours.
How to install before finishing is complete
The algorithm for installing the plinth before finishing is completed differs significantly from the usual one, and among the key points are:
- preparing glue and putty;
- moisturizing the working surface;
- preparing a working solution based on putty;
- fillet sticker.
Preparing glue and putty
The choice of gluing before finishing involves two implementation methods:
- using glue;
- using putty.
The use of glue is implemented in the same way as the previous option, but you will need to tinker with the putty. It is necessary to achieve a solution that is slightly thicker than when treating walls.
Surface moistening
After the baseboard is adjusted and ready for gluing, the surface of the wall is wetted for better adhesion of the putty. In addition to the wall, do not forget to wet the inside surface of the baseboard itself.
Preparation of a working solution based on putty
Algorithm of actions necessary to prepare a working solution for working with ceiling plinths:
- Take a mixing container.
- Fill it with water.
- We gradually add the dry mixture to it until the solution reaches the consistency necessary for the work.
- Mix the mixture with a construction mixer for 2-3 minutes.
If the solution is made manually, first pour in the mixture, then pour in water.
How to glue fillets
When gluing the baseboard, you need to press it firmly against the wall so that part of the applied solution is squeezed out through the bottom, thereby filling the unevenness in the wall. Excess solution is subsequently removed using a regular spatula and a clean rag.
Tools and materials
- Stepladder, scaffolding or stable chair;
- roulette;
- pencil;
- stationery knife;
- miter box for cutting baguette in corners;
- a small metal spatula or gun (for liquid nails);
- a thin spatula made of rubber or plastic, which will remove excess glue and putty the joints of the elements;
- medium hard brush for painting.
The materials you will need are glue, putty or sealant, which will be used to seal cracks and eliminate joints before painting, plastic film to protect the ceiling from glue splashes, as well as napkins to remove them.
How to stick after finishing finishing
Many people competent in the construction industry are still arguing about how best to glue the baseboard - before or after finishing. We will consider both options, and it’s up to you to decide which one to choose.
Note! Unless you are an experienced builder with the proper skills and equipment, try to stick the ceiling plinth on after the finishing is completed. This way you will reduce the risk of incorrectly calculating the location of the fillet fixation, and you will not have to redo the whole job again
Selection of adhesive composition
When choosing an adhesive, it is necessary to take into account the material of the baseboard and the characteristics of the room being repaired.
For those who don’t want to bother buying glue, we advise you to pay attention to the following products:
- Moment;
- liquid Nails;
- Adefix;
Moment
An adhesive that is in great demand among customers due to its versatility and practicality. Advantages:
- Suitable for most building materials used in renovation.
- Reliably fixes the part.
- Dries quickly.
Liquid Nails
The best choice for heavy fillet models that require increased reliability of the adhesive during fixation. The adhesive does not deteriorate when exposed to water, which allows it to be used in rooms with high humidity levels.
Adefix
Acrylic-based adhesive, suitable for working with skirting boards made of:
- polyurethane;
- polystyrene foam;
- extruded polystyrene.
After hardening, the glue does not lose its elasticity, which significantly expands the scope of its application.
Preparing tools
Correct, advance preparation of tools speeds up and simplifies any repair work. To glue the ceiling plinth after finishing, you will need:
- ladder;
- stationery knife;
- ruler or tape measure;
- hand saw;
- tray for cutting profile lumber;
- clean rag;
- pencil.
Performing markup
Marking is carried out using a pencil and tape measure, while noting:
- the lower edge of the ceiling plinth;
- joint places.
Applying glue
The glue is applied to the back side of the fillet, after which it is necessary to give it a few seconds for the substance to begin to set.
Trimming is done using a saw and a tray for cutting profile material. It has standard slots made at different angles, which greatly facilitates the process of marking and cutting.
Skirting calculation
First, the length and width of the room are measured. Its perimeter is calculated using the formula P=2*(a+b). 15-20 cm is added to the resulting amount for each corner. The finished figure is divided by the standard baguette size, usually its length is 2 m. The result is rounded up. Buy 1-2 more baguettes in case of defects or damage. If the room has a non-standard shape, its configuration is divided into separate sections, from which the required amount of plinth is ultimately calculated.
Calculation for a rectangular room measuring 8x5 m with 4 corners:
- perimeter: 2*(8+5)=26 m;
- taking into account angles: 4*0.15=0.6 m;
- total length: 26+0.6=26.6 m;
- number of strips: 26.6:2=13.3 pcs.
The resulting number is rounded to 14 pcs., and taking into account possible defects, you need to buy 15-16 pcs.
Foam fillets
The plinth, made of foam plastic, is very light and comfortable. This is an ideal option for rooms with already finished walls, which is convenient when a suspended ceiling is installed at the end of a renovation.
The disadvantage of this material is its great fragility and lack of flexibility. If you attach it along the perimeter of a curved ceiling, in most cases it will break or crack. In addition, polystyrene foam deteriorates when exposed to solvents and other chemicals present in the adhesive.
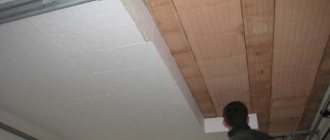
How to glue baguettes onto a suspended ceiling
Preparing the walls
- They are cleaned of old finishes and treated with a primer to increase adhesion. Instead of purchased primers, you can use a solution of latex and water in a ratio of 5 to 1.
- After the soil has dried, they begin to work.
It is better to glue the wallpaper after installing the baseboard, then during the next cosmetic repair there will be no need to dismantle it. This gluing technique will be more reliable.
If the walls are already covered with wallpaper, only light foam molding is selected. In this case, work with glue is carried out very carefully so as not to stain the finish. Any excess mixture that appears is removed with a napkin.
If the baseboard will be repainted a different color, it is best to apply the first layer of dye before installation.
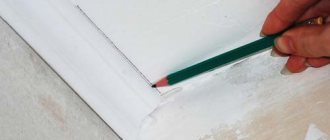
Marking
- The fillet is pressed tightly against the wall so that its upper edge rests against the ceiling.
- A pencil is used to make a mark along the bottom edge of the baseboard in each corner of the room. For marking, use a small piece of plinth no more than 0.2 m long.
- The marks made are connected with a paint cord, and a line is drawn around the perimeter of the room.
Gluing skirting boards
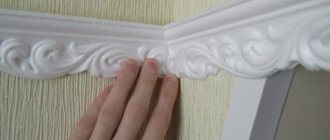
- Pasting begins from the corner of the room.
- The adhesive is applied in an even layer along the wide side of the baseboard.
- The baguette must be attached along the bottom mark, evenly pressing it against the wall along its entire length. The initial adhesion time depends on the type of adhesive (indicated on the packaging).
- Excess glue is removed with a spatula or napkin.
- On the next baguette, glue is applied to the main and side surfaces.
- The plinth is mounted around the perimeter.
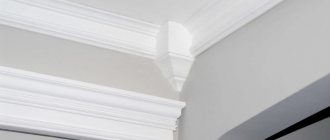
Docking in corners
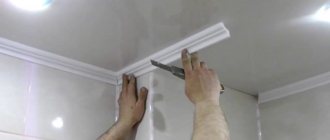
At the corners, the fillets are joined at an angle of 45°. A miter box is used to form an even joint. Baguettes can be cut with a knife or saw. With a knife, the cut is better, the border is not painted, and hangnails do not appear.
The plinth is placed in the miter box downwards with the side that will be adjacent to the suspended ceiling. The knife is inserted into the inclined slots of the sides. When joining the cut parts, glue is applied to the cut of one of them. You can buy ready-made corner parts, but they are quite difficult to select in size and texture.
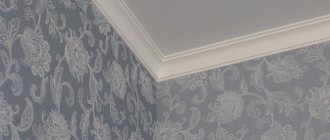
Sealing cracks
The joints and gaps between the molding and the wall are masked with sealant. The cracks are sealed with putty during gluing. After complete drying, you can begin grouting the joints and painting the baseboards.
To reduce the gaps between the ceiling and the fillet, it is slightly pressed upward during installation. It is necessary to hold the plinth until it is completely fixed to prevent slipping.
Dimensions
Skirting boards come in different sizes and differ in length, width and surface type.
Usually they are selected to match the overall style and interior of the room. Sometimes the choice of plinth depends on the size of the joint that has formed between the ceiling and the wall. Also, the choice of ceiling fillets depends on their purpose. If they should play an exclusively decorative role in the room, the walls are smooth, like the joint line, there is no need to hide any defects, then the plinth can be replaced with molding. Otherwise, use elements whose side attached to the wall is wide enough. This way you can hide small repair errors and joints.
In terms of length, it is better to choose options that, during installation, will create as few joints as possible and a minimum of scraps. Therefore, in order not to make a mistake with its length, before purchasing skirting boards you need to know the exact dimensions of all walls. If the installation of such elements is carried out independently and for the first time, then it is better to buy a plinth with a reserve, this will avoid the need to run to the store for additional material.
Some people have difficulty cutting corners during the installation process. Therefore, to simplify the work, manufacturers offer to use ready-made corners, which only need to be glued between the straight lines of the baseboards.
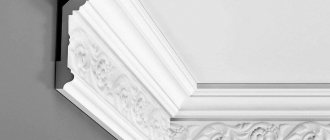
Mounting on a two-level ceiling
The plinth is attached in the same way as to a single-tier ceiling - on the wall. The technological seam between the tiers is masked with decorative PVC inserts in the form of tubes, mushrooms or ovals.
To hide the transition between curved levels, it is better to use flexible plugs. The masking tape is pushed into the joint with a wooden or plastic spatula.
For decoration, a twisted cord can be used as a plug. It is fixed with glue and allows you to disguise the transition between tiers, the joints between the ceiling and the wall.
Expert advice
To correctly install a ceiling plinth on a suspended ceiling, you must adhere to the following rules:
- The plinth must be secured using a polyethylene lining between the stretch ceiling and the narrow side of the plinth. After installation, the gasket is removed.
- corner elements are cut at an angle of 45 degrees;
- the gap between the fillet and the wall must be sealed with acrylic putty;
- It is not recommended to glue polyurethane elements to wallpaper, as they are heavy and the wallpaper may not support their weight;
- The wooden plinth is not glued , but is attached using special elements, so it always holds securely.